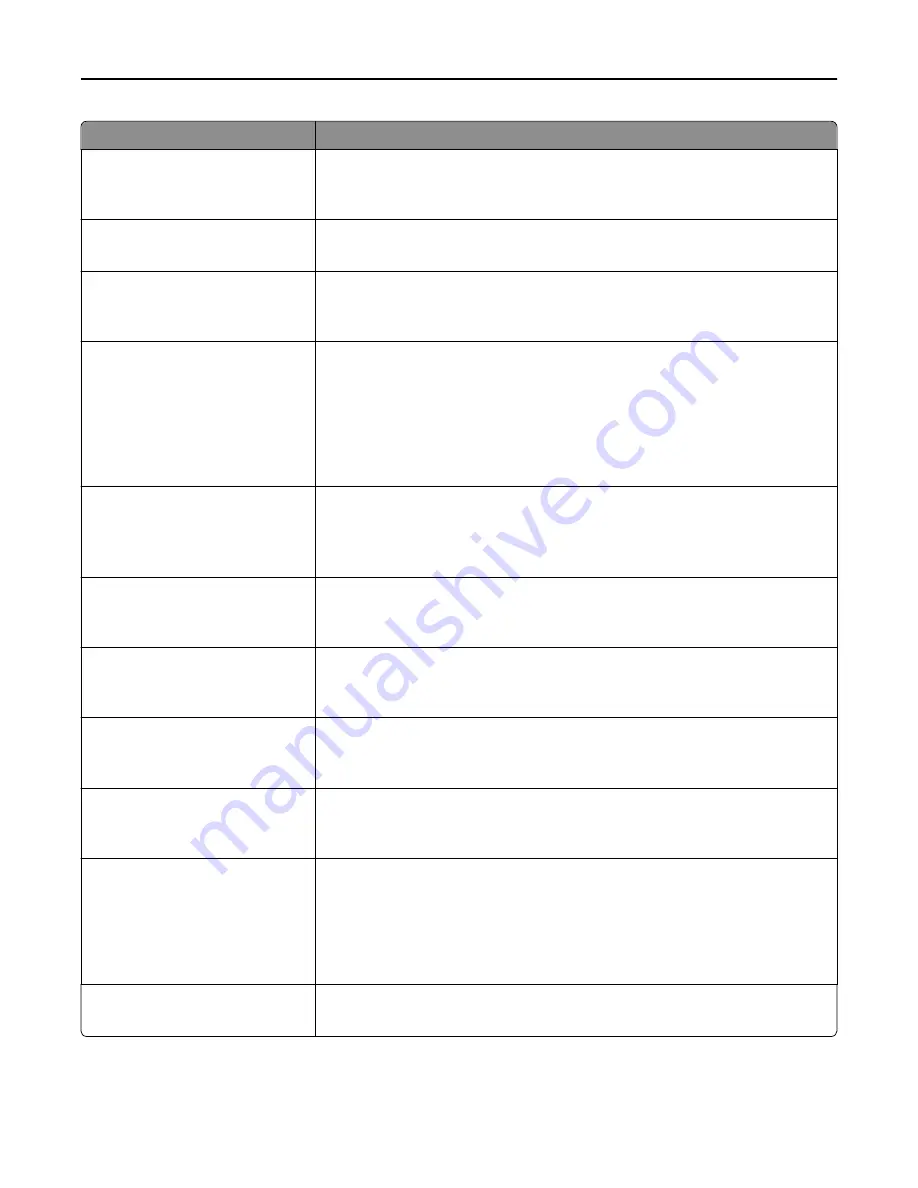
Menu item
Description
Text/Photo Default
5–90
Sets the quality of a text or photo image in relation to file size and the quality of the
image
Note:
75 is the factory default setting.
Photo Default
5–90
Sets the quality of a photo image in relation to file size and the quality of the image
Note:
50 is the factory default setting.
E
‑
mail images sent as
Attachment
Web Link
Specifies how the images will be sent
Note:
Attachment is the factory default setting.
Use Multi
‑
Page TIFF
On
Off
Provides a choice between single-page TIFF files and multiple
‑
page TIFF files. For a
multiple-page scan
‑
to
‑
e-mail job, either one TIFF file is created containing all the
pages, or multiple TIFF files are created with one file for each page of the job.
Notes:
•
On is the factory default setting.
•
This menu applies to all scan functions.
Transmission Log
Print log
Do not print log
Print only for error
Specifies whether or not the transmission log prints
Note:
Print log is the factory default setting.
Log Paper Source
Tray [x]
Manual Feeder
Specifies the paper source for printing e-mail logs
Note:
Tray 1 is the factory default setting.
E
‑
mail Bit Depth
8 bit
1 bit
Enables the Text/Photo mode to produce smaller file sizes by using 1
‑
bit images when
Color is set to Off
Note:
8 bit is the factory default setting.
Custom Job scanning
Off
On
Lets you copy, in a single copy job, a document that contains mixed paper sizes
Note:
Off is the factory default setting.
Scan Preview
Off
On
Specifies whether or not a preview will appear on the display for scan jobs
Note:
Off is the factory default setting.
Allow Save as Shortcut
On
Off
Lets you save e-mail addresses as shortcuts
Notes:
•
On is the factory default setting.
•
When set to Off, the Save as Shortcut button does not appear on the e-mail
Destination screen.
Background Removal
‑
4 to 4
Adjusts the amount of background visible on a scanned image
Note:
0 is the factory default setting.
Understanding printer menus
208
Summary of Contents for X950de 4
Page 28: ...Touch To Reset Reset values on the screen Understanding the home screen 28 ...
Page 242: ...4 Locate the printhead wipers Maintaining the printer 242 ...
Page 259: ...7 Lower the cover 8 Slide out the printhead wipers 3x 3x 3x Maintaining the printer 259 ...
Page 260: ...9 Slide the printhead wipers back into place 10 Close the cover Maintaining the printer 260 ...
Page 266: ...3 Hold the tabs on both sides of the staple cartridge Maintaining the printer 266 ...
Page 267: ...4 Rotate the booklet staple cartridge at an angle Maintaining the printer 267 ...


