
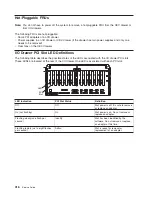


Hot-Pluggable
PCI
Adapter
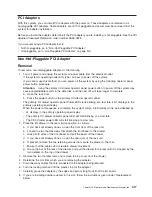
Removing
a
Hot-Pluggable
PCI
Adapter
Note:
If
you
are
removing
an
adapter
and
replacing
it
with
an
adapter
that
is
identical
to
the
adapter
removed,
use
the
“Replacing
a
Hot-Pluggable
PCI
Adapter”
on
page
420
procedure.
To
remove
an
adapter,
do
the
following:
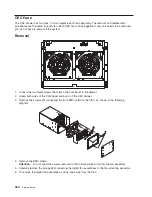
1.
Place
the
I/O
drawer
in
the
rear
service
position:
a.
If
you
have
not
already
done
so,
open
the
front
door
of
the
rack
unit.
b.
Loosen
the
two
thumbscrews
that
attach
the
front
bezel
to
the
drawer.
c.
Grasp
both
sides
of
the
front
bezel
and
pull
the
bezel
off
the
drawer.
d.
If
you
have
not
already
done
so,
open
the
rear
door
of
the
rack
unit.
e.
If
present,
remove
the
two
retaining
screws
that
secure
the
drawer
to
the
rails.
Refer
to
“Rear
Service
Position”
on
page
463.
f.
Ensure
that
the
cables
do
not
restrain
drawer
movement.
g.
Grasp
the
bar
at
the
rear
of
the
drawer,
and
pull
the
drawer
to
the
rear
until
it
is
stopped
by
the
detents.
2.
Remove
the
two
thumbscrews
and
remove
the
top
cover
from
the
drawer.
3.
Determine
the
slot
from
which
you
are
removing
the
adapter.
4.
Ensure
that
any
processes
or
applications
that
might
use
the
adapter
are
stopped.
Note:
Removing
a
hot-pluggable
PCI
adapter
requires
the
system
administrator
to
take
the
PCI
adapter
offline
before
performing
any
PCI
adapter
hot-plug
procedures.
Before
taking
an
adapter
offline,
the
devices
attached
to
the
adapter
must
be
taken
offline
as
well.
This
action
prevents
a
service
representative
or
user
from
causing
an
unexpected
outage
for
system
users.
For
additional
information
about
taking
an
adapter
offline
or
removing
it
from
the
system
configuration,
see
the
AIX
System
Management
Guide:
Operating
System
and
Devices
.
This
publication
is
located
on
the
AIX
Documentation
CD.
The
documentation
information
is
made
accessible
by
loading
the
documentation
CD
onto
the
hard
disk
or
by
mounting
the
CD
in
the
CD-ROM
drive.
5.
Refer
to
“PCI
Hot-Plug
Manager
Access”
on
page
423,
and
follow
the
steps
in
the
access
procedure
to
select
PCI
Hot
Plug
Manager
.
Then
return
here
to
continue.
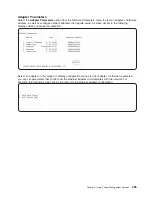
6.
Select
Unconfigure
a
Device
and
press
Enter.
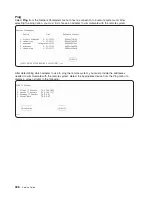
7.
Press
F4
to
display
the
Device
Names
menu.
8.
Select
the
adapter
you
are
removing
from
the
menu.
9.
Use
the
Tab
key
to
answer
NO
to
Keep
Definition
.
Press
Enter.
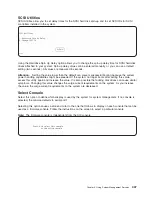
10.
The
ARE
YOU
SURE
screen
displays.
Press
Enter
to
verify
the
information.
Successful
unconfigure
is
indicated
by
the
OK
message
displayed
next
to
the
Command
field
at
the
top
of
the
screen.
11.
Press
F3
to
return
to
the
PCI
Hot-Plug
Manager
menu.
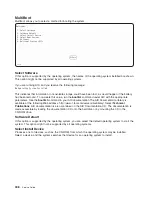
12.
Select
Replace/Remove
a
PCI
Hot-Plug
Adapter
and
press
Enter.
The
Replace/Remove
a
PCI
Hot-Plug
Adapter
menu
displays.
13.
Move
the
cursor
to
select
the
adapter
that
you
are
removing
and
press
Enter.
(The
description
entry
displays
as
unknown
).
14.
Press
the
Tab
key
until
the
entry
field
displays
the
remove
operation
and
then
Press
the
Enter
key.
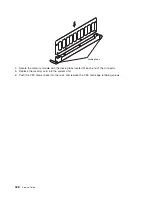
Follow
the
instructions
that
display
on
the
screen
until
you
are
instructed
to
remove
the
adapter.
Chapter
10.
Removal
and
Replacement
Procedures
419
Summary of Contents for RS/6000 Enterprise Server M80
Page 1: ...RS 6000 Enterprise Server Model M80 Eserver pSeries 660 Model 6M1 Service Guide SA38 0571 01...
Page 10: ...x Service Guide...
Page 14: ...xiv Service Guide...
Page 16: ...xvi Service Guide...
Page 22: ...Data Flow 4 Service Guide...
Page 30: ...CEC Card Cage Rear of CEC drawer viewed from top cover removed 12 Service Guide...
Page 84: ...66 Service Guide...
Page 176: ...158 Service Guide...
Page 376: ...358 Service Guide...
Page 430: ...412 Service Guide...
Page 485: ...Chapter 11 Parts Information This chapter contains parts information for the system 467...
Page 486: ...CEC Drawer Card Assembly 9 468 Service Guide...
Page 488: ...CEC Drawer Backplane 5 2a 1 2 3 4 470 Service Guide...
Page 490: ...CEC Drawer Power Supplies 1 2 3 4 5 6 7 8 9 472 Service Guide...
Page 492: ...CEC Drawer Fan Assemblies 2 1 3 4 5 6 8 9 10 11 12 13 7 14 474 Service Guide...
Page 496: ...7 8 9 10 6 1 2 3 4 4 5 478 Service Guide...
Page 508: ...490 Service Guide...
Page 520: ...502 Service Guide...
Page 522: ...504 Service Guide...
Page 526: ...508 Service Guide...
Page 558: ...540 Service Guide...
Page 565: ......


