


GE HealthCare CONFIDENTIAL
Direction
5936427
, Rev. 1
LOGIQ Totus
Basic Service Manual
Chapter 3 LOGIQ Totus Setup
3 - 79
3-7-9-7
Print Button Settings
Use the Print Button Settings page to set parameters for print buttons.
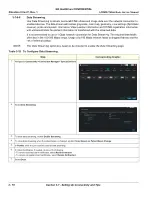
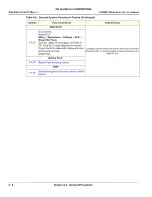
3. When connected to the network through a wireless LAN, to send images to the DICOM device over the wireless LAN, enable
Send Images
via Wireless
.
NOTE
: If disabled, images spooled in the Spooler will be sent when the Ultrasound system is connected to the wired network.
4. When connected to the network through a wireless LAN, to receive images from the DICOM device over the wireless LAN, enable
Receive
Images Wireless
.
NOTE
: If disabled, images will be received when the Ultrasound system is connected to the wired network.
5. Under
Send To: Default Service
, select the default Send To service.
6. To allow communication between the Ultrasound system and the Koios Server VM (installed in the Ultrasound system) even when there is no
network, enable
Process Dicom Job Without Network
.
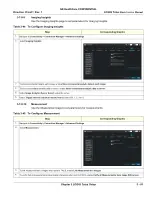
Table 3-42 To Configure Print Button Settings
Step
Corresponding Graphic
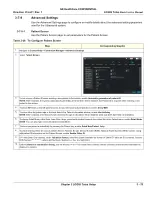
1. Navigate to
Connectivity > Connection Manager > Advanced Settings
.
2. Select
Print Button Settings
.
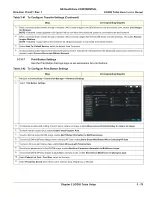
3. To allow the pressing and holding of a print key to replace an image, enable
Allow press and hold print key to replace an image
.
4. To allow a smart capture area, enable
Enable Smart Capture Area
.
5. To add a title bar to the DICOM image, enable
Add Titlebar information to Multiframe loops
.
6. To store DICOM multiFrame images when collecting RF Data, enable
Store Dicom MultiFrame When Collecting RF Data
.
7. To store a 2D loop with timeline data, enable
Store 2D Loop with Timeline Data
.
8. To add scan parameter(s) to the DICOM image, enable
Add Scan Parameter information to Multiframe Loops
.
9. To store DICOM MultiFrame images in Quantitative Analysis mode, enable
Store Dicom MultiFrame in QAnalysis pack
.
10. Under
Patient List Print - Font Size
, select the font size.
11. Under
P[1-4] Key Sound
, select None, Click, Chimes, Ding, Ding-Dong, or Whoosh.
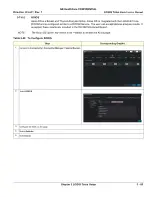
Table 3-41 To Configure Transfer Settings (Continued)
Step
Corresponding Graphic
Summary of Contents for LOGIQ Totus
Page 2: ......
Page 4: ...GE HealthCare CONFIDENTIAL Direction 5936427 Rev 1 LOGIQ Totus Basic Service Manual ii...
Page 5: ...GE HealthCare CONFIDENTIAL Direction 5936427 Rev 1 LOGIQ Totus Basic Service Manual iii...
Page 6: ...GE HealthCare CONFIDENTIAL Direction 5936427 Rev 1 LOGIQ Totus Basic Service Manual iv...
Page 643: ......