Connectivity
111
Cen
tre
Ware
In
tern
et Se
rv
ic
es
7
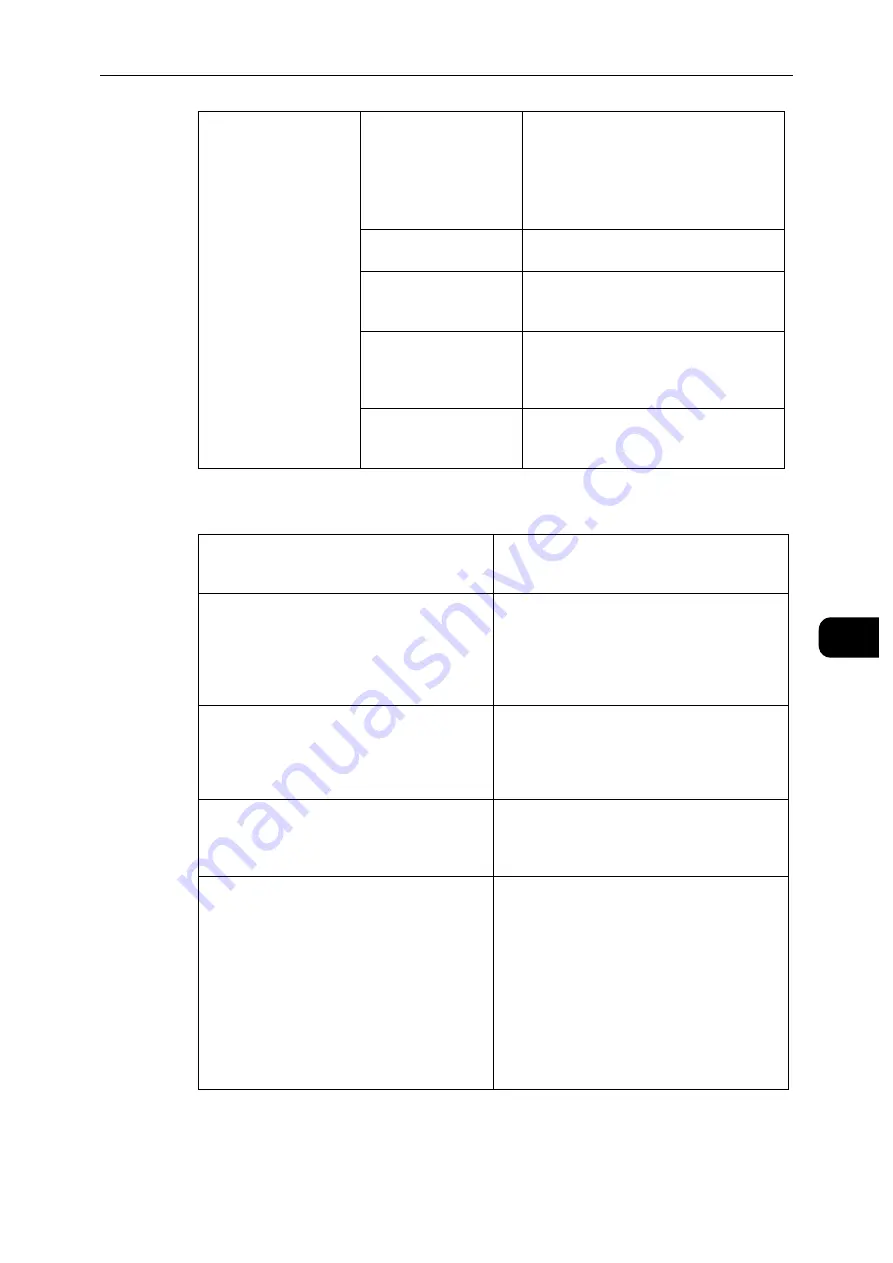
LDAP Authentication
Advanced Settings
Search Directory Root
Enter a search root character string with
up to 255 characters.
Note
Enter the distinguished name of the root
node. (Example: CN=users,
DC=mydomain, DC=mycorp, DC=com)
Login Name
Enter the login name for searching in
LDAP server up to 255 characters.
Password
Set a login password for the user specified
in [Login Name]. Up to 32 characters are
allowed.
LDAP Referrals
Specify whether or not to re-establish
connection to another LDAP server if a
currently connected LDAP server requests
to do so.
Maximum Number of
LDAP Referral Hops
When using the Referral feature, specify
how many times that a user is allowed to
hop servers within 1 to 5 times.
[Authentication Method]
Select the method for authentication from
[Direct Authentication] and [Authentication of
User Attributes].
[Common Name]
Enter the attribute of user name. Up to 32
ASCII characters can be entered. This attribute
is used to search user name in the LDAP Server.
Enter the LDAP attribute for user name typed
on the control panel. When users enter the e-
mail address, specify "Mail".
[Login User Name]
Enter the attribute of login user name. Up to 32
ASCII characters can be entered.
As the attribute for authentication, enter one of
the login user names registered in the LDAP
server.
[Use Added Text String]
Select whether or not to automatically add text
strings in [Added Text String] when you enter
the authentication information from the
control panel.
[Added Text String]
Enter the fixed string when [Use Added Text
String] is enabled. Up to 64 ASCII characters
can be entered.
For example, when "host" is set in [Common
Name] and the user's mail address is
"[email protected]", this user needs to enter
"[email protected]".
However, when [Use Added Text String] is
enabled and "@mail.com" is set in [Added Text
String], this user needs to enter only "host" on
the control panel. The machine appends
"@mail.com".
Summary of Contents for DocuPrint P505 d
Page 1: ...1 RFX3ULQW 3 G User Guide ...
Page 9: ...1 1Before Using the Machine ...
Page 15: ...2 2Setting Up the Printer Printer Setup ...
Page 28: ...Setting Up the Printer Printer Setup 28 Setting Up the Printer Printer Setup 2 ...
Page 29: ...3 3Product Overview ...
Page 37: ...4 4Paper and Other Media ...
Page 59: ...5 5Printing ...
Page 75: ...6 6Device ...
Page 87: ...7 7CentreWare Internet Services ...
Page 142: ...CentreWare Internet Services 142 CentreWare Internet Services 7 ...
Page 143: ...8 8Encryption and Digital Signature Settings ...
Page 151: ...9 9Authentication and Accounting Features ...
Page 157: ...10 10Maintenance ...
Page 182: ...Maintenance 182 Maintenance 10 5 Bundle the cable 6 Slide and lift the 4 Bin Mailbox ...
Page 183: ...11 11Problem Solving ...
Page 269: ...12 12Appendix ...
Page 278: ...Appendix 278 Appendix 12 ...


