
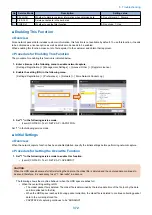

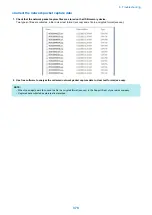


Pickup size
When a jam occurs, a paper size is displayed. (The row displaying "SIZE" on the jam screen refers to the paper size.)
Due to the limitation of displayable number of characters, some paper size names are omitted. The following is the list of displayed
row of texts and corresponding paper sizes.
* The following is based on the display specification and not all paper sizes can actually be used.
Display
Paper Size
Display
Paper Size
A0
A0
LDR
LEDGER
A1
A1
LDRFB
LEDGERFULLBLEED
A2
A2
LGL
LEGAL
A3
A3
LTR
LETTER
A3FB
A3FULLBLEED
EXE
EXECUTIVE
A4
A4
STMT
STATEMENT
A5
A5
10x8
10x8
A6
A6
12x18
12x18
A7
A7
13x19
13x19
I-B0
ISOB0
15x11
15x11
I-B1
ISOB1
17x22
17x22
I-B2
ISOB2
18x24
18x24
I-B3
ISOB3
A-FLS
Australian-FOOLSCAP
I-B4
ISOB4
ALGL
Argentina-LEGAL
I-B5
ISOB5
ALTR
Argentina-LETTER
I-B6
ISOB6
OFI
OFICIO
I-B7
ISOB7
A-OFI
Argentina-OFICIO
I-C0
ISOC0
B-OFI
Bolivia-OFICIO
I-C1
ISOC1
E-OFI
Ecuador-OFICIO
I-C2
ISOC2
M-OFI
Mexico-OFICIO
I-C3
ISOC3
KLGL
Korea-LEGAL
I-C4
ISOC4
GLGL
Government-LEGAL
I-C5
ISOC5
GLTR
Government-LETTER
I-C6
ISOC6
IND-LGL
India-LEGAL
I-C7
ISOC7
COM10
COM10
I-SRA3
SRA3
DL
DL
J-B0
JISB0
E_C2
Nagagata 2
J-B1
JISB1
E_C3
Nagagata 3
J-B2
JISB2
E_C4
Nagagata 4
J-B3
JISB3
E_C5
Nagagata 5
J-B4
JISB4
E-K2
Kakugata 2
J-B5
JISB5
E_K3
Kakugata 3
J-B6
JISB6
E_K4
Kakugata 4
J-B7
JISB7
E_K5
Kakugata 5
K16
K16
E_K6
Kakugata 6
K8
K8
E_K7
Kakugata 7
ND-PCD
Newdry Postcard
E_K8
Kakugata 8
OTHER
OTHER
E_Y1
Yougata 1
PCARD
Postcard
E-Y2
Yougata 2
PCARD4
4 on 1 Postcard
E_Y3
Yougata 3
F4A
F4A
E-Y4
Yougata 4
F4B
F4B
E_Y5
Yougata 5
FLSC
FOOLCAP
E_Y6
Yougata 6
FOLIO
FLIO
E_Y7
Yougata 7
FREE
FREE SIZE
EVLP_YN3
Yougatanaga 3
ICARD
INDEXCARD
E-B5
B5 Envelope
USER
Custom
E-C5
C5 Envelope
MONA
MONARCH
7. Error/Jam/Alarm
381
Summary of Contents for imagerunner advance 4551i
Page 19: ...Product Overview 1 Product Lineup 7 Features 13 Specifications 16 Name of Parts 26 ...
Page 155: ...Periodical Service 3 Consumable Parts List 143 Cleaning Check Adjustment Locations 146 ...
Page 392: ...Error Jam Alarm 7 Overview 380 Error Code 383 Jam Code 509 Alarm Code 520 ...
Page 545: ...Service Mode 8 Overview 533 COPIER 549 FEEDER 845 SORTER 851 BOARD 871 ...
Page 892: ...Unpacking 1 2 1200 mm 840 mm 769 mm 1230 mm 2430 mm 3 9 Installation 879 ...
Page 895: ...3 4 NOTE Keep the removed screws for relocating the host machine 2x 5 6 7 9 Installation 882 ...
Page 896: ...8 9 10 1x Installing the Air Filter 1 9 Installation 883 ...
Page 897: ...2 3 Installing the Drum Unit 1 2 3 9 Installation 884 ...
Page 899: ...8 NOTE The screw removed at procedure 4 is used 1x 9 10 11 12 9 Installation 886 ...
Page 923: ...5 6 NOTE Use the screws and Rubber Caps removed in step 1 2x 7 2x 9 Installation 910 ...
Page 935: ...7 1x 8 9 6x 10 2x 9 Installation 922 ...
Page 936: ...11 Installing the NFC Kit 1 2 2x 3 TP M3x4 1x 9 Installation 923 ...
Page 938: ...4 5 1x 6 9 Installation 925 ...
Page 985: ...8 2x 2x TP M4x8 Black When installing the USB Keyboard 1 9 Installation 972 ...
Page 991: ...7 4x 8 1x 1x Lower Cover 9 1x 10 1x 1x 9 Installation 978 ...
Page 992: ...11 1x 1x 12 1x 13 TP M3x12 2x 14 4x TP M3x6 9 Installation 979 ...
Page 997: ...Installation Procedure 1 2 2x 3 2x 4 6x 5 4x 9 Installation 984 ...
Page 998: ...6 7 NOTE Do not close the Wire Saddle 1x 1x 8 9 9 Installation 985 ...
Page 1003: ...2 1x 1x 3 2x 2x 4 9 Installation 990 ...
Page 1012: ...2 1x 1x 3 2x 2x 4 9 Installation 999 ...
Page 1014: ...7 CAUTION The connector must be contacted TP㸹M3x6 3x 1x 8 4x 9 9 Installation 1001 ...
Page 1016: ...13 4x 14 15 Binding M4x16 Binding M3x16 2x M3x16 M4x16 16 Binding M4x6 1x 9 Installation 1003 ...
Page 1023: ...Installation Procedure Preparation 1 4x 2 1x 1x 3 2x 9 Installation 1010 ...
Page 1029: ...4 5 1x 1x 9 Installation 1016 ...
Page 1048: ...3 2x TP M3x8 Black 4 2x TP M3x6 5 9 Installation 1035 ...
Page 1053: ... Installing the Removable HDD Kit 1 2x 2x 2 3 1x 4 9 Installation 1040 ...
Page 1065: ...3 2x TP M3x8 Black 4 2x TP M3x6 5 9 Installation 1052 ...
Page 1071: ... Installing the Removable HDD Kit 1 2x 2x 2 3 1x 4 9 Installation 1058 ...


