


2. Printing the set/registered data
• COPIER > FUNCTION > MISC-P > USER-PRT
• COPIER > FUNCTION > MISC-P > P-PRINT
In case the backup fails, print it out or export it to a USB.
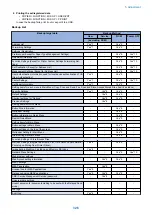
Backup List
Backup target data
Backup Method
User
Service
DCM
Power OFF
(excluding DCM)
Address List
Yes*1
-
Yes*9
-
Forwarding Settings
Yes*1
-
Yes*9
-
Settings / Registration
Preferences (Except for Paper Type Management Settings)
-
-
Yes*9
Yes*10
Adjustment/Maintenance(*)
-
-
Yes*9
Yes*10
Function Settings (Except for Printer Custom Settings,Forwarding Set-
tings)
-
-
Yes*9
Yes*10
Set Destination (Except for Address List)
-
-
Yes*9
Yes*10
Management Settings (Except for Address List)
-
-
Yes*9
Yes*10
User authentication information used for local device authentication of UA
(User Authentication)
Yes*2
-
Yes*9
-
Printer Settings
Yes*1
-
Yes*9
Yes*10
Set Paper Information
Yes*1
-
Yes*9
-
Setting items for each menu in Main Menu (Copy, Scan and Send, Fax, Scan and Store, Access Stored Files, Fax/I-Fax Inbox)
Favorite Settings
Yes*1
Yes*8
Yes*9
-
Default Settings
-
Yes*8
Yes*9
-
Shortcut settings for “Options”
-
Yes*8
Yes*9
-
Previous Settings
-
Yes*8
-
-
Setting items for Quick Menu
Button Size information
-
-
Yes*9
-
Wallpaper Setting
-
-
Yes*9
-
Button information in Quick Menu
-
-
Yes*9
-
Restrict Quick Menu
-
-
Yes*9
-
Setting items for Main Menu
Button settings in Main Menu
-
-
Yes*9
-
Button settings on the top of the screen
-
-
Yes*9
-
Wallpaper Setting for Main Menu
-
-
Yes*9
-
Other settings for Main Menu
-
-
Yes*9
-
Function Settings > Store/Access Files
Mail Box Settings (Register Box Name, PIN, Time Until File Auto Delete,
Printer upon Storing from Printer Driver)
Yes*4
-
Yes*9
-
Image data in Mail Box, Fax Inbox, and Memory RX Inbox
Yes*4
-
-
-
Network Place Settings
-
-
Yes*9
Yes*10
Web browser settings
Web Access setting information
-
Yes*8
Yes*9
-
MEAP settings
MEAP application
-
Yes*8
-
-
License files for MEAP applications
Yes*5
-
-
-
Data saved using MEAP applications
Yes*5
Yes*8
Yes*9
-
SMS (Service Management Service) password
-
Yes*8
-
-
Universal data settings
Unsent documents (documents waiting to be sent with the Delayed Send
mode)
-
-
-
-
Job logs
-
-
-
-
Audit Log
Yes*6
-
-
-
5. Adjustment
326
Summary of Contents for imagerunner advance 4551i
Page 19: ...Product Overview 1 Product Lineup 7 Features 13 Specifications 16 Name of Parts 26 ...
Page 155: ...Periodical Service 3 Consumable Parts List 143 Cleaning Check Adjustment Locations 146 ...
Page 392: ...Error Jam Alarm 7 Overview 380 Error Code 383 Jam Code 509 Alarm Code 520 ...
Page 545: ...Service Mode 8 Overview 533 COPIER 549 FEEDER 845 SORTER 851 BOARD 871 ...
Page 892: ...Unpacking 1 2 1200 mm 840 mm 769 mm 1230 mm 2430 mm 3 9 Installation 879 ...
Page 895: ...3 4 NOTE Keep the removed screws for relocating the host machine 2x 5 6 7 9 Installation 882 ...
Page 896: ...8 9 10 1x Installing the Air Filter 1 9 Installation 883 ...
Page 897: ...2 3 Installing the Drum Unit 1 2 3 9 Installation 884 ...
Page 899: ...8 NOTE The screw removed at procedure 4 is used 1x 9 10 11 12 9 Installation 886 ...
Page 923: ...5 6 NOTE Use the screws and Rubber Caps removed in step 1 2x 7 2x 9 Installation 910 ...
Page 935: ...7 1x 8 9 6x 10 2x 9 Installation 922 ...
Page 936: ...11 Installing the NFC Kit 1 2 2x 3 TP M3x4 1x 9 Installation 923 ...
Page 938: ...4 5 1x 6 9 Installation 925 ...
Page 985: ...8 2x 2x TP M4x8 Black When installing the USB Keyboard 1 9 Installation 972 ...
Page 991: ...7 4x 8 1x 1x Lower Cover 9 1x 10 1x 1x 9 Installation 978 ...
Page 992: ...11 1x 1x 12 1x 13 TP M3x12 2x 14 4x TP M3x6 9 Installation 979 ...
Page 997: ...Installation Procedure 1 2 2x 3 2x 4 6x 5 4x 9 Installation 984 ...
Page 998: ...6 7 NOTE Do not close the Wire Saddle 1x 1x 8 9 9 Installation 985 ...
Page 1003: ...2 1x 1x 3 2x 2x 4 9 Installation 990 ...
Page 1012: ...2 1x 1x 3 2x 2x 4 9 Installation 999 ...
Page 1014: ...7 CAUTION The connector must be contacted TP㸹M3x6 3x 1x 8 4x 9 9 Installation 1001 ...
Page 1016: ...13 4x 14 15 Binding M4x16 Binding M3x16 2x M3x16 M4x16 16 Binding M4x6 1x 9 Installation 1003 ...
Page 1023: ...Installation Procedure Preparation 1 4x 2 1x 1x 3 2x 9 Installation 1010 ...
Page 1029: ...4 5 1x 1x 9 Installation 1016 ...
Page 1048: ...3 2x TP M3x8 Black 4 2x TP M3x6 5 9 Installation 1035 ...
Page 1053: ... Installing the Removable HDD Kit 1 2x 2x 2 3 1x 4 9 Installation 1040 ...
Page 1065: ...3 2x TP M3x8 Black 4 2x TP M3x6 5 9 Installation 1052 ...
Page 1071: ... Installing the Removable HDD Kit 1 2x 2x 2 3 1x 4 9 Installation 1058 ...


