


General Description 2-5
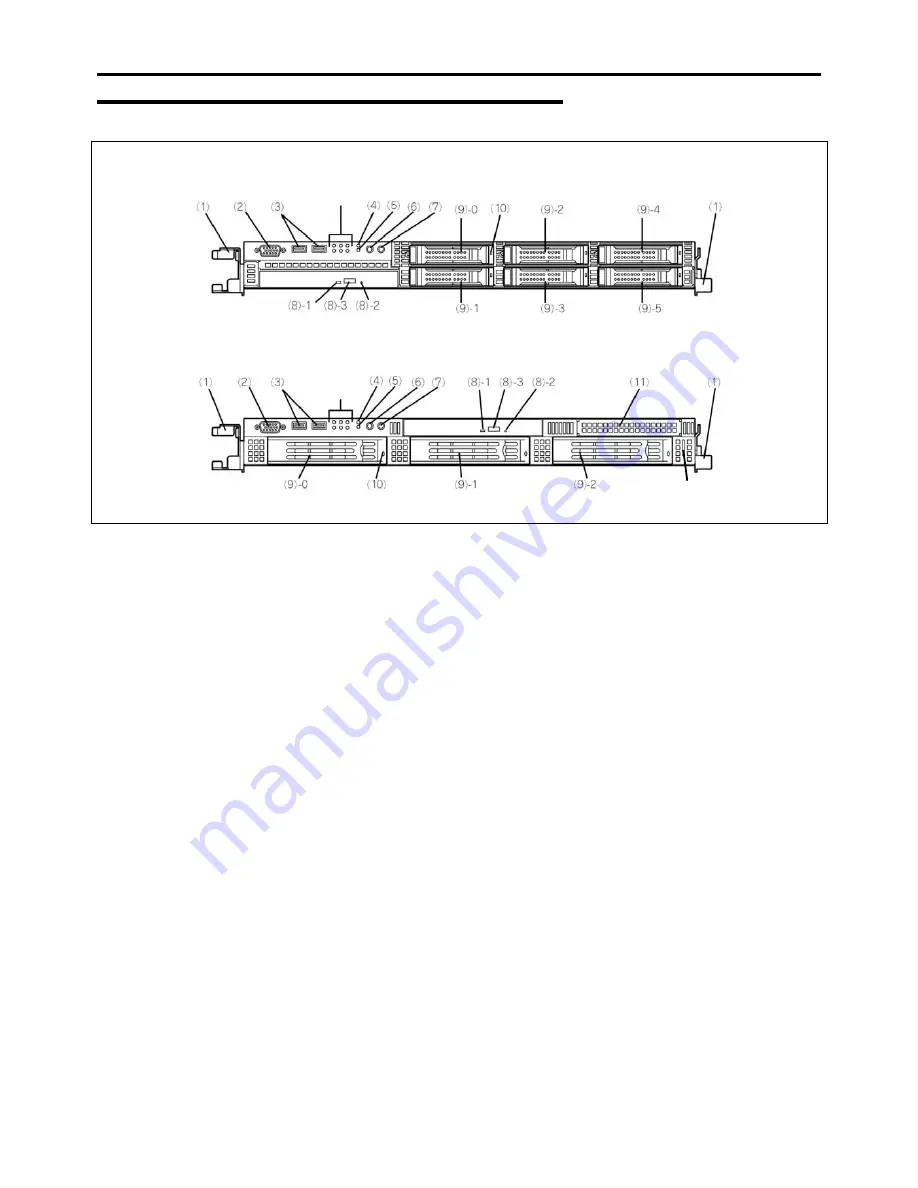
Front View with Front Bezel Removed
2.5-inch disk model
3.5-inch disk model
(12)
1 Handles (1 on each side)
Hold the handles when dismounting/mounting the server from/in the rack.
2 Monitor
connector
Connect the display unit to this connector. Do not use it if the one on the rear panel is already
connected to a monitor.
3 USB connectors (2 ports)
Connect devices compliant with the USB interface to the connectors.
4 RESET
switch
Press this switch to reset the server.
5 DUMP (NMI) switch
Press this switch to dump system memory.
6 POWER
switch
Press this switch to turn on/off the power. Pressing the switch once turns on the power, and
the POWER LED goes on. Pressing it again turns off the power. Keep pressing the switch for
4 seconds or more forcibly turns off the power.
7 UID (Unit ID) switch
Press this switch to turn on/off the UID LEDs on the front and rear panels of the server.
Pressing the switch once turns on the LEDs. Pressing it again turns them off.
(The LED also goes on or flashes when software issues a command.)
8 Optical disk drive
This drive reads data from the disc.
8
-1 Disk access LED
8
-2 Emergency eject hole
8
-3 Tray eject button
9 Hard disk drive bays
Mount hard disk drives in the bays. The last digit indicates the channel number. The hard
disk drives must be purchased separately.
3.5-inch disk model: up to 3 drives
2.5-inch disk model: up to 6 drives
10 DISK LED (green/amber)
Hard disk drive LED. Each hard disk drive LED is green during access to the hard disk drive.
The LED turns amber when the hard disk drive fails. The LED flashes switching back and
forth between green and amber during build processing (only in RAID System).
11
Floppy disk drive bay
Install an optional floppy disk drive or a battery for RAID Controller in this slot. They are
mutually exclusive.
12 Slide
tag
A label for indicating the serial number or name of the server.
Summary of Contents for NovaScale R440 E2
Page 1: ...NovaScale R440 E2 User s Guide NOVASCALE REFERENCE 86 A1 46FB 00...
Page 2: ......
Page 32: ...1 16 Notes on Using Your Server...
Page 70: ...2 38 General Description...
Page 94: ...3 24 Setting Up Your Server This page is intentionally left blank...
Page 147: ...Configuring Your Server 4 53 Property of Physical Device in the Universal RAID Utility...
Page 272: ...5 74 Installing the Operating System with Express Setup This page is intentionally left blank...
Page 308: ...7 12 Maintenance This page is intentionally left blank...
Page 408: ...9 54 Upgrading Your Server Screws...
Page 446: ...9 92 Upgrading Your Server This page is intentionally left blank...
Page 456: ......
Page 458: ...C 2 IRQ This page is intentionally left blank...
Page 490: ...D 32 Installing Windows Server 2008 4 Activate Windows The Windows activation is complete...
Page 494: ......
Page 544: ...G 2 Using a Client Computer with a CD Drive This page is intentionally left blank...
Page 548: ...H 4 Product Configuration Record Table This page is intentionally left blank...
Page 551: ......
Page 552: ...BULL CEDOC 357 AVENUE PATTON B P 20845 49008 ANGERS CEDEX 01 FRANCE REFERENCE 86 A1 46FB 00...