Electrical and Ignition
Timing Adjustments
116
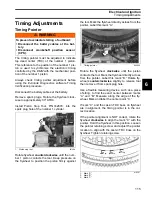
Repeat the entire adjustment process to make
sure pointer is aligned correctly.
Install spark plugs. Refer to Spark Plug
Timing Verification
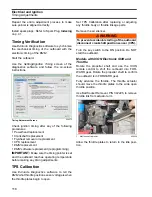
Use
Evinrude Diagnostics
software to synchronize
the mechanical timing of the outboard with the
electronic timing of the
EMM
.
Start the outboard.
Use the
Settings/Ignition Timing
screen of the
diagnostics software and follow the on-screen
instructions.
Check ignition timing after any of the following
procedures:
•
Powerhead replacement
•
Crankshaft replacement
•
Flywheel removal or replacement
•
CPS replacement
•
EMM
replacement
•
EMM
software replacement (reprogramming)
IMPORTANT:
Make sure the timing pointer is set
and the outboard reaches operating temperature
before making any timing adjustments.
TPS Calibration
Use
Evinrude Diagnostics
software to tell the
EMM
what throttle position sensor voltage is when
the throttle plates begin to open.
Set TPS Calibration after replacing or adjusting
any throttle body or throttle linkage parts.
Remove the air silencer.
Turn the key switch to the ON position. Do NOT
start the outboard.
Models with ICON Electronic Shift and
Throttle
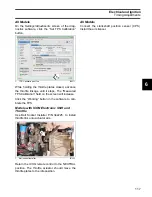
Rotate the propeller shaft and use the
ICON
remote control to shift the outboard into FOR-
WARD gear. Rotate the propeller shaft to confirm
the outboard is in FORWARD gear.
Fully advance the throttle. The throttle actuator
should move the throttle plates to the wide open
throttle position.
Use Ball Socket Remover, P/N 342226, to remove
throttle link from actuator arm.
Allow the throttle plates to return to the idle posi-
tion.
Timing Adjustment Screen
008572
WARNING
To prevent accidental starting of the outboard
disconnect crankshaft position sensor (CPS).
1.
Ball socket remover
008034
1
Summary of Contents for EVINRUDE E-TEC BE225HGXABA
Page 163: ...Oiling System Oil Supply Diagrams 163 8 008208R Port Side View Starboard Side View ...
Page 165: ...Oiling System Oil Supply Diagrams 165 8 008432R Port Side View Starboard Side View ...
Page 167: ...Oiling System Oil Recirculation Diagrams 167 8 008207R Starboard View Port View ...
Page 251: ...Powerhead Powerhead Views 251 11 Powerhead Views Port Hose Routings 3 3 L models 007153 ...
Page 252: ...252 Powerhead Powerhead Views Starboard Hose Routings 3 3 L models 007154 ...
Page 253: ...Powerhead Powerhead Views 253 11 Port Hose Routings 3 4 L models 008503 ...
Page 254: ...254 Powerhead Powerhead Views Starboard Hose Routings 3 4 L models 008502 ...
Page 255: ...Powerhead Powerhead Views 255 11 Port 3 3 L models 008448 ...
Page 256: ...256 Powerhead Powerhead Views Starboard 3 3 L models 008449 ...
Page 257: ...Powerhead Powerhead Views 257 11 Port 3 4 L models 008441 ...
Page 258: ...258 Powerhead Powerhead Views Starboard 3 4 L models 008442 ...
Page 259: ...Powerhead Powerhead Views 259 11 Front 3 3 L models 008450 ...
Page 260: ...260 Powerhead Powerhead Views Front 3 4 L models 008439 ...
Page 261: ...Powerhead Powerhead Views 261 11 Rear 3 3 L models 007142 ...
Page 262: ...262 Powerhead Powerhead Views Rear 3 4 L models 008440 ...
Page 263: ...Powerhead Powerhead Views 263 11 Top 008438 ...
Page 264: ...264 Powerhead Powerhead Views Starboard ICON models 008504 ...
Page 269: ...Midsection Service Charts 269 12 Muffler 004117R ...
Page 320: ...S 322 ...

