296
Trim and Tilt
Routine Inspections
Routine Inspections
General
Check for external signs of fluid leakage. Correct
causes as necessary.
Check the battery to be sure it is in good operating
condition.
Reservoir Fluid
Check reservoir fluid level every three years or
every 300 operating hours. System capacity is
approximately 21 fl. oz. (620 ml).
Refer to
dure.
Manual Release Valve
Check the manual release valve with a torque
wrench.
IMPORTANT:
Tighten valve to a torque of 45 to
55 in. lbs. (5 to 6 N·m).
Stern Brackets
Inspect the stern brackets for binding.
Tighten starboard tilt tube nut to a torque of 45 to
50 ft. lbs. (61 to 68 N·m).
Troubleshooting
If the power trim/tilt system has malfunctioned and
the cause has not been determined, the
on p. 297 should help locate the
problem.
Keep a manual release valve and a valve body in
stock for troubleshooting. Use these parts when
the
on p. 297 call for the
substitution of known good parts.
If the trim/tilt does not work, and its motor neither
runs nor hums, troubleshoot the problem by refer-
ring to
If the outboard tilts part way up but not smoothly,
or with a constant sound, there is probably air in
the system due to low fluid. Fill reservoir and
bleed (purge air from) the system.
To test for mechanical binding, open the manual
release valve and manually tilt the motor up and
down. If parts are binding, refer to
section.
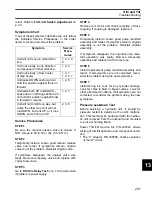
If a V4 model will not lower from shallow water
drive position at any throttle setting, or if a V6
model will not stay in shallow water drive and
drops down at fast idle, the wrong manual release
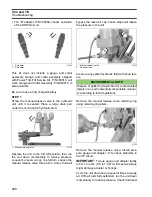
valve may be installed. Check for the identification
groove in the face of the valve.
If the outboard does not tilt as high as it should,
and the tilt motor TURNS OFF at maximum tilt
(does not sound like it is stalled at the maximum
tilt position), adjust the tilt limit switch higher and
1.
Grooves (V4 Models)
2.
No grooves (V6 Models)
010359
1
2
Summary of Contents for EVINRUDE E-TEC BE225HGXABA
Page 163: ...Oiling System Oil Supply Diagrams 163 8 008208R Port Side View Starboard Side View ...
Page 165: ...Oiling System Oil Supply Diagrams 165 8 008432R Port Side View Starboard Side View ...
Page 167: ...Oiling System Oil Recirculation Diagrams 167 8 008207R Starboard View Port View ...
Page 251: ...Powerhead Powerhead Views 251 11 Powerhead Views Port Hose Routings 3 3 L models 007153 ...
Page 252: ...252 Powerhead Powerhead Views Starboard Hose Routings 3 3 L models 007154 ...
Page 253: ...Powerhead Powerhead Views 253 11 Port Hose Routings 3 4 L models 008503 ...
Page 254: ...254 Powerhead Powerhead Views Starboard Hose Routings 3 4 L models 008502 ...
Page 255: ...Powerhead Powerhead Views 255 11 Port 3 3 L models 008448 ...
Page 256: ...256 Powerhead Powerhead Views Starboard 3 3 L models 008449 ...
Page 257: ...Powerhead Powerhead Views 257 11 Port 3 4 L models 008441 ...
Page 258: ...258 Powerhead Powerhead Views Starboard 3 4 L models 008442 ...
Page 259: ...Powerhead Powerhead Views 259 11 Front 3 3 L models 008450 ...
Page 260: ...260 Powerhead Powerhead Views Front 3 4 L models 008439 ...
Page 261: ...Powerhead Powerhead Views 261 11 Rear 3 3 L models 007142 ...
Page 262: ...262 Powerhead Powerhead Views Rear 3 4 L models 008440 ...
Page 263: ...Powerhead Powerhead Views 263 11 Top 008438 ...
Page 264: ...264 Powerhead Powerhead Views Starboard ICON models 008504 ...
Page 269: ...Midsection Service Charts 269 12 Muffler 004117R ...
Page 320: ...S 322 ...

