background image

Chapter 3

Basic Procedures for Using the Mini Creative Cutter

24

Creative Cutter MINI

IMPORTANT:

TO CUT AN 8 1/2” X 11” PAPER, ENTER 11” FOR LENGTH AND 8” 

FOR THE HEIGHT. IT SHOULD APPEAR IN LANDSCAPE ORIENTATION ON YOUR 

COMPUTER SCREEN. See figure 23 .

3

Type the length and height of the paper you are cutting in the appropriate boxes and then 

click 

OK

4

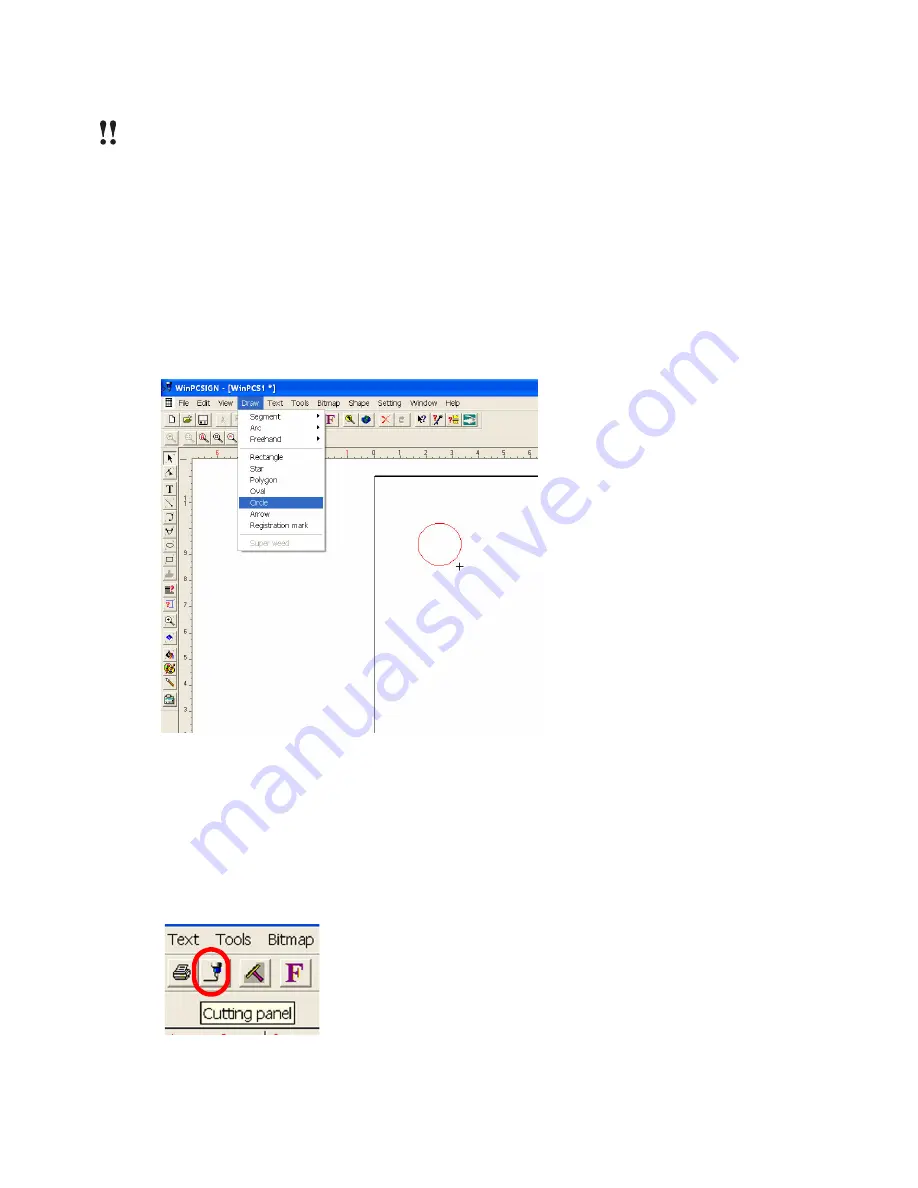
At the top of the screen, click 

Draw

 and then click 

Circle

. When you do, the cursor changes 

to a plus sign.

5

In the blank page on your screen, click the cursor about one inch inside and down from the 

upper-left corner.

6

Hold down the mouse and drag the cursor to draw a circle about the size of a quarter. Your 

screen should look similar to figure 25 

Figure 25

Step 3: Make the Cut

1

Position the paper onto the mat and load it into the cutter. For test cuts, use lightweight 

(65 lb.) cardstock. For detailed instructions on loading the paper, see “Working With the 
Cutting Mat” on page 17. 

2

At the top of the screen, click the 

Cut Panel 

icon to open 

Cutting Control Panel 

window.

Figure 26

Содержание Mini Creative Cutter

Страница 1: ...Pazzles Creative Cutter Mini User Guide www pazzles com...

Страница 2: ...elDRAW is a registered trademark or registered trademarks of Corel Corporation or Corel Corporation Limited Microsoft Publisher Microsoft Windows operating systems and Outlook Express are registered t...

Страница 3: ...er Package 5 Installing the Software 6 Installing and Starting the Software 6 Setting Up the Cutter and Installing the USB Driver 6 Attach the Cutter to the Computer 6 Install the USB Driver 7 Determi...

Страница 4: ...Using the Cutter 22 Step 1 Start the Cutter 23 Step 2 Start the Software 23 Step 3 Make the Cut 24 Change the Page Size 26 Tips for Determining Proper Pressure to Assure Clean Cuts 27 Changing the Pos...

Страница 5: ...re 42 Step 2 Type the Title 43 Step 3 Connect the Letters 45 Cut your Title 48 Step 1 Select the Inside and Outside Part of the Word 48 Add a Graphic to the Title 50 Step 1 Prepare the Software 50 Ste...

Страница 6: ...f Images and Text 83 Changing and Previewing Various Fonts 83 Moving and Resizing Images 84 Selecting an Object 84 Resizing an Object 85 Moving an Object 85 Filling a Page With an Image Multiplying 85...

Страница 7: ...Pixels Resolution Vectors Oh My 105 Manipulating Scanning and Importing Graphics 106 Scanning a Picture or Drawing into Pazzles Creative Cutter 106 Importing an Image or Word Created in CorelDraw or A...

Страница 8: ...ng Objects From the Front or Back When Working With Lines 118 Sorting the Inline Path Before Cutting 118 Troubleshooting Problems With Inline Cutting 119 Cutting a Project More Than Once 119 Creating...

Страница 9: ...reds of dollars for dies To get the most of your cutter we recommend you spend a few moments becoming acquainted with the cutter the Pazzles Creative Cutter software and the supplemental Creative Cutt...

Страница 10: ...Chapter 5 and beyond Sharing Tips and Ideas The folks who use the Pazzles Creative Cutter are enthusiastic knowledgeable and love to share tips and ideas To join the discussions get tips and suggesti...

Страница 11: ...Chapter 1 Introduction Creative Cutter MINI 3 If the problem is with cutting check the blade and the mat...

Страница 12: ...after completing these steps contact Pazzles at www pazzles com Include the following information in your e mail Your name and if applicable your company name Your TSID number A complete description...

Страница 13: ...Creative Cutter Instruction Manual this book THE FOLLOWING CD S ARE ALL COMBINED ON ONE CD SEE figure 1 Figure 1 Creative Cutter The Basics Tutorial CD Sample Images CD Paper Piecing Patterns from the...

Страница 14: ...CD Drive and click the program icon 2 To install the software click Install Letter 2005 3 When you are prompted to enter a password type pazzmini 4 Leave this CD in until instructed to remove Setting...

Страница 15: ...need to be uninstalled 2 Using the Purple or Gray USB cord connect the cutter to your computer See figure 2 on page 6 3 Use the power button to turn on the power to the cutter See figure 3 Figure 3 4...

Страница 16: ...STEPS BELOW IF THE ABOVE STEPS DO NOT INSTALL PROPERLY 1 Press BACK until you reach the page shown in figure 4 on page 7 then Select No Not at this Time Then click Next to proceed with the installati...

Страница 17: ...age 4 Click Device Manager 5 Click Ports to view a list of ports see figure 6 6 From the list of ports look for a USB Serial Port Take note of the port number assigned to it You will use the port numb...

Страница 18: ...s ROCKEY2 in white lettering See Figure 6 NOTE The key can be found in your Cutting And Design software case with the Pazzles Creative Cutter software CD Figure 7 2 This key will install automatically...

Страница 19: ...ght box Then click OK The page dimensions you typed are saved for use in the future and the Workspace screen opens IMPORTANT The mini uses 11 for the Length and 8 for the Height See figure 23 on page...

Страница 20: ...the View menu click Grid to select it Turning on Grid is helpful in placing images by displaying small dots at 1 inch intervals on the Page screen 4 Click the Settings menu and then click Grid to ope...

Страница 21: ...lways connect power and then the USB If using a laptop turn off screen savers sleep mode This causes the ports to go to sleep If this happens you must unplug and re plug your cutter back into your com...

Страница 22: ...gernail 3 Screw the bladeholder into the black plunger until the blade is barely visible and can barely be felt Use the blade positioning guide see figure 15 on page 16 on how to adjust the blade to t...

Страница 23: ...unit into the opening of the cutting carriage Loosen to remove blade holder Figure 14 7 While supporting the carriage with a finger push in the bladeholder When the blade holder unit is inserted as fa...

Страница 24: ...Chapter 2 Installation and Setup 16 Creative Cutter MINI Blade Positioning Guide Figure 15...

Страница 25: ...at beyond its useful life will result in poor quality cuts 1 Please take off the clear cover that came on your mat before putting the paper on the mat See figure 16 Figure 16 2 Place your paper on the...

Страница 26: ...Insert the mat from the back of the cutter 6 Turn the paper feed knob located on the left side of the cutter foward to move the mat under the pinch rod See figure 19 Figure 19 7 See figure 20 this sh...

Страница 27: ...ays store your mat flat and keep it covered with it s clear covering when not in use When cared for properly the adhesive on the cutting mat has a useful life of about 25 50 passes Do not over extend...

Страница 28: ...kyness Scrape bits of paper off the mat try to remove it by patting rolled up packing tape over the mat or by using an old credit card Do not cut high fiber papers that can leave fibers on the mat Sin...

Страница 29: ...troducing the Cutting Control Panel The Cutting Control Panel plays an important role in the success of your cutting projects It s important that you are familiar with the Cutting Control Panel and th...

Страница 30: ...in and out while within the cutting mode Color Boxes Enables you to select which line color to cut Panels If 101 102 appears indicates that your project is too big for the paper Speed Slow and Medium...

Страница 31: ...op of the machine on the right end cap will turn from red then green when it is ready to cut 2 Apply the paper to the mat as shown in Insert the Mat Into the Cutter on page 18 Figure 23 3 Insert the m...

Страница 32: ...you do the cursor changes to a plus sign 5 In the blank page on your screen click the cursor about one inch inside and down from the upper left corner 6 Hold down the mouse and drag the cursor to draw...

Страница 33: ...king With the Cutting Mat on page 17 7 Verify that the blade carriage is at the right side of the cutter and the green light is on 8 Set the pressure to 145 and the cut speed to SLOW 9 On the Cutting...

Страница 34: ...Change the Page Size 1 Click Setting from the menu bar at the top of the screen 2 From the Setting menu click Page See figure 29 Figure 29 3 Change the page size to 11x8 See figure 30 4 Click OK Figur...

Страница 35: ...barely be felt and then increase the pressure Once you determine a good pressure for 65 lb light cardstock paper use that pressure as a baseline for other types of papers For example if a pressure of...

Страница 36: ...stop cutting button is pressed Cutter Starts to Cut Poorly If the cutter was working fine and then seems unable to cut through paper try these procedures Clean the mat Scrape off any bits of paper and...

Страница 37: ...ve Cutter MINI 29 Replace the blade It might be worn from use it might be damaged from a paper jam or from cutting heavy or unusual material or it might be defective Restart the cutter Restart the pro...

Страница 38: ...Chapter 3 Basic Procedures for Using the Mini Creative Cutter 30 Creative Cutter MINI...

Страница 39: ...stalled and set up the cutter and the cutter software If not return to Chapters 2 and 3 Tutorial 3 and Tutorial 4 use advanced skills and can be completed in any order after you are comfortable with t...

Страница 40: ...se it Figure 33 Step 2 Open the Pazzles Creative Cutter Program 1 Double click the icon your desktop screen See figure 34 Figure 34 2 Press the ESC key on your computer keyboard when you see the Welco...

Страница 41: ...amd 8 height See figure 36 Figure 36 Find and Import an Image 1 Go to FILE then IMPORT then select IMAGE on the menu that pops out to the right 2 Locate your CD drive under My Computer To see all loca...

Страница 42: ...g on it For this project we are using a file called Butterfly05 Figure 39 6 Click Open The image you selected will appear on your 11x8 page Step 2 Create a Shadow Mat for the Image 1 To apply changes...

Страница 43: ...he following selections in the Transformation box TIP To change a selection click the Undo button For this setting Enter this value Notes Thickness 0 08 In most cases widths are between 0 02 and 0 10...

Страница 44: ...nd Fill the Page Step 1 Select and Position the Image Use the Select Elements tool to select both the butterfly image and its outline TIP Select Elements is the tool you will use the most 1 To select...

Страница 45: ...the image to the location where you want to place it on the page For this project place it about 0 5 inch down and 0 5 inch from the left Your page should resemble figure 46 Figure 46 5 Resize the im...

Страница 46: ...ply Figure 47 3 In the Number box on the Multiply selected elements window type the number of copies needed to fill the page across side to side Figure 48 4 Set spacing values or leave the settings as...

Страница 47: ...t All Small boxes surround the images on the page showing that all of them are selected If you prefer you can use the Select Elements tool to select all the images on the page Click the tool and then...

Страница 48: ...nother piece of paper adjust the pressure up or down and cut again For this setting Enter this value Notes Speed Slowest Start with the slowest when first learn ing Most projects will be done on slow...

Страница 49: ...he Cut on page 40 3 Open the Cutting Control Panel by clicking the Cutting Control Panel icon 4 On the Cutting Control Panel click the red box to select Shadow Outlines 5 For Speed click Slowest 6 For...

Страница 50: ...e Step 1 Prepare the software 1 Open Pazzles Creative Cutter See Step 2 Open the Pazzles Creative Cutter Program on page 32 2 Click the Create New Document image See figure 52 Figure 52 3 Set up to cu...

Страница 51: ...check click the View menu and then click Toolbars Select Standard Tools Manipulation Selection and Zoom Step 2 Type the Title 1 To type a word first click on the Text tool 2 The rectangle on the work...

Страница 52: ...lements tool Small black squares appear around the word to indicate that it is selected Figure 57 TIP When you click on a typed word the whole word is selected not just the letter you clicked on 6 Cho...

Страница 53: ...r and click the Zoom Selected icon See figure 59 Figure 59 TIP Make sure your word is still selected Click on the word with the Select Elements tool 2 Click Text in the menu bar at the top of the scre...

Страница 54: ...he letters move to the location represented by the little boxes See figure 64 Figure 64 6 To weld the letters into one complete word the letters must overlap as shown in figure 65 Continue to adjust y...

Страница 55: ...Chapter 4 Creative Cutter Tutorials Creative Cutter MINI 47 8 Click on Tools and select Welding The overlapping letters weld together Figure 66 Figure 67 Congratulations You just made your first title...

Страница 56: ...a spot on the workspace that is above and to the left of the word Hold down the mouse button as you drag the mouse to the right and down to create a box around the entire word TIP Drag a BIG box You m...

Страница 57: ...l be done on slow or medium Panels Leave blank If you see 101 201 your project is larger than 11x8 Material Use 12 00 for all papers that are 12 and under Reflects the size of your paper Pressure For...

Страница 58: ...ni can be set at if the image you are cutting does not cut on the first pass select the image right click with your mouse and select Duplicate from the list that appears You can also select the image...

Страница 59: ...1 4 If the window shown in figure 71 opens click Cancel to close it Figure 71 Step 2 Import a Graphic 1 Click File at the upper left corner of the menu bar at the top of the Win PCSIGN screen Figure 7...

Страница 60: ...ns on your computer Figure 75 4 Double click on the CD drive 5 Double click the SampleProjects05 folder Figure 76 6 Double click the Summer Sun05 file Figure 77 Move and Edit the Graphic Image 1 The i...

Страница 61: ...the Image 1 Move the summer sun image so that it overlaps the Summer title TIP To move the image hover the Select Elements tool over the image until it changes into the Move tool NOTE If you leave pa...

Страница 62: ...tool Resize the title to your liking by clicking on one of the corner boxes Hold the mouse button as you pull out to enlarge or push in to make smaller Figure 82 2 Click on the screen away from the ti...

Страница 63: ...rk to accept the outline For this setting Enter this value Notes Thickness 0 08 In most cases widths are between 0 02 and 0 10 Number 1 The Number setting specified the number of outlines Three is the...

Страница 64: ...t it 3 Select the red outline by clicking on it with the Select Elements tool 4 Move the mouse until you see the arrow change to a double cross that indicates Move 5 Click mouse button and drag the ou...

Страница 65: ...Creative Cutter MINI 57 7 Position the shadow below the title 8 Cut your project For instructions see Make the Cut on page 40 TIP Cut the title and shadow twice using two different colors of paper The...

Страница 66: ...utorial 1 and Tutorial 2 before attempting the advanced tutorials You can complete advanced tutorials in any order Prepare the Line Graphic The most easily converted graphics are simple drawings with...

Страница 67: ...etup page box type 11x8in the Height and Length boxes These settings set up the cutter to cut a 11x8 paper and reflect the actual available cutting space on the paper IMPORTANT Be sure that your page...

Страница 68: ...then re open your computer Be sure to turn the scanner on before turning on the computer Figure 92 6 In the Select Source box highlight your scanner and click Select If you have more than one scanner...

Страница 69: ...Tutorials Creative Cutter MINI 61 8 Scan the drawing as black and white bitmap See figure 94 TIP Your scanner software might look different from the pictures Figure 94 9 Set the resolution DPI to at l...

Страница 70: ...begin with and the closer your dots are together resolution the better the cutting image Be sure to scan at 250 300 dpi Most computer graphic programs create objects with tiny dots called pixels The...

Страница 71: ...s available 4 Using the Vectorizing wand click on the image See figure 98 If the Working box appears you have successfully vectorized the image and you can go on to Edit the Image on page 65 The Worki...

Страница 72: ...hange Resolution tool which looks like a cog wheel becomes available 2 Using the Change Resolution tool click on the image When you do the Bitmap resolution window opens to display information about t...

Страница 73: ...See figure 102 The image on the left shows unwanted lines in red The image on the right shows the image after the unwanted lines are deleted TIP You can identify a line that is selected for editing b...

Страница 74: ...row turns into a cross symbol the Move symbol Click and hold down the mouse button as you drag the image into place on the page Place it about one inch down and one inch in from the left side of the p...

Страница 75: ...re two lines meet If you push or pull in the middle of a line you create an arc If you push or pull at a point you create an angle 6 Fix bumpy rough lines like the one shown in figure 107 with the Lin...

Страница 76: ...ocedure Multiply the Image and Fill the Page on page 36 to create multiple copies of the image and fill the page 2 Place a 8 5x12 paper on the cutting mat 3 Insert mat into the Creative Cutter 4 Start...

Страница 77: ...pen Pazzles Creative Cutter and create a blank 11x8 page IMPORTANT Be sure your page appears in landscaped orientation see Starting and Using the Cutter on page 22 2 If you are importing an image use...

Страница 78: ...st 250 When you do the image appears on the Pazzles Creative Cutter workspace as shown in figure 111 Figure 111 Resize the image to fill the screen To do so first click the image with the Select Eleme...

Страница 79: ...tes Segment from Path As you draw a segment with this tool it will automatically join the segment previously created To start drawing click and drag a line To continue drawing lines click on a spot fu...

Страница 80: ...Cutter MINI Figure 113 5 Click the Color Palette tool to open the Color window See figure 114 6 Right click your mouse button on a color for the tracing line Choose a color that will stand out from th...

Страница 81: ...ure 2 Click the Segment from Path tool 3 Click on a starting point and hold the mouse button down as you drag the starting line See figure 115 Figure 115 4 Continue tracing around the picture by click...

Страница 82: ...segments around tight areas as shown in figure 117 2 Click the Redraw tool to turn the line color to red or whatever color you have chosen Figure 117 3 Continue tracing around the picture until you r...

Страница 83: ...ill use it to shape the lines to fit the picture See figure 119 Figure 119 6 Click on a segment that must be rounded and hold down the mouse button as you move the line in or out To round the segment...

Страница 84: ...atures Keep in mind that when using the Segment from Path tool the end of the line must connect with the beginning point Figure 120 2 Use the Draw Segment tool to add individual accent lines These acc...

Страница 85: ...middle of the segment To resize the segment or create a point click an end point of the segment 4 Use the Join Two Points tool to connect the ends of lines Click and hold down the mouse button while d...

Страница 86: ...ck Copy and Paste to make a copy of your project The copy will assist you in seeing if any adjustments must be made See figure 123 Figure 123 3 Make changes and adjustments as desired 4 Click on the g...

Страница 87: ...ected The program zooms in on all loose ends Ignore the open ends you wish to leave open Fix the ends you wish to close To do so use the Join Two Points tool to drag a small box around the points to c...

Страница 88: ...Chapter 4 Creative Cutter Tutorials 80 Creative Cutter MINI...

Страница 89: ...which are optimized for use with the Creative Cutter You can also use TrueType fonts that are stored in your computer s Windows Fonts folder Select Elements Select letters words objects and parts of...

Страница 90: ...click to fill with color Mirror Rotate Mirror flip an object vertically or horizontally Rotate turn the selected element by the number of degrees you specify Move point Select a construction point on...

Страница 91: ...utting Cutting is recommended and then click a font from the displayed list of available fonts The Preview boxes show the text with the new font applied 4 When you are satisfied with your font selecti...

Страница 92: ...tiple elements Selecting an Object With the Select Elements tool selected click the item s you want to resize move or change See figure 125 To work with a single element click the element To work with...

Страница 93: ...ly on the center of the object and hold down the mouse button When you do the pointer changes to a cross the Move tool 3 While continuing to hold down the mouse button move the object on your page TIP...

Страница 94: ...you want to place the objects Figure 127 5 Click OK The page fills with the image as shown in figure 128 Figure 128 TIP If you have too many or not enough images click the Undo tool and start over NO...

Страница 95: ...The distance is displayed at the bottom of the screen Figure 129 Creating Outlines and Shadows Figure 130 You can create an outline shadow of any letter number word or shape Use the instructions that...

Страница 96: ...ne or shadow any of the following issues might be causing the problem The image or word has too many outlines Do not exceed three outlines You attempted to outline a circle Circles cannot be outlined...

Страница 97: ...ool to move points or lines You can select 4 or 8 points see step 5 Select Use Form to choose a pre designed image distortion available in the top window Scroll up and down to see the many shapes avai...

Страница 98: ...ars between the areas where you clicked If the arc is upside down use the Select Elements tool to flip it over Then use the Select Elements tool to adjust the size and depth of the curve Be sure the a...

Страница 99: ...eative Cutter MINI 91 Figure 134 Example of text curved to right 7 Click Apply to save your selections TIP To separate the line from the word click Break text on the Write Text on box This allows you...

Страница 100: ...lly above the each other Using the Center Technique to Spell Words Vertically Figure 135 1 Type the word letter by letter in the font you prefer Press the ENTER key after typing each letter to move th...

Страница 101: ...Select the letter to be moved and use the arrow keys on your computer s keyboard to move the letter up or down See column 2 6 Continue using the rectangle as a spacer to help with the positioning of...

Страница 102: ...tle boxes TIP If you must lengthen parts of the letters to get the proper spacing see How to Lengthen Letters on page 95 Figure 137 4 Use the Select Elements tool to select the word 5 On the Tools men...

Страница 103: ...e Point tool to lengthen them For best results weld first and then lengthen the letters After lengthening the letters weld the newly overlapped letters Create small rectangles to create a bridge betwe...

Страница 104: ...to move the bar so that it overlaps word 4 Use the Select Elements tool to select the bar and letters together To do so click Select All under the Tools menu or use the Select Elements tool to drag a...

Страница 105: ...select the outline click on the first object while holding down the SHIFT key and then click on the next object If objects do not weld make sure the objects are overlapping and check for open paths Us...

Страница 106: ...gment to create an arc See figure 141 To display all joints and points use the Move Point tool to drag a box around the object Viewing all joints and points is very helpful when making precise adjustm...

Страница 107: ...43 Cut Path Tool The Cut Path tool enables cutting out a segment of a line in an image To use it click two places with the Cut Path tool and then use the Erase tool to remove the cut section See figur...

Страница 108: ...r Changing colors can make lines more visible Changing the color of lines facilitates cutting different parts of the image at different pressures Changing the color of lines helps to indicate the tool...

Страница 109: ...r with a pen Creating Words Inside a Rectangle You can manipulate the letters in words that are enclosed in a rectangle so that they are either separated or attached Creating a Word with Separated Let...

Страница 110: ...4 Duplicate the rectangle use ALT D and use the arrow key to move the new rectangle straight above the word See figure 149 5 Select both rectangles and the word and weld them together See Welding Ima...

Страница 111: ...Chapter 5 Manipulating Letters and Shapes Creative Cutter MINI 103 Figure 149...

Страница 112: ...Chapter 5 Manipulating Letters and Shapes 104 Creative Cutter MINI...

Страница 113: ...tiny dots called pixels The number of pixels per inch which is also referred to as dots per inch dpi is called the object s resolution The higher the resolution the more dots per inch And the higher t...

Страница 114: ...or Graphic on page 106 to vectorize it Importing an Image or Word Created in CorelDraw or Adobe Illustrator If you have created the design in Adobe Illustrator or CorelDraw save it as an Adobe Illust...

Страница 115: ...e converted vector image 10 Use the Select Elements tool to drag a square around the converted vector image and then move it to the appropriate location on the page TIP You might want to the change th...

Страница 116: ...area Click the area several times to remove extra points Convert an Uneven Circle Use the Convert to Circle tool double click the Oval tool to convert an uneven circle to a perfectly shaped circle Str...

Страница 117: ...roblems when trying to vectorize a scanned drawing or photograph not an outline or solid convert images to an outline or solid image To do so first outline it by hand with a black pen Then scan at 200...

Страница 118: ...p 2 on the Creative Cutter CD 3 On the Pazzles Creative Cutter Bitmap menu click Vectorization and Automatic Vectorization 4 Click on your scanned image When you do the program begins to convert it to...

Страница 119: ...utton drag the picture to a larger size 3 Double click the Segment tool located on the left side of the workspace to open the Segment toolbar You will use the first two tools on the toolbar Figure 155...

Страница 120: ...inue tracing the image by clicking on a spot some distance away from your first line As you click along the outline of the image a line will fill in between the point 5 Click the Redraw tool When you...

Страница 121: ...figure 157 Figure 157 To round a line click the middle of a segment To resize a segment or to create a point click on an end point of a segment 2 Shape the lines all the way around the outline as nee...

Страница 122: ...s of lines To do so click and hold down the mouse button while dragging a box around the end points that need to be joined When you release the mouse button the ends should join 7 Select the image pic...

Страница 123: ...ter 6 Working With Graphics Creative Cutter MINI 115 Tracking Customer Data Use the Customer option on the Edit menu to keep records of your customers names prices charged and fonts and images Figure...

Страница 124: ...Chapter 6 Working With Graphics 116 Creative Cutter MINI...

Страница 125: ...not a warranted repair For tips on cutting a wide variety of materials please refer to the cutting pressure guide that was included with the sample paper pack Please contact Pazzles if you need a cutt...

Страница 126: ...rranged for easier manipulation Use the Move to Back Move to Front tool to manipulate the image on your screen See figure 161 Figure 161 Sorting the Inline Path Before Cutting Use this procedure to pr...

Страница 127: ...three times Do remove the mat from the cutter after the first cut To make cut multiple times use one of the following methods Method 1 Press Start on the cutter control panel Be sure Advance is not ch...

Страница 128: ...to change the color of the scored part of the project See Change Color Line Tool on page 100 Scoring and Then Cutting an Image IMPORTANT Do not move the mat between steps 1 Select the color for scorin...

Страница 129: ...ol 3 In the Radius box assign a value to apply to the corner and then click OK To change this value later double click on the computer screen See figure 165 Figure 165 TIP If you choose too large a ra...

Страница 130: ...but greatly eases cutting See figure 167 and figure 168 Figure 167 Figure 168 Creating Stitch Marks You can convert lines to stitch marks Two lengths of stitch marks are available KissCut1 and KissCut...

Страница 131: ...easier to insert over time If the pen is difficult to insert try rubbing it with sandpaper to to allow it to insert into the pen tool 2 Insert the pen holder into the carriage of the Creative Cutter u...

Страница 132: ...click the box with the color that corresponds to the pen color The screen display changes to show only lines of that color 6 Verify that the Advance box is clear not checked 7 Set the pressure to 100...

Страница 133: ...Chapter 7 Specialized Cutting and Finishing Techniques Creative Cutter MINI 125...

Страница 134: ...Chapter 7 Specialized Cutting and Finishing Techniques 126 Creative Cutter MINI...

Страница 135: ...calling Support Troubleshooting Tips Issue Possible Causes and Remedies You want to work in Pazzles Creative Cutter while cutting Open another Pazzles Creative Cutter You can cut and paste between the...

Страница 136: ...5 and then click the remove button to the right of it Step 4 Delete the Signmax and Pazzles Creative Cutter folders 1 Point to Start and then click My Computer 2 Select the C drive and click the folde...

Страница 137: ...ines After three click on the outermost outline and do the outline function again Issue You are trying to outline and you have chosen TOO large of an outline Solution Reduce the size of the outline Is...

Страница 138: ...me AOL Outlook Express and some scanners and printers Start and stop points do not meet Decrease pressure Check the cutting mat It might be warped or in need of cleaning Remove small bits of lint from...

Страница 139: ...Be sure you place the rollers on the same part of the mat each time to help you learn where the machine cuts You ve lost changes to a project Save save save Saving a project in Pazzles Creative Cutte...

Страница 140: ...Chapter 8 Troubleshooting Guide 132 Creative Cutter MINI...

Отзывы: