23
Installing
the Inverter
2.2 Enabling the RTC (Real-Time Clock) Battery
The H100 series inverter comes from the factory with a CR2032 lithium-manganese battery
pre-
installed on the I/O PCB. The battery powers the inverter’s built-in RTC. The battery is
installed with a protective insulation strip to prevent battery discharge; remove this
protective film before installing and using the inverter.
ESD (Electrostatic discharge) from the human body may damage sensitive electronic
components on the PCB. Therefore, be extremely careful not to touch the PCB or the
components on the PCB with bare hands while you work on the I/O PCB.
To prevent damage to the PCB from ESD, touch a metal object with your hands to discharge
any electricity before working on the PCB, or wear an anti-static wrist strap and ground it on a
metal object.
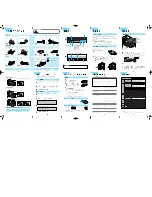
Follow the instructions below to remove the protective insulation strip and enable the RTC
feature on the H100 series inverters.
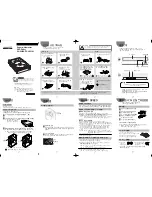
1
Turn off the inverter and make sure that DC link voltage has dropped to a safe level.
2
Loosen the screw on the power cover then remove the power cover.
0.75
–30 kW Models
37
–90 kW Models
110~185kW Models
220~500kW Models
Содержание LSLV-H100 Series
Страница 17: ...Preparing the Installation 4 37 90 kW 3 Phase ...
Страница 18: ...Preparing the Installation 5 110 132 kW 3 Phase ...
Страница 19: ...Preparing the Installation 6 160 185 kW 3 Phase ...
Страница 20: ...Preparing the Installation 7 220 250 kW 3 Phase ...
Страница 21: ...Preparing the Installation 8 315 400 kW 3 Phase ...
Страница 22: ...Preparing the Installation 9 500 kW 3 Phase ...
Страница 35: ...Installing the Inverter 22 ...
Страница 50: ...37 Installing the Inverter Input and Output Control Terminal Block Wiring Diagram ...
Страница 104: ...91 Learning Basic Features 0 10 V Input Voltage Setting Details V1 Quantizing ...
Страница 181: ...168 Learning Advanced Features PID Command Block ...
Страница 182: ...169 Learning Advanced Features ...
Страница 183: ...170 Learning Advanced Features PID Feedback Block ...
Страница 184: ...171 Learning Advanced Features PID Output Block ...
Страница 185: ...172 Learning Advanced Features PID Output Mode Block ...
Страница 198: ...185 Learning Advanced Features EPID1 Control block ...
Страница 199: ...186 Learning Advanced Features EPID2 Control block ...
Страница 220: ...207 Learning Advanced Features ...
Страница 235: ...222 Learning Advanced Features The Time Chart for the Exception Day ...
Страница 506: ...Table of Functions 493 ...
Страница 520: ...Table of Functions 507 8 16 4 Cooling Tower MC4 Group ...
Страница 549: ...Troubleshooting 536 ...
Страница 569: ...Technical Specification 556 11 3 External Dimensions 0 75 30 kW 3 phase 37 90 kW 3 phase ...
Страница 570: ...Technical Specification 557 110 185 kW 3 phase ...
Страница 601: ...588 ...
Страница 602: ...589 ...
Страница 603: ...590 ...