Problem:
The
critical
low-battery
error
message
is
displayed,
and
the
computer
immediately
turns
off.
Solution:
The
battery
power
is
getting
low.
Do
either
of
the
following:
v
Connect
the
AC
adapter
to
the
computer
and
plug
it
into
an
electrical
outlet.
v
Replace
the
battery
with
a
fully
charged
one.
Problem:
While
operating
with
the
battery,
the
computer
does
not
return
from
standby
mode,
or
the
standby
indicator
stays
on
and
the
computer
does
not
work.
Solution:
The
system
may
have
entered
standby
or
hibernation
mode
automatically
because
the
battery
is
depleted.
1.
Connect
the
AC
adapter
to
the
computer.
2.
If
the
standby
indicator
is
on,
press
any
key.
If
the
standby
indicator
is
off,
press
the
power
button
to
resume
operation.
3.
If
you
press
Fn
or
the
power
button,
and
the
system
does
not
return
from
standby
or
hibernation
mode,
the
computer
stops
responding
and
cannot
be
turned
off:
a.
Turn
off
the
computer
by
pressing
and
holding
the
power
button
for
4
seconds
or
more.
Unsaved
data
may
be
lost.
b.
If
the
computer
still
does
not
respond,
remove
and
reinstall
the
AC
adapter
and
the
battery.
50
Lenovo
®
IdeaPad
™
S9e
and
S10e
User
Guide
Содержание S10e - IdeaPad 4187 - Atom 1.6 GHz
Страница 1: ...Lenovo IdeaPad S9e and S10e User Guide ...
Страница 8: ...viii Lenovo IdeaPad S9e and S10e User Guide ...
Страница 44: ...36 Lenovo IdeaPad S9e and S10e User Guide ...
Страница 66: ...58 Lenovo IdeaPad S9e and S10e User Guide ...
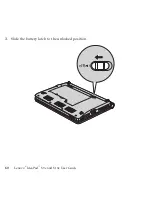
Страница 68: ...3 Slide the battery latch to the unlocked position 1 1 60 Lenovo IdeaPad S9e and S10e User Guide ...
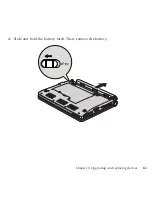
Страница 69: ...4 Slide and hold the battery latch Then remove the battery 2 Chapter 5 Upgrading and replacing devices 61 ...
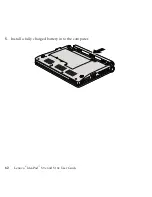
Страница 70: ...5 Install a fully charged battery into the computer 62 Lenovo IdeaPad S9e and S10e User Guide ...
Страница 74: ...5 Slide the HDD in the direction of the arrow 66 Lenovo IdeaPad S9e and S10e User Guide ...
Страница 75: ...6 Remove the HDD by pulling out the tab Chapter 5 Upgrading and replacing devices 67 ...
Страница 76: ...7 Align the HDD as shown in the drawing then put it gently in place 68 Lenovo IdeaPad S9e and S10e User Guide ...
Страница 77: ...8 Slide the HDD in the direction of the arrow Chapter 5 Upgrading and replacing devices 69 ...
Страница 82: ...1 2 1 2 74 Lenovo IdeaPad S9e and S10e User Guide ...
Страница 126: ...118 Lenovo IdeaPad S9e and S10e User Guide ...
Страница 144: ...136 Lenovo IdeaPad S9e and S10e User Guide ...
Страница 146: ...138 Lenovo IdeaPad S9e and S10e User Guide ...
Страница 166: ...158 Lenovo IdeaPad S9e and S10e User Guide ...
Страница 174: ...166 Lenovo IdeaPad S9e and S10e User Guide ...
Страница 175: ......
Страница 176: ......

