Diagnosing
problems
using
PC-Doctor
for
DOS
The
PC-Doctor
for
DOS
diagnostic
program
runs
independently
of
the
Windows
operating
system.
Use
PC-Doctor
for
DOS,
if
you
are
unable
to
start
the
Windows
operating
system
or
if
PC-Doctor
for
Windows
has
not
been
successful
in
isolating
a
possible
problem.
You
can
run
PC-Doctor
for
DOS
from
a
diagnostic
CD/DVD
image.
Creating
a
diagnostic
CD/DVD
image
To
create
a
diagnostic
CD/DVD
image,
download
a
self-starting
bootable
CD/DVD
image
(known
as
an
.iso
image)
of
the
diagnostic
program
from
http://
www.lenovo.com/support.
After
you
download
the
image,
you
can
create
the
CD/DVD
using
any
CD/DVD
burning
software.
Running
diagnostics
from
the
CD/DVD
To
run
diagnostics
from
the
diagnostic
CD/DVD
image
that
you
created,
use
the
following
procedure:
1.
Make
sure
your
computer
is
turned
off.
2.
Insert
the
CD/DVD
into
the
optical
drive.
3.
Restart
the
computer.
Note:
If
the
diagnostic
program
does
not
start,
the
optical
drive
has
not
been
set
as
a
bootable
device.
Press
F12
to
choose
boot
item
at
startup.
4.
When
the
diagnostics
program
opens,
follow
the
instructions
on
the
screen.
5.
Select
the
diagnostic
test
you
want
to
run.
Press
F1
for
additional
help.
6.
When
the
program
finishes,
remove
the
CD/DVD
from
the
drive.
46
Lenovo
®
IdeaPad
™
S9e
and
S10e
User
Guide
Содержание S10e - IdeaPad 4187 - Atom 1.6 GHz
Страница 1: ...Lenovo IdeaPad S9e and S10e User Guide ...
Страница 8: ...viii Lenovo IdeaPad S9e and S10e User Guide ...
Страница 44: ...36 Lenovo IdeaPad S9e and S10e User Guide ...
Страница 66: ...58 Lenovo IdeaPad S9e and S10e User Guide ...
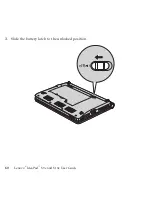
Страница 68: ...3 Slide the battery latch to the unlocked position 1 1 60 Lenovo IdeaPad S9e and S10e User Guide ...
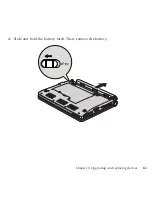
Страница 69: ...4 Slide and hold the battery latch Then remove the battery 2 Chapter 5 Upgrading and replacing devices 61 ...
Страница 70: ...5 Install a fully charged battery into the computer 62 Lenovo IdeaPad S9e and S10e User Guide ...
Страница 74: ...5 Slide the HDD in the direction of the arrow 66 Lenovo IdeaPad S9e and S10e User Guide ...
Страница 75: ...6 Remove the HDD by pulling out the tab Chapter 5 Upgrading and replacing devices 67 ...
Страница 76: ...7 Align the HDD as shown in the drawing then put it gently in place 68 Lenovo IdeaPad S9e and S10e User Guide ...
Страница 77: ...8 Slide the HDD in the direction of the arrow Chapter 5 Upgrading and replacing devices 69 ...
Страница 82: ...1 2 1 2 74 Lenovo IdeaPad S9e and S10e User Guide ...
Страница 126: ...118 Lenovo IdeaPad S9e and S10e User Guide ...
Страница 144: ...136 Lenovo IdeaPad S9e and S10e User Guide ...
Страница 146: ...138 Lenovo IdeaPad S9e and S10e User Guide ...
Страница 166: ...158 Lenovo IdeaPad S9e and S10e User Guide ...
Страница 174: ...166 Lenovo IdeaPad S9e and S10e User Guide ...
Страница 175: ......
Страница 176: ......

