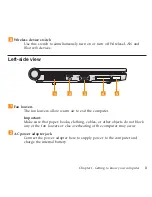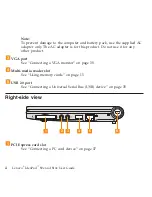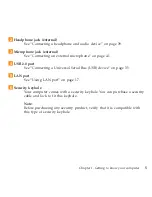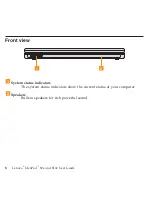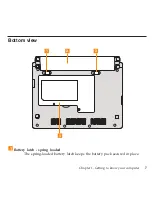
When
you
insert
a
battery
pack,
this
latch
automatically
secures
the
battery
in
place.
To
remove
the
battery,
hold
this
latch
in
the
unlocked
position.
2
Battery
pack
See
“Handling
the
battery”
on
page
30.
3
Battery
latch
-
manual
The
manual
battery
latch
is
used
to
keep
the
battery
pack
secured.
Move
the
manual
battery
latch
to
the
unlocked
position
to
insert
or
remove
the
battery
pack.
Move
the
manual
latch
to
the
locked
position
after
inserting
the
battery
pack.
4
Hard
disk
drive/memory
(RAM)
compartment
v
Hard
disk
drive
The
hard
disk
drive
is
secured
in
a
compartment.
Important:
Do
not
disassemble
the
hard
disk
drive
by
yourself.
If
you
do
need
to,
ask
a
Lenovo
authorized
service
center
or
dealer
to
disassemble
it.
v
Memory
(RAM)
compartment
The
memory
compartment
provides
expansion
capabilities
for
additional
memory.
The
BIOS
automatically
detects
the
amount
of
memory
in
the
system
and
configures
CMOS
accordingly
during
the
Power-On
Self-Test
(POST)
process.
There
is
no
hardware
or
software
(including
BIOS)
setup
required
after
the
memory
is
installed.
Note:
Only
purchase
expansion
modules
from
authorized
retailers
of
this
computer
to
ensure
maximum
compatibility
and
reliability.
8
Lenovo
®
IdeaPad
™
S9e
and
S10e
User
Guide
Содержание S10e - IdeaPad 4187 - Atom 1.6 GHz
Страница 1: ...Lenovo IdeaPad S9e and S10e User Guide ...
Страница 8: ...viii Lenovo IdeaPad S9e and S10e User Guide ...
Страница 44: ...36 Lenovo IdeaPad S9e and S10e User Guide ...
Страница 66: ...58 Lenovo IdeaPad S9e and S10e User Guide ...
Страница 68: ...3 Slide the battery latch to the unlocked position 1 1 60 Lenovo IdeaPad S9e and S10e User Guide ...
Страница 69: ...4 Slide and hold the battery latch Then remove the battery 2 Chapter 5 Upgrading and replacing devices 61 ...
Страница 70: ...5 Install a fully charged battery into the computer 62 Lenovo IdeaPad S9e and S10e User Guide ...
Страница 74: ...5 Slide the HDD in the direction of the arrow 66 Lenovo IdeaPad S9e and S10e User Guide ...
Страница 75: ...6 Remove the HDD by pulling out the tab Chapter 5 Upgrading and replacing devices 67 ...
Страница 76: ...7 Align the HDD as shown in the drawing then put it gently in place 68 Lenovo IdeaPad S9e and S10e User Guide ...
Страница 77: ...8 Slide the HDD in the direction of the arrow Chapter 5 Upgrading and replacing devices 69 ...
Страница 82: ...1 2 1 2 74 Lenovo IdeaPad S9e and S10e User Guide ...
Страница 126: ...118 Lenovo IdeaPad S9e and S10e User Guide ...
Страница 144: ...136 Lenovo IdeaPad S9e and S10e User Guide ...
Страница 146: ...138 Lenovo IdeaPad S9e and S10e User Guide ...
Страница 166: ...158 Lenovo IdeaPad S9e and S10e User Guide ...
Страница 174: ...166 Lenovo IdeaPad S9e and S10e User Guide ...
Страница 175: ......
Страница 176: ......

