


8.
Press
Enter
once
to
move
to
the
Confirm
New
Password
field.
Retype
the
password
you
just
entered
to
verify
it.
9.
Commit
any
password
to
memory,
and
press
Enter
.
10.
Press
F10
to
exit.
11.
Select
Yes
in
the
Setup
Confirmation
window.
The
next
time
you
turn
on
your
computer,
you
will
have
to
enter
the
HDD
user
or
master
password
to
get
access
to
your
operating
system.
Changing
or
Removing
the
Hard
Disk
Password
To
change
the
HDD
master
password,
do
the
following:
1.
Select
Change
Master
Password
,
and
press
Enter
.
The
Change
Master
Password
window
opens.
2.
Type
correct
password
in
the
Enter
Current
Password
field.
Then
press
Enter
once
to
move
to
the
Enter
New
Password
field,
type
a
new
master
password
in.
3.
Press
Enter
once
to
move
to
the
Confirm
New
Password
field.
Retype
the
password
you
just
entered
to
verify
it.
4.
Commit
your
password
to
memory,
and
press
Enter
.
To
change
the
HDD
user
password,
do
the
following:
1.
Select
Change
User
Password
,
and
press
Enter
.
The
Change
User
Password
window
opens.
2.
Type
correct
password
in
the
Enter
Current
Password
field.
Then
press
Enter
once
to
move
to
the
Enter
New
Password
field,
type
a
new
user
password
in.
3.
Press
Enter
once
to
move
to
the
Confirm
New
Password
field.
Retype
the
password
you
just
entered
to
verify
it.
24
Lenovo
®
IdeaPad
™
S9e
and
S10e
User
Guide
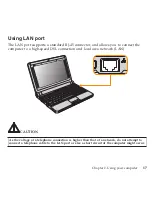
Содержание S10e - IdeaPad 4187 - Atom 1.6 GHz
Страница 1: ...Lenovo IdeaPad S9e and S10e User Guide ...
Страница 8: ...viii Lenovo IdeaPad S9e and S10e User Guide ...
Страница 44: ...36 Lenovo IdeaPad S9e and S10e User Guide ...
Страница 66: ...58 Lenovo IdeaPad S9e and S10e User Guide ...
Страница 68: ...3 Slide the battery latch to the unlocked position 1 1 60 Lenovo IdeaPad S9e and S10e User Guide ...
Страница 69: ...4 Slide and hold the battery latch Then remove the battery 2 Chapter 5 Upgrading and replacing devices 61 ...
Страница 70: ...5 Install a fully charged battery into the computer 62 Lenovo IdeaPad S9e and S10e User Guide ...
Страница 74: ...5 Slide the HDD in the direction of the arrow 66 Lenovo IdeaPad S9e and S10e User Guide ...
Страница 75: ...6 Remove the HDD by pulling out the tab Chapter 5 Upgrading and replacing devices 67 ...
Страница 76: ...7 Align the HDD as shown in the drawing then put it gently in place 68 Lenovo IdeaPad S9e and S10e User Guide ...
Страница 77: ...8 Slide the HDD in the direction of the arrow Chapter 5 Upgrading and replacing devices 69 ...
Страница 82: ...1 2 1 2 74 Lenovo IdeaPad S9e and S10e User Guide ...
Страница 126: ...118 Lenovo IdeaPad S9e and S10e User Guide ...
Страница 144: ...136 Lenovo IdeaPad S9e and S10e User Guide ...
Страница 146: ...138 Lenovo IdeaPad S9e and S10e User Guide ...
Страница 166: ...158 Lenovo IdeaPad S9e and S10e User Guide ...
Страница 174: ...166 Lenovo IdeaPad S9e and S10e User Guide ...
Страница 175: ......
Страница 176: ......


