Disk P0: File 0–2: Save
695
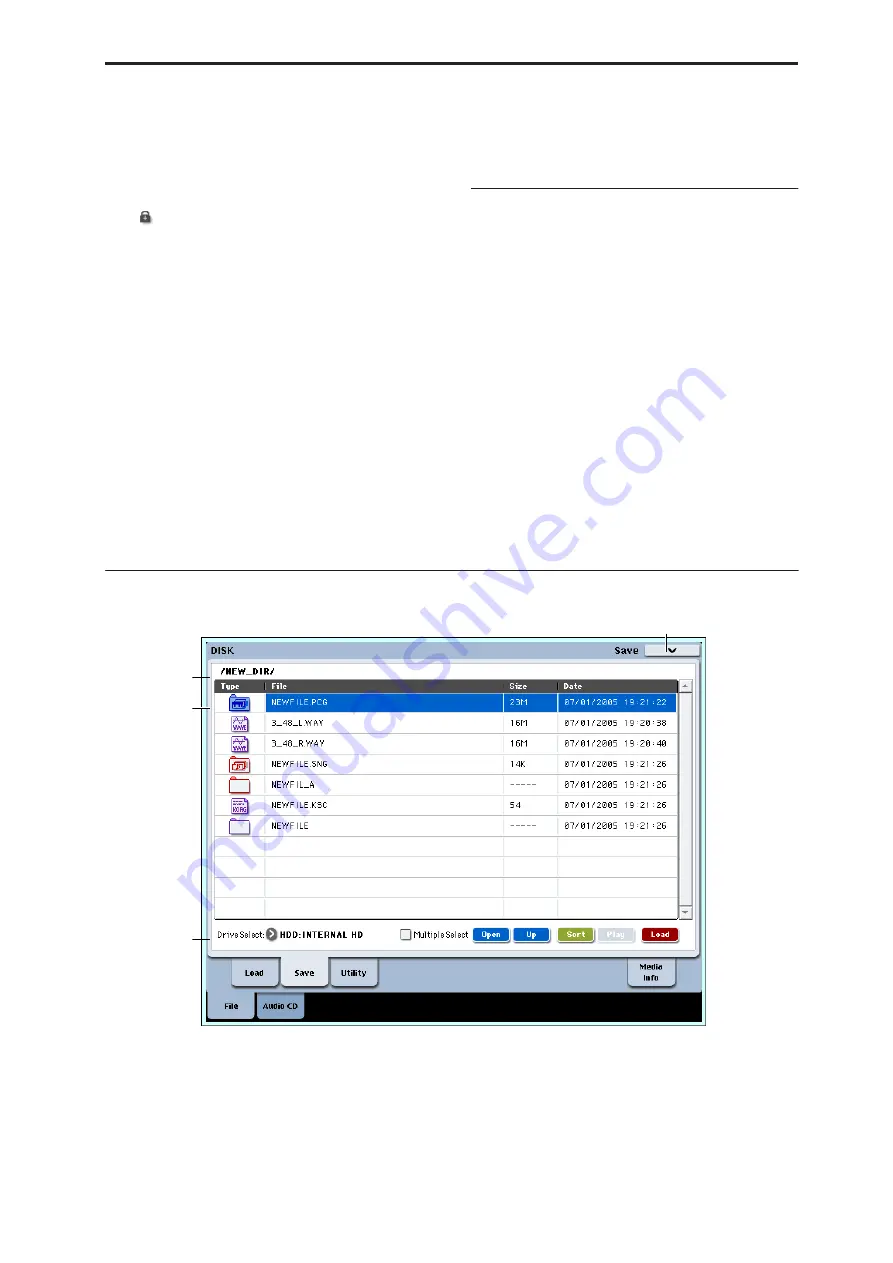
Type
This icon indicates the type of file.
For details on how the icons correspond to the
different file types, refer to the diagram “Files that can
be loaded” on page 692.
Lock [Off,
On]
Files and directories with this symbol are locked, and
cannot be overwritten, copied, or deleted. Use the
“Lock/Unlock” page menu command to lock or
unlock a file or directory.
File
When the menu command
Translation
is off (not
checked), this will show the low-level DOS file names.
When
Translation
is on (checked), you’ll see the full
names of the Multisample and Sample files (.KMP and
.KSF), instead of the abbreviated DOS names.
Size
This is the size of the file, in bytes.
Date
This is the date and time at which the file was saved.
From the left, this is the year, month, day, hour, minute,
and second.
To set the current date and time for the OASYS system,
use the Utility page menu command
Set Date/Time
.
For more information, see “Set Date/Time” on
page 723.
▼
0–1: Page Menu Commands
The number before each command shows its ENTER +
number-key shortcut. For more information on these
shortcuts, see “ENTER + 0-9: shortcuts for menu
commands” on page 138.
• 0:
Hide unknown
fi
les
. For more information, see
“Hide unknown files” on page 703.
• 1:
Translation
. For more information, see
• 2:
Lock/Unlock selected
. For more information, see
“Lock/Unlock selected” on page 703.
• 3:
Load selected
. For more information, see “Load
• 4:
Load PCG (RAM) and Samples
. For more
information, see “Load PCG (RAM) and Samples”
on page 715.
0–2: Save
Here you can save data from internal memory to
internal or external disks, CD-R/RW, flash media, etc.
Use the Open button and Up button to move to the
desired directory (i.e., change the current directory),
and then select the desired page menu command.
When you execute a Save operation, the data will be
saved in the same level of the disk hierarchy as the files
that are displayed.
Mounting USB devices
Before you can load from or save to a USB device, such
as hard drives or flash media, you need to mount the
device. To do so:
1. Go to the Media Info page.
2. Select the Scan device command from the page
menu.
0–1c
0–1b
0–1a
0–2PMC
Содержание Electronic Keyboard
Страница 1: ...Parameter Guide Parameter Guide ...
Страница 2: ......
Страница 180: ...Program mode EXi 170 ...
Страница 290: ...EXi STR 1 Plucked String 280 ...
Страница 572: ...Sequencer mode 562 ...
Страница 700: ...Global mode 690 ...
Страница 751: ...Insert Effects IFX1 IFX12 Routing 741 Fig 2 3a Fig 2 3b ...
Страница 902: ...Effect Guide 892 ...


