background image

KARMA GE guide

952

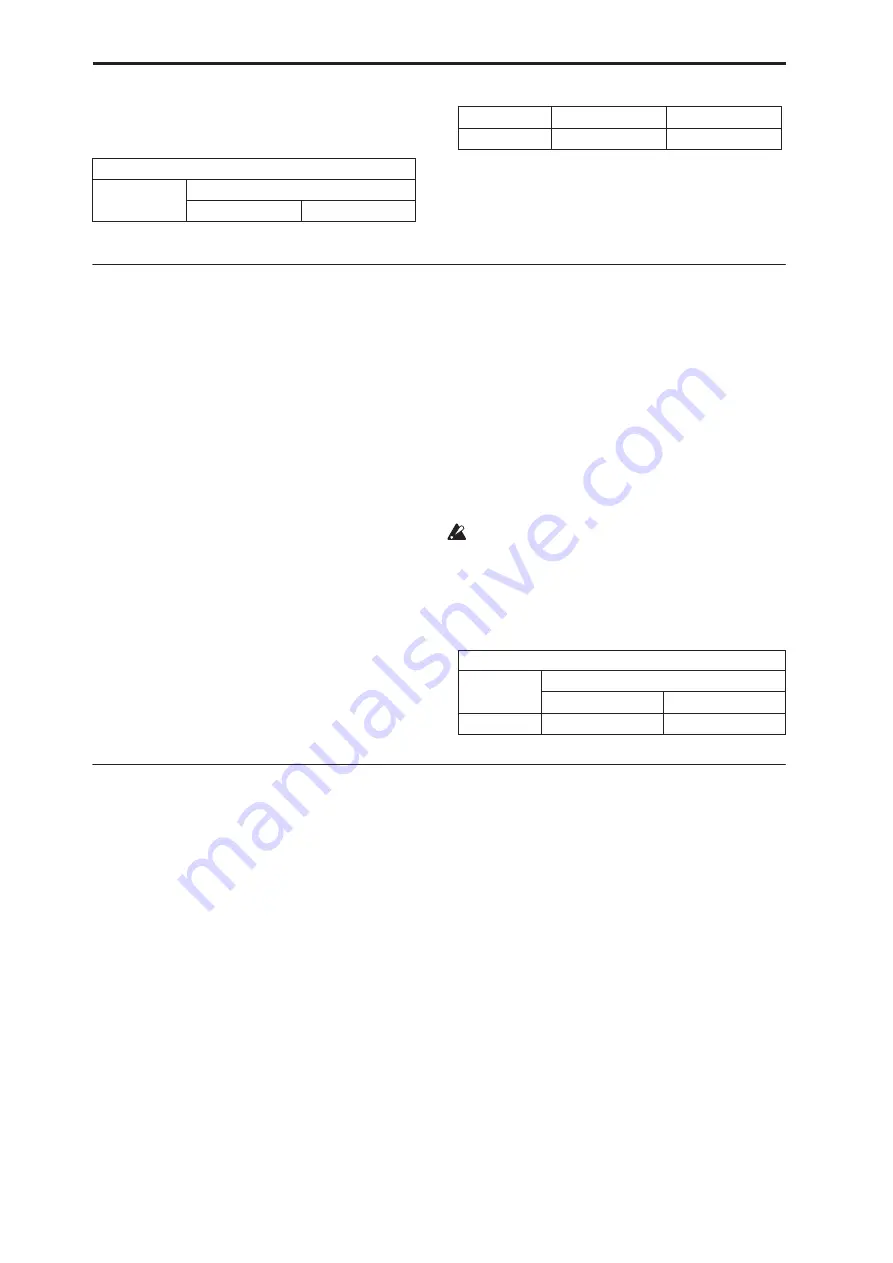
The following table summarizes the effect of the 
various Weighting Curves and the Factor field on 
Drum Sound choices:

Random Weighting Parameters– Rests

The Random Weighting Parameters - Rests are made 
available when at least one column in the grid has a 
rest and at least one other Drum Sound turned on. This 
will happen with either the 

1: pool

 or 

2: poly

 selected, 

since you can have random rests in both modes; they 
just operate differently (see the description under 
“Pools/Poly,” below).

Whenever this step is encountered in playing through 
the pattern and a random choice must be made, the 
likelihood of a rest occurring can be favored by the use 
of a separate weighting curve.

Rests-Random Factor

[–99…+99]

Controls the degree of slope to the Weighting Curve. 

0


a Linear Curve

 with any Weighting Curve. Negative 

values not only invert but rotate the curve. For 
examples, see “Random Weighting Curves” on 
page 961.

Rests-Weighting Curve

[0, 1]

2 different shapes are available, which affect the 
likelihood of a rest occurring when a random choice is 
made. For more information, see “Random Weighting 
Curves” on page 961.

0: Exponential

With a positive 

Factor (+)

, choices will be 

exponentially weighted towards the Drum 
Sounds/Notes more often. With a negative 

Factor (-)

choices will be exponentially weighted towards the 
rests more often.

1: Logarithmic 

With a positive 

Factor (+)

, choices will be 

logarithmically weighted towards the Drum 
Sounds/Notes more often. With a negative 

Factor (-)

choices will be logarithmically weighted towards the 
rests more often.

A Factor of 

0

 with any shaped curve yields a linear 

table (straight diagonal line), and each of the values 
in the pool will have an equal chance of getting 
chosen.

The following table summarizes the effect of the 
various Weighting Curves and the Factor field on 
random rests:

Associated Parameters

Pools/Poly

[0, 1]

Chooses one of 2 modes of operation for the entire grid 
when columns contain more than one Drum Sound 
and/or a rest.

0: Poly

If there is more than one Drum Sound selected in a 
column (and no rest), then all of the Drum Sounds at 
that step will be played; if you had a kick, snare, and 
hi-hat in the same column, all 3 would be played when 
that step was reached. This is the typical operation of 
most grid-based rhythm pattern software. However, if 
a rest is also selected, then there will be a random 
possibility of a rest or a Drum Sound for each of the 
Drum Sounds; in other words, if you had a kick, snare, 
hi-hat and rest in the same column, for each of the 3 
Drum Sounds a choice between the sound and the rest 
would be made (subject to the Random Rest Weighting 
Curve described previously). This would result in one 
of 8 possible combinations:

1: Pools

If there is more than one Drum Sound selected in a 
column, then those sounds form a “pool” of choices 
from which only one will be chosen at random. If a rest 
is also selected, then there will be a possibility of a rest 
or only one of the Drum Sounds. For example, if you 
had a kick, snare, hi-hat and rest in the same column, 
there would first be a choice of one of the 3 Drum 
Sounds (subject to the Random Pool Weighting Curve 
described previously), then a choice as to whether to 
play the single chosen Drum Sound or a rest (subject to 
the separate Random Rest Weighting Curve described 
previously). This would result in one 4 possible 
choices:

Drum Pool values that receive priority:

Weighting 
Curve

Factor

+ (positive)

– (negative)

Exp/Log

higher in grid

lower in grid

Exp-S/Log-S

middle

higher/lower

0: Exponential

1: Logarithmic

Values that receive priority:

Weighting 
Curve

Factor

+ (positive)

– (negative)

Exp/Log

less rests

more rests

0: Poly

1: Pools

kick, snare, hi-hat

kick, snare, hi-hat

(rest), snare, hi-hat

snare, hi-hat

kick, (rest), hi-hat

kick, hi-hat

kick, snare, (rest)

kick, snare

(rest), snare, (rest)

snare

(rest), (rest), hi-hat

hi-hat

kick, (rest), (rest)

kick

(rest), (rest), (rest)

rest (nothing)

kick

Содержание Electronic Keyboard

Страница 1: ...Parameter Guide Parameter Guide ...

Страница 2: ......

Страница 3: ... GE Setup Key Zones 98 7 2 MIDI Filter CC Offset 100 7 3 Module Parameters Control 103 7 4 Module Parameters Trigger 108 7 5 GE Real Time Parameters 110 7 6 Perf Real Time Parameters 112 7 7 Dynamic MIDI 116 7 8 Random Seeds 118 7 9 Name Note Map 121 Program P8 Insert Effect 123 8 1 Routing 123 8 5 Insert FX 126 8 6 Track View 129 8 7 IFX 1 12 130 8 9 Common FX LFO 132 Program P9 Master Total Effe...

Страница 4: ...31 Tone Adjust 232 Changes from the original CX 3 233 EXi CX 3 Page Menu Commands 234 EXi STR 1 Plucked String 235 STR 1 Overview 235 EXi Program P0 Play 237 0 1 Main 237 Program P4 String 239 4 1 Pluck and Noise 239 4 2 PCM Oscillator 241 4 3 PCM Oscillator Pitch 243 4 4 Excitation Mixer 246 4 5 String Main 248 4 6 Damping and Dispersion 252 4 7 String Pitch 254 4 8 Pickups and Feedback 256 4 9 M...

Страница 5: ...8 Combination P2 Timbre Parameters 360 2 1 MIDI 360 2 2 OSC 361 2 3 Pitch 363 2 4 Delay 364 2 5 Wave Sequence KARMA 365 2 6 EXi Audio Input 367 Combination P3 MIDI Filter Zones 368 3 1 MIDI Filter1 368 3 2 MIDI Filter2 369 3 3 MIDI Filter3 370 3 5 Keyboard Zones 371 3 6 Velocity Zones 373 Combination P7 KARMA 375 7 1 GE Setup Key Zones 375 7 2 MIDI Filter CC Offset 379 7 3 Module Parameters Contro...

Страница 6: ...FO 520 Sequencer P9 Master Total Effect 521 9 1 Routing 521 9 2 MFX1 522 9 3 MFX2 523 9 4 TFX1 523 9 5 TFX2 523 Sequencer Page Menu Commands 524 System Exclusive events supported in Sequencer mode 560 Sampling mode 563 Sampling Overview 563 Sampling to RAM or direct to disk 563 Sampling features 563 Sampling P0 Recording 567 0 1 Recording 567 0 8 Audio Input 573 0 9 Control Surface 579 Sampling P1...

Страница 7: ... 008 Stereo Mastering Limiter 770 009 Stereo Gate 771 010 Stereo Noise Reduction 772 EQ and Filters 773 011 Stereo Parametric 4EQ 773 012 Stereo Graphic 7EQ 774 013 Stereo Master 3EQ 774 014 Stereo Exciter Enhncr 775 015 Stereo Isolator 775 016 Stereo Wah Auto Wah 776 017 St Vintage Custom Wah 777 018 Stereo Random Filter 778 019 Multi Mode Filter 780 020 Stereo Sub Oscillator 781 021 Talking Modu...

Страница 8: ...Dens 852 Mono Mono Serial 854 109 P4EQ Exciter 854 110 P4EQ Wah 854 111 P4EQ Chorus Flanger 855 112 P4EQ Phaser 856 113 P4EQ Multitap Delay 857 114 Comp Wah 858 115 Comp Amp Sim 858 116 Comp OD HiGain 859 117 Comp P4EQ 860 118 Comp Chorus Flanger 860 119 Comp Phaser 861 120 Comp Multitap Delay 862 121 Limiter P4EQ 863 122 Limiter Chorus Flanger 863 123 Limiter Phaser 864 124 Limiter Multitap Delay...

Страница 9: ...rs 916 Index Group 917 Overview 917 About Index Patterns 917 Pattern Grid Associated Parameters 917 Associated Parameters 917 Random Weighting Parameters 918 Associated Parameters 918 Cluster Group 921 Overview 921 About Cluster Patterns 921 Pattern Grid Associated Parameters 921 Random Weighting Parameters 922 Associated Parameters 922 Velocity Group 923 Overview 923 About Velocity Patterns 923 G...

Страница 10: ...n 1029 AIFF and WAVE format details importing 1029 AIFF and WAVE format details exporting 1029 About KORG format files 1030 CD R RW disks on the OASYS UDF and packet writing 1033 Option boards Memory Calendar battery 1035 Installing an option board memory calendar battery 1037 EXB DI option 1041 Updating the system 1042 Using the included Restore CDs to restore the system and factory sounds 1043 V...

Страница 11: ...its and crossfades including two way layers Wave Sequencing for creating rhythmic patterns or complex evolving timbres Vector Synthesis Dual multi mode resonant filters Drive and Low Boost for adding per voice grit girth and distortion Three envelopes two LFOs and two AMS Mixers per OSC plus a common LFO Vector envelope and KARMA for the Program as a whole Two complex key tracking generators per O...

Страница 12: ... touch a parameter and you ll jump to the corresponding edit page Tip Wherever you are in the Program mode pages pressing EXIT three times or fewer will take you back to this page and select the Program name You can then immediately use the numeric keys or switches to select a different Program For instance if you re on any page other than P0 Play Press it once to go to the previously selected tab...

Страница 13: ...lue dial You can also change Programs via MIDI Program Change message or by pressing a footswitch For more information see Foot Switch Assignments on page 981 Standard Programs are numbered from 0 to 127 while GM Programs use the range from 1 to 128 as per the GM specification Note On this page only the VALUE slider functions as a modulation source which means that you can t use it to select Progr...

Страница 14: ... Category popup button and the Category Program Select menu will appear as described below Category Program Select 1 Press the Category popup button above the Program Select parameter to open the Category Program Select menu 2 Press one of the tabs on the left to select the desired category If no Programs are assigned to a particular category or sub category you won t be able to select its tab 3 P...

Страница 15: ...equences and their velocity ranges filter settings EGs and LFOs and so on The graphics give you a quick way to check all of these settings at a glance They also let you jump instantly to any of the displayed parameters Just touch one of the graphics and you ll jump to the page containing its parameters For instance if you touch the Filter EG graphic you ll go to the Filter EG page OSC1 OSC1 Multis...

Страница 16: ...to jump to the Program P9 Routing page KARMA This shows the name of the selected KARMA GE Touch this area to jump to the Program P7 GE Setup Key Zones page 0 1 Page Menu Commands The number before each command shows its ENTER number key shortcut For more information on these shortcuts see ENTER 0 9 shortcuts for menu commands on page 138 0 Write Program For more information see Write Program on pa...

Страница 17: ...r and scene settings will be initialized the same as if you ve selected Clear RTC Setup On Normally you will leave this on Off unchecked The current KARMA controller assignments and values will be preserved as much as possible For example you might select a drum pattern GE with this setting turned On checked edit some of the KARMA Scene settings appropriately for that GE and then turn this Off unc...

Страница 18: ...ge 194 of the Operation Guide KARMA Module Info Chord Name This shows the name of the chord detected by the KARMA Module Note Chord detection is affected by the following parameters The KARMA module s Key Zone See Key Zone on page 99 The KARMA module s Transpose See Transpose on page 103 The Destination Dynamic MIDI Destination See Destination on page 117 The Chord Scan and Smart Scan settings KAR...

Страница 19: ...slider head and adjusting the value with the Value Slider the Up Down Keys the Value Dial etc KARMA SLIDER 1 Stored Value This shows the setting of Slider 1 that is written into the program KARMA SLIDER 1 Name This shows the name of KARMA SLIDER 1 You can assign this name in Program 7 9 Name Map 0 6 Page Menu Commands The number before each command shows its ENTER number key shortcut For more info...

Страница 20: ... indicate the functions assigned to SW1 and 2 Knobs 5 8 Assignment These indicate the functions assigned to knobs 5 8 See 1 8 Set Up Controllers on page 45 0 7c Effects IFX1 12 MFX1 2 TFX1 2 Effect This area shows the effect assigned to each insert effect master effect and total effect and its on off status FX Balance IFX 10 0 10 This controls the Wet Dry balance of all insert effects A setting of...

Страница 21: ... control surface to adjust Audio Input You can use the control surface to adjust most of the Audio Input mixer parameters including Play Mute Solo Pan Level and Sends 1 and 2 For more information see 0 9c Audio Inputs on page 22 and Adjusting volume Pan EQ and FX sends on page 52 of the Operation Guide 0 8a Audio Input Use Global setting Off On Programs can use the single Global audio input mixer ...

Страница 22: ... the specified REC bus The Pan setting is ignored and the signal is sent in monaural 1 2 3 4 The external audio input signal will be sent in stereo to the specified pair of REC busses The Pan setting sends the signal in stereo to busses 1 and 2 or busses 3 and 4 Send1 to MFX1 000 127 Send2 to MFX2 000 127 These adjust the levels at which the external audio input signal is sent to the master effect...

Страница 23: ...hole and is not saved independently with each Program Level Meter This shows the signal level at the final stage of sampling after any adjustments on the Audio Inputs page any effects etc The meter is active only during standby mode and recording CLIP If 0 dB is exceeded the display will indicate CLIP This means that the level of the sampling signal is too high in this case adjust the Recording Le...

Страница 24: ... sample the signal heard at the main L R outputs including any processing by TFX 1 2 This is the default setting For more information see the diagram Source Bus L R on page 14 REC1 2 REC3 4 These let you sample the signals sent to the REC 1 2 or REC 3 4 busses Using the REC busses you can isolate one or more sounds for recording or sampling even if the sounds are also being mixed into the main out...

Страница 25: ...L R or IFX1 12 Level Pan Insert Effects OSC Audio Input 1 Audio Input 2 Source Bus Audio Input 1 2 x Source Direct Solo Total Effects Master Effects Sampling Monitor L Mono R Mono Stereo Level Pan Insert Effects CLIP L MONO R AUDIO OUTPUT HEADPHONES Insert Effects L R Bus REC 1 2 REC 3 4 Indiv 1 2 3 4 5 6 7 8 Bus L R or IFX1 12 Level Pan Insert Effects OSC S P DIF L S P DIF R Source Bus S P DIF L ...

Страница 26: ...conversion to a program Note The amount of RAM available for user sampling is shown by Free Sample Memory Locations Sampling 0 1f The amount of RAM available for user sampling will vary depending upon both the amount of physical RAM installed and the size of the currently loaded EXs banks For more information see Sampling and RAM on page 563 Data written into RAM memory will be lost when the power...

Страница 27: ...d volume of the metronome as set up in by Metronome Precount 0 2c The metronome is available only if Trigger is set to Sampling START SW Bus Output Select L R L R 1 8 This sets the audio output for the metronome sound L R The metronome will be hear d in the main stereo outputs L Mono and R the S P DIF output and the headphones 1 8 The metronome will be heard only in the selected individual output ...

Страница 28: ... Global mode Local Control setting is important If Local Control is On the physical Control Surface will work properly as long as MIDI is not being looped back into the OASYS If Local Control is Off you must loop back MIDI into the OASYS in order for the physical Control Surface to work properly Regardless of the Local Control setting you can always edit Control Surface parameters via the touch sc...

Страница 29: ...you d like parameter edits to be smooth and always move from the current value Reset Controls The front panel RESET CONTROLS button lets you recall the stored settings for any slider knob or switch on the control surface You can also use it to reset the Vector Joystick to the center position or to reset all of the parameters in the current KARMA Module Resetting a single control To reset a single ...

Страница 30: ...ned On then none of the EQ parameters here will have any effect LOW EQ 18 00 18 00dB This controls the gain of the 80Hz Low Shelf EQ in increments of 0 5dB MID FREQ 100Hz 10 00kHz This sets the center frequency for the Mid sweep EQ MID GAIN 18 00 18 00dB This controls the gain of the Mid Sweep EQ in increments of 0 5dB HIGH EQ 18 00 18 00dB This controls the gain of the 10kHz High Shelf EQ in incr...

Страница 31: ...er also affects the way that Solo works When Exclusive Solo is Off unchecked you can solo multiple oscillators and inputs at once When Exclusive Solo is On checked only one oscillator or input can be soloed at a time In this mode pressing a Solo switch automatically disables any previous solos You can also toggle Exclusive Solo by holding ENTER and pressing 1 on the numeric keypad OSC1 Select Solo...

Страница 32: ... settings or effects processing for particular inputs In this case set Use Edit Global Setup to Off and the audio inputs will use the Program s custom settings Mixer Knobs Channel Strip Individual Pan This switch controls whether the knobs show the pan settings for all 6 inputs at once Individual Pan or the pan and FX Send levels for the selected input Channel Strip For more information please see...

Страница 33: ... and off to remind you that solo is in use Note The main Solo button merely changes the functions of the Select Solo switches It does not enable or clear the individual solo states For more information see Clearing all solos on page 21 and Exclusive Solo menu parameter on page 21 Select Solo 1 6 Off On This switch either selects or solos the input depending on the Solo switch setting For more deta...

Страница 34: ...ent value of the knob s MIDI CC Switches 1 16 MIDI Channel 1 16 01 16 Gch This read only parameter shows the MIDI Channel for the switch Each can send on a different channel if desired Gch means that the slider will transmit on the Global MIDI Channel as set in Global mode CC Assign 1 16 Off 000 119 This read only parameter shows the MIDI CC sent by the switch Switch Off On 1 16 Off On When the sw...

Страница 35: ...responding MIDI CC Also when the CC is received via MIDI or generated by KARMA the knob value changes to match the CC value Unless otherwise noted scaling means that the parameters are at their programmed values when the controller is at 64 at their minimum when the controller is at 0 and at their maximum when the controller is at 127 For another look at this see the diagram below CC parameter sca...

Страница 36: ...y At that point all of the Relative parameters are reset to 0 Edits to Absolute parameters are immediately reflected in the corresponding on screen parameters and vice versa Tone Adjust and MIDI SysEx The Tone Adjust sliders knobs and switches all send and receive MIDI System Exclusive messages You can use this to record and play back Tone Adjust edits with a sequencer including the built in seque...

Страница 37: ...arameters work For instance Multisample Min and Max set the minimum and maximum values of the Tone Adjust Multisample parameter Selected parameter information This status line shows detailed read only information about the currently selected Tone Adjust parameter Control Knob1 8 SW1 16 Slider1 8 Slider M This is the physical controller assigned to the Tone Adjust parameter Slider M is the Master S...

Страница 38: ...me direction positive or negative as the original Program For instance if the original Program s EG Intensity was set to 25 then setting the Tone Adjust to 99 moves the EG Intensity to 99 Amp Velocity Intensity 99 99 This scales the effect of velocity on the Amp level 99 removes the velocity modulation entirely 99 means maximum modulation in the same direction positive or negative as the original ...

Страница 39: ...this parameter has no effect For more information please see Detune on page 34 Thickness Off 01 09 Absolute This Absolute parameter sets the pattern of detuning between the Unison voices If Unison is not On or if Detune is set to 0 this parameter has no effect For more information please see Thickness on page 35 Common Step Sequencer Smoothing 00 99 Absolute This Absolute parameter sets amount of ...

Страница 40: ...sy to select between a group of bells or a set of electric basses MS WS DKit Max 0 16383 Meta This Meta parameter sets a maximum value for the MS WS Dkit Select parameter Please see MS WS DKit Min above for more information Start Offset 0 8 Absolute This allows you to change the Start Offset of the Multisample specified by the MS WS Select parameter It applies only when The Program is a Single or ...

Страница 41: ...et Tone Adjust on page 143 2 Copy Scene This is available only when Control Assign is set to RT KNOBS KARMA For more information see Copy Scene on page 147 3 Swap Scene This is available only when Control Assign is set to RT KNOBS KARMA For more information see Swap Scene on page 147 1 switch Reverse 2 switch OSC2 Tune 1 switch Reverse 2 switch OSC2 Tune 9 11 switch Filter Cutoff Filter Resonance ...

Страница 42: ... EGs LFOs and so on Drums mode is a special variation of Single mode and uses a Drum Kit as created in Global mode instead of multisamples Single The Program will use one oscillator for a maximum of 172 note polyphony Double The Program will use two oscillators for a maximum of 84 note polyphony Drums The Program will use one oscillator to play a Drum Kit In this case the program will normally hav...

Страница 43: ...have a smoother sound for more gentle transitions between the notes The Mode parameter below switches between two different Mono Legato effects each of which achieves this smoothness in a different way See the description of that parameter for more details On checked When you play with legato phrasing the notes within a legato phrase will sound smoother according to the setting of the Mode paramet...

Страница 44: ... only when Unison is On Stereo Spread 0 100 Stereo Spread lets you create a wider stereo field when using Unison It applies only when Unison is On This feature separates the different Unison voices into two groups One group is panned to the left and the other to the right At 0 both groups will be in the center at 100 the two groups will be hard panned left and right respectively at intermediate va...

Страница 45: ...th Drum Kits Hold can be especially useful for drum programs since it lets the samples ring out naturally In general when you set the Oscillator Mode to Drums it s good to set Hold to On Once you ve turned on Hold for a drum program the function is controlled on a note by note basis according to settings within the selected Drum Kit If a key s Enable Note Off Receive parameter on the Voice Mixer t...

Страница 46: ...Trigger feature tries to make a good guess at where you intended the note to be If you play the note just a bit late within a 32nd note of the 8th note it will assume that you meant the note to sound on the beat that just passed In this case the note will play immediately On the other hand if you play the note up to three 32nd notes early it will assume that you re intending the note to sound on t...

Страница 47: ...ond Well Tempered tuning dating from the early 18th century Slendro This is an Indonesian gamelan scale with five notes per octave When Key is set to C use the C D F G and A notes Other keys will play the normal equal tempered pitches Pelog This is another Indonesian gamelan scale with seven notes per octave When Key is set to C use the white keys The black keys will play the equal tempered pitche...

Страница 48: ...n example In addition to moving the point directly with the Vector Joystick you can also use the Vector Envelope to move its position automatically over time as shown below Vector Envelope moving the Vector Point Vector Joystick and Vector Envelope You can move the Vector point using the combination of the Vector Joystick and the Vector Envelope The two work together although you don t necessary h...

Страница 49: ...ils see the Vector Control section of Combi mode Enable Volume Control Off On When this box is checked the Vector position will control the volumes of Oscillators 1 and 2 When this box is not checked the Vector position will not directly affect volume However it s still possible for the Vector to control volume via Vector CCs and AMS Equal Power Off On This applies only when Enable Volume Control ...

Страница 50: ...X Mode Positive Negative Xfade Split You can set up the Vector to send out CCs in several different patterns as shown in the graphic below This controls the pattern for the X axis Note that this setting affects only CC Control it has no effect on Volume Control Vector CC Modes Positive sends out only X starting at 0 at the far left and increasing to 127 at the far right X is disabled in this mode ...

Страница 51: ...he Vector Joystick labeled J The transitions between the EG s points are shown by black lines and the loop transition is shown by a gray line Show Volume Image Off On The vector graphic includes an image representing the current Vector Volume Control settings You can use the Show Volume Image check box to toggle this part of the graphic on and off Show Point Vector Joystick Vector Envelope Point 0...

Страница 52: ...rameter applies only to this per note EG When the Key Sync parameter is Off the CC Control and Volume Control EGs are completely synchronized When Key Sync is On each note s Volume Control EG will start at note on and go into release at note off All the notes will still share a single CC Control EG 1 6a Basic Vector Envelope On Off On On checked When this box is checked the Vector EG will work wit...

Страница 53: ...times The Hold Time sets how long the EG lingers at each point and the Transition time sets how long it takes to go from the selected point to the next For instance the graphic below shows the succession of Hold and Transition times when the Loop Type is set to 1 3 For clarity only the Y axis positions are shown Vector EG times Loop Type 1 3 The transition from Point 3 into the loop always uses Po...

Страница 54: ...p You can set this in either seconds milliseconds or rhythmic values depending on whether the Mode is set to Time or Tempo The Time Base Note and Multiplier parameters work just like those for Point 0 as described under Transition on page 44 Point 4 Point 4 is the Vector EG s release destination Its time setting is different from those of the other Points Instead of setting the time it takes to mo...

Страница 55: ...a function to the SW1 switch The on off status can also be memorized When you change the assignment the switch is set to the Off condition For a complete list of the possible assignments please see SW1 2 Assignments on page 979 Mode Toggle Momentary This specifies the mode of on off when the SW1 switch is pressed Toggle The state will alternate between On and Off each time you press the SW1 switch...

Страница 56: ...e notes themselves These settings are stored independently for each Program In addition to playing sounds directly the pads are also used to select chords for Chord mode For more information see Using Chord mode on page 49 of the Operation Guide Assigning notes to the pads You can assign notes to the pads directly from the keyboard and front panel controls without using this page at all Alternativ...

Страница 57: ...ll be recorded as a single chord You can take as long as you like to play the phrase 3 Press the pad to which you d like to assign the notes After pressing the pad you re done Edit notes and velocities using the LCD You can edit the recorded notes and velocities using the on screen parameters If you like you can also enter new notes this way For more information please see Pad 1 above Copying and ...

Страница 58: ...mples and or Wave Sequences for the Oscillator in a Single or Double Program or select the Drum Kit for a Drum Program Set the Oscillator s basic pitch Create velocity splits and crossfades between Multisamples and or Wave Sequences 2 1a OSC1 Frequency Octave 2 32 1 16 0 8 1 4 This sets the basic pitch of the Oscillator in octaves The default is 0 8 The standard octave of a multisample is 0 8 Tran...

Страница 59: ...me MS1 High These are the settings for the first and highest velocity zone If you want to create a simple setup with only a single Multisample or Wave Sequence just set up MS1 as desired and then set the Bottom Velocity to 1 and the Xfade Range to 0 Type Off Multisample Wave Sequence This selects whether MS1 will play a Multisample a Wave Sequence or nothing at all The Type selection affects the c...

Страница 60: ...mono Multisamples in the Bank If the Bank contains stereo multisamples you ll also see the left and right channels as separate mono multisamples with L and R appended to the end of the name If Bank is set to RAM Stereo only the stereo Multisamples will appear However they will still be listed as separate left and right Multisamples Selecting either the left or right channels will select the stereo...

Страница 61: ...se the normal start point Off or to use one of the alternate start points 1st 8th Some ROM and EXs Multisamples may have fewer than 8 pre programmed points in which case only the available points can be selected Start Offsets RAM Multisamples With RAM Multisamples only Off and 1st are available Off uses the normal start point and 1st uses the loop start instead 2nd through 8th will be grayed out B...

Страница 62: ...001 127 This sets the highest velocity at which the Oscillator will sound Note The Top velocity must be greater than the Bottom velocity Bottom 001 127 This sets the lowest velocity at which the Oscillator will sound Entering velocity values from the keyboard You can enter velocity values directly by playing them on the keyboard To do so 1 Select one of the Key parameters 2 Hold down the ENTER key...

Страница 63: ... 3 Swap Oscillators For more information see Swap Oscillator on page 144 4 Sample Parameters For more information see Sample Parameters on page 145 2 2 OSC1 Pitch This page contains all of the settings for Oscillator 1 s pitch modulation For example you can Set up pitch bend from both Joystick X with separate settings for bending up and bending down and the ribbon controller Use Pitch Slope to con...

Страница 64: ...keyboard the pitch will rise if this parameter is set to a positive value or fall if this parameter is set to a negative value 2 2b Pitch EG Intensity 12 00 12 00 This controls the initial effect of the Pitch EG on Oscillators 1 s frequency in half steps before any AMS modulation The Pitch EG s shape can swing all the way from 99 to 99 When the Intensity is set to a positive value positive values ...

Страница 65: ...to Portamento lets the pitch glide smoothly between notes instead of changing abruptly Enable Off On On checked Turns on Portamento so that pitch glides smoothly between notes Off unchecked Turns off Portamento This is the default state Fingered Off On This parameter allows you to control Portamento through your playing style When it s enabled playing legato will turn on Portamento and playing det...

Страница 66: ... shape of the EG For instance you can Create the basic EG shape by setting the levels and times of each segment Control the curvature of each EG segment for subtle control over the sound of the EG Set up complex modulation of EG levels and times Set up an AMS source such as an LFO to restart the EG To control how much effect the EG has on the pitch use the Pitch EG parameters on the Pitch Mod page...

Страница 67: ...value negative levels will make it go down Note that unlike the Filter and Amp EGs the Pitch EG s Sustain Level is always 0 Start 99 99 This sets the initial EG level at note on Attack 99 99 This sets the level at the end of the Attack time Break 99 99 Break short for Break Point sets the level at the end of the Decay time Release 99 99 This sets the level at the end of the Release time Time Highe...

Страница 68: ...ities By using different settings for each of the three levels you can cause both subtle and dramatic changes to the EG shape as shown below Pitch EG Level Modulation Note Once the EG has started a segment between two points that segment can no longer be modulated This includes both the time of the segment and the level reached at the end of the segment For instance if the EG is in the middle of t...

Страница 69: ... at 127 a setting of 8 will make the Attack time almost twice as long and a setting of 8 will cut the Attack time almost in half Decay 99 99 This controls the depth and direction of the AMS modulation for the Decay time Slope 99 99 This controls the depth and direction of the AMS modulation for the Slope time 2 9 Page Menu Commands The number before each command shows its ENTER number key shortcut...

Страница 70: ...levels of each filter including modulation of resonance and output level 3 1a Filter Routing Filter Routing Single Serial Parallel 24dB oct Each oscillator has two filters Filter A and Filter B This parameter controls whether one or both of the filters are used and if both are used it controls how they are connected to each other Single This uses only Filter A as a single 2 pole 12dB octave filter...

Страница 71: ...t can create buzzy or nasal timbres Band Reject This filter type also called a notch filter cuts only the parts of the sound directly around the cutoff frequency Try modulating the cutoff with an LFO to create phaser like effects Filter Types and Cutoff Frequency Bypass Off On This lets you bypass Filter A completely If Bypass is Off Filter A functions normally When Bypass is On Filter A has no ef...

Страница 72: ...etting The resonance level is determined by adding the Resonance and Intensity values Output Level 00 99 This controls the output level of Filter A You can use this to balance the volumes of Filters A and B when the Routing is set to Parallel or to turn down the volume to avoid clipping later in the signal chain AMS Output Level List of AMS Sources This selects a modulation source to control the o...

Страница 73: ...wise the parameters for Filter B will be grayed out 3 2a Keyboard Track Most acoustic instruments get brighter as you play higher pitches At its most basic keyboard tracking re creates this effect by increasing the cutoff frequency of a lowpass filter as you play higher on the keyboard Usually some amount of key tracking is necessary in order to make the timbre consistent across the entire range 3...

Страница 74: ...his controls how much the keyboard tracking will affect Filter B s cutoff frequency Key Low Break C 1 G9 This sets the breakpoint note between the two lower ramps the hinge of the lower door Center C 1 G9 This sets the center of the keyboard tracking the main hinge At this key the keyboard tracking has no effect on the filter cutoff or on any AMS destinations High Break C 1 G9 This sets the breakp...

Страница 75: ...e different ways Set an initial amount of EG modulation using the Intensity to A and B parameters Use velocity to scale the amount of the EG applied to the filter Use any AMS source to scale the amount of the EG applied to the filter You can use all three of these at once and the results are added together to produce the total EG effect To set up the EG itself including attack and release times le...

Страница 76: ...ity to B 99 99 This controls the depth and direction of the EG AMS modulation for Filter B 3 2c Filter A B Modulation This section lets you assign any two AMS sources to control Filter A and another two AMS sources to control Filter B This modulation is added to the basic Filter A and B cutoff frequencies as set on the Filter 1 page Filter A AMS1 List of AMS Sources This selects the first modulati...

Страница 77: ... of Filter Cutoff Intensity to B LFO1 99 99 This controls the initial effect of the LFO on Filter B s cutoff frequency before any JS Y or AMS modulation JS Y Intensity to A LFO1 99 99 Moving the joystick down from the center detent position towards yourself produces the JS Y controller You can use this to scale the amount of the LFO applied to Filter A Negative settings will invert the phase of th...

Страница 78: ...ommands on page 138 0 Write Program For more information see Write Program on page 138 1 Exclusive Solo For more information see Exclusive Solo on page 138 2 Copy Oscillator For more information see Copy Oscillator on page 144 3 Swap Oscillators For more information see Swap Oscillator on page 144 3 4 Filter1 EG The Filter EG or Envelope Generator lets you create complex time varying changes to th...

Страница 79: ...ff frequency or other AMS destination go up from its programmed value negative levels will make it go down Start 99 99 This sets the initial EG level at note on Attack 99 99 This sets the level at the end of the Attack time Break 99 99 Break short for Break Point sets the level at the end of the Decay time Sustain 99 99 This sets the level at the end of the Slope time Once it reaches the Sustain l...

Страница 80: ...an each have different modulation intensities By using different settings for each of the three levels you can cause both subtle and dramatic changes to the EG shape as shown below Filter EG Level Modulation Once an EG segment begins it can t be modulated Once the EG has started a segment between two points that segment can no longer be modulated This includes both the time of the segment and the ...

Страница 81: ...re identical to those of AMS1 above 3 4 Page Menu Commands The number before each command shows its ENTER number key shortcut For more information on these shortcuts see ENTER 0 9 shortcuts for menu commands on page 138 0 Write Program For more information see Write Program on page 138 1 Exclusive Solo For more information see Exclusive Solo on page 138 2 Copy Oscillator For more information see C...

Страница 82: ...is page controls Oscillator 2 s Filter EG It is available only when the Oscillator Mode is set to Double if not the page will be grayed out The parameters are identical to those for Oscillator 1 as described under 3 4 Filter1 EG on page 68 ...

Страница 83: ...er adds saturation and overdrive to the sound for everything from subtle fattening to drastic distortion Unlike an overdrive effect the Driver processes each voice individually so the timbre stays the same regardless of how many voices are being played The two main parameters Drive and Low Boost work together to create the overall Driver effect Drive contributes edge and bite and Low Boost provide...

Страница 84: ...1 Press the Control Surface Timbre Track button 2 Set the MIXER KNOBS switch to INDIVIDUAL PAN 3 Move Knob 1 to set the pan for Oscillator 1 and Knob 2 to set the pan for Oscillator 2 You can also control pan via MIDI Pan CC 10 A CC 10 value of 0 or 1 places the sound at the far left 64 places the sound at the location specified by the Pan parameter and 127 places the sound at the far right Note y...

Страница 85: ...ing works by creating four ramps or slopes between five keys on the keyboard The bottom and top keys are fixed at the bottom and top of the MIDI range respectively You can set the other three keys named Low Break Center and High Break to be anywhere in between The four Ramp values control the rate of change between each pair of keys For instance if the Low Center Ramp is set to 0 the value will st...

Страница 86: ... Low Break key For normal key track use negative values Low Center Inf 99 99 Inf This sets the slope between the Low Break and Center keys For normal key track use negative values Center High Inf 99 99 Inf This sets the slope between the Center and High Break keys For normal key track use positive values High Top Inf 99 99 Inf This sets the slope between the High Break key and the top of the MIDI ...

Страница 87: ...mum level double the Amp Level and Amp EG level settings the volume cannot be increased any further With negative values of this parameter the volume will decrease when pressure is applied to the keyboard 4 2c LFO 1 2 You can modulate the Amp level with both LFO1 and LFO2 LFO1 Intensity LFO1 99 99 This controls the depth and direction of LFO1 s effect on the oscillator s volume Negative values wil...

Страница 88: ...when passing through the threshold moving upwards When the threshold is negative the EG triggers when passing through the threshold moving downwards Note with some LFO shapes and with faster LFO speeds the LFO may not always reach the extreme values of 99 or 99 In this case setting the Threshold to these values may cause inconsistent behavior or may mean that the EG doesn t reset at all If this ha...

Страница 89: ...nges more quickly at the beginning Amp EG Curve Different curve settings for up and down You may find that different amounts of curvature are suitable for segments which go up and segments which go down For instance a curve of 3 is a good default setting for upward segments such as Attack On the other hand a curve of 6 or more is good for downward segments such as Decay and Release Attack 0 Linear...

Страница 90: ... time will get much shorter at higher velocities When the AMS source is at its maximum value for instance when Velocity is at 127 a setting of 8 will make the segment time almost twice as long and a setting of 8 will cut the segment time almost in half Decay 99 99 This controls the depth and direction of the AMS modulation for the Decay time Slope 99 99 This controls the depth and direction of the...

Страница 91: ... 9a 3 Band Parametric EQ In addition to using the on screen parameters you can also use the front panel Control Surface to set up most of the EQ parameters everything except for Bypass To do so 1 Press the Control Surface Timbre Track button 2 Set the MIXER KNOBS switch to Channel Strip 3 Set the Trim Low Gain Mid Freq Mid Gain and High Gain using the knobs Bypass On Off When Bypass is checked all...

Страница 92: ...mber key shortcut For more information on these shortcuts see ENTER 0 9 shortcuts for menu commands on page 138 0 Write Program For more information see Write Program on page 138 1 Exclusive Solo For more information see Exclusive Solo on page 138 2 Copy Oscillator For more information see Copy Oscillator on page 144 3 Swap Oscillators For more information see Swap Oscillator on page 144 ...

Страница 93: ...parameters to control how long the LFO waits to start after note on and whether it starts abruptly or fades in slowly Set the LFO to sync to MIDI tempo 5 1a OSC 1 LFO 1 Waveform Triangle Random6 Continuous This selects the basic LFO waveform as shown in the graphic below Most of the waveforms should be self explanatory but a few will benefit from more details Guitar is intended for guitar vibrato ...

Страница 94: ...modulation Higher values mean faster speeds as shown in the table below By using AMS modulation you can also get speeds much faster and much slower than are available through this basic setting Frequency Fine 00 99 This allows you to control the LFO frequency with greater precision giving you 98 additional steps for each step of the main Frequency parameter When this is set to 00 the LFO speed is ...

Страница 95: ... Off the delay applies only to the first note of the phrase 5 1b Frequency Modulation You can use two alternate modulation sources AMS to adjust the speed of the LFO AMS1 Frequency List of AMS Sources This selects the first modulation source for the LFO s frequency For a list of AMS sources see AMS Alternate Modulation Source List on page 967 Note that you can use LFO2 to modulate LFO1 s frequency...

Страница 96: ...h command shows its ENTER number key shortcut For more information on these shortcuts see ENTER 0 9 shortcuts for menu commands on page 138 0 Write Program For more information see Write Program on page 138 1 Exclusive Solo For more information see Exclusive Solo on page 138 2 Swap LFO 1 2 For more information see Swap LFO 1 2 on page 146 5 2 OSC1 LFO2 This is Oscillator 1 s second LFO Its paramet...

Страница 97: ...ry under LFO1 Waveform on page 83 Start Phase 180 180 Random The Reset Source described above lets you reset the Common LFO This is the phase from which the LFO will start when it is reset Shape 99 99 Shape adds curvature to the basic waveform For more details please see the entry under LFO1 Shape on page 84 Note Shape does not affect the Square and Random 3 waveforms since their values are always...

Страница 98: ... the per voice LFO s Key Sync Off setting set this to Gate 1 Damper Offset 99 99 By default almost all of the LFO waveforms are centered around 0 and then swing all the way from 99 to 99 This parameter lets you shift the LFO up and down so that for instance it s centered on 50 and then swings from 49 to 149 For a complete description please see the entry under LFO1 Offset on page 85 5 9b Frequency...

Страница 99: ...nmodified inputs to the AMS Mixers are still available as well For instance if you use LFO 1 as an input to a AMS Mixer you can use the processed version of the LFO to control one AMS destination and the original version to control another Finally you can cascade the two AMS Mixers together by using AMS Mixer 1 as an input to AMS Mixer 2 6 1a AMS Mixer 1 Mixer Type A B Amt AxB Offset Smoothing Sha...

Страница 100: ...depth and direction of the AMS B input Amt A x B AMS Mixer Type A x B This Mixer Type uses AMS B to scale the amount of AMS A For instance you can control the amount LFO1 with the Filter EG or control the amount of the Pitch EG with the ribbon AMS Mixer Amt AxB example AMS A List of AMS Sources This selects the first AMS source which can then be scaled by AMS B For a list of AMS sources see AMS Al...

Страница 101: ... can be useful for creating clipped shapes such as shown in the last of the AMS Mixer Offset examples above Smoothing This Mixer Type smooths out the AMS input creating more gentle transitions between values You have separate control of the amount of smoothing during the attack when the signal is increasing and decay when it s decreasing The higher the Attack and Decay settings the more that the i...

Страница 102: ...ze others For example let s say that you are using a triangle LFO through Shape to modulate filter cutoff If Shape emphasizes the high value range the filter will spend more time at the higher frequencies If it emphasizes the low range the filter will spend more time at the lower frequencies AMS Mixer Shape examples Bipolar and Unipolar AMS sources To understand Shape it helps to understand the di...

Страница 103: ...n Step 2 Now playing the Ribbon will create quantized pitch bends JSX will still produce smooth pitch bends as usual so you can use both techniques together Gate AMS Mixer Type Gate This Mixer Type lets you set up two different AMS sources or fixed AMS amounts and then switch between the two using a third AMS source It s similar to an audio gate with a side chain but with even more flexibility sin...

Страница 104: ...will affect the pitch 8 With the foot switch off play a chord and hold it through step 9 9 Press down on and hold the footswitch and then play a new note above the chord 10 Use the ribbon to bend the pitch of the new note The new note will bend but the original chord played before you pressed on the foot switch will not Selective pitch bend using only the joystick You can also use a single AMS sou...

Страница 105: ... adjusting parameters according to pitch The OASYS keyboard tracking can be fairly complex if desired You can create different rates of change over up to four different parts of the keyboard For instance you can Make the modulation increase very quickly over the middle of the keyboard and then increase more slowly or not at all in the higher octaves Make the modulation increase as you play lower o...

Страница 106: ...s make the output go up Bottom Low Inf 99 99 Inf This sets the slope between the bottom of the MIDI note range and the Low Break key For normal key track use negative values Low Center Inf 99 99 Inf This sets the slope between the Low Break and Center keys For normal key track use negative values Center High Inf 99 99 Inf This sets the slope between the Center and High Break keys For normal key tr...

Страница 107: ...6 9 Common Keyboard Track 97 1 Exclusive Solo For more information see Exclusive Solo on page 138 2 Copy Oscillator For more information see Copy Oscillator on page 144 3 Swap Oscillators For more information see Swap Oscillator on page 144 ...

Страница 108: ...The Global Basic page Load KARMA Settings when changing parameters let you select between these two behaviors There are separate settings for Programs Combis and Songs To set this up 1 Go to the Global Basic page 2 Under Load KARMA setting when changing set the Programs check box as desired Check the box to load the individual Programs KARMA settings Un check the box to keep KARMA settings the sam...

Страница 109: ... 1 Bottom Key Zone Bottom C 1 G9 Specifies the bottom key lower limit of the Key Zone Top Key Zone Top C 1 G9 Specifies the top key upper limit of the Key Zone Note These parameters can also be set by holding down the Enter switch and pressing a note Thru In Zone Off On On checked Note data from keys within the Key Zone will be input to the KARMA Module and will also be input directly to the tone ...

Страница 110: ...rol change messages transmitted when the KARMA function is turned on CC Offset parameters 7 2a Program Name and Tempo Bank INT A F GM g 1 9 g d USER A G Bank Type HD 1 EXi Program 0 127 INT and USER Banks 1 128 GM Banks Tempo 040 00 240 00 EXT These are the current bank bank type HD 1 or EXi Program and Tempo For more information see 1 1a Program Name and Tempo on page 32 7 2b MIDI Filter Receive ...

Страница 111: ...g MIDI data will not be transmitted from the KARMA Module Note The GE can also automatically produce pitch bend and various types of control change messages in addition to note data Three envelope generators can also be used to apply time variant change to velocity tempo duration and various control changes such as pitch bend JS Y CC 1 etc The data that is output will depend on the settings of the...

Страница 112: ...nge message that will be transmitted The value of the transmitted message is specified by Value If the KARMA ON OFF switch is on the specified MIDI control change message will be transmitted when you select a program whose KARMA ON OFF switch is turned on If the selected GE produces the control change specified here the effect of the control change produced by the GE will be given priority Note Th...

Страница 113: ...le in relationship to the area of the keyboard that is played Note data from the keyboard or the MIDI IN connector will be input to the KARMA Module Bottom Key Zone Bottom Top Key Zone Top 7 1b Transpose 7 3a Here you can make settings so that the note data input to the KARMA Module is restricted to a specific range Off The input notes will be sent to the KARMA Module as played with no further alt...

Страница 114: ... C3 B3 1 Resulting transposed input notes E3 G 3 B3 D 4 EMaj7 first inversion G 2 B2 D 3 E3 EMaj7 second inversion B2 D 3 E3 G 3 EMaj7 third inversion D 3 E3 G 3 B3 EMaj7 fourth inversion C3 B3 2 Resulting transposed input notes D 3 E3 G 3 B3 EMaj7 D D 3 E3 G 3 B3 EMaj7 D D 3 E3 G 3 B3 EMaj7 D D 3 E3 G 3 B3 EMaj7 D all identical Force Range Wrap C B When Force Range above is set to C3B3 1 this par...

Страница 115: ... Note Type Regular become quite predictable as spans greater than an octave are essentially compressed into one octave before going into the Note Series section Clock Advance Here you can make settings for the clock that will operate the KARMA Module By using these settings in conjunction with the Dynamic MIDI Program 7 7 function you can use Manual Advance by operating controllers such as the joy...

Страница 116: ...generated by KARMA 0 127 to be remapped to any other MIDI note 0 127 or filtered out removed Therefore a diagonal line represents linear no change and what goes in is what comes out You can use it to remap drum kits from one set of drum sounds to another remove or substitute different drum sounds within the same kit remove certain pitches from melodic output constrain output pitches to various sca...

Страница 117: ...chord played in any octave will be transposed so it ends up with its lowest note in the C2 octave before being run through the table and returned to the correct octave after As an example assume you play an input chord in the key of C in the C2 octave lowest octave of a 61 note keyboard If you remove the 3rd for example which is E2 playing a chord anywhere on the keyboard will have the lowest note...

Страница 118: ...6th note upper row of the diagram above Update On Release Off On Allows the release of individual input notes to remove those notes from the notes going to the GE thereby changing the effect to use only those notes still being held Off unchecked Releasing some notes while holding others causes no change to the input source material and therefore no change in the Generated Effect This is the most s...

Страница 119: ... them to be the same If the selected GE does not use Envelopes these settings will have no effect For information on specific GEs please see the Voice Name List on page 1041 Envelope Trigger Any AKR 1st Dyn Any Any Note Dynamic MIDI Every note on will cause triggering i e each note on will cause the envelope to start from the beginning AKR 1st Note After Key Release Dynamic MIDI Triggering will oc...

Страница 120: ...you can control the phrase or pattern in real time while you play 7 5a GE Number Name RTC Select and Tempo GE Number Name 0000 Arp Model 01 Up Dn 2047 Tempo Env Repeats This shows the GE selected for the Module For more information please see 0 6b GE Select on page 8 GE RTC Select 1 16 17 32 This switches the GE realtime parameter display 1 16 GE parameters 1 16 will be displayed 17 32 GE paramete...

Страница 121: ...switch the value between minimum and maximum only The minimum to center range of the Slider is off and the center to maximum is on If you set Value 0050 Assign Slider SW 1 and Polarity Turning the slider toward the minimum will produce a value of 0000 Turning it to center or maximum will produce a value of 0100 SW1 8 The parameter will be assigned to switch 1 8 The minimum is off and the maximum i...

Страница 122: ... to choose a Parameter from The KARMA parameters are divided into six groups Parameter Time Signature Retrigger Each Time Indicates the parameter that you wish to assign The parameters that can be selected will differ according to the Group setting above Min Minimum Value 8192 8192 This sets the parameter value when the selected controller is at its minimum point for instance when a slider is at t...

Страница 123: ... octave steps Transpose Octave 5th 0036 0036 Assigns the Transpose Program 7 3b function Control the transposition in steps of an octave and a fifth Group Control Force Range 0000 0004 Assigns the Force Range Program 7 3b function 0000 Off 0001 Lowest 0002 Highest 0003 C3 B3 1 0004 C3 B3 2 For more information see Force Range on page 103 Force Range Wrap 0000 0011 Assigns the Force Range Wrap Prog...

Страница 124: ...tart 0000 0025 Assigns the Delay Start Program 7 4b function 0000 Off 0001 Fixed 0002 0025 3 4x For more information see Delay Start on page 108 Delay Start ms 0000 5000 Assigns the Delay Start Fixed Program 7 4b function See Delay Start Fixed p 108 Note Trigger 0000 0003 Assigns the Note Trigger Program 7 4b function 0000 Any 0001 AKR 0002 1st 0003 Dyn For more information see Note Trigger on pag...

Страница 125: ... assign it as a RT Parameter it will be limited to either end of the range Freeze Loop Length 0000 0032 Assigns the Freeze Loop Length Program 7 8b function This specifies the number of measures bars in the phrases that are repeatedly generated by the KARMA Module After being triggered the Module will generate a phrase of the number of measures you specify here and will then repeat that phrase Fre...

Страница 126: ...ot be changed Source Off JS Y CC 01 Velocity Outside Zone Indicates the controller or action that will be the Dynamic MIDI source For more information see Dynamic MIDI Sources Destinations on page 984 Bottom Range Bottom 000 127 Specifies the lower limit for the value controlled by Source If Source is Short Note Note No White Note or Black Note the numeric value corresponds to the note numbers C 1...

Страница 127: ...at can be selected are limited by the Destination For more information see Dynamic MIDI Sources Destinations on page 984 Destination Off RT Params Control Buffer Latch Selects the Dynamic MIDI Control destination function For more information see Dynamic MIDI Destinations on page 986 Polarity Specifies the Dynamic MIDI polarity For example if you set Polarity to and the Source is KARMA SLIDER 1 mo...

Страница 128: ... the seed that is used by the KARMA Module to generate the random phrase Note Seed is the source data from which the randomizations are created Start Seed is the seed that will be used each time a trigger occurs 0 Random A different phrase will be generated each time the trigger occurs Within the KARMA Module a different Start Seed value is specified randomly each time the trigger occurs Any value...

Страница 129: ...op Length settings will affect the phrase or control data that is randomly generated by the KARMA Module each time triggering occurs according to the GE settings you are using 1 Start Seed 0 Random Freeze Loop Length Off unchecked The phrase will change randomly each time triggering occurs Each time the phrase repeats it will change randomly For example suppose there is a GE that if you input C D ...

Страница 130: ...ge 109 and the applicable internal settings of the GE and any envelopes will be retriggered according to the Envelope Trigger Latch settings Envelope Trigger on page 109 Envelope Latch on page 109 When Off unchecked the overall length of the internal GE Phase Pattern controls when the loop will be retriggered For example if the Phase Pattern is 8 bars and the Freeze Loop Length is set to 2 bars th...

Страница 131: ...gn KARMA RTC Name command For more information see Auto Assign KARMA RTC Name on page 139 7 9c Note Map Note Maps allow notes being generated by the GE to be selectively remapped to other notes or removed completely changed into rests Here you can view Global Note Map Tables and edit the Custom Note Map Table that is stored with each Program The Note Map Table is assigned in Module Parameters Cont...

Страница 132: ... Octave Replicate Off On When On checked any edit that you make within an octave will be made in every octave This is mainly for applying the table to Melodic GEs where you want to do something like remove every minor third remap every fourth to a fifth etc and have that change take place in every octave Reset button Restores the current table to linear no change a diagonal line 7 9 Page Menu Comm...

Страница 133: ...m Name 000 127 001 128 Name Tempo 040 00 240 00 EXT This area displays information about the program selected for editing including the Program Bank number and name and the tempo used for LFOs effects and KARMA Use Dkit Setting Off On This is shown if Oscillator Mode is set to Drums If Oscillator Mode is set to Single or Double this setting is ignored For more information please see Oscillator Mod...

Страница 134: ...3 4 These settings send the output of the oscillator 1 2 to the REC busses four mono channels 1 2 3 4 The REC busses are dedicated internal busses for recording used for sampling in the various modes or for recording audio tracks in Sequencer mode In Program mode you can resample your keyboard or KARMA performance or sample an external audio signal from the AUDIO INPUT jacks In order for you to sa...

Страница 135: ...panel 1 Press the CONTROL ASSIGN MIXER TIMBRE TRACK switch to turn it on lit 2 Press the MIXER KNOBS switch to select CHANNEL STRIP 3 Use the MIXER SELECT 1 2 switches to select the oscillator whose send levels you want to adjust 4 Use FX SEND 1 knob 7 and FX SEND 2 knob 8 to control the send levels If Bus Select IFX Indiv Out Assign is set to L R or OFF this will control OSC1 Send1 to MFX1 and OS...

Страница 136: ...ounded to the closest 1 but the internal values have a much finer resolution This means that you may sometimes add an effect but see no change in the resource meter FX shows the percentage of the total processing power being used for the IFX MFX and TFX This will vary depending on the specific effects being used If an effect has been assigned to an IFX MFX or TFX it will take up the same amount of...

Страница 137: ... the input will simply be passed to the output When 000 No Effect is selected there s no difference between On and Off The setting will alternate between on and off each time you press the button Separately from this setting you can use MIDI CC 92 on the global MIDI Channel to turn all insert effects off A value of 0 turns them off and values of 1 127 restore the original setting Chain to IFX2 IFX...

Страница 138: ... CC 91 to control the Send 2 level The global MIDI channel specified by MIDI Channel Global 1 1a is used for these messages IFX2 12 Here you can specify each insert effect s effect type on off status chaining and mixer settings following the insert effect With the exception of Chain to and Chain the parameters are the same as for IFX1 See IFX1 on page 127 IFX2 Chain to IFX3 IFX12 IFX3 Chain to IFX...

Страница 139: ...e passing through IFX11 and IFX12 OUTPUT shows the Bus Select setting that follows the insert effects This tells you where the audio signal is being output The following diagram shows the IFX assigned to each key of a drum kit when Oscillator Mode is set to Drums for an HD 1 Program and Use DKit Setting is turned on In this example you can see that IFX1 2 3 4 and 5 are each used by a key in the dr...

Страница 140: ... Dmod Most effects have one or more parameters which can be modulated in realtime In the OASYS this is called Dynamic Modulation or Dmod for short For a complete list of Dmod sources see Dynamic Modulation Source List on page 976 Effect dynamic modulation Dmod is controlled on the global MIDI Channel Global 1 1a For more information see Dynamic modulation Dmod and Tempo Synchronization on page 729...

Страница 141: ...g Effect Presets 1 Select an effect in the Insert FX page 2 The P00 Initial Set settings will be recalled P Effect Preset will indicate 3 Use P Effect Preset to select an effect preset P00 P15 or U00 U15 The stored parameters will be recalled Note that this will overwrite all parameters of the effect 4 Edit the recalled parameters as desired 5 If you ve come up with settings you like and want to s...

Страница 142: ...at will reset the Common LFO For a complete list of Dmod sources see Dynamic Modulation Source List on page 976 This will be off when the modulation source specified by Source has a value below 64 and on when the value is above 64 The LFO will be reset when this value rises from a level below 64 to a level higher than 64 Frequency 0 02 20 00 Hz This specifies the frequency of the Common FX LFO Hig...

Страница 143: ...m on page 138 1 Exclusive Solo For more information see Exclusive Solo on page 138 2 Copy Insert Effect For more information see Copy Insert Effect on page 149 3 Swap Insert Effects For more information see Swap Insert Effect on page 150 Stereo Flanger Common FX LFO1 Common FX LFO Stereo Phaser Stereo Auto Pan Waveforem Triangle Generate original LFO waveform Frequency Hz Reset Phase Offset 0 deg ...

Страница 144: ...ype for master effect 1 You can use any of the available effects without limitation If you choose 000 No Effect the output from the master effect is muted Category MFX Select menu When you press the popup button the Category MFX Select menu will appear letting you select effects by category Use the tabs to select a category and then select an effect within that category Press the OK button to exec...

Страница 145: ...ill depend on the selected effect type The total effects are stereo in and stereo out but the output may be monaural depending on the type of effect you select See In Out on page 734 TFX1 TFX1 000 185 This selects the effect type for total effect 1 You can use any of the available effects without limitation Category TFX Select menu When you press the popup button the Category TFX Select menu will ...

Страница 146: ...tion see Copy MFX TFX on page 153 3 Swap MFX TFX For more information see Swap MFX TFX on page 154 9 2 MFX1 Effects Modulation Dmod Most effects have one or more parameters which can be modulated in realtime In the OASYS this is called Dynamic Modulation or Dmod for short For a complete list of Dmod sources see Dynamic Modulation Source List on page 976 Effect dynamic modulation Dmod is controlled...

Страница 147: ...usive Solo on page 138 2 Copy MFX TFX For more information see Copy MFX TFX on page 153 3 Swap MFX TFX For more information see Swap MFX TFX on page 154 4 Write FX Preset For more information see Write FX Preset on page 154 9 3 MFX2 9 4 TFX1 9 5 TFX2 These pages let you edit the parameters of Master Effect 2 and Total Effects 1 and 2 To select different effects types use the Routing page as descri...

Страница 148: ...rogram name If you wish to modify the program name press the text edit button to move to the text edit dialog box and enter the desired program name 2 In Category and Sub Category specify the category of the program that you are writing The category can be used to find this Program when selecting a program in Program Combination or Sequencer modes Note You can edit these category names in the Glob...

Страница 149: ...tion please see RAM on page 572 1 Select Optimize RAM to open the dialog box 2 Press the OK button to execute the command or press the Cancel button to cancel without executing Auto Optimize RAM If Auto Optimize RAM Global 0 1d is enabled you don t need to use the Optimize RAM command instead RAM will be optimized automatically Select Sample No Select Sample No is available on the Audio In Samplin...

Страница 150: ...lso lets you audition WAVE files directly from the disk you can use this as a shortcut instead of using the similar function in DISK mode Specifying the save destination for a WAVE file 1 Select the Select Directory to open the dialog box 2 Use the popup button located at the left of Drive select to select the writing destination drive for sampling 3 Use the Open button and Up button to move to th...

Страница 151: ...ritten into RAM If you choose DISK the sampled data will be saved to disk as a WAVE file 2 If you selected RAM for Save to you can also specify whether the sample will be automatically converted to a program after resampling If you want to convert the sample check the Convert to Program option and use Program to specify the desired convert destination program 3 Press the OK button to execute Resam...

Страница 152: ... save it to disk 4 If you ve selected Save to RAM you can specify whether the sample will automatically be converted to a program If you want the sample to be converted to a program check Convert to Program and use the Program field to specify the convert destination program 5 If you want to apply an insert effect to the external audio input source while you sample use IFX to select the insert eff...

Страница 153: ...the Tone Adjust parameter assignments and values Assignments Only This copies only the Tone Adjust parameter assignments without the values 5 Press the OK button to execute the Copy Tone Adjust command or press the Cancel button if you decide to cancel Reset Tone Adjust Reset Tone Adjust is available on the Control Surface page when CONTROL ASSIGN is set to TONE ADJUST This command resets the Tone...

Страница 154: ...ble Copy Vector Envelope Copy Vector Envelope is available on the Vector Envelope tab of the Basic Vector page This command copies vector envelope settings from the specified program combination timbre or song 1 Select Copy Vector Envelope to open the dialog box 2 Use the From field to select the mode bank and number of the desired copy source You can press a BANK key to select the desired bank Th...

Страница 155: ...Level parameter in Sampling mode edits here will affect the values shown in Sampling mode and vice versa Each Sample also has a 12dB setting as configured in Sampling mode if this is on the Sample will play back approximately 12dB louder Cutoff 99 00 99 This adds to or subtracts from the Oscillator s filter cutoff settings Resonance 99 00 99 This adds to or subtracts from the Oscillator s filter r...

Страница 156: ...ked 6 If you want to copy the note and velocity settings of pads 1 8 turn Pads on 7 Press the OK button to execute the Copy KARMA Module command or press the Cancel button if you decide to cancel Settings copied by Copy KARMA Module When copying from a program If GE RTP Control Setting Scenes and Perf RTP Panel Settings are Off checked the following content is copied The GE selected by the copy so...

Страница 157: ...they will return to the values preset by the GE The GE selection will not be initialized If you initialize with GE RTP Control Settings Scenes turned On checked In addition to the parameters initialized with the Off unchecked setting the following parameters will also be initialized 7 5 GE Real Time Parameters page ASSIGN Off and POLARITY KARMA CONTROLS slider and KARMA SWITCH settings in each sce...

Страница 158: ...mode to execute Capture Random Seed for all KARMA Modules Capture Random Seed will be executed only for the KARMA Modules whose Start Seed parameter is not assigned as an Perf Real Time Parameter If the Start Seed parameter of any KARMA Module is assigned as a Perf Real Time Parameter Capture Random Seed will not be executed for those KARMA Modules Checking the Freeze Randomize function and perfor...

Страница 159: ... KARMA Module 14 When you hear a phrase you want to be played each time you trigger the GE execute Capture Random Seed Press the Page Menu button and choose Capture Random Seed from the page menu 15 When the dialog box appears press the OK button The Start Seed parameter will automatically be set to the internal value needed to reproduce the phrase Example Capture Random Seed has set Start Seed to...

Страница 160: ...t type and its parameters will be copied Copying 000 No Effect Copying a single effect set to 000 No Effect will not work no data will be copied If either All or All used is selected and 000 No Effect exists within a chain it will be copied However if the entire chain consists of 000 No Effect nothing will be copied Swap Insert Effect Swap Insert Effect is available on all of the IFX pages This co...

Страница 161: ...or Don t use the Insert IFX Slot command Instead remove the unwanted IFX slot by changing the Chain to settings or by using the Copy IFX or Swap IFX commands Auto Chain on If the IFX you ve inserted is located within a chain the Chain setting will automatically be turned on for the inserted IFX so that it will be chained with the preceding and following IFX If the IFX you ve inserted is not inside...

Страница 162: ...se separate Bus Select settings if the IFX Routing page s Use DKit Setting parameter is turned On In this case you have two options Either Use Auto Routing and then manually adjust the Bus Select settings for each key of the Drum Kit to match the new IFX slot arrangement or Don t use the Cut IFX Slot command Instead remove the unwanted IFX slot by changing the Chain to settings or by using the Cop...

Страница 163: ...ts you copy any desired effect settings from Program Combination Song or Sampling mode 1 Select Copy MFX TFX to open the dialog box 2 In From select the copy source mode bank and number You can also use the BANK SELECT switches to select the desired bank If you press the Set To Current button the currently selected mode bank number and MFX TFX edit cell will automatically be assigned to the From f...

Страница 164: ...cel press the Cancel button Write FX Preset Write FX Preset is available on all of the effects parameter editing pages including IFX 1 12 MFX 1 and 2 and TFX 1 and 2 1 Select Write FX Preset to open the dialog box 2 Press the text edit button to open the text edit dialog box and input a name for the effect preset 3 Use the To field to select the writing destination We recommend that you use U00 U1...

Страница 165: ...tep Sequencer These standard parameters are available in the pages under the Common button and are described in this chapter Auto Song Setup The Auto Song Setup feature copies the current Program or Combination into a Song and then puts the OASYS in record ready mode If inspiration for a phrase or song strikes you while you re playing you can use this function to start recording immediately To do ...

Страница 166: ...ude oscillator settings filter settings EGs LFOs step sequencers drawbar settings and so on See the individual EXi documentation for details The graphics give you a quick way to check all of these settings at a glance They also let you jump instantly to any of the displayed parameters Just touch one of the graphics and you ll jump to the page containing its parameters For instance if you touch the...

Страница 167: ...knobs and switches to different Tone Adjust parameters Other than the exceptions noted below it works almost exactly like the similar page for HD 1 Programs substituting EXi 1 2 for OSC 1 2 For more information see 0 9 Control Surface on page 18 0 9e RT KARMA Real Time Knobs KARMA Realtime Knobs 1 4 have dedicated functions Cutoff Resonance Filter EG Intensity and Filter Release EXi instruments wi...

Страница 168: ...erent ways and allow you to adjust completely different parameters For instance one EXi might be a virtual analog synthesizer and another might be a physically modeled tone wheel organ This menu displays all of the EXi s installed on the system You can select either one or two EXi s for the Program Unlike HD 1 Programs there is no setting for Single or Double If there are two EXi s it doesn t matt...

Страница 169: ...r more details On checked When you play with legato phrasing the notes within a legato phrase will sound smoother according to the setting of the Mode parameter below Off unchecked Legato phrasing will produce the same sound as detached playing Mode Normal Use Legato Offset This parameter is available only when Mono Legato is On Normal When you play legato the envelopes and LFOs and samples if the...

Страница 170: ... be in the center at 100 the two groups will be hard panned left and right respectively at intermediate values they will be panned to intermediate left and right positions If there is an odd number of voices one voice will be panned to the center If the voices are true stereo Stereo Spread steers the stereo image of each voice similar to MIDI Pan CC 10 and the Control Surface Pan knobs In this cas...

Страница 171: ...nction Hold Top C 1 G9 This sets the highest key affected by the Hold function 4 1e Scale Type Equal Temperament User Octave Scale15 Selects the basic scale for the Program Note that for many of the scales the setting of the Key parameter below is very important For a complete list of the available scales please see 1 1g Scale on page 36 Key Scale Key C B Selects the key of the specified scale Thi...

Страница 172: ...below shows a selection of representative points Half Damper modulation of Amp EG Release Time 4 1 Page Menu Commands The number before each command shows its ENTER number key shortcut For more information on these shortcuts see ENTER 0 9 shortcuts for menu commands on page 138 0 Write Program For more information see Write Program on page 138 1 Exclusive Solo For more information see Exclusive So...

Страница 173: ...8 1 Exclusive Solo For more information see Exclusive Solo on page 138 2 Copy EXi Oscillator For more information see Copy EXi Oscillator on page 169 4 6 Vector Envelope The Vector Envelope works together with the Vector Joystick to control the Vector position It s also special because it s the only programmable modulation source which lets you modulate both Program and Effects parameters The Vect...

Страница 174: ...e similar page for HD 1 Programs for more information see 1 9 Set Up Pads on page 46 4 9 Page Menu Commands The number before each command shows its ENTER number key shortcut For more information on these shortcuts see ENTER 0 9 shortcuts for menu commands on page 138 0 Write Program For more information see Write Program on page 138 1 Exclusive Solo For more information see Exclusive Solo on page...

Страница 175: ...idual steps to create a random level Use Smoothing to create gentle curving shapes Differences from per voice Step Sequencers There is only a single Common Step Sequencer shared by the entire Program It starts running as soon as you select the Program and only resets when you tell it to do so explicitly via the Sequencer Reset parameter This is different from the per voice Step Sequencer s Key Syn...

Страница 176: ...wards When the threshold is negative the Step Sequencer triggers when passing through the threshold moving downwards Note with some LFO shapes and with faster LFO speeds the LFO may not always reach the extreme values of 99 or 99 In this case setting the Threshold to these values may cause inconsistent behavior or may mean that the Step Sequencer doesn t reset at all If this happens reduce the Thr...

Страница 177: ...38 2 Copy Step Sequencer For more information see Copy Step Sequencer on page 169 5 2 Common LFO This is a single free running LFO global for all voices in the Program like the modulation LFOs in some vintage analog synths It s always available as a modulation source for both EXi1 and EXi2 regardless of which EXi instruments are being used This page works exactly like the similar page for HD 1 Pro...

Страница 178: ...similar pages for HD 1 Programs for more information see Program P8 Insert Effect on page 123 EXi Program P9 Master Total Effect This pages let you control the Program s two Master Effects MFX and two Total Effects TFX They work exactly like the similar pages for HD 1 Programs for more information see Program P9 Master Total Effect on page 134 ...

Страница 179: ...n to execute the Copy Oscillator operation or press the Cancel button if you decide not to execute Copy Step Sequencer This command copies the step sequencer settings of the desired EXi program 1 Select Copy Step Sequencer to open the dialog box 2 Use the From field to select either Common Step Sequencer or Voice Step Sequencer as the step sequencer you want to copy Voice Step Sequencer lets you c...

Страница 180: ...Program mode EXi 170 ...

Страница 181: ...odulation mixers Access to all standard EXi Program features including the Common LFO Common Step Sequencer Key Track 1 2 KARMA EQ and effects Unsupported EXi Common parameters The AL 1 supports all of the EXi Common parameters except for two of the voice allocation options Poly Legato and Mono Mode Normal Use Legato Offset Both of these options are designed for sample playback and so they don t a...

Страница 182: ...ub Oscillator It also shows the level and balance settings for the three Oscillators plus the Ring Modulator and Noise Generator Levels are shown in red and balance settings in green Press this area to jump to the OSC Basic page For more information see 4 1 OSC Basic on page 174 Common Key Zone This shows the key zones for EXi1 and EXi2 as set on the Common section s Program Basic page in relation...

Страница 183: ...This section will always show the same parameters regardless of which EXi are being used Common Voice Assign Mode This shows the voice assign mode of the Program either POLY or MONO Press this area to jump to the Program Basic page Common Step Sequencer This shows a graphic overview of the Common Step Sequencer Press this area to jump to the Common Step Sequencer page Common LFO Graphic This shows...

Страница 184: ... pitch see Randomizing frequency for an analog feel on page 176 Unison pitch see Thickness on page 160 Oscillator interaction see Initial Phase on page 175 Basic filter characteristics see Filter Routing on page 185 Filter timbre see Resonance Bass on page 186 Monophonic voice assignment see Priority on page 159 Portamento see Mode on page 181 4 1a Oscillator 1 Waveform Waveform Saw Pulse Saw Puls...

Страница 185: ...form selection above When the Waveform is set to Pulse or Saw Pulse this is named Pulse Width and controls the width of the Pulse waveform For details see More on Pulse Width below When Waveform is set to Double Saw it is named Phase and controls the phase relationship between the two Sawtooth waves When Waveform is set to Detuned Saw 1 or 2 this is named Detune and controls the detune amount betw...

Страница 186: ...the carrier In other words FM affects the timbre of Oscillator 2 and does not affect the timbre of Oscillator 1 You can create stable periodic waveforms by setting FM Amount to any multiple of 6 such as 6 12 18 24 etc At other settings the signal will roll around in interesting ways This feature is similar to a classic five voice analog synthesizer s Osc B to Freq A function except that the depth ...

Страница 187: ...ing Modulator has its own input to the Mixer section The default volume is 0 so to hear it you ll need to turn it up When the frequencies of the Carrier and the Modulator are the same the Ring Modulator produces steady constant waveforms When the two are detuned it produces more movement and overtones Note that FM Sync and Ring Mod can all be used simultaneously Even though the oscillators themsel...

Страница 188: ...ncy settings see below allowing you to create organic rumbling timbres Filter Frequency 0 99 This is a simple 1 pole lowpass filter for controlling the color of the noise 4 2 Page Menu Commands The number before each command shows its ENTER number key shortcut For more information on these shortcuts see ENTER 0 9 shortcuts for menu commands on page 138 0 Write Program For more information see Writ...

Страница 189: ... direction of the Oscillator 1 Balance AMS modulation Phase Invert Off On This inverts the phase of Oscillator 1 4 3b Oscillator 2 Oscillator 2 has the same mixer parameters as described under 4 3a Oscillator 1 above 4 3c Sub OSC Audio Input In addition to the Level Balance AMS and Phase Invert parameters described under 4 3a Oscillator 1 above this section has controls for using an external audio...

Страница 190: ... This can be useful for special effects sounds for instance If you want to create more complex effects you can assign key tracking as an AMS source Pitch Slope pitch and note Ribbon 60 60 semitones You can use the ribbon controller for pitch bend This parameter specifies in semitones the ribbon s pitch bend range Positive values make the pitch rise when you press the ribbon controller to the right...

Страница 191: ...e the two assignable switches SW1 and SW2 to turn portamento on and off To do so 1 Go to Program page 1 8 Controller Setup 2 Under Panel Switch Assign set either SW1 or SW2 to Portamento SW CC 65 Now the selected switch will enable and disable Portamento It will also send the MIDI Portamento controller CC 65 Even if you don t assign SW1 2 to Portamento you can still use MIDI Controller 65 to turn ...

Страница 192: ...teps before any AMS modulation The Pitch EG s shape can swing all the way from 99 to 99 When the Intensity is set to a positive value positive values from the EG raise the pitch and negative values lower the pitch When the Intensity is set to a negative value the effect of the EG is reversed positive EG values mean lower pitches and negative EG values mean higher pitches AMS List of AMS Sources Th...

Страница 193: ...ction of the AMS 2 pitch modulation in semitones Intensity Mod AMS List of AMS Sources You can modulate AMS 2 s Intensity from another AMS source This selects that source Intensity 48 00 semitones This controls the depth and direction of the Intensity Mod AMS in semitones The result is summed with the main AMS 2 Intensity to produce the final pitch modulation amount 4 5d OSC 2 Pitch Modulation Osc...

Страница 194: ...al configuration To create a standard serial filter configuration 1 Set the Filter Routing to Serial This connects the output of Filter A to the input of Filter B 2 Set all of the mixer s Balance controls to 0 This makes all of the inputs go to Filter A first and then through Filter B Standard parallel configuration To create a standard parallel filter configuration 1 Set the Filter Routing to Par...

Страница 195: ...e parts of the sound which are lower than the cutoff frequency You can use this to make timbres sound thinner or more buzzy Band Pass This cuts out all parts of the sound both highs and lows except for the region around the cutoff frequency Since this filter cuts out both high and low frequencies its effect can change dramatically depending on the cutoff setting and the oscillator s multisample Wi...

Страница 196: ...urces This selects a modulation source to control the Resonance amount For a list of AMS sources see AMS Alternate Modulation Source List on page 967 Intensity 99 99 This controls the depth and direction of the Resonance modulation Pan Random L001 C064 R127 This controls the stereo pan for Filter A s output It is available only when Filter Routing is set to Parallel When the Filter Routing is set ...

Страница 197: ... page will be reflected on the Filter Basic page and vice versa 5 2b Mode Crossfade Mode 1 List of filter types This sets the filter type for Mode 1 Low Pass High Pass Band Pass and Band Reject are the standard filter types For more information see Filter Type on page 185 The following types combine two or more filters at equal volumes Dry is the un filtered input signal The minus sign indicates w...

Страница 198: ...pass 99 99 This sets the volume of the Highpass filter output Bandpass 99 99 This controls the volume of the Bandpass filter output Dry 99 99 This sets the volume of the dry signal 5 2d Manual 2 The Manual 2 parameters are identical to those of Manual 1 as described above 5 2 Page Menu Commands The number before each command shows its ENTER number key shortcut For more information on these shortcu...

Страница 199: ...e special settings which create abrupt changes for split like effects When a ramp is set to Inf or Inf the keyboard tracking will go to its extreme highest or lowest value over the span of a single key For more detailed explanations please see 3 2a Keyboard Track on page 63 Bottom Low Inf 99 99 Inf This sets the slope between the bottom of the MIDI note range and the Low Break key For normal key t...

Страница 200: ...ources This selects the first modulation source to control Filter A s Frequency For a list of AMS sources see AMS Alternate Modulation Source List on page 967 Intensity 99 99 This controls the depth and direction of the Frequency modulation Intensity Mod AMS List of AMS Sources This selects an AMS source to modulate the intensity of AMS 1 Intensity 99 99 This controls the depth and direction of th...

Страница 201: ...towards yourself produces the JS Y controller You can use this to scale the amount of the LFO applied to Filter A This parameter sets the maximum amount of LFO modulation added by JS Y AMS List of AMS Sources This selects an AMS modulation source to scale the amount of the LFO applied to Filter A s cutoff frequency For a list of AMS sources see AMS Alternate Modulation Source List on page 967 Inte...

Страница 202: ...eters Drive and Low Boost work together to create the overall Driver effect Drive contributes edge and bite and Low Boost provides the body as well as boosting the bass Although the oscillators themselves have extremely low aliasing the Driver can produce aliasing especially at higher frequencies If your goal is a completely pristine sound set the Driver s Bypass to On Otherwise let it rip Bypass ...

Страница 203: ...wn from that maximum 6 1c Pan Pan Random L001 C064 R127 This controls the stereo pan of the EXi A setting of L001 places the sound at the far left C064 in the center and R127 to the far right When this is set to Random the pan position will be different for each note on You can also set this Pan parameter directly from the Control Surface knobs To do so 1 Press the Control Surface Timbre Track but...

Страница 204: ...of the parameters please see 4 2a Keyboard Track on page 75 There is one difference between the two however the AL 1 s Amp tracking is affected by Portamento so that it changes smoothly during glides Key Low Break C 1 G9 This sets the breakpoint note between the two lower ramps Center C 1 G9 This sets the center of the keyboard tracking At this key the keyboard tracking has no effect on the volume...

Страница 205: ...ary AMS modulation source to scale the intensity of AMS1 For a list of AMS sources see AMS Alternate Modulation Source List on page 967 Intensity 99 99 This controls the depth and direction of the Intensity Mod AMS Even if the main AMS1 Intensity is set to 0 Intensity Mod AMS can still control the final amount of AMS A over the full 99 range For example if AMS1 is set to LFO1 and Intensity Mod AMS...

Страница 206: ...hythmic effects When the threshold is positive the EG triggers when passing through the threshold moving upwards When the threshold is negative the EG triggers when passing through the threshold moving downwards Note with some LFO shapes and with faster LFO speeds the LFO may not always reach the extreme values of 99 or 99 In this case setting the Threshold to these values may cause inconsistent b...

Страница 207: ...Release 0 Linear 1 9 10 Exp Log This sets the curvature of the Release segment the transition from the Sustain level to the Release level 6 3c Level Modulation These settings let you use an AMS source to control the Level parameters of the EG The Start Attack and Break levels share a single AMS source but can each have different modulation intensities Note Once the EG has started a segment between...

Страница 208: ...ers of both AMS2 and AMS 3 are identical to those of AMS1 above 6 3 Page Menu Commands The number before each command shows its ENTER number key shortcut For more information on these shortcuts see ENTER 0 9 shortcuts for menu commands on page 138 0 Write Program For more information see Write Program on page 138 1 Exclusive Solo For more information see Exclusive Solo on page 138 2 Copy Envelope ...

Страница 209: ...rol over the sound of the EG Set up complex modulation of EG levels and times Set up an AMS source such as an LFO to restart the EG One thing that you can t do on this page is to control how much effect the EG has on the parameters it modulates To do that you ll need to adjust the AMS intensities on the pages for the individual parameters 7 1a EG Reset AMS List of AMS Sources This selects an AMS s...

Страница 210: ... the time it takes to move from the Attack level to the Break level Slope 00 99 This sets how long the EG takes to move from the Break level to the Sustain level Once it reaches the Sustain level the EG will stay there until note off unless it is reset via AMS Release 00 99 This sets how long it takes the EG to move from the Sustain level to the Release level Curve For the sake of simplicity most ...

Страница 211: ...the Start level Attack level or Attack time will not affect notes that are already sounding unless the EG is then reset via AMS AMS List of AMS Sources This selects an AMS source to control the EG s Level parameters For a list of AMS sources see AMS Alternate Modulation Source List on page 967 Start 99 99 This controls the depth and direction of the AMS modulation for the Start level For example i...

Страница 212: ...e AMS modulation for the Release time AMS2 and AMS3 These select the second and third AMS sources respectively for controlling the EG s Time parameters Each has its own intensities for Attack Decay Slope and Release The parameters of both AMS2 and AMS 3 are identical to those of AMS1 above 7 1 Page Menu Commands The number before each command shows its ENTER number key shortcut For more informatio...

Страница 213: ...apes 8 1a Step Sequencer Mode Loop One Shot Loop makes the Step Sequence loop continuously between the Start Step and the End Step One Shot makes the Step Sequence play once from the Start Step to the End Step and then hold at the End Step You can still reset the Step Sequencer from AMS to make it play again Start Step 1 32 This is the step on which the sequence will start If Mode is set to Loop t...

Страница 214: ...change continuously over the duration of the step For instance if you used an LFO as the Value AMS Input you d hear the LFO move over the duration of the step AMS Input S H grabs the level of the Value AMS Input source at the start of the step and then maintains that single value for the duration of the step Duration Base Note 1 32 This sets the basic length of the step relative to the system temp...

Страница 215: ...LFO For instance you can Select the LFO s basic waveform and modify it with the Shape parameter Control the LFO s frequency and assign AMS controllers to modulate the frequency Use the Key Sync parameter to choose whether the LFO runs separately for each voice or is synchronized across all of the voices Use the Fade and Delay parameters to control how long the LFO waits to start after note on and ...

Страница 216: ...S sources see AMS Alternate Modulation Source List on page 967 Intensity 99 99 This controls the depth and direction of the modulation Frequency 00 99 This controls the speed of the LFO before any modulation Higher values mean faster speeds as shown in the table below By using AMS modulation you can also get speeds much faster and much slower than are available through this basic setting Frequency...

Страница 217: ...O starts When Key Sync is Off the delay applies only to the first note of the phrase 8 2b Frequency Modulation You can use two alternate modulation sources AMS to adjust the speed of the LFO AMS1 List of AMS Sources This selects the first modulation source for the LFO frequency For a list of AMS sources see AMS Alternate Modulation Source List on page 967 Note that you can use LFO2 to modulate LFO...

Страница 218: ...Note by 01 32 This multiplies the length of the Base Note For instance if the Base Note is set to a sixteenth note and Times is set to 3 the LFO will cycle over a dotted eighth note 8 2 Page Menu Commands The number before each command shows its ENTER number key shortcut For more information on these shortcuts see ENTER 0 9 shortcuts for menu commands on page 138 0 Write Program For more informati...

Страница 219: ... A B adds two AMS sources together For more information see A B on page 90 Amt Ax B scales the amount of one AMS source with the other See Amt A x B on page 90 for more details Offset adds or subtracts a constant value to or from an AMS source For more information see Offset on page 91 Smoothing creates more gentle transitions between values smoothing out abrupt changes such as a quick move on a j...

Страница 220: ...Detune Pulse Width AMS Intensity absolute Oscillator 2 Oscillator 2 has the same Tone Adjust parameters as Oscillator 1 above Oscillators common Sync On Off absolute FM Amount absolute FM AMS Intensity absolute Mixer OSC 1 level absolute OSC 2 level absolute Sub OSC Audio Input level absolute Ring Mod level absolute Noise level absolute Filter A In addition to the standard Tone Adjust filter param...

Страница 221: ...the AL 1 adds the following separate controls LFO 3 Speed relative LFO 3 Fade relative LFO 3 Delay relative LFO 3 Stop absolute LFO 4 Speed relative LFO 4 Fade relative LFO 4 Delay relative LFO 4 Stop absolute LFO 1 2 3 and 4 Waveform absolute LFO 1 2 3 and 4 Shape absolute Step Sequencer In addition to supporting the standard Tone Adjust Common Step Sequencer parameters the AL 1 adds the followin...

Страница 222: ...to select the two envelopes you want to swap 3 Press the OK button to execute the Swap Envelope operation If you decide not to execute press the Cancel button Copy LFO This copies settings from one AL 1 LFO to another 1 Select Copy LFO to open the dialog box 2 Use the From field to select the copy source LFO 3 Use the To field to select the copy destination LFO 4 Press the OK button to execute the...

Страница 223: ...otary speaker amp vibrato chorus and so on These use up a small amount of processing power even if you re not playing any notes Because of this you can use only four CX 3s simultaneously in a Combination or Song If other EXis with fixed resources are in use the maximum number of CX 3s will be reduced accordingly Each EXi in each Program counts towards the maximum for instance a Program with two CX...

Страница 224: ...y edits made via Tone Adjust They do not update to show temporary changes made by AMS modulation For instance moving the joystick up JS Y will often switch the Rotary Speaker between fast and slow via AMS You ll hear the sound change but since the programmed parameter is still the same the display won t be updated CX 3 Drawbar Mode This shows whether the Drawbars are set to Normal or EX modes Pres...

Страница 225: ...Speaker page Rotary Speaker On Off This shows the On Off setting of the rotary speaker Mode Switch This shows the rotary speaker s Mode Switch Rotate Stop setting of the rotary speaker Speed Switch This shows the rotary speaker s Speed Switch setting Fast Slow Common The graphics along the right side of the screen show the most important Common parameters which are shared by both EXi in the Progra...

Страница 226: ...rfect set of tone wheels with no leakage noise By default these tone wheels have no additional overtones but you can add them by using the Overtone Level parameter below Drawbar Level Curve Bright Mellow This controls the way in which the tone wheel levels change in relation to pitch which contributes to the overall brightness of the sound Bright produces a crisp effect slightly brighter than trad...

Страница 227: ...1 Page Menu Commands The number before each command shows its ENTER number key shortcut For more information on these shortcuts see ENTER 0 9 shortcuts for menu commands on page 138 0 Write Program For more information see Write Program on page 138 1 Exclusive Solo For more information see Exclusive Solo on page 138 4 2 Controllers 4 2a Pitch Bend JS X 60 12 This sets the maximum amount of pitch b...

Страница 228: ...heel Brake Off On This parameter allows you to manually control the Wheel Brake Off is the default the tone wheels will turn normally Changing this to On will make the tone wheels gradually slow down and eventually stop altogether AMS List of AMS sources This selects an AMS source to control the Wheel Brake For a list of AMS sources see AMS Alternate Modulation Source List on page 967 AMS Mode Tog...

Страница 229: ...e Momentary Toggle This determines the behavior of Split Enable AMS For details see AMS Mode on page 218 Split Point C 1 G9 This sets the highest key of the lower split range Upper Octave Shift 2 octaves 2 octaves This raises or lowers the pitch of the Upper drawbars in one octave steps Lower Octave Shift 2 octaves 2 octaves This raises or lowers the pitch of the Lower drawbars in one octave steps...

Страница 230: ...e 16 drawbar normally sounds one octave below the played note If you play an F1 on the keyboard this would imply that the 16 sound at F0 Since this is far below the range of the tone wheels the 16 sounds at its lowest possible F an F2 5 2a Lower Drawbar Levels These parameters control the individual drawbar volume levels for the Lower split The drawbars express their pitches in terms of feet refer...

Страница 231: ...elow may only be perceptible in the lower octaves of the keyboard 5 3a Lower EX Drawbars These parameters control the individual EX drawbar pitches and volume levels for the Lower split EX Drawbar Pitch Mode Preset 1 4 Custom Presets 1 4 are the CX 3 s default Pitch settings for the set of four EX Drawbars When one of the Presets is selected the EX Drawbar 1 4 Pitch parameters below are grayed out...

Страница 232: ...ge Menu Commands The number before each command shows its ENTER number key shortcut For more information on these shortcuts see ENTER 0 9 shortcuts for menu commands on page 138 0 Write Program For more information see Write Program on page 138 1 Exclusive Solo For more information see Exclusive Solo on page 138 2 Copy Drawbars For more information see Copy Drawbars on page 234 3 Swap Drawbars For...

Страница 233: ...1b Level Level Soft Loud This toggles the Percussion Level between Soft and Loud The actual volume levels are determined by the Loud Level and Soft Level parameters below Note that the Percussion Level parameter can also affect the volume of the drawbars as controlled by the Loud Drawbar Attenuation parameter AMS List of AMS Sources This selects an AMS source to switch the Percussion Level between...

Страница 234: ...ces the same pitch as the 4 drawbar one octave higher than the 8 3rd produces the same pitch as the 2 2 3 drawbar one octave and a fifth higher than the 8 AMS List of AMS Sources This selects an AMS source to switch the Harmonic between 2nd and 3rd For a list of AMS sources see AMS Alternate Modulation Source List on page 967 AMS Mode Toggle Momentary This determines the behavior of the Harmonic A...

Страница 235: ... 0 8 This sets the volume of the 5 1 3 drawbar within the Percussion pulse EX Drawbar 1 0 8 This sets the volume of EX Drawbar 1 within the Percussion pulse EX Drawbar 2 0 8 This sets the volume of EX Drawbar 2 within the Percussion pulse 6 2 Page Menu Commands The number before each command shows its ENTER number key shortcut For more information on these shortcuts see ENTER 0 9 shortcuts for men...

Страница 236: ...te Modulation Source List on page 967 Intensity 99 99 This controls the depth and direction of the AMS modulation of Amp Gain 7 1b EQ Treble 10 10 This adjusts the high frequency range of the amp as selected by Amp Type Mid 10 10 This adjusts the mid frequency range of the amp as selected by Amp Type Bass 10 10 This adjusts the low frequency range of the amp as selected by Amp Type 7 1c Vibrato Ch...

Страница 237: ...r Chorus AMS List of AMS Sources This selects an AMS source to modulate the Type For a list of AMS sources see AMS Alternate Modulation Source List on page 967 Intensity 05 05 This controls the depth and direction of the AMS modulation for the Type 7 1e Custom These parameters are available only if the Mode above is set to Custom Mix 0 100 This adjusts the balance between the Vibrato and Chorus ef...

Страница 238: ...face AMS List of AMS Sources This selects an AMS source to modulate Pan Note that all notes of the organ share the same Pan value For a list of AMS sources see AMS Alternate Modulation Source List on page 967 Intensity 99 99 This controls the depth and direction of the AMS modulation for Pan 7 1 Page Menu Commands The number before each command shows its ENTER number key shortcut For more informat...

Страница 239: ...Mode switch AMS For details see AMS Mode on page 218 Speed Speed Switch Fast Slow The Rotary Speaker has two basic speeds and this allows you to switch between the two You can set the speeds of the horn and rotor sections separately for both the Fast and Slow settings as well as the time that it takes them to speed up and slow down For more information see the Horn and Rotor sections below on page...

Страница 240: ...00 This adjusts the distance between the Rotor and its microphones Lower values bring the mics closer to the speaker Rotor Mic Spread 000 100 This adjusts the distance between the two Rotor microphones to widen the stereo field Higher values increase the stereo effect 7 2e Horn Rotor Horn Rotor Balance Rotor 1 99 Horn This sets the output balance between the high frequencies of the Horn and the lo...

Страница 241: ...For more information see A B on page 90 Amt AxB scales the amount of one AMS source with the other See Amt A x B on page 90 for more details Offset adds or subtracts a constant value to or from an AMS source For more information see Offset on page 91 Smoothing creates more gentle transitions between values smoothing out abrupt changes such as a quick move on a joystick or a sharp edge on an LFO Fo...

Страница 242: ...e Program Drawbars Upper Drawbars 1 9 Lower Drawbars 1 9 Upper EX Drawbars 1 4 Lower EX Drawbars 1 4 Noise level Leakage level Wheel Brake Overtone Level Key On Click Level Percussion Percussion On Off Level Soft Loud Decay Slow Fast Harmonic 2nd 3rd EX Percussion levels 1 5 Vibrato Chorus Vibrato Chorus Type Upper Drawbars V C On Off Lower Drawbars V C On Off Expression Expression Level Amp Amp G...

Страница 243: ... This allows you to play a bass line with percussion as in ELP s Tarkus Percussion parameters changed to absolute values Instead of relative offsets you can directly set the values for Percussion Slow and Fast Decay and Percussion Loud and Soft Vibrato Chorus custom mode added In addition to the six traditional presets you can create your own custom settings which can then be modulated via AMS Rot...

Страница 244: ... the copy destination drawbars 4 Press the OK button to execute the Copy Drawbars operation If you decide to cancel press the Cancel button Swap Drawbars This exchanges drawbar or EX drawbar settings within the CX 3 oscillator 1 Select Swap Drawbars to access the dialog box 2 Use the Source1 and Source2 fields to specify the two sets of drawbars you want to exchange 3 Press the OK button to execut...

Страница 245: ...tional multi mode resonant filter dedicated to the string excitation Live audio input including modeled feedback Four per voice LFOs five re triggerable EGs two key tracking generators a string tracking generator and four AMS mixers Access to all standard EXi Program features including the Common LFO Common Step Sequencer Key Track 1 2 KARMA EQ and effects as well as layering with any other EXi in...

Страница 246: ...FO1 EG1 4 LFO1 String Track 1 2 Amp String EQ Feedback Main Filter Mixer Excitation Filter LFO1 AMS Mixer 1 4 Filter Key Track STR 1 Overview Amp Key Track Pickup 1 Pickup 2 Damping Disp String Track Fret Position Audio per voice Modulation Legend Audio per Program Audio Modulation PCM ...

Страница 247: ... Pluck This area shows the selected Pluck Type and Width Touch this area to jump to the 4 1 Pluck and Noise page PCM Oscillator This area shows the four Multisamples selected for the PCM Oscillator Colors are used to distinguish between the various possibilities as detailed below Red ROM Multisamples Green RAM Multisamples Grey Off Touch this area to jump to the 4 2 PCM Oscillator page Excitation ...

Страница 248: ...mon The graphics along the right side of the screen show the most important Common parameters which are shared by both EXi in the Program This section will always show the same parameters regardless of which EXi are being used Common Voice Assign Mode This shows the voice assign mode of the Program either POLY or MONO Press this area to jump to the Program Basic page Common Step Sequencer This sho...

Страница 249: ...ion Position between 5 and 35 Square Pluck With randomization turned up this sounds like bright clav or harpsichord Midrange Pluck This is similar to Square Pluck but with more midrange harmonics Smooth Pulse This has very few harmonics for a mellow and full tone Resonant Pulse This is similar to Smooth Pulse but brighter and more resonant Dark Clav Midrange Clav Bright Clav These offer variations...

Страница 250: ...row higher values as you play higher on the keyboard Similarly when using the PCM oscillator or noise generator as the excitation use an EG to control the level at the Excitation mixer or the cutoff of the Excitation Filter and then scale the EG times so that they become shorter as you play higher on the keyboard Try setting the Excitation Position Tone to 100 In the main mixer use the pickups ins...

Страница 251: ... of the amplitude it will tend to sound like bowing In this case using a bit of constant Harmonic Pressure can produce a good effect among other things this removes some energy from the string Using the string as a comb filter for PCM You can use the string as a comb filter for the PCM Oscillator To do so 1 Follow the steps under Creating an initialized STR 1 Program on page 242 2 Press the EXi 1 ...

Страница 252: ...ntly loaded EXs banks will appear on this menu Note that unlike the HD 1 you can only select mono Multisamples Multisample Select List This parameter lets you select a Multisample for the velocity zone You can use any mono Multisample or the left or right channel of a stereo Multisample Some Multisamples may have an upper limit to their keyboard range over which they may not produce any sound Mult...

Страница 253: ...ameters for MS4 are also similar to those for MS1 except that MS4 has no setting for Bottom Velocity which is always fixed at 1 4 2 Page Menu Commands The number before each command shows its ENTER number key shortcut For more information on these shortcuts see ENTER 0 9 shortcuts for menu commands on page 138 0 Write Program For more information see Write Program on page 138 1 Exclusive Solo For ...

Страница 254: ...fected by the MIDI CCs The other element will always have Portamento off regardless of the MIDI CCs Enable Off On On checked Turns on Portamento so that pitch glides smoothly between notes Off unchecked Turns off Portamento This is the default state Fingered Off On This parameter allows you to control Portamento through your playing style When it s enabled playing legato will turn on Portamento an...

Страница 255: ...e effect of the EG is reversed positive EG values mean lower pitches and negative EG values mean higher pitches AMS AMS Sources This selects an AMS modulation source to scale the amount of the Pitch EG applied to the PCM Oscillator For a list of AMS sources see AMS Alternate Modulation Source List on page 967 Intensity 48 00 48 00 This controls the depth and direction of the pitch EG AMS modulatio...

Страница 256: ... the intensity of AMS 1 Intensity 100 100 This controls the depth and direction of the Intensity Mod AMS AMS 2 AMS Sources This selects a second modulation source to control the PCM Oscillator Level For a list of AMS sources see AMS Alternate Modulation Source List on page 967 Intensity 100 100 This controls the depth and direction of AMS 2 4 4b Pluck These parameters control the Pluck Table s inp...

Страница 257: ...ments of 1 10 of an octave The specific effect of the cutoff frequency will change depending on the selected Filter Type as described above AMS 1 List of AMS Sources This selects the first modulation source for controlling the Frequency For a list of AMS sources see AMS Alternate Modulation Source List on page 967 Intensity 100 100 This controls the depth and direction of the AMS 1 Frequency modul...

Страница 258: ...t the nut just before the headstock Usually values between 8 0 and 25 0 should work well 50 0 is the middle of the string The timbres of different values are approximately symmetric around this position except for very near the ends of the string In other words 60 0 produces a similar timbre to 40 0 75 0 is similar to 25 0 and so on The delay between the excitation and the pickups will change howe...

Страница 259: ...hough other settings may give good results depending on the particular excitation signal 100 also works well to counteract the low end thump which can be caused by low frequency excitation signals including plucks with very low or negative Width values Other Tone settings will make the comb filter described under Position above work differently Settings between 100 and 0 will reduce the effect of ...

Страница 260: ...llow the instructions under Creating an initialized STR 1 Program on page 242 2 Assign EG3 to Harmonic AMS1 and set the Intensity to 100 0 3 On the EG3 page P7 3 set the Break and Sustain levels to 00 4 Adjust the Decay Time between 0 and 20 and listen to the way the sound changes This controls the amount of time that the string is being pressed down As you increase this time the harmonic tone wil...

Страница 261: ...l controls the output level of the STR 1 as a whole so the final release time will be a combination of the String Release and the Amp EG For more information see Decay above AMS List of AMS Sources This selects a modulation source to control the Release For a list of AMS sources see AMS Alternate Modulation Source List on page 967 Intensity 100 100 This controls the depth and direction of the Rele...

Страница 262: ...ource to modulate the intensity of AMS 1 Intensity 100 0 100 0 This controls the depth and direction of the Intensity Mod AMS AMS 2 List of AMS Sources This selects a second modulation source to control the Damping For a list of AMS sources see AMS Alternate Modulation Source List on page 967 Intensity 100 0 100 0 This controls the depth and direction of AMS 2 AMS 3 List of AMS Sources This select...

Страница 263: ...n Intensity Mod AMS List of AMS Sources This selects an AMS source to modulate the intensity of AMS 1 Intensity 100 0 100 0 This controls the depth and direction of the Intensity Mod AMS AMS 2 List of AMS Sources This selects a second modulation source to control the Dispersion For a list of AMS sources see AMS Alternate Modulation Source List on page 967 Intensity 100 0 100 0 This controls the de...

Страница 264: ...ter and negative values will cause the pitch to fall When you lift off of the ribbon the pitch will snap back to the center unless you re using the SW1 2 Ribbon Lock feature So by tapping on the right edge of the ribbon and then releasing quickly you can create guitar style hammer on effects JS X 60 60 semitones This sets the maximum amount of pitch bend in semitones when you move the joystick to ...

Страница 265: ...tick up from the center detent position away from yourself produces the JS Y controller You can use this to scale the amount of the LFO applied to the pitch This parameter sets the maximum amount of LFO modulation added by JS Y in semitones As this value is increased moving the joystick in the Y direction will cause the LFO to produce deeper pitch modulation Negative settings will invert the phase...

Страница 266: ...dulate AMS 2 s Intensity from another AMS source This selects that source Intensity 48 00 semitones This controls the depth and direction of the Intensity Mod AMS in semitones The result is summed with the main AMS 2 Intensity to produce the final pitch modulation amount 4 7 Page Menu Commands The number before each command shows its ENTER number key shortcut For more information on these shortcut...

Страница 267: ...brations get past it The higher the Pickup Position the lower the range in which this can occur The normal range of a guitar is much less than that of a 76 or 88 note keyboard and higher pickup positions may make sense and make sound only when playing within that normal guitar range Also note that this can only happen when the Tracking Mode is set to String Track Pickup Position AMS List of AMS So...

Страница 268: ... For a list of AMS sources see AMS Alternate Modulation Source List on page 967 Intensity 10 00 10 00 This controls the depth and direction of the Distance AMS modulation Orientation degrees 180 180 This models turning the guitar away from the amp Turning the guitar primarily affects the tone of the feedback but also affects the pitch and the volume AMS List of AMS Sources This selects a modulatio...

Страница 269: ...tring Level AMS modulation Balance 0 100 This controls the filter routing for the String It applies only when the Filter Routing is set to either Serial or Parallel otherwise it is grayed out 0 is the default and means that the String goes into Filter A If the Filter Routing is set to Serial it will also pass through Filter B 99 means that the String goes into Filter B In between the String will g...

Страница 270: ... 4 9e Pickup 2 Pickup 2 has the same mixer parameters as described under 4 9a String above 4 9 Page Menu Commands The number before each command shows its ENTER number key shortcut For more information on these shortcuts see ENTER 0 9 shortcuts for menu commands on page 138 0 Write Program For more information see Write Program on page 138 1 Exclusive Solo For more information see Exclusive Solo o...

Страница 271: ...t of Filter B 2 Set all of the mixer s Balance controls to 0 This makes all of the inputs go to Filter A first and then through Filter B Standard parallel configuration To create a standard parallel filter configuration 1 Set the Filter Routing to Parallel 2 Set all of the mixer s Balance controls to 50 This routes all of the inputs to both filters at equal volumes Dual signal paths You can also s...

Страница 272: ...uencies its effect can change dramatically depending on the cutoff setting and the oscillator s multisample With low resonance settings you can use the Band Pass filter to create telephone or vintage phonograph sounds With higher resonance settings it can create buzzy or nasal timbres Band Reject This filter type also called a notch filter cuts only the parts of the sound directly around the cutof...

Страница 273: ...tion Source List on page 967 Intensity 99 99 This controls the depth and direction of the Resonance modulation Pan Random L001 C064 R127 This controls the stereo pan for Filter A s output It is available only when Filter Routing is set to Parallel When the Filter Routing is set to Single Serial or 24dB oct the Pan parameters will be grayed out AMS AMS Sources This selects an AMS source to modulate...

Страница 274: ...page will be reflected on the Filter Basic page and vice versa 5 2b Mode Crossfade Mode 1 List of filter types This sets the filter type for Mode 1 Low Pass High Pass Band Pass and Band Reject are the standard filter types For more information see Filter Type on page 262 The following types combine two or more filters at equal volumes Dry is the un filtered input signal The minus sign indicates wh...

Страница 275: ...e Highpass 99 99 This sets the volume of the Highpass filter output Bandpass 99 99 This controls the volume of the Bandpass filter output Dry 99 99 This sets the volume of the dry signal 5 2d Manual 2 The Manual 2 parameters are identical to those of Manual 1 as described above 5 2 Page Menu Commands The number before each command shows its ENTER number key shortcut For more information on these s...

Страница 276: ...al settings which create abrupt changes for split like effects When a ramp is set to Inf or Inf the keyboard tracking will go to its extreme highest or lowest value over the span of a single key For more detailed explanations please see 3 2a Keyboard Track on page 63 Bottom Low Inf 99 99 Inf This sets the slope between the bottom of the MIDI note range and the Low Break key For normal key track us...

Страница 277: ... Sources This selects the first modulation source to control Filter A s Frequency For a list of AMS sources see AMS Alternate Modulation Source List on page 967 Intensity 99 99 This controls the depth and direction of the Frequency modulation Intensity Mod AMS List of AMS Sources This selects an AMS source to modulate the intensity of AMS 1 Intensity 99 99 This controls the depth and direction of ...

Страница 278: ...wards yourself produces the JS Y controller You can use this to scale the amount of the LFO applied to Filter A This parameter sets the maximum amount of LFO modulation added by JS Y AMS AMS Sources This selects an AMS modulation source to scale the amount of the LFO applied to Filter A s cutoff frequency For a list of AMS sources see AMS Alternate Modulation Source List on page 967 Intensity 99 9...

Страница 279: ... s overall volume via MIDI using both Volume CC 7 and Expression CC 11 When used one at a time the two controllers work in exactly the same way a MIDI value of 127 is equal to the Amp Level setting and lower values reduce the volume If both CC 7 and CC 11 are used simultaneously the one with the lower value determines the maximum volume and the one with the higher value scales down from that maxim...

Страница 280: ... things you can Set up complex keyboard tracking shapes to control the Amp level Assign AMS modulation for the Amp level Control the effect of the LFOs on the Amp level The total effects of the modulation can increase the volume to a maximum of two times louder than the Amp Level setting 6 2a Keyboard Track Keyboard tracking lets you vary the volume as you play up and down the keyboard Usually som...

Страница 281: ... Alternate Modulation Source List on page 967 Intensity 99 99 This controls the depth and direction of the Intensity Mod AMS Even if the main AMS1 Intensity is set to 0 Intensity Mod AMS can still control the final amount of AMS A over the full 99 range For example if AMS1 is set to LFO1 and Intensity Mod AMS is set to After Touch positive settings mean that aftertouch will increase the amount of ...

Страница 282: ...ic effects When the threshold is positive the EG triggers when passing through the threshold moving upwards When the threshold is negative the EG triggers when passing through the threshold moving downwards Note with some LFO shapes and with faster LFO speeds the LFO may not always reach the extreme values of 99 or 99 In this case setting the Threshold to these values may cause inconsistent behavi...

Страница 283: ...n level Release 0 Linear 1 9 10 Exp Log This sets the curvature of the Release segment the transition from the Sustain level to the Release level 6 3c Level Modulation These settings let you use an AMS source to control the Level parameters of the EG The Start Attack and Break levels share a single AMS source but can each have different modulation intensities Note Once the EG has started a segment...

Страница 284: ...rs of both AMS2 and AMS 3 are identical to those of AMS1 above 6 3 Page Menu Commands The number before each command shows its ENTER number key shortcut For more information on these shortcuts see ENTER 0 9 shortcuts for menu commands on page 138 0 Write Program For more information see Write Program on page 138 1 Exclusive Solo For more information see Exclusive Solo on page 138 2 Copy Envelope F...

Страница 285: ... EG 2 Pitch Please take these names as suggestions rather than restrictions If you like you re free to use these envelopes to control any EG or AMS destination or to use other EGs to control Filter Frequency or Pitch 7 1 EG 1 Filter 7 2 EG 2 Pitch 7 3 EG 3 7 4 EG 4 The STR 1 s EGs 1 4 are identical to the AL 1 s EG1 For detailed explanations please see 7 1 EG 1 Filter on page 199 Program P8 LFO 1 ...

Страница 286: ... String Track The String Track tracking generators allow you to scale parameters based on the string on which the note is played This helps to model the sonic characteristics of the different strings such as different materials as with the nylon and steel strings of an acoustic guitar different gauges of strings and so on 9 1 AMS Mixers 1 2 9 2 AMS Mixers 3 4 The STR 1 s AMS Mixers are identical t...

Страница 287: ...g pitches This changes the break points for all of the String Track generators at once This means that as the Fret Position increases the same note will be played in higher positions on the neck using lower strings The current fret position in other words the combination of Fret Position and its AMS is itself available as the AMS source named appropriately Fret Position AMS List of AMS Sources Thi...

Страница 288: ...Control Surface page as well as in the popup menu Some parameters with longer names may show an abbreviation for the slider knob and switch labels Pluck Pluck Type Pluck Randomization Pluck Delay Pluck Width Pluck Width AMS1 Intensity Noise Noise Saturation Noise Filter Frequency PCM Oscillator PCM Osc MS Select PROG 0 16383 PCM Osc MS Bank MS ROM Mono EXs7 Mono PCM Osc MS Min meta PCM Osc MS Max ...

Страница 289: ...ion to the standard Tone Adjust filter parameters the STR 1 adds the following Filter A Type Filter A Cutoff Filter A Resonance Filter A EG Intensity Filter A LFO Intensity Filter B Filter B has the same Tone Adjust parameters as Filter A above Amp Amp AMS 1 Intensity Amp AMS 2 Intensity EGs In addition to supporting the standard Tone Adjust EG parameters the STR 1 adds the following separate cont...

Страница 290: ...EXi STR 1 Plucked String 280 ...

Страница 291: ... LFOs AMS modulation of all original MS 20 parameters along with four AMS Mixers Live audio input External Signal Processor with dedicated filters triggering and audio to CV conversion Access to all standard EXi Program features including the Common LFO Common Step Sequencer Key Track 1 2 KARMA EQ and effects as well as layering with any other EXi including using two MS 20EXs together MS 20EX uses...

Страница 292: ...nd value of the current parameter along with other related information 2 Use any of the data entry controls to edit the value You can use the value slider the inc dec buttons the rotary dial or the numeric keypad As you edit the value notice that the graphic knob moves and that the value in the Parameter Details area changes as well Editing on off switches To edit an on off switch such as the MG K...

Страница 293: ...utoff frequencies for the Highpass and Lowpass filters Touch this area to jump directly to the Oscillators Filters page MG EG Mod This section shows the waveform and frequency of the MG and the Attack and Release times for EGs 1 and 2 Touch this area to jump directly to the MG EG Modulation page Patch Panel This section shows a miniature overview of the Patch Panel with its cables and jacks Touch ...

Страница 294: ... the Common Step Sequencer page Common LFO Graphic This shows the waveform of the Common LFO Press this area to jump to the Common LFO page 3 Band EQ Graphic This shows the mid sweepable 3 band EQ Press this area to jump to the EQ page IFX MFX TFX Press the IFX area to jump to the IFX Routing page Press the MFX TFX area to jump to the MFX Routing page KARMA GE Name This shows the name of the selec...

Страница 295: ...bed below White Noise This is an un pitched sound containing equal amounts of all frequencies The original MS 20 manual suggests using this for wind surf gunshot percussion and other such effects PW 0 00 10 00 50 0 This adjusts the pulse width when Oscillator 1 s Waveform is set to Square Pulse 0 00 produces a square wave Increasing the value produces narrower pulses until at 10 00 the pulse is so...

Страница 296: ...ram page 1 8 Controller Setup 2 Under Panel Switch Assign set either SW1 or SW2 to Portamento SW CC 65 Now the selected switch will enable and disable Portamento It will also send the MIDI Portamento controller CC 65 Even if you don t assign SW1 2 to Portamento you can still use MIDI Controller 65 to turn Portamento on and off FINE TUNE FINE TUNE 5 00 5 00 This adjusts the pitch of the oscillators...

Страница 297: ...tches over about one and a half octaves CUTOFF FREQUENCY MODULATION HPF MG T EXT 0 00 10 00 If nothing is connected to the patch panel s TOTAL input jack this adjusts the depth to which the MG will modulate the filter cutoff frequency If a cable is connected to the TOTAL input jack this controls the depth of modulation from that signal For more information see TOTAL input jack on page 295 EG2 EXT ...

Страница 298: ...S sources as described below Parameter group This shows the group of the parameter such as VCO MIXER Parameter name range depends on parameter This shows the name and exact value of the parameter You can edit the parameter value with any of the standard data entry controls AMS List of AMS Sources This selects a modulation source to control the selected parameter For a list of AMS sources see AMS A...

Страница 299: ...instance EG 1 and EGs 3 6 may be routed to the Patch Panel s VCA INITIAL GAIN input EGs 3 6 may control the VOLUME knob via AMS Via AMS EGs 3 6 may also control the levels of other modulation sources such as EGs 1 2 the MG LFOs etc routed through MIXER 1 or MIXER 2 and then patched to the VCA INITIAL GAIN input To handle all of these possible cases instead of using a fixed Amp EG to determine when...

Страница 300: ... expect When using the MG to trigger the EGs however this makes perfect sense the EGs start when the LED goes on and release when the LED goes off 5 1c ENVELOPE GENERATOR 1 By default EG 1 is triggered by note ons However you can use the Patch Panel s TRIG IN or EG 1 TRIG IN jacks to trigger it from a different source such as the MG AMS sources or the ESP s TRIG OUT jack For more information see T...

Страница 301: ... the Patch Panel page select the main VOLUME knob 2 Set the VOLUME knob to 0 3 Set the VOLUME AMS Intensity to 10 00 4 Assign the desired EG 3 6 as the knob s AMS source 5 Set the VOICE ALLOCATION parameter to the same EG 6 Select the Mod Switch jack 7 Set the Mod Switch AMS Source to AMS Mixer 1 8 In AMS Mixer 1 set the Type to Gate the Source to Note Number and the Threshold to 99 9 Set both Bel...

Страница 302: ...first input LEVEL B 10 00 10 00 This sets the level and polarity of the second input 5 1h Parameter Details When you touch a knob a yellow square appears around it showing that it has been selected This area shows details for the selected knob including its parameter group and parameter name its exact value and its AMS assignments Individual parameters and AMS The EXTERNAL MODULATION knobs BASE NO...

Страница 303: ...ng a distribution amplifier Connections from one input to another or from one output to another are not allowed Making connections To make a connection between two patch points 1 Touch one of the two jacks either input or output A yellow square will appear around the selected jack The Detail Panel will also show the name of the selected jack and what it is connected to 2 Touch the same jack again ...

Страница 304: ...ual access to each of the two oscillators two filters and final VCA Separate EXi AUDIO INPUT and BAND PASS FILTER IN which allow you to route signals through the band pass filter and or frequency to cv converter while using the audio input separately Dual two input mixers with phase inversion These modifications open up many new possibilities such as Route VCO 1 through the HPF and VCO 2 through t...

Страница 305: ...d 1 Select the KBD TRIG OUT jack 2 In the Parameter Details box set Trigger On to Note Gate For more information see KBD TRIG OUT jack on page 302 6 1a VCOs 1 and 2 For descriptions of the VCO parameters see 4 1a Oscillators on page 285 VCO 1 OUT jack This Patch Panel modification provides the output of VCO 1 VCO 2 OUT jack This Patch Panel modification provides the output of VCO 2 TOTAL input jac...

Страница 306: ... determines the maximum volume and the one with the higher value scales down from that maximum SIGNAL OUT jack On the original MS 20 this was the final output With the MS 20EX you may find it useful for routing the overall output signal back into the patch such as for creating a feedback loop Note that connecting to this jack does not mute the output signal PHONES output jack On the original MS 20...

Страница 307: ...n generate a random value at note on by connecting the KBD TRIG OUT to the CLOCK input This will also let through additional values at note off which may or may not be desirable If you d prefer to generate a random value at note on only 1 Connect the WHITE or PINK output of the NOISE GENERATOR to the SAMPLE HOLD IN jack 2 Connect the Switch output to the CLOCK input 3 Leave the Switch AMS source s...

Страница 308: ...an white noise with reduced high frequency components WHITE output jack White noise is classic broad band noise Note that white noise is also available as a waveform in VCO 1 6 1h Mod Wheel and Mod Switch The Mod Wheel and Switch jacks allow you to select any AMS source controllers EGs LFOs step sequencer etc scale it via Intensity and then route the signal into the patch panel For more informatio...

Страница 309: ...N jack This mono input lets you route audio from elsewhere in OASYS through the MS 20EX You can use any of the audio inputs any of the audio outputs the REC buses the FX Control buses or the outputs of any of the Insert Master or Total Effects You can also route live or recorded audio through the MS 20EX in realtime and we re sure that you ll be able to think of other creative uses The audio input...

Страница 310: ...e Bandpass filter Only frequencies lower than this will pass through the filter BAND PASS FILTER OUT jack This is the output of the Bandpass filter Frequency to Voltage F V CONVERTER This converter generates a control voltage signal based on the pitch of the audio input which you can then use to control the pitch of the VCOs CV ADJUST knob 0 00 10 00 Adjust this so that the input signal and the sy...

Страница 311: ...nnect the ESP s TRIG OUT jack to the TRIG IN jack This makes EG1 and EG2 respond to the ESP s trigger output instead of the keyboard 7 Connect the ENV OUT jack to the VCA s INITIAL GAIN jack This makes the VCA level follow the amplitude of the ESP s signal as generated by the envelope follower 8 Connect the F V CV OUT jack to the VCO 1 2 CV IN jack or the VCO 2 CV IN jack This makes the pitch of t...

Страница 312: ...is jack lets you select the trigger type as below Trigger On Note Gate Sustain Note Gate Note Gate Sustain is the default and is most appropriate for general use Note Gate is useful for keyboard trigger operation within self triggering patches For more information see Tip Creating self triggering patches on page 295 Knobs If a knob is selected this area shows its parameter group and parameter name...

Страница 313: ...dentical to those of the AL 1 For detailed explanations please see 8 2 LFO 1 on page 205 Program P9 AMS Mixers The AMS Mixers combine two AMS sources into one or process an AMS source to make it into something new For instance they can add two AMS sources together or use one AMS source to scale the amount of another You can also use them to modify the response of realtime controllers The AMS Mixer...

Страница 314: ...l to those of the AL 1 although the MS 20EX has four to the AL 1 s two For detailed explanations please see 9 1 AMS Mixer on page 209 EXi MS 20EX Page Menu Commands Delete All Connections This command removes all of the connections from the Patch Panel so that you can start from a blank slate ...

Страница 315: ... which is normalled to both filter cutoff and amplitude Filter Amp EG Decay Time 99 99 CC 75 This scales the decay time of EG2 It interacts with CC 75 Filter Amp EG Sustain Level 99 99 CC 70 This scales the sustain level of EG2 Filter Amp EG Release Time 99 99 CC 72 This scales the release time of EG2 Filter EG Amp EG and Pitch EG Attack Time Decay Time Sustain Level Release Time are not supported...

Страница 316: ...MG T Ext HPF Mod EG2 Ext LPF LPF Frequency LPF Peak CUTOFF FREQUENCY MODULATION LPF LPF Mod MG T Ext LPF Mod EG2 Ext PITCH Bend Range Transpose MODULATION GENERATOR MG MG Key Sync MG Tempo Sync MG Base Note MG Frequency MG Times MG Wave Form ENVELOPE GENERATOR 1 EG1 Delay Time EG1 Attack Time EG1 Release Time ENVELOPE GENERATOR 2 EG2 Hold Time EG2 Attack Time EG2 Decay Time EG2 Sustain Level EG2 R...

Страница 317: ...O Common Step Sequencer Key Track 1 2 KARMA EQ and effects as well as layering with any other EXi including using two PolysixEXs together PolysixEX uses EXi fixed resources The PolysixEX uses EXi fixed resources for its built in effects These take up a small amount of processing power even if you re not playing any notes Because of this you can use only 16 PolysixEXs simultaneously in a Combinatio...

Страница 318: ...t parameter along with other related information 2 Use any of the data entry controls to edit the value You can use the value slider the inc dec buttons the rotary dial or the numeric keypad As you edit the value notice that the graphic knob or switch moves and that the value in the Parameter Details area changes as well Editing on off switches To edit an on off switch such as the MG KEY SYNC butt...

Страница 319: ...mportant oscillator filter envelope and modulation generator parameters Touch this area to jump directly to the main PolysixEX page Arpeggiator This section shows the arpeggiator parameters Touch this area to jump directly to the Modulation Arpeggiator page EGs and LFOs EG 2 3 Graphics These show the shapes of the two multi stage EGs Touch either of them to jump directly to the corresponding edit ...

Страница 320: ...form of the Common LFO Press this area to jump to the Common LFO page 3 Band EQ Graphic This shows the mid sweepable 3 band EQ Press this area to jump to the EQ page IFX MFX TFX Press the IFX area to jump to the IFX Routing page Press the MFX TFX area to jump to the MFX Routing page KARMA GE Name This shows the name of the selected KARMA GE Press this area to jump to the GE Setup Key Zones page ...

Страница 321: ... PW but uses a dedicated LFO to modulate the waveform The speed of the LFO is controlled by PWM SPEED below The PW PWM setting determines the maximum width PW PWM 0 00 10 00 When WAVEFORM is set to PW this directly controls the shape of the waveform When WAVEFORM is set to PWM this controls the maximum pulse width when being modulated by the dedicated PWM LFO When PW PWM is set to 0 00 the LFO wil...

Страница 322: ...gato do not cause the phase to be reset This parameter is not modulatable via AMS BASE NOTE 1 1 1 32 When TEMPO SYNC is ON this sets the basic speed of the MG relative to the system tempo The values range from a 32nd note to a whole note including triplets This value is then multiplied by the FREQUENCY TIMES knob below When TEMPO SYNC is OFF this parameter has no effect This parameter is not modul...

Страница 323: ...e main control source for the volume EG means that the volume is controlled by the ADSR envelope You can also use EGs 2 or 3 to modulate the main VOLUME parameter via AMS Gate means that the volume goes to maximum immediately at note on and falls to silence immediately at note off ATTENUATOR 20 0 20 0dB Adjusts the volume up or down by 20dB in 0 1 dB increments This is separate from the main VOLUM...

Страница 324: ...r name range depends on parameter This shows the name and exact value of the parameter You can edit the parameter value with any of the standard data entry controls Knobs AMS List of AMS Sources This selects a modulation source to control the selected parameter For a list of AMS sources see AMS Alternate Modulation Source List on page 967 Intensity range depends on parameter This controls the dept...

Страница 325: ...h command shows its ENTER number key shortcut For more information on these shortcuts see ENTER 0 9 shortcuts for menu commands on page 138 0 Write Program For more information see Write Program on page 138 1 Exclusive Solo For more information see Exclusive Solo on page 138 ...

Страница 326: ...applied to the amp VCA MG LEVEL 10 00 10 00 Specifies the depth and direction of the modulation applied to the MG Modulation Generator LEVEL Source 2 This allows you to route a second AMS source to the same list of mod destinations The parameters are identical to those under Source 1 above 5 1b ARPEGGIATOR ON OFF Off On Switches the arpeggiator on off KEY SYNC Off On If this setting is ON the arpe...

Страница 327: ...AMS Sources This selects the first modulation source to control the selected parameter For a list of AMS sources see AMS Alternate Modulation Source List on page 967 Intensity range depends on parameter This controls the depth and direction of the AMS modulation The range is the same as the selected parameter in both positive and negative directions For instance if the parameter range is 0 00 10 0...

Страница 328: ...hortcuts see ENTER 0 9 shortcuts for menu commands on page 138 0 Write Program For more information see Write Program on page 138 1 Exclusive Solo For more information see Exclusive Solo on page 138 Program P7 EG 2 3 The PolysixEX has two assignable EGs in addition to the original EG Each of these can be used as an AMS modulation source to control a wide variety of parameters 7 1 EG 2 7 2 EG 3 The...

Страница 329: ...ter PolysixEX Tone Adjust parameters In addition to the Common Tone Adjust parameters listed above the PolysixEX adds a number of its own parameters Note that these additional parameters are separate for each EXi as opposed to being shared by both EXi in the Program All of the additional parameters are listed below Tone Adjust parameters may affect the internal parameters in one of two ways they m...

Страница 330: ... Sync MG Base Note MG Frequency MG Frequency AMS Int MG Sync Times MG Sync Times AMS Int MG Delay MG Level MG Level AMS Int MG Mode PITCH Transpose Transpose AMS Int Tune Tune AMS Int EFFECTS Effect Mode Effect Spread Effect Spread AMS Int Effect Speed Intensity Effect Speed AMS Int ARPEGGIATOR Arpeg On off Arpeg Key Sync Arpeg Tempo Sync Arpeg Base Note Arpeg Speed Arpeg Speed AMS Int Arpeg Times...

Страница 331: ...ng 0 1 Program Select Mixer This is the main page for selecting and playing Combinations You can also set the Program status pan and volume for each of the 16 Timbres Tip Wherever you are in the Combination mode pages pressing EXIT three times or fewer will take you back to this page and select the Combination name You can then immediately use the numeric keys or switches to select a different Com...

Страница 332: ...u can use the Favorite function to view and select combinations whose Favorite setting is on You can use a foot switch to select combinations For more information see the Global parameter Foot Switch Assign on page 659 For a list of the functions that can be assigned to the footswitch see Foot Switch Assignments on page 981 You can transmit MIDI program changes from a connected external MIDI devic...

Страница 333: ... of each combination can be specified in the Write Combination dialog box Favorite Off On On checked Turns on the Favorite setting for combinations Only combinations that you marked as favorites will be shown and can be selected in the Bank Combination Select menu and Category Combination Select menu If you mark frequently used combinations as Favorites i e check the Favorite setting for those com...

Страница 334: ...scroll bar to see the remaining programs 4 If you check Favorite in the menu the programs you marked as Favorites will be shown You cannot select this if no programs in the selected category are marked as Favorites 5 Press the OK button to execute or press the Cancel button to cancel your selection Program Select INT A F USER A G 000 127 G g 1 g 9 g d 001 128 Here you can select the program used b...

Страница 335: ...ram will respond to both the local keyboard and MIDI input on the Timbre s MIDI channel The Timbre will not transmit MIDI data EXT Use this to play an external MIDI device with Bank Select via the front panel Bank buttons With this setting the Timbre s Program will not respond to either the local keyboard or MIDI input MIDI will be transmitted to external devices on the selected MIDI channel EX2 U...

Страница 336: ... an effect in an IFX MFX or TFX slot it always uses processing power whether or not any audio is passing through it EXi with fixed resources Some EXi instruments such as the AL 1 are completely dynamic Others may use a combination of fixed and dynamic allocation For instance the CX 3 includes fixed elements such as the built in rotary speaker amp and vibrato chorus along with dynamically allocated...

Страница 337: ...ill then return to its normal color and its Program will make sound again These same steps will work with Tracks in Sequencer mode Use Program Changes to optimize resource usage If you re using OASYS for multitimbral sequencing with different Programs on different MIDI channels you can optimize the EXi fixed resource usage by only having these Programs loaded when they are needed For instance if y...

Страница 338: ...f unchecked This setting will be cleared when you reselect the combination It will not be remembered when you write the combination GE Category Select Arpeggio Real Time This lets you select a GE by category from Arpeggio through Real Time GE Select 0000 Arp Model 01 Up Dn 2047 Tempo Env Repeats This selects the Module s GE from among the 2048 presets B C D Module B C D Here you can make settings ...

Страница 339: ...RMA SWITCH or KARMA SLIDER is shown here which is linked with the operation of the front panel switch or slider Then you could get rid of the section that says 2 8 are the same as 1 etc KARMA SWITCH 1 The current setting of KARMA SWITCH 1 is shown here This is linked with the operation of switch 1 You can also operate this by touching the switch shown in the display KARMA SWITCH 1 Stored Value Thi...

Страница 340: ...0 00 EXT This is the tempo for the current Combination which applies to tempo synced LFOs Wave Sequences and Vector EGs EXi Step Sequencers KARMA and tempo synced effects EXT means that the tempo will sync to external MIDI clocks For more information see Tempo on page 323 040 00 240 00 allow you to set a specific tempo in BPM with 1 100 BPM accuracy 0 7b Assignment View VJS This area shows informa...

Страница 341: ...ation on page 405 1 Exclusive Solo For more information see Exclusive Solo on page 138 2 Copy From Program For more information see Copy From Program on page 405 0 8 Audio Input Sampling Here you can adjust the settings for the analog digital audio signal input AUDIO INPUT S P DIF and the sampling related settings for Combination mode As in Program mode sampling in Combination mode allows you to s...

Страница 342: ...1 2 7 8 Off FX Ctrl Bus FX Control Bus Off 1 2 REC Bus Off 1 4 1 2 3 4 Send1 to MFX1 000 127 Send2 to MFX2 000 127 PLAY MUTE Off On Solo ON OFF Off On Pan L000 C064 R127 Level 000 127 ADC OVERLOAD Here you can specify the input source for the analog and digital audio devices and set the input level pan buses and the send levels to the master effects These input settings are valid when User Global ...

Страница 343: ... MIDI messages to external devices This page shows you the current values for each of the sliders knobs and buttons along with information about what they are controlling For instance you can Adjust the volume and pan for all 16 Timbres Control each Timbre s EQ settings and Master Effects Send levels Modulate sounds and effects using the Real Time Knobs Control KARMA and select KARMA scenes using ...

Страница 344: ...ard data entry controls When you edit a value using the LCD and data entry you ll notice that the LEDs on the sliders knobs and switches reflect the change as well Jump Catch When you change the Control Assign setting the physical position of the knobs or sliders may be different than the parameter value as shown by the LEDs The Knob Slider Mode parameter under System Preferences on the Global mod...

Страница 345: ...en use the SELECT buttons to choose the specific Timbre Individual Pan With this setting the knobs will control the Pan for the current group of Timbres Knob 1 controls the pan for Timbre 1 or 9 knob 2 controls the pan for Timbre 2 or 10 and so on Mixer Knobs switch Knobs 1 8 Channel Strip When the Mixer Knobs switch is set to Channel Strip the knobs provide quick access to the Pan EQ and FX Send ...

Страница 346: ...e 1 9 above Solo switch and Select switches 1 8 Solo Off On Solo lets you isolate one or more Timbres or Audio Inputs so that you hear them by themselves It does this by temporarily muting all non soloed Timbres and Audio Inputs Solo uses the Select switches These switches can show and control either which Timbre is currently selected or which Timbres are soloed The main Solo button lets you switc...

Страница 347: ...annel Strip Individual Pan This switch controls whether the knobs show the pan settings for all 6 inputs at once Individual Pan or the pan and FX Send levels for the selected input Channel Strip For more information please see Mixer Knobs on page 337 Knobs 1 8 Channel Strip When the Mixer Knobs switch is set to Channel Strip the knobs provide quick access to the selected input s Pan and FX Send pa...

Страница 348: ... and one or more Timbres or Audio Inputs are soloed the Solo LED will blink on and off to remind you that solo is in use Note The main Solo button merely changes the functions of the Select switches It does not enable or clear the individual solo states For more information see Clearing all solos on page 336 and Exclusive Solo menu parameter on page 336 Select 1 6 Off On This switch either selects...

Страница 349: ...nd drum pads Note this selection is not stored with the Combi Knobs 1 8 MIDI Channel 1 8 01 16 Gch This read only parameter shows the MIDI Channel assigned to the knob Each can send on a different channel if desired Gch means that the knob will transmit on the Global MIDI Channel as set in Global mode This allows you to re direct any number of sliders knobs switches and pads to a different channel...

Страница 350: ...rolling a Performance Real Time Parameter You can assign many parameters to a single slider or switch if desired Due to space limitations however only first four parameters will be shown here If there are more assignments than can be displayed you ll see a symbol after the fourth parameter To change the parameter assignments use the KARMA GE RTP and Perf RTP pages For more information please see 7...

Страница 351: ... of the Filter and Amp EGs and transmits and receives MIDI CC 72 Knobs 5 8 000 127 You can set knobs 5 8 to a wide variety of modulation functions using the Controller Setup page P1 8 Many of the functions scale a particular set of Program parameters All of the settings also correspond to MIDI messages usually CCs KARMA SCENES 1 8 KARMA Scenes 1 8 A KARMA SCENE includes the settings for all of the...

Страница 352: ...ecting the way that it sounds in Program mode or in any other Combis or Songs Timbre select Timbre 1 16 This selects the Timbre whose Tone Adjust parameters appear on the screen and the Control Surface You can switch back and forth between the different Timbres as much as you like without losing your edits This parameter is the same as the selected Timbre in TIMBRE TRACK mode changing one will als...

Страница 353: ... depending on the Program type For more information please see HD 1 Tone Adjust Parameters on page 29 AL 1 Tone Adjust parameters on page 210 CX 3 Tone Adjust parameters on page 232 STR 1 Tone Adjust parameters on page 278 MS 20EX Tone Adjust parameters on page 305 PolysixEX Tone Adjust parameters on page 319 Other EXi instruments will have their own set of parameters as described in their manuals...

Страница 354: ...th CC 73 Filter Amp EG Decay Time This scales the decay and slope times of the Filter and Amp EGs It interacts with CC 75 Filter Amp EG Sustain Level This scales the sustain levels of the Filter and Amp EGs It interacts with CC 70 Filter Amp EG Release Time This scales the release times of the Filter and Amp EGs It interacts with CC 72 Filter EG Attack Time This scales the attack times of the Filt...

Страница 355: ...n is not On this parameter has no effect For more information please see Detune on page 34 Thickness This Absolute parameter sets the pattern of detuning between the Unison voices If Unison is not On or if Detune is set to 0 this parameter has no effect For more information please see Thickness on page 35 0 9 Page Menu Commands The number before each command shows its ENTER number key shortcut For...

Страница 356: ...bination Name 000 127 Name These display only parameters show the bank number and name of the current Combination Tempo 040 00 240 00 EXT This is the tempo for the current Combination which applies to tempo synced LFOs and Wave Sequences the Vector EG EXi Step Sequencers KARMA and tempo synced effects EXT means that the tempo will sync to external MIDI clocks For more information see Tempo on page...

Страница 357: ...arameter uses a linear scale 50 is equivalent to 6dB 25 is the same as 12dB and so on High settings of the Low Mid and High Gain controls can cause substantial increases in the overall level You can compensate for this by turning down the input trim High Gain 18 0 00 0 18 0dB This controls the gain of the 10kHz High Shelf EQ in increments of 0 5dB Mid Frequency 100Hz 10kHz This sets the center fre...

Страница 358: ...een the two Oscillators Oscillator 1 is always at maximum volume when the Vector position is all the way to the left X and Oscillator 2 is always at maximum when the Vector Position is all the way to the right X In Combi mode on the other hand the Vector can fade between any or all of the 16 Timbres You can assign each of the Timbres to be controlled by any of the four Vector axes X X Y Y or to no...

Страница 359: ...dual Program s parameter settings Combi Vector CC Control Vector Joystick Combi Vector EG VJS X and Y modes Combi switch Enable CC control X and Y CC Assignments Vector CC Modulation of Program and FX Parameters Global Channel Only Combi Vector Volume Control Combi switch Enable Volume control Vector Modulation of Timbre Volume Timbres 1 16 Center Volume and Equal Power settings Vector Joystick MI...

Страница 360: ... loop transition is shown by a gray line Show Volume Image Off On The vector graphic includes an image representing the Vector Volume Control settings for the current Timbre see Timbre Select below You can use the Show Volume Image check box to toggle this part of the graphic on and off Timbre Select 01 16 This selects the Timbre whose volume image will be shown Show Point VJS Vector EG Point 0 4 ...

Страница 361: ...hortcuts for menu commands on page 138 0 Write Combination For more information see Write Combination on page 405 1 Exclusive Solo For more information see Exclusive Solo on page 138 2 Copy From Program For more information see Copy From Program on page 405 1 6 Vector CC Control 1 6a Vector CC Control Vector CC Control lets you use the combination of the Vector Joystick and the Vector EG to contro...

Страница 362: ... just like other physical controllers See Vector and MIDI above for more information This parameter affects only the Combi Vector CCs Even if this is turned Off the individual Programs Vector CCs will still function normally VJS X Mode Positive Negative Xfade Split You can set up the Vector to send out CCs in several different patterns as shown in the graphic below This controls the pattern for th...

Страница 363: ... CCs and the Timbre s Program will respond to them according to its own AMS settings If this is Off the Timbre will not receive the CCs This can be useful if the Combi s Vector CCs are causing unwanted modulation or conflicting with the Program s own Vector CCs Enable Program Vector CC Off On This controls whether or not the Program s own Vector CCs will be active If this is On the Program s Vecto...

Страница 364: ...e Key Sync parameter applies only to this per note EG When the Key Sync parameter is Off the CC Control and Volume Control EGs are completely synchronized When Key Sync is On each note s Volume Control EG will start at note on and go into release at note off All the notes will still share a single CC Control EG 1 7a Basic Vector Envelope On Off On On checked When this box is checked the Vector EG ...

Страница 365: ...mes The Hold Time sets how long the EG lingers at each point and the Transition time sets how long it takes to go from the selected point to the next For instance the graphic below shows the succession of Hold and Transition times when the Loop Type is set to 1 3 For clarity only the Y axis positions are shown Vector EG times Loop Type 1 3 The transition from Point 3 into the loop always uses Poin...

Страница 366: ...u can set this in either seconds milliseconds or rhythmic values depending on whether the Mode is set to Time or Tempo The Time Base Note and Multiplier parameters work just like those for Point 0 as described under Transition on page 356 Point 4 Point 4 is the Vector EG s release destination Its time setting is different from those of the other Points Instead of setting the time it takes to move ...

Страница 367: ...see SW1 2 Assignments on page 979 SW1 Off After Touch Lock Assigns a function to the SW1 switch The on off status can also be saved When you change the assigned function the status will be reset to off Mode Toggle Momentary Specifies the on off action that occurs when you press the SW1 switch Toggle The function will alternate between on and off each time you press the SW1 switch Momentary The fun...

Страница 368: ...rent MIDI channel if desired These settings are stored independently for each Combination You can assign notes to the pads directly from the keyboard and front panel controls without using this page at all Alternatively you can enter notes and velocities using the parameters on this page Regardless of how the notes were first assigned you can edit their values here For more information including s...

Страница 369: ...r a chord of up to 8 notes You can play a single note or a simple chord If you like you can also play up to 8 notes as a legato phrase As long as you take care that the notes overlap each other the entire phrase will be recorded as a single chord You can take as long as you like to play the phrase 3 Press the pad to which you d like to assign the notes After pressing the pad you re done Edit notes...

Страница 370: ...es the bank number that will be transmitted when Status is set to EX2 This setting has no effect if Status is other than EX2 Timbre Priority Off On This specifies the voice priority for the timbre On checked Timbres for which this is checked will be given priority If a new note on would exceed the available number of voices a currently sounding voice will normally be stopped stolen allowing the ne...

Страница 371: ...ogram 1 1b With the MN or LGT settings the Program s Priority setting Program 1 1c will determine the priority of the note that sounds when you play two or more notes EXi programs will ignore this setting if the program does not support the Voice Assign Mode specified by the selected Instrument Type AL 1 Poly MN and LGT are supported CX 3 Poly and MN are supported LGT will operate as MN If differe...

Страница 372: ...SC Chord Chord PRG Off Bsc Adv PRG uses the Program s setting If the Program is set to Off then the Chord SW has no effect Off disables the Chord function Bsc Basic re creates the chord mode of the original Polysix Each time you play a new chord it will cut off the previous chord This option ignores the Voice Assign settings Adv Advanced uses the Program s Voice Assign settings as if each note in ...

Страница 373: ...djust on page 408 Transpose and Detune can be controlled via MIDI RPN messages The way that this works depends on whether or not the Timbre uses an HD 1 Drum Program If the Timbre does not use an HD 1 Drum Program for example if it uses a Single or Double HD 1 Program or an EXi Program then MIDI RPN Coarse Tune will control Transpose and RPN Fine Tune will control Detune If the Timbre uses an HD 1...

Страница 374: ... transmitted via MIDI 2 3 Page Menu Commands The number before each command shows its ENTER number key shortcut For more information on these shortcuts see ENTER 0 9 shortcuts for menu commands on page 138 0 Write Combination For more information see Write Combination on page 405 1 Exclusive Solo For more information see Exclusive Solo on page 138 2 Copy From Program For more information see Copy ...

Страница 375: ...te Even if you change Tempo 0 1a the delay time will always be a half note If you use these parameters to specify a delay of a half note In this case a Tempo of 60 00 BPM will produce a 2000 ms delay and a Tempo of 120 00 BPM will produce a 1000 ms delay Timbres 02 16 These are the delay time settings for timbres 2 through 16 They are the same as for timbre 1 See Timbre 01 2 4 Page Menu Commands T...

Страница 376: ...imbre Off Control Normal Timbre Off by KARMA Off Timbre Off by KARMA On Nrm Normal The KARMA ON OFF switch will not control whether a timbre will sound Normally you will select Normal by Off Timbre Off by KARMA Off The timbre will sound as usual when the KARMA ON OFF switch is on The timbre will not sound when the KARMA ON OFF switch is off Use this when you want a specific timbre of multiple timb...

Страница 377: ... can use this to create a feedback loop if desired PRG uses the setting stored in the Program For more information see 4 2 EXi Audio Input on page 162 Off disables the input Audio Input 1 2 3 4 and S P DIF Input L R use the live audio from the selected input L R Output and Indiv Output 1 2 7 8 use the audio as it is heard from the selected output like connecting a cable from the output back to the...

Страница 378: ...l changes In this case if the same control change as Knob 1 2 3 or 4 has been assigned in MIDI Filter pages 1 and 2 the settings in MIDI Filter pages 1 and 2 will take priority Also if the same control change is assigned to two or more controllers in the MIDI Filter pages 2 and 3 checking any one of them will enable that control change Off unchecked Transmission and reception of MIDI data is disab...

Страница 379: ...y shortcut For more information on these shortcuts see ENTER 0 9 shortcuts for menu commands on page 138 0 Write Combination For more information see Write Combination on page 405 1 Exclusive Solo For more information see Exclusive Solo on page 138 2 Copy From Program For more information see Copy From Program on page 405 3 2 MIDI Filter2 3 2a MIDI Filter2 Timbre 01 Enable Realtime Control Knob 1 ...

Страница 380: ...Off On Enable SW2 Off On Specifies whether or not the effect of the SW1 and SW2 switches will be received The function of these switches is specified in the P1 Set Up Controllers page These settings are valid if these keys are assigned to SW1 Mod CC 80 SW2 Mod CC 81 or Portamento SW CC 65 Enable Foot Switch Off On Specifies whether or not the effect of the ASSIGNABLE SWITCH will be received The fu...

Страница 381: ...ifferent sounds to ranges that do not overlap you can play different sounds in different ranges of the keyboard Layer By setting the ranges to overlap you can play two or more sounds with a single note Positional Cross fade If you set the slopes the grayed portion to overlap the sounds will overlap and the proportion of the overlap will change according to the keyboard location 3 5a Zone Map This ...

Страница 382: ...ENTER switch and playing a note on the keyboard It is not possible to set the bottom key above the top key of the same timbre Nor is it possible for the top and bottom slopes to overlap Timbres 02 16 These are the key zone settings for timbres 2 through 16 They are the same as for timbre 1 See Timbre 01 3 5 Page Menu Commands The number before each command shows its ENTER number key shortcut For m...

Страница 383: ...3 6a Zone Map This area indicates the note and velocity ranges in which each timbre will sound For more information please see 3 5a Zone Map on page 371 3 6b Velocity Zones Timbre 01 Top Velocity 1 127 Specifies the maximum velocity value that will sound each timbre Top Slope 0 120 Specifies the number of velocity steps over which the original volume will be reached starting from the Top Velocity ...

Страница 384: ... same as for timbre 1 See Timbre 01 3 6 Page Menu Commands The number before each command shows its ENTER number key shortcut For more information on these shortcuts see ENTER 0 9 shortcuts for menu commands on page 138 0 Write Combination For more information see Write Combination on page 405 1 Exclusive Solo For more information see Exclusive Solo on page 138 2 Copy From Program For more informa...

Страница 385: ... will be loaded as well In some cases however you may wish to try out different Combinations while keeping the KARMA settings the same The Global Basic page Load KARMA Settings when changing parameters let you select between these two behaviors There are separate settings for Programs Combis and Songs To set this up 1 Go to the Global Basic page 2 Under Load KARMA setting when changing set the Com...

Страница 386: ...e 2048 presets For more information see GE Select on page 328 Key Zones Bottom Key Zone Bottom C 1 G9 Top Key Zone Top C 1 G9 For more information see Key Zone on page 99 Note In Combination mode each KARMA Module also has its own MIDI Input Channel and Output Channel as described under 7 1c MIDI I O below Transpose Thru In Zone Off On Transpose In Zone 36 36 Thru Out Zone Off On Transpose Out Zon...

Страница 387: ...hat has passed through the KARMA Module will be sent via the Output Channel to timbres Off unchecked When the KARMA function is off MIDI data that has passed through the KARMA Module will not be sent to timbres If you wish to apply separate phrases or patterns by using KARMA Module A for timbre 1 and KARMA Module B set the MIDI channels as follows Example setting 1 1 Set the global MIDI channel Gl...

Страница 388: ...o be played by the keyboard because of the Timbre Thru On setting of KARMA Module B See KARMA ON OFF OFF 2 in the diagram above Module Timbre MIDI Display This shows the timbres that will be sounded by each KARMA Module according to the MIDI output channel settings of each KARMA Module and the MIDI channel of each timbre 2 1a 7 1 Page Menu Commands The number before each command shows its ENTER nu...

Страница 389: ... from the KARMA Module so that the corresponding timbre will be forcibly set to this bend range This ensures that the pitch bend data generated by the KARMA Module s GE will function as intended At this time pitch bender data produced by operating the joystick will automatically be adjusted to produce the same bend effect as when KARMA is off in most cases If multiple timbres are being controlled ...

Страница 390: ... 7 3 Module Parameters Control Here you can set KARMA Module Control parameters In Combination mode four KARMA Modules A B C D can be used 7 3a Module Parameter Control Control Transpose 36 36 Force Range Off Lowest Highest C3 B3 1 C3 B3 2 Force Range Wrap C C Root Position Off On Please see Control on page 103 Timbre Zone Bypass Off On Specifies whether the key zone settings 3 5 and velocity zone...

Страница 391: ...r menu commands on page 138 0 Write Combination For more information see Write Combination on page 405 1 Exclusive Solo For more information see Exclusive Solo on page 138 2 Copy KARMA Module For more information see Copy KARMA Module on page 408 3 Initialize KARMA Module For more information see Initialize KARMA Module on page 409 4 Copy Scene For more information see Copy Scene on page 409 5 Swa...

Страница 392: ...en Trigger By Module is Off Setting a Module to be triggered by a percentage of its own phrase will have no additional effect Note The actual overall GE Phrase Length is determined by the number of Phase Pattern Steps the Phase Length Mode and various other internal GE settings Cutoff Module A B C D Off On When this Module s effect is triggered it can cutoff any effects that are playing on the spe...

Страница 393: ...ultaneously or control individual parameters from different Modules conveniently at the same time GE Real Time Parameters 01 32 Here you can edit GE parameters and assign GE parameters to KARMA Real Time Controls etc for use with Module Control Master GE PARAMETER GE Real Time Parameter MIN Minimum Value 5000 5000 MAX Maximum Value 5000 5000 VALUE 5000 5000 ASSIGN Slider1 8 Slider SW 1 8 SW1 8 Dyn...

Страница 394: ...er 1 is selected module A e g drum pattern could be switched to scene 5 and module B e g bass riff could be switched to scene 8 Off unchecked Changing a Scene in the Master Layer only changes Module parameters assigned to KARMA SLIDERS and SWITCHES in the Master Layer The Module Layers do not change Scenes but stay where they are Each layer is independent this is the mode you would use mainly in t...

Страница 395: ...RMA Module For more information see Initialize KARMA Module on page 409 4 Copy Scene For more information see Copy Scene on page 409 5 Swap Scene For more information see Swap Scene on page 409 6 Capture Random Seed For more information see Capture Random Seed on page 409 7 Copy From Program For more information see Copy From Program on page 405 7 6 Perf Real Time Parameters Here you can assign co...

Страница 396: ...e see Trigger By Module on page 382 GE Phrase Length 0000 0100 Assign the function of GE Phrase Length 7 4a Please see GE Phrase Length on page 382 Group Key Zones For more information see Group Zone on page 114 Group Random Seeds For more information see Group Random on page 115 7 6 Page Menu Commands The number before each command shows its ENTER number key shortcut For more information on these...

Страница 397: ...on M T C For more information see Action Source Action on page 116 Destination Off RT Params Control Buffer Latch For more information see Destination on page 117 and Dynamic MIDI Sources Destinations on page 984 A B C D Off On Specifies the Modules for which the Dynamic MIDI settings will be valid On checked The Dynamic MIDI settings will be valid Off unchecked The Dynamic MIDI settings will be i...

Страница 398: ...ree of randomness for various parameter groups such as rhythm duration velocity etc The random calculations are performed based on initial starting values known as seeds For example if you select Rhythm Seed 1 for all four KARMA Modules running the same GE under the same conditions will cause the randomness of the rhythms to be identical If many types of randomness are being used such as duration ...

Страница 399: ... the randomizable characteristics for the WaveSeq Group similar to those explained under Rhythm Rhythm Seed above For more information see WaveSeq Group on page 930 7 8b Start Loop Link to Start Seed Off On If turned On when you specify a Start Seed value for one of the active KARMA Modules the Start Seed of all other active Modules in the Performance will be set to the same value This is useful f...

Страница 400: ...Control layer has its own set of names for the 8 KARMA SLIDERS and 8 KARMA SWITCHES For more information see 7 9b Module A on page 121 Master Module A D Slider1 8 000 no name 571 Waveform Select 16 Switch1 8 000 no name 571 Waveform Select 16 7 9b Note Map Table Custom Global 1 64 Note In C 1 G9 Note Out Remove C 1 G9 Octave Replicate Off On Reset For more information see 7 9b Note Map on page 390...

Страница 401: ...lo on page 138 2 Copy KARMA Module For more information see Copy KARMA Module on page 408 3 Initialize KARMA Module For more information see Initialize KARMA Module on page 409 4 Copy Scene For more information see Copy Scene on page 409 5 Swap Scene For more information see Swap Scene on page 409 6 Capture Random Seed For more information see Capture Random Seed on page 409 7 Auto Assign KARMA RT...

Страница 402: ...he Effect Guide on page 727 8 1 Routing1 Specifies the bus to which the program oscillator s used by each timbre 1 16 will be sent You can also set the send levels to the master effects from this page 8 1a Routing Map This shows the status of the insert effects This area shows the insert effect routing Bus Select the name of the assigned effect the on off status chaining and the output bus that fo...

Страница 403: ...Bus Select FX Control Bus and Send 1 2 settings will be used All drum instruments will be sent to the specified bus Bus Select IFX Indiv Out Assign L R IFX1 12 1 8 1 2 7 8 Off This specifies the output bus for the timbre s program oscillator This parameter can also be edited from the P8 Routing 2 page L R Output to the L R bus IFX1 12 Output to the IFX1 12 buses 1 8 The timbre will be output in mo...

Страница 404: ...he timbre Timbre 02 16 Timbre Number These settings specify the program oscillator output bus and master effect send levels for timbres 2 through 16 They are the same as for timbre 1 See Timbre 01 Note You can use the control surface to control Send1 and Send2 These can also be controlled from the mixer section of the front panel or from the P0 Control Surface page of the LCD screen Here s the pro...

Страница 405: ...f the timbre to an FX Control bus two channel stereo FX Ctrl 1 or 2 Use the FX Control buses when you want a separate sound to control the audio input of an effect You can use two FX Control buses each is a two channel stereo bus to control effects in various ways For more information please see FX Control Buses on page 730 REC Bus All OSCs to Off 1 4 1 2 3 4 These settings send the output of the ...

Страница 406: ...n see Exclusive Solo on page 138 2 Copy Insert Effect For more information see Copy Insert Effect on page 149 3 Swap Insert Effect For more information see Swap Insert Effect on page 150 4 Drum Kit IFX Patch For more information see Drum Kit IFX Patch on page 410 8 5 Insert FX 8 5a IFX Here you can choose the type of each insert effect 1 through 12 its on off status chaining and adjust the post IF...

Страница 407: ...fect EXi Fixed Resource Meter FX EXi FIXED FREE FOR VOICES The number of voices you can play is affected by how effects and EXi are being used This meter shows the resource allocation as an approximate percentage of the total processing power For more information see CX 3 STR 1 Limitations on EXi fixed resources on page 326 and About effects resources on page 727 8 5 Page Menu Commands The number ...

Страница 408: ...elow you can specify the Effect Type and On Off status of the selected effect slot This is also the effect slot that will be affected by the page menu commands Insert IFX Slot and Cut IFX Slot When you move from this page to the P8 IFX1 12 page the IFX you selected here will be selected For example if you select Timbre 03 only the insert effects used by timbre 3 will be shown OUTPUT indicates the ...

Страница 409: ... with the on off setting in the P8 Insert FX page Ch Control Channel Ch01 16 G ch All Routed This parameter specifies the MIDI channel that will be used to control effect dynamic modulation Dmod pan following the insert effect CC 8 Send 1 and Send 2 The channel number of the timbre routed through this IFX will be followed by a displayed at the right of Ch01 16 If two or timbres with different MIDI...

Страница 410: ... if you ve just selected an effect written a program or selected a new Combi Selecting this setting from the menu will not have any effect Note Combis save the effects parameter settings but they don t save the number of the selected Effect Preset If you select an Effect Preset and then save the Combi the Effect Preset setting will revert to For more details see Using Effect Presets on page 131 IF...

Страница 411: ... for Common LFO 1 and 2 G ch The global MIDI channel will be used for control This is the default Sync Reset Off On Source Dmod Source List of Dmod Sources Frequency 0 02 20 00 Hz MIDI Tempo Sync Off On BPM MIDI 040 00 240 00 Base Note 3 3 3 3 Times 01 32 These parameters are the same as in Program mode For details see 8 9a Common FX LFO1 on page 132 8 9b Common FX LFO2 These parameters are the sa...

Страница 412: ...e master effects are sent to the L R bus The total effects are inserted into the L R bus 9 1a MFX1 2 MFX1 MFX1 000 185 MFX1 On Off Off On Return 1 000 127 MFX2 MFX2 000 185 MFX2 On Off Off On Return 2 000 127 Chain Chain On Off Off On Chain Direction MFX1 MFX2 MFX2 MFX1 Chain Level 000 127 These parameters are the same as in Program mode For more information please see 9 1a MFX1 2 on page 134 9 1b...

Страница 413: ... different MIDI channels to control Dmod for each effect if desired as selected by the Ch Control Channel parameter 9 2a MFX1 MFX1 On Off Off On This turns master effect 1 on off This is linked with the on off setting in the P9 Routing page Ch Control Channel Ch01 16 G ch Specifies the MIDI channel that will control dynamic modulation Dmod for the master effect Ch01 Ch16 The specified MIDI channel...

Страница 414: ...save the Combination the Effect Preset setting will revert to For more details see Using Effect Presets on page 131 MFX1 Parameters Here you can set the effect parameters of the insert effect you chose in the P9 Routing page For details on the master effects please see the Effect Guide on page 727 9 2 Page Menu Commands The number before each command shows its ENTER number key shortcut For more in...

Страница 415: ...ion Assign the Combination to a Category Mark the Combination as a Favorite Copy the Combination to a different Bank and number Be sure to Write any Combination that you wish to save An edited Combination cannot be recovered if you do not write it before turning off the power or selecting another Combination For more information please see Write Program on page 138 If you use Category or Sub Categ...

Страница 416: ...l be turned On checked 5 Use the To field to specify the copy destination timbre The parameters for each timbre will be initialized The copy source program will be assigned to Program 0 1b Timbre Program Select on page 324 The MIDI Channel 2 1a setting will not change if with KARMA is checked If with KARMA is unchecked MIDI Channel will be automatically set to G ch The Bank Select When Status EX2 ...

Страница 417: ...rameter assignments and values Assignments Only This copies only the Tone Adjust parameter assignments without the values 6 To execute the Copy Tone Adjust command press the OK button To exit without copying the controls press the Cancel button Reset Tone Adjust Reset Tone Adjust is available on the Control Surface page when CONTROL ASSIGN is set to TONE ADJUST This command affects only the select...

Страница 418: ...e The appropriate Detune value will be calculated automatically from these two values For example if you set From to 60 bpm and To to 120 bpm Detune will be set to 1200 one octave up 6 To execute the Detune BPM Adjust command press the OK button To exit without changing the Detune value press the Cancel button Note since this command does not affect the sample data itself and always over writes th...

Страница 419: ... Note Map controller name settings If you turn Perf RTP Panel Setting On checked In addition to the content copied when Perf RTP Panel Settings is Off unchecked the following content is copied Tempo setting Time Signature setting KARMA ON OFF switch setting KARMA LATCH switch setting KARMA Module Control switch setting 7 6 Perf Real Time Parameters page settings 7 7 Dynamic MIDI Page settings The ...

Страница 420: ...IFX1 12 1 In the Routing1 page or Routing2 page select the timbre for which you want to make settings Select a timbre parameter or Timbre Number 2 Select Drum Kit IFX Patch to open the dialog box 3 In the DrumKit IFX popup select the output bus to which you want to patch the signal an insert effect or L R 1 8 1 2 7 8 or Off 4 To execute the Drum Kit Insert Effect Patch command press the OK button ...

Страница 421: ...nal MIDI sequencer The sequencer lets you record a maximum of 400 000 MIDI events or 300 000 audio events up to 200 songs and as many as 999 measures per song Timing resolution is a maximum of 192 There are sixteen tracks for MIDI performance data and a master track that controls the time signature and tempo The KARMA function can be used during playback or recording The RPPR Realtime Pattern Play...

Страница 422: ...xteen audio tracks are provided Each track provides linear 16 bit PCM recording with a maximum length of 80 minutes for one recorded take Automation data volume pan EQ send 1 2 can be recorded for each track Sixteen tracks can be played back simultaneously and four tracks can be recorded simultaneously The Stereo Pair function lets you control two adjacent tracks by adjusting just the odd numbered...

Страница 423: ...ck can change as the song progresses For details on Control Change messages and RPN see OASYS and MIDI CCs on page 995 and Using RPN Registered Parameter Numbers on page 1009 For details on MIDI System Exclusive messages see System Exclusive events supported in Sequencer mode on page 560 Audio tracks Setup parameters Rec Source Play Rec Mute Pan Volume EQ Bypass Low Gain Mid Frequency Mid Gain Hig...

Страница 424: ...press the REC WRITE switch The Setup to Record dialog box will appear 4 To execute the Auto Song Setup function press the OK button If you decide not to execute press the Cancel button You will automatically move to Sequencer mode and the settings of the combination will be copied to the song The first unused song will be the copy destination song Contents automatically copied from a combination T...

Страница 425: ...ime signature at the current location of the song The time signature can be changed at each measure This will be displayed when you press the SEQUENCER REC WRITE switch Specify this when you wish to use the time signature that is already recorded for that measure and wish to record without changing the time signature 1 4 16 4 1 8 16 8 1 16 16 16 This is the time signature at the current location o...

Страница 426: ...s best to avoid recording at a stiff resolution to begin with Tempo Mode Auto Manual REC Auto The tempo will follow the tempo of the Master Track The tempo of the master track can be specified by using the MIDI Event Edit command with the Master Track chosen in Track Select or by the REC operation described below When Auto is selected it will not be possible to modify the Tempo setting while a son...

Страница 427: ...ay Rec Mute buttons 0 1b 0 2a select the record enabled tracks regardless of the Track Select setting Use Track Name to give the track a descriptive name If other tracks are set to the same MIDI channel as the selected track and their Status is set to INT or BTH they ll be controlled by the keyboard as well Also if other tracks are set to the same MIDI channel as the selected track and their Statu...

Страница 428: ...dio event name STEREO Stereo Pair on off status and KBD The MIDI Track number program bank number name that sounds when you play the keyboard Gray color and Inactive warning in Track Info Normally the numbers for un selected Tracks use a dark blue background and a light blue background hilights the selected Track If the background is gray instead this means that the maximum amount of EXi Fixed Res...

Страница 429: ...he procedure given below describes how to make these settings from the front panel 1 Press the CONTROL ASSIGN MIXER TIMBRE TRACK switch to select tracks 1 8 or 9 16 2 Use the MIX PLAY MUTE 1 9 8 16 switches to switch the Play Rec Mute status of each track You can t select REC for single track recording Solo On Off On Off This turns the Solo function on off Only tracks with SOLO On will sound Other...

Страница 430: ...anel 1 Press the CONTROL ASSIGN MIXER TIMBRE TRACK switch to select tracks 1 8 or 9 16 2 Use the MIX VOLUMES 1 9 8 16 sliders to adjust the volume When Status 2 1a is INT or BTH CC 7 Volume can be received to control the volume The volume of a track is determined by multiplying the MIDI Volume CC 7 and Expression CC 11 values When you change the song or return to the beginning of the song tracks w...

Страница 431: ... track For more information see 0 1b Track Program Select on page 418 Track 01 Track Number This indicates the audio track number The parameters below this track number are the settings for that track REC Source Stereo Pair Off Audio Input1 4 S P DIF L S P DIF R L R REC1 4 Indiv 1 8 Stereo Pair On Audio Input1 2 3 4 S P DIF L R L R REC1 2 3 4 Indiv 1 2 7 8 This selects the source that will be reco...

Страница 432: ...ts Audio Input 1 Audio Input 2 REC Source Audio Input 1 Single Track REC Recording Bus L R or IFX1 12 Bus L R or IFX1 12 Insert Effects Level Pan HDR Track Mono Audio Track selected in Track Select REC Source Audio Input1 L MONO R AUDIO OUTPUT HEADPHONES x Source Direct Solo Total Effects Master Effects Monitor Level Pan Insert Effects CLIP L MONO R AUDIO OUTPUT HEADPHONES Insert Effects L R Bus S...

Страница 433: ...reo Pair is on L is sent to odd numbered tracks and R is sent to even numbered tracks Level Pan Insert Effects CLIP Insert Effects L R Bus Sequencer Playback Keyboard Level Pan Insert Effects S P DIF L S P DIF R REC Source S P DIF L R Recording Multi REC Bus L R or IFX1 12 Bus L R or IFX1 12 Insert Effects Level Pan HDR Track Mono HDR Track Mono REC 1 2 3 4 Indiv 1 2 3 4 5 6 7 8 Set Play Rec Mute ...

Страница 434: ...lay Rec Mute button Play The track will play Rec This will be displayed during single track recording normal recording It cannot be selected When you use multi track recording the Preferences page Multi REC is on select REC for the tracks that you wish to record You can specify REC for up to four tracks Mute The track will be muted silent Level Pan L R Bus Insert Effects Insert Effects REC Bus 1 2...

Страница 435: ... will change accordingly Pan L000 C064 R127 This specifies the pan of audio track L000 C064 R127 L000 is hard left and R127 is hard right If a mono insert effect is in use the settings you make here will be ignored In this case the Pan CC 8 parameter in P8 Insert FX page will adjust the panning of the sound after the Insert Effect For details see Mixer on page 744 Note You can use the control surf...

Страница 436: ... From Program For more information see Copy From Program on page 526 12 Stereo Pair For more information see Stereo Pair on page 528 13 Auto HDR Sampling Setup For more information see Auto HDR Sampling Setup on page 529 0 3 MIDI Track Loop When playing or recording a song you can independently loop the MIDI tracks 0 3a Track Select Selected Track Info This displays information about the currently...

Страница 437: ...ber key shortcut For more information on these shortcuts see ENTER 0 9 shortcuts for menu commands on page 138 0 Memory Status For more information see Memory Status on page 524 1 Exclusive Solo For more information see Exclusive Solo on page 138 2 Rename Song For more information see Rename Song on page 524 3 Delete Song For more information see Delete Song on page 524 4 Copy From Song For more i...

Страница 438: ...erdub Select this method when you wish to add data to a previously recorded track except for audio events To begin recording press the SEQUENCER REC WRITE switch and then the SEQUENCER START STOP switch To stop recording press the SEQUENCER START STOP switch once again If you use this method to record on a track that has already been recorded the result will differ depending on the track or type o...

Страница 439: ... the key note number that corresponds to the MIDI data you wish to delete All occurrences of that note number will be deleted for the interval that you continue holding down the key Controller data can also be erased in a similar way For example while you move and hold the joystick in the X horizontal direction bender data will be erased While you apply pressure to the keyboard after touch data wi...

Страница 440: ... Meter 1 4 This adjusts the final level of the signal being recorded from the REC Source to the audio track Adjust the level optimally without allowing the level meter to reach the CLIP indication The upper part of the level meter slider shows the corresponding audio track number If you re using single track recording Recording Level 1 and Level Meter 1 are valid If you re using multi track record...

Страница 441: ... L Mono and or R 1 8 1 2 7 8 Output from OUTPUT INDIVIDUAL 1 8 respectively Precount Measure 0 2 Specifies the pre count that will occur before recording begins With a setting of 0 recording will begin the instant you press the SEQUENCER START STOP switch after first pressing the SEQUENCER REC WRITE switch 0 5 Page Menu Commands The number before each command shows its ENTER number key shortcut Fo...

Страница 442: ...n page 415 Load GE Options Dialogue These options let you specify whether the values and assignments for the KARMA SLIDERS and SWITCHES will be set automatically be initialized or be preserved when you select a GE For more information see Load GE Options on page 7 KARMA T Sig KARMA Time Signature GE TS 1 4 16 4 1 8 16 8 1 16 16 16 For more information see KARMA T Sig Time Signature on page 7 0 6b ...

Страница 443: ...ng on page 524 5 Load Template Song For more information see Load Template Song on page 524 6 Save Template Song For more information see Save Template Song on page 525 7 FF REW Speed For more information see FF REW Speed on page 525 8 Set Location for Locate Key For more information see Set Location for Locate Key on page 525 9 GM Initialize For more information see GM Initialize on page 526 10 C...

Страница 444: ... These indicate the functions assigned to knobs 5 8 For more information see 1 8 Set Up Controllers on page 357 0 7c Effects IFX1 12 MFX1 2 TFX1 2 This area indicates the effect assigned to each insert effect master effect and total effect and its on off status FX Balance IFX This controls the Wet Dry balance of all insert effects A setting of 10 is Wet or Wet a setting of 0 leaves the settings of...

Страница 445: ...e sampling related settings for Sequencer mode In Sequencer mode the external audio sources you specify here can be recorded to audio tracks or sampled You can also record or sample a song that s played back by the OASYS or your own playing on the keyboard You can also use the OASYS as a 6 in 10 out effect processor You can t record a Song or pattern while sampling Nor can you sample while recordi...

Страница 446: ...g is not saved per song it is a single setting for Sequencer mode 0 8c Sampling Setup Here you can select the source to be sampled and the method by which to initiate sampling Except for Trigger the following parameters are the same as in the Program mode P0 Audio Input Sampling page See 0 8c Sampling Setup on page 14 Sampling Setup settings are maintained not separately for each song but as a sin...

Страница 447: ...on see GM Initialize on page 526 10 Copy From Combination For more information see Copy from Combination on page 526 11 Copy From Program For more information see Copy From Program on page 526 12 Optimize RAM For more information see Optimize RAM on page 139 13 Select Sample No This applies only when Save to is set to RAM For more information see Select Sample No on page 139 13 Select Directory Th...

Страница 448: ...he Audio Inputs press the AUIDIO button repeatedly to step through the three options As with TIMBRE TRACK above the Control Surface remembers your last selection under AUDIO If you switch to one of the other Control Assign modes and then go back to AUDIO it will automatically return to the previously selected group AUDIO HDR 1 8 and HDR 9 16 let you adjust the volume pan EQ and send levels for eac...

Страница 449: ...TROL button Similarly to reset a single KARMA Scene hold RESET CONTROLS and press any of the SCENE buttons 0 9a Song Select Tempo This section duplicates the most important information from the main Play page Song 000 127 This is the current Song Tempo 040 00 240 00 EXT This is the tempo for the current Song which applies to KARMA tempo synced LFOs and Wave Sequences and so on EXT means that the t...

Страница 450: ...ent for each note on Note with some EXi sounds such as the CX 3 Random pan may affect all notes at once Pan 2 10 8 16 Random L001 C064 R127 These control the stereo pan of Tracks 2 8 or 10 16 depending on the setting of the TIMBRE TRACK button For more details see Pan 1 9 above Play Mute switches 1 9 8 16 The top row of switches allow you to turn each of the Tracks on and off Play Mute 1 9 Off On ...

Страница 451: ... TRACK pressing the Select buttons will change the Keyboard Track and vice versa Also when CONTROL SELECT is set to AUDIO HDR 1 8 or 9 16 pressing the Select buttons will change the audio record track and vice versa Volume Sliders 1 9 8 16 These sliders adjust the volume level of the Tracks Volume 1 9 000 127 This controls the volume of either Track 1 or Track 9 depending on whether the TIMBRE TRA...

Страница 452: ...l Strip For more information please see Mixer Knobs on page 442 Knobs 1 8 Channel Strip When the Mixer Knobs switch is set to Channel Strip the knobs provide quick access to the selected input s Pan and FX Send parameters Pan L000 C064 R127 This controls the stereo pan of the selected input A setting of L000 places the sound at the far left C064 in the center and R127 to the far right Send 1 000 1...

Страница 453: ...oes not enable or clear the individual solo states For more information see Clearing all solos on page 440 and Exclusive Solo menu parameter on page 440 Select 1 6 Off On This switch either selects or solos the input depending on the Solo switch setting For more details see Solo above Volume Sliders 1 6 Audio Input Volume 1 6 000 127 These sliders adjust the volume levels of the audio inputs Maste...

Страница 454: ...e this selection is not stored with the Song Knobs 1 8 MIDI Channel 1 8 01 16 Gch This read only parameter shows the MIDI Channel assigned to the knob Each can send on a different channel if desired Gch means that the knob will transmit on the Global MIDI Channel as set in Global mode This allows you to re direct any number of sliders knobs switches and pads to a different channel at once without ...

Страница 455: ...hat the switch is controlling a Performance Real Time Parameter You can assign many parameters to a single slider or switch if desired Due to space limitations however only first four parameters will be shown here If there are more assignments than can be displayed you ll see a symbol after the fourth parameter To change the parameter assignments use the KARMA GE RTP and Perf RTP pages For more in...

Страница 456: ...ensity CC 79 000 127 This knob scales the effect of the Filter EG on the cutoff frequencies of Filters A and B It also transmits and receives MIDI CC 79 Knob 4 EG Release CC 72 000 127 This knob scales the release time of the Filter and Amp EGs and transmits and receives MIDI CC 72 Knobs 5 8 000 127 You can set knobs 5 8 to a wide variety of modulation functions using the Controller Setup page P1 ...

Страница 457: ...fecting the way that it sounds in Program mode or in any other Combis or Songs Track select Track 1 16 This selects the Track whose Tone Adjust parameters appear on the screen and the Control Surface You can switch back and forth between the different Timbres as much as you like without losing your edits This parameter is the same as the selected Track in TIMBRE TRACK mode changing one will also c...

Страница 458: ...on Tone Adjust Parameters on page 344 After the Common parameters the items in the list will vary depending on the Program type For more information please see HD 1 Tone Adjust Parameters on page 29 AL 1 Tone Adjust parameters on page 210 CX 3 Tone Adjust parameters on page 232 STR 1 Tone Adjust parameters on page 278 MS 20EX Tone Adjust parameters on page 305 PolysixEX Tone Adjust parameters on p...

Страница 459: ...rom Song For more information see Copy From Song on page 524 5 Load Template Song For more information see Load Template Song on page 524 6 Save Template Song For more information see Save Template Song on page 525 7 FF REW Speed For more information see FF REW Speed on page 525 8 Set Location for Locate Key For more information see Set Location for Locate Key on page 525 9 GM Initialize For more ...

Страница 460: ...en you play the keyboard If you ve selected an audio track this shows the AT audio track number region number and name of the first audio event STEREO Stereo Pair on off status and KBD the bank number name of the program that will sound when you play the keyboard RPPR Assign will not show all of the RPPR assignments if there are many of them You can use the P5 Pattern Edit page to see all of the R...

Страница 461: ...o so 1 Press the CONTROL ASSIGN MIXER TIMBRE TRACK switch to select either Tracks 1 8 or 9 16 2 Use the MIX SELECT 1 9 8 16 switches to select the Track you want to control 3 Press the MIXER KNOBS switch to select CHANNEL STRIP 4 Use the MIX CHANNEL STRIP knobs 2 6 to adjust the EQ TRIM LOW EQ gain MID EQ frequency and gain and HIGH EQ gain as desired Track 02 16 Track Number These parameters adju...

Страница 462: ...e control surface EQ parameters other than Bypass can be edited not only from within the screen but also using the control surface You can also make this setting from the front panel mixer section or from the P0 Control Surface page of the LCD The procedure given below describes how to make these settings from the front panel 1 Press the CONTROL ASSIGN MIXER AUDIO switch to select either 1 8 or 9 ...

Страница 463: ...formation on Vector Synthesis please see What does Vector mean on page 38 and Vector Joystick and Vector Envelope on page 38 Program and Song Vectors work together In Sequencer mode each Track s Program still has its own Vector EG which controls volume and CCs as it did in Program mode You can disable the Program Vector Volume and CC control separately for each Track if desired There is also a sep...

Страница 464: ... Song Vector EG VJS X and Y modes Song switch Enable CC control X and Y CC Assignments Vector CC Modulation of Program and FX Parameters Global Channel Only Song Vector Volume Control Song switch Enable Volume control Vector Modulation of Track Volume Track 1 16 Center Volume and Equal Power settings Vector Joystick MIDI In Global Chan Vector CC MIDI Output Song Global switch Vector MIDI Out Vecto...

Страница 465: ...me Image Off On The vector graphic includes an image representing the Vector Volume Control settings for the current Track see Track Select below You can use the Show Volume Image check box to toggle this part of the graphic on and off Track Select 01 16 This selects the Track whose volume image will be shown Show Point VJS Vector EG Point 0 4 You can view the volume and CC values for the current ...

Страница 466: ...24 3 Delete Song For more information see Delete Song on page 524 4 Copy From Song For more information see Copy From Song on page 524 5 Load Template Song For more information see Load Template Song on page 524 6 Save Template Song For more information see Save Template Song on page 525 7 FF REW Speed For more information see FF REW Speed on page 525 8 Set Location for Locate Key For more informa...

Страница 467: ...nd receive its dedicated MIDI CCs just like other physical controllers See Vector and MIDI above for more information This parameter affects only the Song Vector CCs Even if this is turned Off the individual Programs Vector CCs will still function normally VJS X Mode Positive Negative Xfade Split You can set up the Vector to send out CCs in several different patterns as shown in the graphic below ...

Страница 468: ... if they are conflicting with the Song s Vector CCs Tracks 02 16 The settings for Tracks 2 16 are identical to those for Track 01 as described above 1 6 Page Menu Commands The number before each command shows its ENTER number key shortcut For more information on these shortcuts see ENTER 0 9 shortcuts for menu commands on page 138 0 Memory Status For more information see Memory Status on page 524 ...

Страница 469: ...lex evolving timbres The Key Sync parameter applies only to this per note EG When the Key Sync parameter is Off the CC Control and Volume Control EGs are completely synchronized When Key Sync is On each note s Volume Control EG will start at note on and go into release at note off All the notes will still share a single CC Control EG 1 7a Basic Vector Envelope On Off On On checked When this box is...

Страница 470: ...ime sets how long the EG lingers at each point and the Transition time sets how long it takes to go from the selected point to the next For instance the graphic below shows the succession of Hold and Transition times when the Loop Type is set to 1 3 For clarity only the Y axis positions are shown Vector EG times Loop Type 1 3 The transition from Point 3 into the loop always uses Point 3 s Transiti...

Страница 471: ...oint in the loop You can set this in either seconds milliseconds or rhythmic values depending on whether the Mode is set to Time or Tempo The Time Base Note and Multiplier parameters work just like those for Point 0 as described under Transition above Point 4 Point 4 is the Vector EG s release destination Its time setting is different from those of the other Points Instead of setting the time it t...

Страница 472: ...ion see Copy from Combination on page 526 11 Copy From Program For more information see Copy From Program on page 526 12 Copy Vector Envelope For more information see Copy Vector Envelope on page 144 1 8 Set Up Controllers Here you can set the Sequencer functions of the SW1 switch SW2 switch and the Realtime Modulation Knob 5 8 These settings are made independently for each song When you operate t...

Страница 473: ...nds The number before each command shows its ENTER number key shortcut For more information on these shortcuts see ENTER 0 9 shortcuts for menu commands on page 138 0 Memory Status For more information see Memory Status on page 524 1 Exclusive Solo For more information see Exclusive Solo on page 138 2 Rename Song For more information see Rename Song on page 524 3 Delete Song For more information s...

Страница 474: ...l Ch01 Ch16 Tch This sets the pad s MIDI output channel You can set this to either a specific channel 1 16 or to follow the channel of the selected Track Ch01 Ch16 The pad will transmit on the selected MIDI channel As shown in the diagram Pads and MIDI Channel below you can Use this in conjunction with the Track MIDI Channel setting to route a pad to a specific Track For more information see MIDI ...

Страница 475: ...t notes and velocities using the LCD You can edit the recorded notes and velocities using the on screen parameters If you like you can also enter new notes this way For more information please see Pad 1 above Copying and Merging Pads Just as you can assign notes to a pad by playing them on the keyboard you can press a pad to copy its assigned notes to another pad The method is similar to steps 1 3...

Страница 476: ... to BTH and play the keyboard and operate the controllers the internal tone generator of the OASYS will sound and at the same time MIDI data will also be transmitted to an external device EXT When the musical data recorded in the MIDI track is played back or when you select a MIDI track that is set to EXT and play the keyboard and operate the controllers MIDI data will be transmitted to an externa...

Страница 477: ... for all tracks and check it only for important tracks that would cause a conspicuous problem if notes were to drop out during the performance Track 02 16 Track Number These are the MIDI related settings for MIDI tracks 2 through 16 They are the same as for track 1 See Track 01 2 1 Page Menu Commands The number before each command shows its ENTER number key shortcut For more information on these s...

Страница 478: ...uring playback However if you come to any Portamento On Off data or Portamento Time data that was recorded the settings will change accordingly When the track whose Status 2 1a is INT or BTH MIDI control change CC 5 Portamento Time and CC 65 Portamento Switch can be received to control this and change the setting If the setting is PRG CC 05 Portamento Time will not be received When you switch song...

Страница 479: ...elves for more information see Using Chord mode on page 49 of the Operation Guide PRG uses the notes of the chord stored in the Track s Program instead of any of the chords in the Combi This makes it easy to use Chord mode for sound specific effects such as octaves stacked fifths and so on When set to PRG the Track will not change chords in response to the pads Track 02 16 Track Number Here you ca...

Страница 480: ...oarse Tune will control Transpose and RPN Fine Tune will control Detune If the Track uses an HD 1 Drum Program MIDI RPN Coarse Tune and Fine Tune will be combined to control Detune The overall range is 1 octave for coarse tune and fine tune together Bend Range PRG 24 00 24 Specifies the amount of pitch change that will occur when the pitch bender is operated in semitone units PRG The pitch range s...

Страница 481: ... page 524 1 Exclusive Solo For more information see Exclusive Solo on page 138 2 Rename Song For more information see Rename Song on page 524 3 Delete Song For more information see Delete Song on page 524 4 Copy From Song For more information see Copy From Song on page 524 5 Load Template Song For more information see Load Template Song on page 524 6 Save Template Song For more information see Sav...

Страница 482: ...sound with a delay of a half note Even if you change Tempo 0 1a the delay time will always be a half note If you use these parameters to specify a delay of a half note In this case a Tempo of 60 00 BPM will produce a 2000 ms delay and a Tempo of 120 00 BPM will produce a 1000 ms delay Track 02 16 Track Number These are the delay time settings for MIDI tracks 2 through 16 They are the same as for t...

Страница 483: ...ation please see Swing on page 35 Wave Sequence Quantize Trigger PRG Off On This allows you to override the Program s Wave Sequence Quantize Trigger setting Program 1 1e If you re using multiple Programs with rhythmic Wave Sequences you can use this to synchronize all of the Wave Sequences at note on Note that Quantize Trigger applies only when the Wave Sequence s Mode is set to Tempo For more inf...

Страница 484: ...A ON OFF Global 2 1b will also be set to MIDI CC 14 if you execute the page menu command Reset Controller MIDI Assign with To set to Default Setting After executing turn the assignment Off for other MIDI CC Assign KARMA Controllers that you do not need to record Track 02 16 Track Number These are the wave sequence and KARMA related settings for MIDI tracks 2 through 16 They are the same as for tra...

Страница 485: ...rogram You may find this convenient if you use Program Change messages to switch between two EXi Programs and wish to have the input enabled for one but disabled for the other For more information see 4 2 EXi Audio Input on page 162 Off disables the input Audio Input 1 2 3 4 and S P DIF Input L R use the live audio from the selected input L R Output and Indiv Output 1 2 7 8 use the audio as it is ...

Страница 486: ...e Solo For more information see Exclusive Solo on page 138 2 Rename Song For more information see Rename Song on page 524 3 Delete Song For more information see Delete Song on page 524 4 Copy From Song For more information see Copy From Song on page 524 5 Load Template Song For more information see Load Template Song on page 524 6 Save Template Song For more information see Save Template Song on p...

Страница 487: ...ollers that can be filtered in the MIDI Filter 2 and 3 pages are set to MIDI control changes filtering will be performed for these control changes In this case any control change filtering that is being performed in the MIDI Filter 1 and 2 pages will be given priority Furthermore if the same control change is assigned to multiple controllers for which there are filter settings in the MIDI Filter 2...

Страница 488: ...tcuts see ENTER 0 9 shortcuts for menu commands on page 138 0 Memory Status For more information see Memory Status on page 524 1 Exclusive Solo For more information see Exclusive Solo on page 138 2 Rename Song For more information see Rename Song on page 524 3 Delete Song For more information see Delete Song on page 524 4 Copy From Song For more information see Copy From Song on page 524 5 Load Te...

Страница 489: ... Off On Enable Realtime Control Knob 8 Off On These specify whether or not MIDI message will be received for Realtime Control knobs 5 through 8 Track 02 16 Track Number These are the MIDI Filter 2 settings for MIDI tracks 2 through 16 They are the same as for track 1 See Track 01 3 2 Page Menu Commands The number before each command shows its ENTER number key shortcut For more information on these...

Страница 490: ...PEDAL will be received The function is assigned in Global P2 Controller page This filter setting is valid when a MIDI control change is assigned Enable Other Control Change Messages Off On Specifies whether or not MIDI control messages not covered in the preceding items MIDI Filter will be received Enable KARMA Waveform SysEx Off On This allows you to enable or disable the System Exclusive message...

Страница 491: ...g from the top bottom key These settings do not affect MIDI transmission reception All note data that is received will be recorded into the internal sequencer and all note data from the internal sequencer or from the keyboard will be transmitted 3 5a Zone Map This area indicates the note and velocity ranges in which each MIDI tracks 1 16 will sound The LCD screen will display a line to indicate th...

Страница 492: ...y shortcut For more information on these shortcuts see ENTER 0 9 shortcuts for menu commands on page 138 0 Memory Status For more information see Memory Status on page 524 1 Exclusive Solo For more information see Exclusive Solo on page 138 2 Rename Song For more information see Rename Song on page 524 3 Delete Song For more information see Delete Song on page 524 4 Copy From Song For more informa...

Страница 493: ...alue that will sound each track Top Slope 0 120 Specifies the number of velocity steps over which the original volume will be reached starting from the Top Velocity 0 The volume will be at the original value from the top velocity 120 The volume will decrease as the velocity approaches the top velocity Bottom Slope 0 120 Specifies the number of velocity steps over which the original volume will be ...

Страница 494: ... see Delete Song on page 524 4 Copy From Song For more information see Copy From Song on page 524 5 Load Template Song For more information see Load Template Song on page 524 6 Save Template Song For more information see Save Template Song on page 525 7 FF REW Speed For more information see FF REW Speed on page 525 8 Set Location for Locate Key For more information see Set Location for Locate Key ...

Страница 495: ...elect the track you want to edit and use From Measure and To End of Measure parameters to specify the region that you want to edit Then choose a command from the page menu and execute the edit For details on the specific commands see Sequencer Page Menu Commands on page 524 4 1a Track data Map This area shows the presence or absence of performance data and indicates the edit range etc The currentl...

Страница 496: ...h on page 541 5 Erase Track For more information see Erase Track on page 541 6 Copy Track For more information see Copy Track on page 542 7 Bounce Track For more information see Bounce Track on page 542 8 Erase Measure For more information see Erase Measure on page 542 9 Delete Measure For more information see Delete Measure on page 543 10 Insert Measure For more information see Insert Measure on ...

Страница 497: ...ge 525 20 Set Location for Locate Key For more information see Set Location for Locate Key on page 525 4 2 MIDI Track Name Here you can assign a name to each track 4 2a MIDI Track Names T01 T16 MIDI Track Name Here you can rename the MIDI tracks Press the text edit button to open the dialog box and input the desired characters You can enter up to 24 characters For more information see Editing name...

Страница 498: ...d characters You can input up to 24 characters For more information see Editing names on page 166 of the Operation Guide 4 3 Page Menu Commands The available commands will be different depending on whether the currently selected Track is MIDI or Audio The commands are exactly the same as for the main Track Edit page for more information see MIDI Track Edit commands on page 486 and Audio Track Edit...

Страница 499: ...created using the Get From MIDI Track command or Copy Pattern command You can also copy a preset pattern to a user pattern and edit it You can t directly edit a preset pattern Preset patterns and user patterns can be placed in or copied into a track 5 1a Location Resolution Tempo Song Track Select Location 01 99 Displays the current measure location of the selected pattern Song Select 000 199 name...

Страница 500: ...menu commands Pattern Select P000 149 U00 U99 Selects a pattern User patterns can be renamed in the P5 Pattern Name page Metronome Only REC REC Play Off Specifies whether the metronome will sound during recording or playback For details see 0 5d Metronome Setup on page 431 Remove Data Off On On checked Unwanted performance data can be removed during pattern recording The procedure is the same as e...

Страница 501: ... on page 524 1 Step Recording Loop Type For more information see Step Recording Loop Type on page 554 2 Event Edit For more information see Event Edit on page 554 3 Pattern Parameter For more information see Pattern Parameter on page 554 4 Erase Pattern For more information see Erase Pattern on page 554 5 Copy Pattern For more information see Copy Pattern on page 554 6 Bounce Pattern For more info...

Страница 502: ...e the playback from the external sequencer to trigger RPPR patterns on OASYS set Local Control OFF If you want the note data generated by RPPR to be recorded by the external sequencer set Local Control ON and turn off the echo back function of the external sequencer See Local Control On settings on page 1002 In the RPPR Setup page RPPR is turned on automatically This will be the same result as whe...

Страница 503: ...ram that s selected for Track Mode Once Manual Endless Specifies the way in which the pattern assigned to the specified KEY will be played Once When you press the key the complete pattern will playback once to the end and then stop Manual The pattern will continue repeating as long as you continue holding the key and will stop as soon as you release the key Endless The pattern will continue repeat...

Страница 504: ...tings of the selected KEY into a copy buffer Paste This pastes the settings from the copy buffer obtained by Copy into the KEY of the selected parameter Example Assigning preset patterns P00 P01 and P02 to KEY Before you begin assign a drum program such as MIDI track 1 1 Check C 2 Assign Set Pattern Bank to Preset set Pattern to P00 and set Track to MIDI Track 01 With a C 2 parameter selected pres...

Страница 505: ...ern of Program mode By using the page menu command Copy From Combination you can copy the entire settings of a combination and real time record a performance that uses the KARMA function Multi REC By using the Auto Song Setup function p 414 you can automatically transfer the settings of a program or combination into a song and then begin recording immediately simply by pressing the START STOP swit...

Страница 506: ... be initialized or be preserved when you select a GE For more information see Load GE Options on page 7 KARMA T Sig KARMA Time Signature GE TS 1 4 16 4 1 8 16 8 1 16 16 16 For more information see KARMA T Sig Time Signature on page 7 Selected KARMA Module Info GE Number Name RTC Model List of RTC Models This displays information for the KARMA Module specified by the Module Control Setting For more...

Страница 507: ...fied by Input Channel and the MIDI channel of the MIDI track selected by Track Select will be used as the MIDI input channels for the KARMA Module If you check Tch Also you will also be able to control the KARMA function from the keyboard transmitted on the MIDI channel of the MIDI track selected by Track Select Note If you ve selected Master Track or Audio Track for Track Select the MIDI channel ...

Страница 508: ...KARMA Module A will be sounded by the Bass type program Example 3 With the following settings switching Track Select the track you play to change programs will also switch to a different KARMA Module at the same time causing a different phrase to play At this time the rhythm track can be triggered and controlled from either track See the diagram Example 3 at the bottom of previous page 1 Set MIDI ...

Страница 509: ... when the KARMA ON OFF switch is off Off unchecked MIDI data that passes through the KARMA Module will not be sent to the track when the KARMA ON OFF switch is off For examples of using this setting see Timbre Thru when KARMA Off on page 377 Module Track MIDI DisplayThis shows the MIDI tracks that will be sounded by each KARMA Module according to the MIDI output channel settings of each KARMA Modu...

Страница 510: ...rn on the KARMA function or when you select a song for which the KARMA function is turned on These messages will be transmitted on the Output Channel Sequencer 7 1c of the KARMA Module Note If the GE also generates the same control change messages as those you specify here the control change messages generated by the GE will be given priority 1 2 3 4 CC Number Off MIDI CC 00 CC 95 Value 000 127 Fo...

Страница 511: ... page 526 7 3 Module Parameters Control Here you can set KARMA Module Control parameters In Sequencer mode four KARMA Modules A B C D can be used 7 3a Module Parameter Control Control Transpose 36 36 Force Range Off Lowest Highest C3 B3 1 C3 B3 2 Force Range Wrap C C Timbre Zone Bypass Off On Root Position Off On For more information see Control on page 103 and p 380 Clock Advance Mode Auto Dyn Au...

Страница 512: ...y Scene on page 409 5 Swap Scene For more information see Swap Scene on page 409 6 Capture Random Seed For more information see Capture Random Seed on page 409 7 FF REW Speed For more information see FF REW Speed on page 525 8 Set Location for Locate Key For more information see Set Location for Locate Key on page 525 9 Copy From Program For more information see Copy From Program on page 526 7 4 M...

Страница 513: ...mation see Initialize KARMA Module on page 409 4 Copy Scene For more information see Copy Scene on page 409 5 Swap Scene For more information see Swap Scene on page 409 6 Capture Random Seed For more information see Capture Random Seed on page 409 7 FF REW Speed For more information see FF REW Speed on page 525 8 Set Location for Locate Key For more information see Set Location for Locate Key on p...

Страница 514: ...tly of modules A B C and D 7 5c GE Real Time Parameters for Module Control A B C D 1 32 For more information see 7 5b GE Real Time Parameters on page 110 and 7 5c GE Real Time Parameters for Module Control A B C D on page 384 7 5d Scene Matrix For more information see 7 5d Module Control Scene Matrix on page 384 7 5 Page Menu Commands The number before each command shows its ENTER number key short...

Страница 515: ...2 and 7 6a Perf Real Time Parameters 1 8 on page 385 7 6 Page Menu Commands The number before each command shows its ENTER number key shortcut For more information on these shortcuts see ENTER 0 9 shortcuts for menu commands on page 138 0 Memory Status For more information see Memory Status on page 524 1 Exclusive Solo For more information see Exclusive Solo on page 138 2 Copy KARMA Module For mor...

Страница 516: ...ts ENTER number key shortcut For more information on these shortcuts see ENTER 0 9 shortcuts for menu commands on page 138 0 Memory Status For more information see Memory Status on page 524 1 Exclusive Solo For more information see Exclusive Solo on page 138 2 Copy KARMA Module For more information see Copy KARMA Module on page 408 3 Initialize KARMA Module For more information see Initialize KARM...

Страница 517: ...umber before each command shows its ENTER number key shortcut For more information on these shortcuts see ENTER 0 9 shortcuts for menu commands on page 138 0 Memory Status For more information see Memory Status on page 524 1 Exclusive Solo For more information see Exclusive Solo on page 138 2 Copy KARMA Module For more information see Copy KARMA Module on page 408 3 Initialize KARMA Module For mor...

Страница 518: ...ormation on these shortcuts see ENTER 0 9 shortcuts for menu commands on page 138 0 Memory Status For more information see Memory Status on page 524 1 Exclusive Solo For more information see Exclusive Solo on page 138 2 Copy KARMA Module For more information see Copy KARMA Module on page 408 3 Initialize KARMA Module For more information see Initialize KARMA Module on page 409 4 Copy Scene For mor...

Страница 519: ...ogram oscillator s used by each MIDI track 1 16 will be sent You can also set the send levels to the master effects from this page 8 1a Routing Map This area shows the insert effect routing the name of the assigned effect the on off status chaining and the output bus that follows the insert effect The type of insert effect the on off status and the chain settings can be edited in the P8 Insert FX ...

Страница 520: ...odify these settings during recording your changes will be recorded as performance data the send amounts will change accordingly during playback You can also modify these settings during playback However if Send 1 and 2 data has been recorded the settings will change according to the recorded data Note You can use the control surface to control Send1 and Send2 These can also be controlled from the...

Страница 521: ...FX Control bus two channel stereo FX Ctrl 1 or 2 Use the FX Control buses when you want a separate sound to control the audio input of an effect You can use two FX Control buses each is a two channel stereo bus to control effects in various ways For more information please see FX Control Buses on page 730 REC Bus All OSCs to Off 1 2 3 4 1 2 3 4 These settings send the output of the track to the RE...

Страница 522: ...n on these shortcuts see ENTER 0 9 shortcuts for menu commands on page 138 0 Memory Status For more information see Memory Status on page 524 1 Exclusive Solo For more information see Exclusive Solo on page 138 2 Copy Insert Effect For more information see Copy Insert Effect on page 149 3 Swap Insert Effect For more information see Swap Insert Effect on page 150 4 Drum Kit IFX Patch For more infor...

Страница 523: ...e of the LCD screen The procedure given below describes how to make these settings from the front panel 1 Press the CONTROL ASSIGN MIXER AUDIO switch to select either tracks 1 8 or 9 16 2 Press the MIXER KNOBS switch to select CHANNEL STRIP 3 Use the MIXER SELECT 1 9 8 16 switches to select the track whose send levels you want to adjust 4 Use MIX CHANNEL STRIP FX SEND 1 knob 7 and FX SEND 2 knob 8...

Страница 524: ...1 2 3 4 For more information please see REC Bus All OSCs to on page 511 Track 02 16 Track Number Here you can specify the output bus effect control bus and REC bus for audio tracks 2 through 16 These are the same as for track 1 See Track 01 8 4 Page Menu Commands The number before each command shows its ENTER number key shortcut For more information on these shortcuts see ENTER 0 9 shortcuts for m...

Страница 525: ...ll change when the data is played back You can also change these settings during playback However if pan CC 8 send 1 or 2 data has been recorded the settings will change accordingly If Status 2 1a is either INT or BTH CC 8 CC 93 and CC 91 can be received to control the pan following the insert effect send 1 or send 2 respectively and change their settings When you switch songs or return to the beg...

Страница 526: ...d shows its ENTER number key shortcut For more information on these shortcuts see ENTER 0 9 shortcuts for menu commands on page 138 0 Memory Status For more information see Memory Status on page 524 1 Exclusive Solo For more information see Exclusive Solo on page 138 2 Copy Insert Effect For more information see Copy Insert Effect on page 149 3 Swap Insert Effect For more information see Swap Inse...

Страница 527: ...fect Type and On Off status of the selected effect slot This is also the effect slot that will be affected by the page menu commands Insert IFX Slot and Cut IFX Slot When you move from this page to the P8 IFX1 12 page the IFX you selected here will be selected For example if you select Track 03 only the insert effects used by track 3 will be shown OUTPUT indicates the Bus Select settings that foll...

Страница 528: ...ort For a complete list of Dmod sources see Dynamic Modulation Source List on page 976 You can use different MIDI channels to control Dmod for each effect if desired as selected by the Ch Control Channel parameter 8 7a IFX1 Here you can edit the effect parameters of the insert effect you selected in the P8 Insert FX page Use the tabs at left to select IFX1 through IFX12 IFX1 On Off Off On Turns th...

Страница 529: ...r settings in U00 U15 U00 U15 These are areas in which you can store your own settings This shows that no Effect Preset has been selected You ll see this if you ve just selected an effect written a program or selected a new Song Selecting this setting from the menu will not have any effect Note Songs save the effects parameter settings but they don t save the number of the selected Effect Preset I...

Страница 530: ...st of Dmod Sources Frequency 0 02 20 00 Hz MIDI Tempo Sync Off On BPM MIDI 40 00 240 00 Base Note 3 3 3 3 Times 01 32 These parameters are the same as in Program mode For more information please see 8 9a Common FX LFO1 on page 132 8 9b Common FX LFO2 These parameters are the same as for Common FX LFO1 For more information please see 8 9a Common FX LFO1 above 8 9 Page Menu Commands The number befor...

Страница 531: ...nformation please see 9 1 Routing on page 134 9 1a MFX1 2 MFX1 MFX1 000 185 MFX1 On Off Off On Return 1 000 127 MFX2 MFX2 000 185 MFX2 On Off Off On Return 2 000 127 Chain Chain On Off Off On Chain Direction MFX1 MFX2 MFX2 MFX1 Chain Level 000 127 9 1b TFX1 2 TFX1 TFX1 000 185 TFX1 On Off Off On TFX2 TFX2 000 185 TFX2 On Off Off On 9 1c Master Volume Master Volume 000 127 9 1 Page Menu Commands Th...

Страница 532: ...nnels to control Dmod for each effect if desired as selected by the Ch Control Channel parameter 9 2a MFX1 MFX1 On Off Off On This turns master effect 1 on off This is linked with the on off setting in the P9 Master Total Effect Routing page Ch Control Channel Ch01 16 G ch Specifies the MIDI channel that will control dynamic modulation Dmod for the master effect Ch01 Ch16 The specified MIDI channe...

Страница 533: ... FX Preset on page 154 5 Put Effect Setting To Track For more information see Put Effect Setting to Track on page 557 6 FF REW Speed For more information see FF REW Speed on page 525 7 Set Location for Locate Key For more information see Set Location for Locate Key on page 525 9 3 MFX2 9 4 TFX1 9 5 TFX2 These pages let you edit the parameters of Master Effect 2 and Total Effects 1 and 2 To select ...

Страница 534: ...attern Events will copy only the setting data of songs except for Play Loop and RPPR data 4 To execute the Copy Song operation press the OK button To cancel press the Cancel button Be aware that if you execute All all setting data and musical data of the currently selected song will be erased and rewritten by the data from the copy source song If you execute Without Track Pattern Events song setti...

Страница 535: ...d and rewritten with the current settings FF REW Speed This allows you to set the speed at which fast forward or rewind will occur when you press the FF switch or REW switch Audio tracks will not produce sound during fast forward or rewind 1 Select FF REW Speed to open the dialog box 2 In Speed specify the speed relative to the playback tempo at which fast forward and rewind will occur This settin...

Страница 536: ...lect the copy source destination 3 Use the IFX All IFX All used MFXs and TFXs check boxes to specify whether you want the effect settings of the combination to be copied as well IFX All All insert effect settings of the copy source combination the contents of the Insert FX page and the IFX1 12 effect parameters will be copied IFX All used Only the insert effects that are used by the copy source co...

Страница 537: ...pose 00 00 Detune 0000 0000 Bend Range PRG PRG Use Program s Scale Delay Mode Time Time Time 0000 0000 WSEQ KARMA WS Key Sync PRG PRG WS Swing PRG PRG WS Quantize Trigger PRG PRG KARMA Track On Off Nrm Nrm P3 MIDI Filter Keyboard Zones Vel Zone On On C 1 G9 Slope 000 C 1 G9 001 127 Slope 000 001 127 P7 KARMA All parameters P8 MIDI Routing1 IFX Indiv Out Assign L R L R Send1 0 0 Send2 40 40 MIDI Ro...

Страница 538: ...ed By default this will be the lowest numbered of the vacant sample numbers If you select No Assign or a sample number that already contains data the sample will automatically be sampled into the lowest numbered vacant sample number If you are sampling in stereo Sample No L and Sample No R will be created 3 Set Auto 12 dB On On checked 12 dB Sampling 2 1d will automatically be turned on for sample...

Страница 539: ...ot return to its prior state 5 Press the OK button to apply the settings you made or press the Cancel button to discard any settings you made after accessing the dialog box Select Directory This command lets you specify the save destination disk directory and filename for the WAVE file that will be created by recording or sampling You can also use this Select Directory command to listen to audio f...

Страница 540: ...the last insert effect in the chain set the REC Bus to 1 for a mono source or 1 2 for a stereo source At this time you will normally set Bus Select to Off but you don t have to do so Note You can also record the input source to an audio track without applying an insert effect and then send the output of the audio track through an insert effect Make the appropriate Bus Select setting in the P8 Audi...

Страница 541: ...k 03 Audio Track 01 Audio Track 02 If you want to apply an effect to the output of audio track 03 use the audio track 03 Bus Select to send the output to IFX1 An example of changing the settings If you want to bounce audio that is processed by an effect you can do this by changing the REC Bus or REC Source settings If you want to bounce the audio from the audio track after it has been processed by...

Страница 542: ...without changing the settings and the samples will automatically be assigned to C 2 D2 and so on A new multisample will be created when you execute Resample SEQ Play once again and sample Auditioning the data you sampled If you executed with Save to RAM and Convert to Program checked select the program you specified as the convert destination and play the C2 key to hear the result If you didn t ch...

Страница 543: ...inue sampling after executing In Track Sampling successive samples will automatically be assigned to C 2 D2 etc However if you execute Auto Sampling Setup once again and then sample the samples will be created in a new multisample Auditioning the data you sampled Return the Location and then press the SEQUENCER START STOP switch to play back the song Alternatively use Track Select 0 1a to select t...

Страница 544: ... specify the bounce recording destination song and the name of the file that will be created and press the OK button The WAVE file will be created automatically 1 Use Song Select to select the song you want to bounce Audio Track Play Rec Mut e Play Recording Track REC 8 To Mode REC 8 Solo From Solo On REC Source In1 Source Audio IFX 6 REC 1 2 8 Stereo Pair Off Source Audio 6 Mode 8 Sampling Setup ...

Страница 545: ... to use it with a program in a track you can use this command to change the BPM of that multisample or sample The Detune BPM Adjust command modifies the BPM of the phrase or rhythm by changing its pitch This command is available when the Detune setting of that track is selected When you execute this command the selected Detune value will be adjusted For more information see Detune BPM Adjust on pa...

Страница 546: ...fied in step 4 Entering a tie If you press the Tie button without pressing the keyboard the previously input note will be tied and lengthened by the amount specified in step 4 If you press the Tie button while holding down a note the note you are playing will be tied and lengthened by the amount specified in step 4 You can even enter notes as shown in the following diagram Deleting a note or rest ...

Страница 547: ...tination and press the Insert button to insert the event at that location 6 When you are finished event editing press the Done button If you press the COMPARE switch you will return the data to the condition in which it was before you began event editing The following table shows the types of musical data that can be edited by MIDI Event Edit and the range of their values 1 Be aware that because t...

Страница 548: ...ence This is convenient when a point inside a region needs to be aligned at a specific location If you edit the location with Trim Region Start checked the Start of the region will also be adjusted simultaneously Check this box if you want to adjust the length without changing the overall position V Volume specifies the volume of the audio event Note The volume of an audio track is determined by t...

Страница 549: ... This edits the area in which the region will sound Select the region that you want to edit and press the Trim button to open the Trim dialog box The functions and operation are the same as in the trim dialog box of Region Edit with the exception of Trim Audio Event Start See Region Edit on page 550 If you check Trim Audio Event Start editing the Start value will simultaneously modify the location...

Страница 550: ...ynamic range of the sample data You can use Level to raise or lower the level as necessary 10 Crossfade This creates an event in which the volume is gradually modified in the area where two audio events overlap causing them to be mixed Edit the location and end location so that the two events overlap Then select the first of the two events and press the Crossfade button to display the dialog box U...

Страница 551: ... will also stop when you reach the end of the audio event This is available only if you ve selected an audio event 7 When you re finished with automation editing press the Done button If desired you can press the COMPARE switch to return to the state prior to automation editing The following table shows the types of Automation Edit events and the range of values Set Song Length This command change...

Страница 552: ...d audio tracks 4 Press the OK button to execute the command If you decide not to execute press the Cancel button Bounce Track This command combines the musical data of the bounce source and bounce destination tracks and places the combined data in the bounce destination All musical data in the bounce source will be erased If MIDI control data existed in the bounce source track and bounce destinati...

Страница 553: ...ied Kind of data will be erased from all audio tracks Audio Tracks 01 16 6 To execute the Erase Measure command press the OK button To cancel press the Cancel button If data extends across the boundary between a measure being erased and a measure that is not being erased only the portion that falls within the specified region will be erased Be aware that if note data extends across several measure...

Страница 554: ...deleted Insert Measure This command inserts the specified number of measures into the specified track Existing data following the insert location will be moved backward If you insert measures between note events that are connected by a tie a note off will be created immediately before the inserted measure and the subsequent portion will be deleted 1 Use Track Select to select the MIDI track MIDI T...

Страница 555: ...he musical data of measures 1 4 will be inserted into measures 5 8 The result will be that measures 1 4 will be played twice 5 Specify the track s for which you want to execute the command If you execute with All Tracks All MIDI Tracks and All Audio Tracks unchecked the playback data will be inserted into the track that s selected in Track Select Be aware that at this time the playback data that f...

Страница 556: ...ault the range of measures will be set as specified on the Track Edit page 5 Use To Song to select the copy destination song use Track or Audio Track to select the copy destination track if you haven t checked All Tracks All MIDI Tracks or All Audio Tracks and use Measure to select the measure at which the copied data will be inserted You can t copy between MIDI and audio 6 To execute the Copy Mea...

Страница 557: ...at you wish to create Control change Control change data will be inserted Use to specify the CC number After Touch Aftertouch data will be inserted Pitch Bend Pitch bend data will be inserted Tempo Tempo data will be inserted if you ve selected the master track 5 In Start Value select the starting value of the control data In End Value select the ending value of the control data By default the Sta...

Страница 558: ...re and To End of Measure will be the range that you specified in the Track Edit page 4 In Kind select the type of musical data events that you wish to quantize All Quantization will be applied to all performance MIDI data Note Quantization will be applied only to note data Bottom specifies the lowest Note that will be affected and Top specifies the highest Note You can use this when you want to qu...

Страница 559: ...cify the amount by which you wish to move the note The amount of shift is set in semitone steps over a range of 127 127 1 will shift the note a semitone upward 6 Select either Replace to move the note numbers or Create to generate additional notes For example if you are editing a track that uses a drum program you can use Replace to exchange the current snare sound for a different snare sound assi...

Страница 560: ... which a WAVE file will play back Editing a region will affect all audio tracks of the song Use caution when editing a region that is already used by an audio track 1 Use Track Select to select an Audio Track 2 Choose Region Edit to open the region edit dialog box 3 Use Index at the top of the dialog box to specify the index number of the region you want to edit this will be displayed at the begin...

Страница 561: ...n 6 Play back the region Select the region that you want to play back and press the Play button to play the region from its Start to End Trim step 6 During playback the Play button indication will change to Stop You can press the Stop button to stop playback 7 Use the trim dialog box to specify the portion of the region that will play back In the trim dialog box select the region that you want to ...

Страница 562: ...vert to the state prior to entering the Trim dialog box 9 When you re finished with Region Edit press the Done button Volume Ramp This command modifies the data values volume of the specified area You can gradually increase Fade In or decrease Fade Out the volume between the start and end points 1 Use Track Select to select the audio track that you want to edit and use From Measure and To End of M...

Страница 563: ... Choose Adjust Song s Tempo to Region to open the dialog box 3 Use From Measure to select the first measure in which you want to create tempo events and use To End of Measure to select the last measure By default From Measure and To End of Measure will be the range of measures you specified in the Track Edit page 4 If you want to create tempo events based on all audio tracks check All Audio Tracks...

Страница 564: ...ected pattern 1 Use Pattern and Pattern Select to specify the pattern 2 Select Pattern Parameter to open the dialog box 3 In Length specify the number of measures in the pattern 4 In Meter specify the time signature of the pattern However this time signature is only temporary and when you put or copy the pattern in a track of a song the pattern will play according to the time signature of that mea...

Страница 565: ... Pattern Parameter menu command specify the pattern length of the get destination 3 Select Get From MIDI Track to open the dialog box 4 In Song select the get source song 5 In Track select the get source MIDI track 6 In Measure specify the first measure of the get source 7 To execute the Get From MIDI Track command press the OK button To cancel press the Cancel button Put To MIDI Track This comman...

Страница 566: ...re specified at the copy destination measures The procedure is the same as for the Put To MIDI Track command For more information see Put To MIDI Track on page 555 Copy KARMA Module For more information please see Copy KARMA Module on page 408 Initialize KARMA Module For more information please see Initialize KARMA Module on page 409 Copy Scene For more information please see Copy Scene on page 14...

Страница 567: ...that you want to insert 4 Use To Song to specify the song Track to specify the track Measure to specify the measure and Beat Tick to specify the beat and clock at which you want to insert the event 5 Press the OK button to execute the Put Effect Setting to Track command If you decide to cancel press the Cancel button The inserted event contains only the type of effect and the effect parameters You...

Страница 568: ...change to 048 Stereo Flanger at measure 9 11 If you press the COMPARE switch it will light and play back the playback will occur as it did before you executed Put Effect Setting to Track You can use the COMPARE switch to compare the state of the track before and after execution 12 In the P4 Track Edit page set Track Select to Track 03 and choose the MIDI Event Edit page menu command to access the ...

Страница 569: ...OMPARE switch it will light and play back to hear the song as it was before you executed Put Effect Setting to Track You can use the COMPARE switch to compare the state of the track before and after execution Note In the P4 Track Edit page of song 000 set Track Select to Track 03 and choose the MIDI Event Edit page menu command to access the Event Edit screen In the Set Event Filters dialog box ch...

Страница 570: ...me PLAY MUTE Solo On Off 1 Audio Track Mixer Rec Source Pan Volume PLAY MUTE Solo On Off 1 Audio In Sampling All Audio Input parameters Control Surface All RT KARMA REAL TIME CONTROL KARMA SCENE KARMA SWITCH KARMA SLIDER parameters TONE ADJ Assign Value P1 EQ Vector Control MIDI Track EQ Auto Load Prog EQ Bypass Input Trim High Gain Mid Frequency Mid Gain Low Gain Audio Track EQ Bypass Input Trim ...

Страница 571: ... mode Put Effect Setting to Track 561 data These recorded events may not be reproduced correctly if you rewind or fast forward during playback If you want to record such events check only one of these two Enable settings in Global mode MIDI Filter ...

Страница 572: ...Sequencer mode 562 ...

Страница 573: ... 2 GB For more information see Installing memory on page 1038 Sampling to disk You can sample directly to disk creating a WAVE file This lets you record up to 80 minutes continuously in either mono or stereo mono approximately 440 MB stereo approximately 879 MB As long as they fit into the available RAM these WAVE files can then be loaded into RAM and used in Drum Kits HD 1 Programs or Wave Sequen...

Страница 574: ...data has been written This is turned on by default but you may switch it on off as necessary For more information see Auto Optimize RAM on page 646 and Optimize RAM on page 620 Editing in Sampling mode In Sampling mode the sample data you sampled or loaded from various media including WAVE and AIFF formats can be assigned to an index zone to create a multisample The waveform can be viewed in the L...

Страница 575: ...ncer etc External audio sources from the various input jacks can be sampled A performance played on the OASYS can be mixed with the external audio source and sampled or you can sample just the external audio source while monitoring the performance played on the OASYS In Sequencer mode when you sample an external audio source while listening to the playback of the song note data will be automatical...

Страница 576: ...l is indicated in 65 536 steps the sixteenth power of two The greater the bit resolution is the closer to the original analog signal the waveform in memory will be 48 kHz 16 bit sampling is the same quality as in audio devices such as DAT CDs use 44 1 kHz 16 bit sampling which is a slightly lower sampling frequency ...

Страница 577: ... not yet made audio input settings go to P0 Audio Input page and make these settings before you proceed 0 1a Multisample Select MS Multisample Select MS 000 999 Selects the multisample Each multisample consists of the samples for one or more indexes an Index is a range or zone of keys This parameter can also be set from P1 P3 To create a new multisample 1 Press the Multisample Select popup button ...

Страница 578: ...re Immediately after the power is turned on this will be 001 008 This indicates that there are eight indexes and that currently the first index is selected To increase the number of indexes use Create in this page When you press the Create button indexes will automatically be added from the left most zone as 002 002 003 003 The position zone width and original key location of the index that is cre...

Страница 579: ...new index can be created at the left of index 1 re set the Top Key setting and press the OK button Set Zone Range If you execute Create when it is not possible to create a new index according to the Create Zone Preference settings the following dialog box will appear This dialog box will also appear if you execute Insert when it is not possible to create a new index with the contents of the Cut or...

Страница 580: ... page under 0 1f Free Sample Memory Locations as described on page 572 Note The amount of RAM available for user sampling will vary depending upon both the amount of physical RAM installed and the size of the currently loaded EXs banks For more information see Sampling and RAM on page 563 Data written into RAM memory will be lost when the power is turned off so you must save it if you want to keep...

Страница 581: ...c IFX1 select 012 St Graphic 7EQ P8 Recording Level dB as desired 0 1c Mode Stereo 0 1d see diagram in 0 8c Source Bus L R Example 5 Sampling a digital source connected to S P DIF without applying internal effects Source Bus S P DIF L R 0 8c Resample Manual 0 8c Recording Level dB as desired 0 1c Mode Stereo 0 1d see diagram in 0 8c Source Bus S P DIF L R Note By setting the 0 8a Input S P DIF L a...

Страница 582: ...cted Index The new index will be created at the right of the currently selected index Left to Selected Index The new index will be created at the left of the currently selected index Zone Range 1 Key 127 Keys Specifies the key range of the newly created index 1 Key Each individual note of the keyboard will be an index The sample of an index will sound at its original key when you play that note 2 ...

Страница 583: ...e information see Select Directory on page 140 13 Auto Sampling Setup For more information see Auto Sampling Setup on page 620 0 8 Audio Input Here you can specify the output destination and input level etc for the external audio signals being input from the INPUT jacks Here you can also specify the source that will be sampled and specify how sampling will be initiated You can also specify a metro...

Страница 584: ...C buses The Pan setting sends the signal in stereo to buses 1 and 2 or buses 3 and 4 Send1 to MFX1 000 127 Send2 to MFX2 000 127 These adjust the levels at which the external audio input signal is sent to the master effects Send1 to MFX1 Send the signal to master effect 1 Send2 to MFX2 Send the signal to master effect 2 If Bus Select IFX Indiv is set to IFX1 12 the send levels to the master effect...

Страница 585: ...o the L channel and REC bus 4 is input to the R channel Audio Input 1 2 Audio Input 3 4 Choose these settings if you want to directly sample the input from AUDIO INPUT 1 4 jacks The input from AUDIO INPUT 1 4 jacks will be sampled directly without being routed through the L R bus REC buses or Individual buses AUDIO INPUT 1 2 or 3 4 will be connected directly regardless of the 0 8a Audio Input sett...

Страница 586: ...NO R AUDIO OUTPUT HEADPHONES Insert Effects L R Bus REC 1 2 REC 3 4 Indiv 1 2 3 4 5 6 7 8 Bus L R or IFX1 12 Level Pan Insert Effects OSC Audio Input 1 Audio Input 2 Source Bus Audio Input 1 2 x Source Direct Solo Total Effects Master Effects Sampling Monitor L Mono R Mono Stereo Level Pan Insert Effects CLIP L MONO R AUDIO OUTPUT HEADPHONES Insert Effects L R Bus REC 1 2 REC 3 4 Indiv 1 2 3 4 5 6...

Страница 587: ...me 0 1d If you want to apply an effect etc to an existing sample and automatically create a new sample Resampling set Trigger to Sampling START SW and set Resample 0 8c to Auto Note On Press the SAMPLING REC switch and then press the SAMPLING START STOP switch to enter sampling standby mode Sampling will begin when you play the keyboard Sampling will also begin if a MIDI note on is received instea...

Страница 588: ...meters of the newly created sample will be automatically set the same as the source sample when played back Key C 1 G9 When Resample is set to Auto this specifies the note to which the sample to be resampled is assigned This can be set only if Trigger is set to Sampling START SW For the resampling procedure see Resample Auto Threshold Level 63dB 0dB When sampling with Trigger set to Threshold this...

Страница 589: ...ling For instance you can Adjust the Oscillator s multisample volume and pan Control the Oscillator s multisample EQ settings and Master Effects Send levels Modulate Oscillators multisample and effects using the Real Time Knobs Use the sliders and switches to control external MIDI devices Control Assign Switches and Tabs You can switch the Control Surface between its different functions using eith...

Страница 590: ...n RESET CONTROLS move a slider or knob or press one of the control surface switches The slider knob or switch will be reset to the value stored in the Program 3 When you re done release the RESET CONTROLS button Resetting a group of controls To reset a group of controls at once 1 Make sure that the Control Surface is showing the parameters you want to reset As a safety precaution you can only rese...

Страница 591: ...n the editing pages and vice versa Pan 1 Random L001 C064 R127 This controls the stereo pan of Oscillator 1 A setting of L001 places the sound at the far left C064 in the center and R127 to the far right Random is available only via the LCD Otherwise it would be difficult to use the knob to sweep smoothly from left to right With the Random setting the pan position will be different for each note o...

Страница 592: ...00 places the sound at the far left C064 in the center and R127 to the far right Send 1 000 127 This controls the send level into FX Send 1 If the input s Output Bus parameter is set to L R or OFF it scales the programmed send level If the Output Bus is set to IFX 1 12 it directly controls the post IFX send levels overwriting any previous setting Send 2 000 127 This controls the send level into FX...

Страница 593: ...all solos on page 581 and Exclusive Solo menu parameter on page 581 Select Solo 1 6 Off On This switch either selects or solos the input depending on the Solo switch setting For more details see Solo above MIX VOLUMES sliders 1 6 Audio Input Volume 1 6 000 127 These sliders adjust the volume levels of the audio inputs Master Volume Slider Master Volume 000 127 This controls the volume of the main ...

Страница 594: ...ly parameter shows the MIDI Channel for the switch Each can send on a different channel if desired Gch means that the slider will transmit on the Global MIDI Channel as set in Global mode CC Assign 1 16 Off 000 119 This read only parameter shows the MIDI CC sent by the switch Switch On Off 1 16 On Off When the switch is turned on it sends a value of 127 when it is turned off it sends a value of 0 ...

Страница 595: ...e number before each command shows its ENTER number key shortcut For more information on these shortcuts see ENTER 0 9 shortcuts for menu commands on page 138 0 Delete Sample For more information see Delete Sample on page 615 1 Copy Sample For more information see Copy Sample on page 616 2 Rename Sample For more information see Rename Sample on page 616 3 Move Sample For more information see Move ...

Страница 596: ...you select here and the waveform will appear in the Sample waveform display 0 1a Note An index can also be selected by holding down the ENTER switch and playing a note on the keyboard or pad The index that includes this note will be selected The key you played will be the base key and will be displayed in blue in Keyboard Pads Keyboard Pads 0 1a Sample Select No Assign 0000 3999 Range C 1 B9 C 1 B...

Страница 597: ... starting at the Start address If Loop is on the grid is displayed starting at the Loop Start address The grid indicates the state of the sample when it is played at the currently selected base key displayed in blue Keyboard Pads 0 1a Resolution 3 3 3 3 This specifies the resolution of the grid The grid is defined by this setting and Tempo Tempo 040 00 480 00 This specifies the spacing of the grid...

Страница 598: ...mple To Program on page 618 10 MS Mono To Stereo This will appear only if the current MS is Mono For more information see MS Mono To Stereo MS Stereo To Mono Change Multisample Type on page 619 10 MS Stereo To Mono This will appear only if the current MS is Stereo For more information see MS Mono To Stereo MS Stereo To Mono Change Multisample Type on page 619 11 Optimize RAM For more information s...

Страница 599: ...r more information please see 0 1a Multisample Select MS on page 567 2 1b Index Sample Select Range Index xxx 001 127 yyy 001 127 Selects the index whose loop and other sample parameters you wish to edit Your edits will apply to the sample of the index selected here and the waveform will appear in the Sample waveform display 0 1a You can also select an index by holding down the ENTER switch and pl...

Страница 600: ... a Korg format sample file KSC KMP KSF However these settings are ignored by Korg format compatible devices other than the OASYS and the TRITON STUDIO i e these settings are ignored by the TRITON TRITON Rack TRITON Le and TRINITY etc as of September 2003 See Data compatibility p 309 12 dB will be turned off when you load an AKAI AIFF or WAVE format sample in Disk mode This parameter is ignored whe...

Страница 601: ...ion see Rename MS Rename Multisample on page 618 8 Move MS For more information see Move MS Move Multisample on page 619 9 Convert MS To Program For more information see Convert MS Multisample To Program on page 618 10 MS Mono To Stereo This will appear only if the current MS is Mono For more information see MS Mono To Stereo MS Stereo To Mono Change Multisample Type on page 619 10 MS Stereo To Mo...

Страница 602: ... The index that includes this note will be selected The selected key will be the base key and will be displayed in blue in Keyboard Pads Sample Select No Assign 0000 3999 This indicates the number and name of the sample that is assigned to the selected index You can also select the sample here 0 1b Stereo This area will indicate Stereo if a stereo multisample or sample is selected or if you sample...

Страница 603: ... copied or assigned to a different number If it is not possible to create a new index when you execute Create or Insert a dialog box will appear If this occurs see Create 0 1b If you have not yet executed Cut or Copy such as immediately after power on the new index will be created according to the Create Zone Preference settings 0 1e 3 1c Position Zone Range and Original Key Position Cut This dele...

Страница 604: ...tereo MS Stereo To Mono Change Multisample Type on page 619 11 Optimize RAM For more information see Optimize RAM on page 139 12 Select Directory This applies only when Save to is set to Disk For more information see Select Directory on page 140 13 Auto Sampling Setup For more information see Auto Sampling Setup on page 620 14 Pitch BPM Adjust For more information see Pitch BPM Adjust on page 638 ...

Страница 605: ...h to make CHANNEL STRIP light 3 Use the MIX CHANNEL STRIP knobs 2 6 to control EQ TRIM LOW EQ MID FREQ MID EQ and HIGH EQ All OSCs Bypass Off On When Bypass is checked all of the EQ will be disabled including the Input Trim Bypass can be convenient for comparing the results of the EQ with the original signal Input Trim 00 99 This adjusts the level of the signal going into the EQ A setting of 50 co...

Страница 606: ...e 618 10 MS Mono To Stereo This will appear only if the current MS is Mono For more information see MS Mono To Stereo MS Stereo To Mono Change Multisample Type on page 619 10 MS Stereo To Mono This will appear only if the current MS is Stereo For more information see MS Mono To Stereo MS Stereo To Mono Change Multisample Type on page 619 11 Optimize RAM For more information see Optimize RAM on pag...

Страница 607: ...Assign area assign Knob5 to Knob Mod 5 CC 17 and Knob6 to Post IFX Pan CC 08 5 Rotate knob 5 6 and the panning of the delay level and the delay will change You can sample the sound while you modify it 4 8 Page Menu Commands The number before each command shows its ENTER number key shortcut For more information on these shortcuts see ENTER 0 9 shortcuts for menu commands on page 138 0 Delete Sample...

Страница 608: ...rmation on these shortcuts see ENTER 0 9 shortcuts for menu commands on page 138 0 Delete Sample For more information see Delete Sample on page 615 1 Copy Sample For more information see Copy Sample on page 616 2 Rename Sample For more information see Rename Sample on page 616 3 Move Sample For more information see Move Sample on page 616 4 Sample Mono To Stereo For more information see Sample Mon...

Страница 609: ...ee MS Mono To Stereo MS Stereo To Mono Change Multisample Type on page 619 11 Optimize RAM For more information see Optimize RAM on page 139 12 Select Directory This applies only when Save to is set to Disk For more information see Select Directory on page 140 13 Auto Sampling Setup For more information see Auto Sampling Setup on page 620 ...

Страница 610: ...be supported by some external CD R RW drives such as drives that do not support reading of CD DA data In such cases you ll see the message Error in reading from medium Be aware that if you play the keyboard or controllers while the CD R RW drive is operating the vibration may cause data skips or read errors making it impossible to play the CD successfully Use the SEQUENCER buttons to play the CD W...

Страница 611: ...io signal from the CD R RW drive to the REC buses four mono channels 1 4 If you want to use the REC buses for sampling set Source Bus 0 8c to REC 1 2 or REC 3 4 The REC buses are used to sample in each mode and to record audio tracks in Sequencer mode They are dedicated buses for recording Off The audio signal will not be sent to the REC bus Normally you will use the Off setting 1 4 The audio sign...

Страница 612: ...o the ending time of the selected track or index Duration 00 00 0 Displays the length of time between Range Start and Range End Range Graphic This graphic shows the selected range within the current Track and Index as set by the Range Start and Range End parameters 5 1 Page Menu Commands The number before each command shows its ENTER number key shortcut For more information on these shortcuts see ...

Страница 613: ...m or combination copy the insert effect settings of Sampling mode and save them Write the program or combination to save it in internal memory Then in Sampling mode use Copy Insert Effect to load the effect settings from the program or combination so that they can be used in Sampling mode You can also use the Save to User Preset menu command to save effects individually 8 1 Routing 8 1a Routing Ma...

Страница 614: ...ve this Off 1 4 The oscillator output will be sent in monaural to the corresponding REC bus 1 2 3 4 The oscillator output will be sent in stereo to the corresponding pair of REC buses 8 1e OSC MFX Send Send1 to MFX1 000 127 Send2 to MFX1 000 127 This sets the send levels at which the output of the oscillator multisample is sent to the master effects The master effects are sent to the L R bus Set t...

Страница 615: ...setting The setting will alternate between on and off each time you press this Separately from this setting you can use control change 92 to turn all insert effects off A value of 0 turns them off and values of 1 127 restore the original setting The global MIDI channel specified by MIDI Channel is used for this message Chain to IFX2 IFX12 You can chain up to twelve insert effects together in serie...

Страница 616: ...fy each insert effect s effect type on off status chaining and mixer settings following the insert effect With the exception of Chain to and Chain the parameters are the same as for IFX1 See IFX1 on page 605 IFX2 Chain to IFX3 IFX12 IFX3 Chain to IFX4 IFX12 IFX4 Chain to IFX5 IFX12 IFX5 Chain to IFX6 IFX12 IFX6 Chain to IFX7 IFX12 IFX7 Chain to IFX8 IFX12 IFX8 Chain to IFX9 IFX12 IFX9 Chain to IFX...

Страница 617: ...ect Type and On Off status of the insert effect slot selected by Track Select See 8 6a Track View above 8 6 Page Menu Commands The number before each command shows its ENTER number key shortcut For more information on these shortcuts see ENTER 0 9 shortcuts for menu commands on page 138 0 Copy Insert Effect For more information see Copy Insert Effect on page 149 1 Swap Insert Effect For more infor...

Страница 618: ... make it easier to re use your favorite settings For instance you can save an Effect Preset while working on a particular Program and then later use the same Effect Preset in a different Program Combi or Song P00 Initial Set These are the default settings that are recalled when you select an effect type in the Insert FX page You can t save your own settings here P01 P15 These contain preset data t...

Страница 619: ...mmon LFOs control only the frequency MIDI synchronization and reset options each individual effect still has its own settings for the LFO waveform and phase Within the individual effects you can choose whether to use one of the Common LFOs or to use the individual effect s frequency sync and or reset settings instead This is done via the effect s LFO Type parameter select Individual to use the eff...

Страница 620: ... its ENTER number key shortcut For more information on these shortcuts see ENTER 0 9 shortcuts for menu commands on page 138 0 Copy Insert Effect For more information see Copy Insert Effect on page 149 1 Swap Insert Effect For more information see Swap Insert Effect on page 150 ...

Страница 621: ...ts are stereo in out but depending on the selected effect type the output may be monaural See In Out on page 734 MFX1 MFX1 000 185 This selects the effect type for master effect 1 Choose from 000 No Effect 185 Mt BPM Dly Mt BPM Dly If you choose 000 No Effect the output from the master effect is muted Category MFX Select menu When you press the popup button the Category MFX Select menu will appear...

Страница 622: ...ect menu will appear letting you choose effect types by category Use the tabs to select an effect category and then choose an effect within that category Press the OK button to execute your choice or press the Cancel button to cancel TFX1 On Off Off On This turns total effect 1 on off If this is off the input will be passed directly through The setting will alternate between on off each time you p...

Страница 623: ...an edit the parameters of the master effect selected in the P9 Routing page For more details please see Master Effects MFX1 2 on page 747 9 2 Page Menu Commands The number before each command shows its ENTER number key shortcut For more information on these shortcuts see ENTER 0 9 shortcuts for menu commands on page 138 0 Copy MFX TFX For more information see Copy MFX TFX on page 153 1 Swap MFX TF...

Страница 624: ...Sampling mode 614 The parameters for MFX2 TFX1 and TFX2 are the same as for MFX1 For more information see 9 2 MFX1 on page 613 ...

Страница 625: ... mix a stereo sample and use it as a mono sample However be aware that once a sample has been mixed to mono it is no longer possible to return it to a stereo sample Start and End settings When using the P1 Sample Edit parameters Truncate Volume Ramp and the P2 Loop Edit parameter Truncate to edit the waveform data of a sample you must first use Start and End to specify the region that you want to ...

Страница 626: ...ple For example you would use this when you wish to use P2 Loop Edit to create two or more versions of the same sample data with different loop addresses Sample memory area will not be consumed by this type of copy If you use P1 Sample Edit to edit the sample data the results will affect all samples that share this sample data 5 To execute the Copy Sample command press the OK button To cancel pres...

Страница 627: ...s can be executed when a mono sample is selected 1 Use Sample Select 0 1b to select the sample that you want to change to stereo 2 Select Sample Mono To Stereo to open the dialog box 3 To execute the Change Sample Type command press the OK button To cancel press the Cancel button When you execute this command the sample type will change as follows The selected sample will be changed to stereo The ...

Страница 628: ... the text edit dialog box and input a multisample name of up to 24 characters If the selected multisample is stereo up to 22 characters can be input as the multisample name This is because the last two characters are reserved for L and R If you rename up to 22 characters of the multisample of either the L or the R channel the other multisample name will automatically be renamed 4 To execute the Re...

Страница 629: ...eo or MS Stereo To Mono to open the dialog box 3 To execute the Change Multisample Type command press the OK button To cancel press the Cancel button When you execute this command the multisample type and sample assignment will change as follows MS Mono To Stereo The selected multisample will be converted to stereo The last two characters of the multisample name will be overwritten as L An identic...

Страница 630: ...lable when Save to is set to DISK Specifying the save destination for a WAVE file 1 Select Select Directory to open the dialog box 2 Use Drive Select to select the disk into which the data will be written during sampling 3 Use the Open button and Up button to move between directories 4 In the Name field specify a name for the WAVE file that will be written during sampling If you check Take No a tw...

Страница 631: ...ngs will be made for sampling to L MONO from Input 1 if you ve selected Analog 1 2 or from Input 3 if you ve selected Analog 3 4 Mono R Settings will be made for sampling to R MONO from Input 2 if you ve selected Analog 1 2 or from Input 4 if you ve selected Analog 3 4 Stereo Settings will be made for sampling in stereo from Input 1 2 or 3 4 3 Use Save to to specify the destination to which the sa...

Страница 632: ...their values Not set automatically Set automatically according to the parameter settings in the dialog box 1Edit sampling mode parameters 2Uses the input source specified as Source Audio 3 If IFX is Off this will be L R If IFX1 12 is selected this will be IFX1 12 4L Mono if the Source Audio is Mono L R Mono if it is Mono R and Stereo if it is Stereo 5When Save to RAM 6Specify the BUS Select of tha...

Страница 633: ...page 615 For stereo samples use Save to No L and R to specify the save destination of the L and R channels 6 To execute the Truncate command press the OK button To cancel press the Cancel button Cut This command deletes the data between the Start End Sample data located after the deleted portion will be moved toward the beginning of the sample 1 Use Sample Select 1 1b to select the sample that you...

Страница 634: ...y in the Sampling mode Sample Edit page will be inserted at the Start address The data that follows this address will be moved toward the end of the sample 1 Use Sample Select 1 1b to select the sample that you wish to edit and set Start to specify the starting address The End setting is ignored 2 Select Insert to open the dialog box 3 To Start will indicate the starting address at which the data ...

Страница 635: ...to which data was placed by the Copy command contains no data the display will indicate Source sample is empty Pasting to a sample that contains no sample data 1 Select the vacant sample number that you wish to paste If you select No Assign for Sample Select and then open the dialog box for this command a vacant sample number will be selected automatically The Start and End settings will be ignore...

Страница 636: ...s been boosted beyond the clipping point re executing this command with negative settings of Level will simply lower the overall level of the clipped signal the waveform will remain distorted Also if executing Level with negative settings causes any portion of the sample data to reach a zero level the zero data will not return to its original state even if you re execute Level with positive settin...

Страница 637: ...ill be displayed in Hz 4 In Save to No specify the save destination sample number By default an unused sample number will be selected The sample number cannot be specified if Overwrite is checked page 615 For stereo samples use Save to No L and R to specify the save destination of the L and R channels 5 To execute the Insert Zero command press the OK button To cancel press the Cancel button This c...

Страница 638: ...ade Length cannot be set any longer than the length of the Rear sample In this case it will not be possible to specify a value up to 100 After selecting a sample in step 1 you can set Start and specify the beginning of the crossfade while viewing the waveform Set End to the end of the sample If you specify these Crossfade Length will indicate the length determined by Start and End 6 In Curve speci...

Страница 639: ...Cancel button Time Slice Time Slice lets you convert a mono or stereo rhythmic sample such as a drum loop into a set of individual hits and matching sequencer data You can then Re create the loop by playing the sequencer data Change the tempo of the loop without altering the pitch Change the pitch of the samples without altering the tempo Change the rhythmic feel by altering quantization swing etc...

Страница 640: ...PM Specifies the tempo at the original key of the source waveform 4 To execute Time Slice press the OK button To cancel without executing press the Cancel button When you press the OK button the attacks will be detected the sample will automatically be sliced and a dialog box will appear In the case of a stereo sample in which L and R have different lengths silent data will automatically be added ...

Страница 641: ... If the attack portion of the following sample has overlapped into the end of the sample or if the sample contains two sounds make adjustments in step 7 7 Make adjustments where the automatic attack detection did not occur correctly Change Index to select the sample that you wish to adjust Make adjustments by changing Start and End and by executing Divide or Link to adjust the slice location Start...

Страница 642: ...ity If necessary use the methods described above to edit each sample The noise occurring at the end of the sample in C will be automatically reduced when you execute steps 8 and following You should adjust Sensitivity while paying particular attention to sections A and B and then execute step 9 If the noise is still obtrusive then you can adjust the end address 8 Save the sliced samples to the mul...

Страница 643: ...e specified if the Start Measure is 001 Also a program change will be created at the Start Measure location In Sequencer mode you can select the song and play it back to hear the result immediately Normally you will check both of these boxes If you choose the Pattern radio button pattern data will be created Use Song Pattern and Meter to specify the song number pattern number and time signature of...

Страница 644: ...instruments such as drums Using it to change the tempo of drum or percussion loops will produce good results with minimal effect on the attack Note It is possible to change the pitch when you adjust the tempo of a rhythm loop or similar sample using the Detune BPM Adjust menu commands You can create interesting effects by raising or lowering the pitch of a drum sound For more information see Detun...

Страница 645: ...yboard this multisample will sound It will behave just as in normal pages e g the Recording page 0 1a In the case of a stereo sample a stereo multisample will be used temporarily The sample at each index will sound in stereo Index Source Result Selects the index for the sample whose waveform you wish to display If you select Source the original waveform before time stretching will be selected If y...

Страница 646: ...use the BPM to be calculated automatically The settings here are also used as the reference values when detecting the attacks at which the sample is divided Beat Specify the number of quarter note beats When you change Beat the Source BPM will indicate the BPM value for playback at the original key This BPM value is automatically calculated according to the length from the start address to the end...

Страница 647: ...e Start Loop Start and End addresses will be indicated by red green and blue colored lines respectively In the case of a stereo sample the L channel sample data will be displayed above and the R channel sample data will be displayed below ZOOM Here you can zoom in out vertically and horizontally on the waveform displayed in the Sample waveform display 1 1f 9 If the slice locations are not appropri...

Страница 648: ...n immediately before the end the length specified by Crossfade Length will gradually decrease and the waveform level immediately before the beginning of the loop will gradually increase as the two are mixed 1 Select the sample that you wish to Crossfade Loop 2 Select Crossfade Loop to open the dialog box 3 In Crossfade Length specify the length of the sample that you wish to crossfade If you set t...

Страница 649: ...precision Minor discrepancies may occur in the final BPM calculation Destination Audio CD Ripping Specifies the writing data of the ripped data and executes ripping Ripping will create a stereo 44 100 Hz sample You can rip to RAM memory or disk If you select DISK a WAVE file will be created Be aware that if you play the keyboard or controllers while ripping the vibration may cause data skips or re...

Страница 650: ...IFX Routings on page 152 Copy Master Total Effect This copies the effect settings from a desired program combination song or Sampling mode For more information please see Copy MFX TFX on page 153 Swap Master Total Effect For more information please see Swap MFX TFX on page 154 Write FX Preset For more information please see Write FX Preset on page 154 ...

Страница 651: ...ke memory protect settings 0 1a Basic Master Tune 50cent 427 47Hz 50cent 452 89Hz This adjusts the overall tuning of the entire OASYS in one cent units semitone 100 cents over a range of 50 cents With a setting of 0 the frequency of A4 will be 440 Hz The A4 pitch given here is when Equal Temperament is selected as the scale If a different scale is selected A4 may not be 440 Hz Key Transpose 12 00 ...

Страница 652: ...stent However with this curve control of softly played notes will be more difficult so use the curve that is most appropriate for your playing strength and style and the effect that you wish to produce After Touch Curve 1 8 This specifies the way in which the volume and or tone will change in response to variations in pressure after touch applied to the keyboard while playing a note When Convert P...

Страница 653: ...red in that combination will be used Normally you will use the On setting Off unchecked The KARMA Module settings will not change even if you switch combination Use this setting if you want only to switch combination sounds without changing the phrases from the KARMA Module 0 1d System Preference Bank Map KORG GM 2 This specifies the mapping of programs and combinations relative to Bank Select con...

Страница 654: ...decrease in audio quality For instance you don t need to worry about turning down the oscillator level before entering a highly resonant filter or be too concerned about maximizing every gain stage Audio input and output on the other hand uses industry standard 24 bit fixed point A D and D A converters As with all such converters these have a theoretical maximum dynamic range of 144dB and the loud...

Страница 655: ...en you move slider 1 slightly below 127 for example to 125 The disadvantage of this setting is that the value will jump abruptly to the current value meaning that control will be discontinuous However the advantage is that the value will respond immediately when you move the controller Catch The value will begin changing only when you have moved the controller surface controller to the position th...

Страница 656: ...ination memory Song Off On This setting protects the internal song memory However when the power is turned off the song data in song memory will be lost regardless of this setting On checked Internal song memory will be protected and the following write operations cannot be performed Recording to the sequencer Loading song data from disk Receiving song data via MIDI data dump Off unchecked Data ca...

Страница 657: ...heir input level bus and master effect sends The settings you make in this page are valid in the following situations When this page is open In Program Combination and Sequencer modes if you ve checked Use Global Setting Program Combination Sequencer 0 8a In other pages of Global mode if the mode in which you were immediately prior to entering Global mode was in state 2 above In Disk mode if the m...

Страница 658: ...bles are connected to the AUDIO INPUT 1 4 jacks the noise component will be input via the AD converters into the OASYS even if there is no audio input and depending on the settings may be output from the AUDIO OUTPUT L R 1 8 jacks If you want to perform using only internal sounds such as programs combinations and songs and are not using external audio inputs you should set Bus Select IFX Indiv to ...

Страница 659: ...e 682 2 Change all bank references For more information see Change all bank references on page 682 3 Touch Panel Calibration For more information see Touch Panel Calibration on page 682 4 Half Damper Calibration For more information see Half Damper Calibration on page 683 5 Pad Calibration For more information see Pad Calibration on page 683 6 LCD Setup For more information see LCD Setup on page 6...

Страница 660: ...ode P0 Play program changes received on the global MIDI channel will switch the combination 1 1c MIDI Filter Use the global MIDI channel to switch IFX 1 12 CC 92 MFX1 2 CC 94 and TFX1 2 CC 95 on off To control the pan following IFX sends 1 2 MFX 1 2 and TFX1 2 use the global MIDI channel when in the Program or Sampling mode while in the Combination or Sequencer modes use the channel specified sepa...

Страница 661: ...n most cases The following information details how the system works internally You ll notice the results of these internal operations only if Local Control is Off AND there is no MIDI loop back which is not a recommended configuration In this case you ll see that the Control Surface works in slightly different ways depending on the Control Assign setting When Control Assign is set to Timbre Track ...

Страница 662: ...n data is received from MIDI IN This setting will not affect the data that is transmitted from MIDI OUT or recorded on the internal sequencer when you play the OASYS s keyboard or play back the sequence Note Receive Note Receive Filter All Even Odd This setting specifies whether even numbered odd numbered or all note numbers will be sounded when note data is received from the OASYS s keyboard or f...

Страница 663: ...d This parameter cannot be set if MIDI Clock is Internal 1 1b MIDI Routing Setup Vector MIDI Out Vector Joystick Vector CC Control This setting specifies the MIDI output generated by vector joystick operations or vector envelope Vector Joystick When you move the vector joystick the two MIDI control change messages specified by VECTOR VJS X and VJS Y 2 1c will be transmitted By default VJS X is CC ...

Страница 664: ...urring depending on the settings of the external devices that you are connected to If this happens disable the Echo Thru settings of the external devices or set one of these KARMA MIDI settings to Off See Set Up KARMA External MIDI Routing on page 686 Start Stop Realtime Out Enable Start Stop Out in Prog Combi Off On In Program and Combination modes this function transmits a MIDI start message whe...

Страница 665: ...ect messages will be recorded regardless of this setting However for playback this setting will apply Combination Change Off On On checked When in Combination P0 Play an incoming program change message on the global MIDI channel set by MIDI Channel 1 1a will switch combinations This is valid when Enable Program Change is checked An incoming program change on a channel other than the global MIDI ch...

Страница 666: ...xternal 1 This page lets you set up the knobs sliders and switches for the Control Surface s EXTERNAL mode In this mode each slider knob and switch can be assigned to a separate MIDI controller and MIDI channel The eight drum pads also have separate settings which apply only when Control Assign is set to External for more information see 1 3 External 2 on page 658 You can create up to 128 differen...

Страница 667: ...sets the MIDI Channel for the slider Each can send on a different channel if desired Gch means that the slider will transmit on the Global MIDI Channel as set in Global mode CC Assign 1 8 Off 00 119 This sets the MIDI CC sent by the slider 1 2 Page Menu Commands The number before each command shows its ENTER number key shortcut For more information on these shortcuts see ENTER 0 9 shortcuts for me...

Страница 668: ...ween being velocity sensitive so that the loudness varies depending on how hard you hit the pad and playing a single fixed velocity for each note handy if you want the same results every time regardless of how hard you play This lets you set the pad s fixed velocity 1 3 Page Menu Commands The number before each command shows its ENTER number key shortcut For more information on these shortcuts see...

Страница 669: ...his setting for open type damper pedals such as the optional Korg DS 1H Use this setting for closed type pedals Foot Switch Polarity KORG Standard Set this to match the polarity of the footswitch connected to the ASSIGNABLE SWITCH jack If the polarity does not match operating the damper pedal will not produce the correct result If no damper pedal is connected set this to KORG Standard KORG Standar...

Страница 670: ...119 These assign note numbers or control change messages to pads 1 8 For more information see Pads MIDI Out on page 653 2 1 Page Menu Commands The number before each command shows its ENTER number key shortcut For more information on these shortcuts see ENTER 0 9 shortcuts for menu commands on page 138 0 Write Global Setting For more information see Write Global Setting on page 682 1 Reset Control...

Страница 671: ...99 99 Makes independent pitch settings for each of the 128 notes Adjust the pitch of each of the 128 notes C 1 G9 in one cent steps This adjustment is relative to equal temperament A setting of 99 lowers the pitch approximately a semitone below normal pitch A setting of 99 raises the pitch approximately a semitone above normal pitch Use the horizontal scroll bar to move to the key range that you w...

Страница 672: ...names of any of the categories and sub categories including both the factory and user categories Add sub categories to the factory categories up to the limit of 8 You can assign a Program or Combination to a category and sub category during the Write process For more information see Write Program on page 138 and Write Combination on page 405 To save changes to category names you ll need to write t...

Страница 673: ...mmands The number before each command shows its ENTER number key shortcut For more information on these shortcuts see ENTER 0 9 shortcuts for menu commands on page 138 0 Write Global Setting For more information see Write Global Setting on page 682 3 2 Combi Category 3 3 KARMA Category These pages let you assign the main category and sub category names to Combinations and KARMA Note that currently...

Страница 674: ...you can then sync to KARMA and the system tempo Crossfading Wave Sequences By using long durations and crossfade times Wave Sequences can produce complex evolving timbres Modulating the Start Step Position and Duration makes the sound even more organic so that every note can play the Wave Sequence a little differently Velocity Switching Wave Sequences By setting each step s duration to GATE and th...

Страница 675: ...th the Wave Sequence itself Instead each Program each Combi Timbre and each Track in a Song has its own Key Sync setting Swing 300 000 300 This parameter applies only when the Mode is set to Tempo Use Swing to add a sense of swing to the rhythm For example Swing provides an easy way to turn a square rhythm into a shuffle groove Swing adjusts the position of the up beats relative to the Wave Sequen...

Страница 676: ...e On Advance is On Start Step modulation is disabled For more information see Note On Advance on page 667 AMS List of AMS Sources This selects a modulation source to control the Start Step For a list of AMS sources see AMS Alternate Modulation Source List on page 967 Intensity 63 63 This controls the depth and direction of the Start Step modulation Negative modulation moves the Start Step earlier ...

Страница 677: ...e by one step with each new note on If Repeat Times is not set to Off this will step through the loop paying attention to the loop direction and number of repeats For instance let s say that the Wave Sequence Start Step is 2 and the End Step is 6 Also the Loop Start is set to 3 the Loop End is set to 5 and the Loop Direction is set to Forward If Repeat Times is Off Note On Advance will make the Wa...

Страница 678: ...he middle of the loop or jump back out of the loop again Duration AMS List of AMS Sources This selects a modulation source to control the step duration and crossfade times You can speed up or slow down the Wave Sequence so that it runs between 1 and 400 of the original rate This can be very useful for making a cross faded Wave Sequence sound more organic For a list of AMS sources see AMS Alternate...

Страница 679: ... of the up beats relative to the Wave Sequence s Resolution setting This parameter applies only when the Mode is set to Tempo For more information please see Swing on page 665 Quantize Triggers Off On This parameter allows you to force most Tempo mode Wave Sequence note ons to be in sync making it easier to play along with other rhythmic elements It applies only when the Mode is set to Tempo For m...

Страница 680: ...waveform or from the loop start point Start Offsets ROM and EXs Multisamples With ROM and EXs Multisamples the Start Offset specifies whether to use the normal start point Off or to use one of the alternate start points 1st 8th Some ROM and EXs Multisamples may have fewer than 8 pre programmed points in which case only the available points can be selected Start Offsets RAM Multisamples With RAM Mu...

Страница 681: ... fade in within the crossfade Off means that the step will start to sound at full volume at the very beginning of the crossfade Log means that the step will fade in quickly at first and then move more slowly as it nears the end of the crossfade Linear means that the step will fade in steadily over the duration of the crossfade Exp means that the step will fade in slowly at first and then moved mor...

Страница 682: ... the Mode is set to Tempo It cuts the step durations and or Multiply Base Note settings in half so that 1 4 notes become 1 8 notes 1 8 notes become 1 16 notes and so on x2 Mode Tempo This command also appears only when the Mode is set to Tempo It multiplies the step durations and or Multiply Base Note settings by two so that 1 8 notes become 1 4 notes 1 4 notes become 1 2 notes and so on 4 2 Page ...

Страница 683: ... kit into internal memory If you turn off the power or select another drum kit before writing your edits cannot be recovered Execute the Write Drum Kit page menu command or press the SEQUENCER REC WRITE switch to open the dialog box and write the edited drum kit When you edit a drum kit all programs that use that drum kit will be affected If Enable Exclusive 1 1c is checked the drum kit can be edi...

Страница 684: ...mple Select 000 416 0000 3999 000 Specify the DS1 drum sample by bank and drum sample number The banks are organized into three main types ROM RAM and EXs For each type you can choose either mono or stereo multisamples However stereo multisamples use up twice as many voices as mono multisamples ROM These are the OASYS s standard preset drum samples RAM These are user samples You can choose samples...

Страница 685: ...his parameter will not change the playback direction of a sample for which Reverse Sampling 2 1d is checked Level Amp Level 99 99 Specifies the volume Keys for which a value of 99 is specified will sound at a volume twice as high as the amp level of the program which uses that drum kit Keys for which a value of 0 is specified will sound at the volume of the amp level of the program which uses that...

Страница 686: ...Drumsample4 Low These are the settings for the second third and fourth velocity zones The parameters for DS2 Mid Hi and DS3 Mid Lo are exactly the same as those for DS1 as described above The parameters for DS4 Low are also similar to those for DS1 except that DS4 Low has no settings for Bottom Velocity which is always fixed at 1 Xfade Range or Curve 5 1 Page Menu Commands The number before each c...

Страница 687: ...vel This offset value for each key and drum sample is applied to the driver Drive Program 4 1a setting of the programs that use this drum kit Low Boost Driver Low Boost 99 99 This adjusts the low boost level of the driver This low boost setting for each key and drum sample is applied to the driver Low Boost Program 4 1a setting of the programs that use this drum kit 3 Band Parametric EQ dB Low 36 ...

Страница 688: ...ecked Note on messages will be received Normally you will check this but you can uncheck it if you do not want specific notes to sound Enable Note Off Receive Off On On checked Note off messages will be received Normally you will uncheck this This parameter is valid when Hold Program 1 1d is checked Hold On In the case of a drum program you will normally select Hold On In this case if Enable Note ...

Страница 689: ...gnal to FX Control Bus 1 In IFX7 Stereo Gate choose FX Control 1 as the Envelope Source Now you can use a signal other than the input reverberant sound to control the gate Pan Random L001 C064 R127 Specifies the panning for each key L001 places the sound at far left and R127 places the signal at far right With a setting of Random the drum sample will be panned randomly at each note on Send1 to MFX...

Страница 690: ...demo mode you can play edit and save Programs Combis and Songs which use it but until you purchase and enter an authorization code any sound which uses the plug in will fade out periodically For more information see Authorizing plug ins below Authorized plug ins are fully functional Some plug ins such as EXs1 EXs2 and the STR 1 may already be authorized by default Get Info button Pressing the Get ...

Страница 691: ... plug in authorizations for OASYS You can find contact information for your Korg distributor by contacting your Korg dealer or from the following page on the Korg website http www korg co jp English index html 3 After you purchase the authorization code s proceed to Authorizing plug ins on the OASYS below Authorizing plug ins on the OASYS 1 Go to the Global Plug in Info page 2 Select the plug in t...

Страница 692: ...ank type will be set to HD 1 EXi The bank type will be set to EXi Note If you execute with a setting other than No Change all data in that bank will be initialized even if you have specified the same bank type as before If you want to keep your data you must first use Save All or Save PCG to save it 3 Press the OK button to execute or press the Cancel button to cancel A dialog box will ask you to ...

Страница 693: ...lease your foot from the pedal 4 Press the Done button If the adjustment could not be performed correctly an error message will be displayed Please perform the procedure once again Pad Calibration This adjusts the velocity sensitivity of the pads 1 Select Pad Calibration to open the dialog box 2 Press the center of each pad as lightly as possible 3 Press the Done button If the calibration could no...

Страница 694: ... only the ROM multisamples and samples will be loaded To load both EXs1 and EXs2 at the same time you must first expand the installed RAM to at least 1 5 GB If you select both EXs1 and EXs2 but there is insufficient RAM a memory full message will appear and the operation will not be executed For information on installing additional memory see Installing memory on page 1038 3 Press the OK button Th...

Страница 695: ...m Exclusive data Select the desired command refer to the following table and a dialog box will appear Then select the bank or timbre etc of the data to be dumped and press the OK button Sending SysEx data dumps Do not touch the OASYS s switches or turn off the power while data is being transmitted 1 Connect the OASYS to the device that will receive the data dump If you re using a computer that is ...

Страница 696: ... bank type are received a message of Program Bank Type Conflicts will be displayed Data dump reception procedure 1 If you re using a computer that is able to receive MIDI System Exclusive messages connect the MIDI OUT connector of your computer s MIDI interface to the OASYS s MIDI IN connector see p 258 If you are using a MIDI data filer connect the OASYS s MIDI OUT connector to the MIDI IN connec...

Страница 697: ...Assign Off Pad Only Velocity 127 1 Select the setup number that you want to reset 2 Choose Reset External Setup to open the dialog box 3 Press the OK button to execute Reset External Setup or press the Cancel button to cancel Reset Controller MIDI Assign This command resets the MIDI control change CC assignments for the KARMA Sliders and Switches the 8 pads and the Vector Joystick You can use this...

Страница 698: ...quence if you want to keep it An edited wave sequence cannot be recovered if you turn off the power or select a different wave sequence before writing it 1 Choose Write Wave Sequence to open the dialog box 2 The upper line shows the wave sequence name If you want to edit the wave sequence name input the desired name in the text edit box 3 Use the lower line To Wave Sequence to select the writing d...

Страница 699: ...Cancel button to cancel without executing Note You can also use the SEQUENCER REC WRITE switch to write in the same way as the Write Drum Kit command Press the SEQUENCER REC WRITE switch to access the Update Drum Kit dialog box and write the drum kit In this case the data will be written to the currently selected drum kit Copy Key Setup This command copies the settings of an individual key to anot...

Страница 700: ...Global mode 690 ...

Страница 701: ...erently shaped icons The OASYS collectively refers to files and directories recognizable by MS DOS readable by a MS DOS computer and UDF format and ISO9660 format files and directories as DOS files and DOS directories Different types of DOS file are distinguished by the extension added to their filename In the case of a DOS file with an extension other than listed below selecting Load selected to ...

Страница 702: ...al settings 1 song 000 199 Track User pattern U00 99 All regions Region All effects All presets U All effects All presets P 1 effect All presets P 1 effect All presets U 1 effect preset P 1 effect preset U Partition AKAI S1000 S3000 Volume AKAI format Program file AKAI format Sample file KMP file KSF file KSC file WAV file AIF file MID file EXL file KCD file DOS directory created by Save SEQ on th...

Страница 703: ...olders until you ve can see the name of the sound you d like to audition 4 Touch the name of the sound 5 Play the sound from the keyboard When auditioning a Combination the Timbres will use the Programs currently loaded into internal memory which may be different from the Programs stored in the PCG file Auditioning Drum Kits and Wave Sequences When auditioning Drum Kits or Wave Sequences you ll he...

Страница 704: ...button the directory will move one level upward Sort Off On This function sorts the files in the current directory Press the button to open the dialog box and use the radio buttons to select the sorting method Then press the OK button to execute Choose one of the following sorting orders No order Unsorted Name Ascending order Directories First Sort in alphabetical order first directories and then ...

Страница 705: ...The number before each command shows its ENTER number key shortcut For more information on these shortcuts see ENTER 0 9 shortcuts for menu commands on page 138 0 Hide unknown files For more information see Hide unknown files on page 703 1 Translation For more information see Translation on page 703 2 Lock Unlock selected For more information see Lock Unlock selected on page 703 3 Load selected Fo...

Страница 706: ...age 718 5 Save PCG For more information see Save PCG on page 718 6 Save SEQ For more information see Save SEQ on page 718 7 Save Sampling Data For more information see Save Sampling Data on page 718 8 Save to Standard MIDI File For more information see Save to Standard MIDI File on page 719 9 Save Exclusive For more information see Save Exclusive on page 720 10 Save Effect Preset For more informat...

Страница 707: ...rmation This screen shows information about the media Use Drive Select 0 1a to select the media 0 9a Media Information Volume Label The volume label of the media Drive This is the specified drive Device Type The type of media Product ID The vendor ID product and product version etc Format Type The type of format If not formatted this will indicate Unformatted Total Size The capacity of the media i...

Страница 708: ...d Write to CD allows you to simply write the audio CD tracks without finalizing the disc and this means that other audio CD tracks can be added to that CD R RW disc at a later time No more audio CD tracks can be added to a disc once that disc has been finalized so be sure that all desired audio CD tracks have been written before you finalize 1 1a Track Total Free Track Track Select 01 99 Specifies...

Страница 709: ...he Open button and Up button to navigate to the appropriate directory and select the Wave file Insert Adds the selected highlighted WAVE file Note If the Multiple Select 0 1a box is checked you can select multiple WAVE files and insert them in a single operation Insert All Adds all WAVE files in the selected directory whose sampling frequency is 44 1 kHz or 48 kHz The files will be added in the or...

Страница 710: ...lays the current location of the audio CD track that is playing When stopped this specifies the location at which playback will begin When Track or Index are re selected this will be 00 00 0 Drive Select Specifies the drive of the audio CD that will be played Only CD ROM R RW drives can be selected Track 01 Selects the audio CD track that will be played Index 01 Specifies the index of the audio CD...

Страница 711: ...to the REC bus Normally you will use the Off setting 1 2 3 4 The audio signal from the CD R RW drive will be sent to the corresponding REC bus The Pan setting will be ignored and the signal will be sent in monaural 1 2 3 4 The audio signal from the CD R RW drive will be sent to the corresponding REC buses The signal will be sent via the Pan setting to buses 1 and 2 or 3 and 4 in stereo Send1 to MF...

Страница 712: ...drive media For more information please see 0 9 Media Information on page 697 1 9 Page Menu Commands The number before each command shows its ENTER number key shortcut For more information on these shortcuts see ENTER 0 9 shortcuts for menu commands on page 138 0 Scan device For more information see Scan device on page 724 1 9a 1 9b 1 9PMC ...

Страница 713: ... the current directory or in a lower directory when loading multisamples sample data PCG or SNG files a dialog box like the following Where is a will appear This will appear in the following cases If when loading a KSC file a KMP file used by it cannot be found If when loading a KMP file a KSF file cannot be found If when loading an S1000 S3000 format Program file a Sample file cannot be found If ...

Страница 714: ... song data in memory The song data within the SNG file that is being loaded will be packed into the available locations See diagram below Select this method when you wish to load song data from disk without erasing the song data that is already in memory The region data used by the song s audio tracks will be loaded following the last existing region number with valid data packed into each consecu...

Страница 715: ... F banks will be skipped and the data will be loaded starting from USER A Load a Program Data for the selected program will be loaded into the program number you specify 1 If you wish to load a program other than the one already selected use Program upper line to select the program that you wish to load Note The selected program can be played from the keyboard even before you load it This is conve...

Страница 716: ... USER A USER G This loads all drum kit data of the selected bank into the load destination bank you specify 1 Use the To field to select the load destination bank 2 To load the data press the OK button To cancel without loading press the Cancel button Note If Multiple Select 0 1a is checked and you ve selected more than one bank the data will be loaded starting with the bank you specified in the T...

Страница 717: ... sequence you specified in the To field Load Global Setting Global setting data in the PCG file will be loaded This includes Global mode parameters other than drum kits and user wave sequences Memory protect settings will not be loaded 1 To load the data press the OK button To cancel without loading press the Cancel button Load SNG All data in the SNG file will be loaded 1 Use Select SNG Allocatio...

Страница 718: ... To load the data press the OK button To cancel without loading press the Cancel button Load Pattern Data The selected user pattern will be loaded into a user pattern of the selected loading destination song However it is not possible to specify an uncreated song as the loading destination 1 If you wish to load a user pattern other than the one already selected use Pattern upper line to re select ...

Страница 719: ...e loaded 1 To load the data press the OK button To cancel without loading press the Cancel button Load Presets P01 15 Preset preset data P01 15 for the selected effect will be loaded Load Presets P01 P15 in Stereo Dyna Compressor 1 To load the data press the OK button To cancel without loading press the Cancel button Load Presets U00 15 Preset user data U00 15 for the selected effect will be loade...

Страница 720: ...e data items use Transmit Interval Time to specify the time interval that will be inserted between each item of exclusive data If you are transmitting the data to another OASYS the required time interval will depend on the type of data After transmitting all program data you must allow an interval of approximately 2 seconds For details refer to the Global mode section on Dump For other MIDI device...

Страница 721: ...nd load them in a single operation In the Load dialog box press the text edit button to access the text input dialog box By specifying or as wild cards in the selected filename multiple sample files that have the same filename extension same file format and exist in the selected directory can be loaded simultaneously Example A folder contains the following files and you select SFX_A_00 WAV and spe...

Страница 722: ...e in which the data had been saved for example immediately after power on 2 If the current directory contains a PCG file and SNG file of the same filename you can select the Load PCG too check box and the Load SNG too check box See Load PCG 1 If you check Load PCG too the PCG file of the same name as the KSC file will also be loaded See Load PCG 2 If you check Load SNG too the SNG file of the same...

Страница 723: ...rectory See Multiple Select on page 694 Loading multiple files at once on page 711 Loading AKAI S1000 S3000 format Sample files Program files or Volumes The OASYS can load AKAI S1000 S3000 format Sample files Program files and Volumes Sample file data you load can be used as RAM samples When you load Program file data settings such as key group key group zone oscillator pitch filter amp pan and EG...

Страница 724: ...s time will be packed into available spaces Append load loading only the valid data Note If the Sample files used by the Program file are not in the current directory or below it a dialog box will appear allowing you to specify the directory Use the procedure If a file to be loaded cannot be found page 703 to load the required Sample files Since sample RAM overflow checking is performed when loadi...

Страница 725: ...umbers and program numbers will automatically be adjusted so that they correspond correctly Content that will be loaded from the PCG file 1 Drum Kit Drum kits in which RAM is selected for the Drumsample DS1 2 3 4 Bank Global 5 1b of at least one key 2 Wave sequences for which the Resources Bank Multisample 4 2c setting of the wave sequence is set to RAM for at least one step 3 Program Programs who...

Страница 726: ... kits will be loaded into consecutive numbers starting at the number you specify here 8 Use the Append to Wave Sequence field to specify the load destination number for the wave sequences in the PCG file When you execute the command only the valid wave sequences will be loaded starting at the number you specify and occupying each consecutive number If the load destination bank and number in steps ...

Страница 727: ...ces can be saved in units of banks Information on the bank to be saved is displayed below each Selection button Banks that are checked will be saved If you want to modify the selections press the Selection button to open the dialog box and check the check boxes for the data you want to save Example when the Selection button for Program is pressed If you press the All button all banks will be check...

Страница 728: ...ialog box Save PCG Data 2 Use the text edit button to move to the text input dialog box and specify the filename For example if you specify NEWFILE and execute the save command a file named NEWFILE PCG will be saved to the media 3 Select the bank s that you want to save For the procedure see 0 2 Save All 3 4 To save the data press the OK button To cancel without saving press the Cancel button Save...

Страница 729: ...ile The filename will be the KSF filename name Initially the filename will automatically be set to the first four characters uppercase of the sixteen character sample name the sample number Examples 0000 NewSample_0000 NEWS0000 KSF 0001 C 3 EGuitar C 3 0001 KSF Note If you wish to export the data in AIFF AIF or WAVE WAV format select the Utility Export Samples as AIF WAV 4 To save the data press t...

Страница 730: ...effects will be saved as a KFX file All Preset Preset data P01 P15 for all effects will be saved as a KFX file All User Preset data U01 U15 for all effects will be saved as a KFX file One Effect Only the preset data of the selected effect will be saved as a KFX file If you check Preset P01 P15 will be saved if you check User U01 U15 will be saved 4 Press the OK button to save the data or press the...

Страница 731: ... media with a larger capacity or press Skip button to omit exporting that sample and proceed to exporting the next sample One Sample The single selected sample will be exported The filename will be the filename of the AIF or WAV file Initially the filename will automatically be set to the first four characters uppercase of the sixteen character sample name the sample number When exporting One Samp...

Страница 732: ...sk floppy disk CD R RW MO disc removable hard disk etc it is not possible to copy to different media on the same drive Delete This command deletes the selected file or directory This command is valid only if a DOS file or directory is selected 1 Select the file or directory that you want to delete 2 Select Delete to open the dialog box 3 Delete will indicate the name of the selected file or direct...

Страница 733: ...a was inserted this will indicate NEW VOLUME 5 Specify the initialization format Quick Format Normally you should use Quick Format to initialize the media Select this if the media has already been physically formatted or if you want to format media that has been UDF formatted by the OASYS Since only the system area of the media need be formatted this will require less time Full Format Select this ...

Страница 734: ...and checks the selected MS DOS format media for errors and corrects them Execute this command if you frequently experience messages such as Error in writing to medium while writing to media or Buffer overrun error occurred while sampling to media Note Executing this command on media that uses flash memory e g Compact Flash or SmartMedia but not a Microdrive will have no effect 1 Make sure that the...

Страница 735: ...n error occurs the display will indicate Error in writing to medium Test and Write A test write will be performed and if the test is successful the disc will actually be written We recommend that you use this method for fast writing speeds Write The media will only be written 4 Specify whether the CD R RW media will be finalized after the audio CD tracks have been written to it If Execute finalize...

Страница 736: ...ut the data itself will remain on the disc until it is overwritten If you want to erase data that should not be seen by someone else execute Full Erase to erase the data completely 4 Press the OK button to execute the Erase operation or press the Cancel button to cancel without executing ...

Страница 737: ...losest 1 but the internal values have a much finer resolution This means that you may sometimes add an effect but see no change in the resource meter FX This shows the percentage of the total processing power being used for the IFX MFX and TFX This will vary depending on the specific effects being used If an effect has been assigned to an IFX MFX or TFX it will take up the same amount of processin...

Страница 738: ...cer modes you can use the track EQ and insert effects to process the program sound and audio track sound of each timbre track Then you can use the master effects to create overall ambience and use the total effects to make final adjustments In Combination mode you can make these settings for each combination and in Sequencer mode you can make them for each song In Sequencer mode you can switch bet...

Страница 739: ...zation Dynamic modulation Dmod Dynamic modulation lets you control certain effects parameters in real time using either the built in controllers or MIDI These effect parameters are marked with the logo For more information see Dynamic Modulation Sources Dmod on page 976 Tempo Synchronization You can synchronize some effects parameters such as LFO speeds and delay times to the system tempo This let...

Страница 740: ...t and often change the waveform individually as well You can edit the Common FX LFO parameters on the P8 Common FX LFO pages of Program Combination Sequencer and Sampling modes FX Control Buses The FX Control Buses lets you create effects sidechains Sidechains let you control an effect with one audio signal the sidechain while the effect processes a completely different audio signal This is conven...

Страница 741: ...the modulator to modulate a different audio signal the carrier In the diagram the output of OSC1 and 2 are the carrier and the audio input from a mic is used as the modulator to produce a speaking instrument type of effect Use Bus Select to send OSC1 and 2 the carrier to IFX1 and set the FX Control Bus 0 8c to FX Control 1 for the mic connected to the AUDIO INPUT and specify FX Control 1 as the Mo...

Страница 742: ...utput level If the input level is too low the SN ratio may decrease On the other hand if the input level is too high clipping may occur The Global Internal Headroom setting will also change the maximum input level of the effect The following table shows the parameters related to the level settings Program mode HD 1 Program mode EXi Common Program mode AL 1 Program mode CX 3 Combination mode Sequen...

Страница 743: ...ograms combinations and songs Sequencer If Use Global Setting is checked these settings are made in Global mode P0 Input AUDIO INPUT LEVEL on the rear panel Audio Input Level P0 P5 Effect Trim parameter 1 P8 P9 Send1 2 P0 P5 P8 Output Effect Wet Dry parameter P8 P9 Return1 2 P9 Input AUDIO INPUT LEVEL on the rear panel Level P0 Send1 2 P0 ...

Страница 744: ... each mode will toggle between ON and OFF When OFF is selected the effect will be bypassed and the stereo input signal will be output in stereo without being processed The OASYS can also turn IFX1 IFX12 off separately from the setting of the ON OFF button by receiving MIDI control change message CC 92 Value 0 will turn them off and value 1 127 will turn them on You can also use Effect Global SW to...

Страница 745: ... Send2 parameters for the post IFX signal will be used In the example shown in the diagram Fig 2 1b the Chain check box is checked and each Chain to parameter is set to the subsequent effect creating a series connection of IFX1 IFX2 IFX3 IFX4 IFX5 IFX6 IFX7 IFX8 IFX9 IFX10 IFX11 IFX12 The post IFX12 settings for Pan CC 8 Bus Select REC Bus Send1 and Send2 will be used Settings for drum programs If...

Страница 746: ...d tracks Sequencer to select an Insert Effect to apply to the corresponding timbres and tracks You can route multiple timbres and tracks to a single Insert Effect Tip You can use each timbre track s Bus Select post IFX Chain to and Chain parameters P8 Insert FX page of each mode to create a variety of routings Fig 2 1b Fig 2 1c ...

Страница 747: ...Send1 and Send2 P8 Insert FX page following the insert effect to adjust the send levels Send1 responds to CC 93 and Send2 responds to CC 91 At this time the actual send level uses the value of the Send 1 and 2 settings for Oscillators 1 and 2 of the Programs selected for the timbres and tracks multiplied by the Send 1 and 2 values received via MIDI The following diagram Fig 2 2a shows an example o...

Страница 748: ...If a drum program Oscillator Mode Drums is selected for a timbre Combination or track Sequencer the DKit check box is available Fig 2 2c Checking this check box will enable the Bus Select settings etc of each key in the drum kit letting you specify the bus to which each drum instrument will be sent For example you can send snare sounds to IFX1 kick sounds to IFX2 and other drum sounds to L MONO an...

Страница 749: ... desired settings for DrumKit IFX Patch and press the OK button to execute If you want to revert to the original settings of the drum kit execute Drum Kit IFX Patch with the settings IFX1 IFX1 IFX2 IFX2 IFX3 IFX3 IFX4 IFX4 IFX5 IFX5 IFX6 IFX6 IFX7 IFX7 IFX8 IFX8 IFX9 IFX9 IFX10 IFX10 IFX11 IFX11 and IFX12 IFX12 You can also revert to the original settings by pressing the RESET button In the follow...

Страница 750: ... from an audio CD while applying insert master or total effects Use the CD R W Drive Audio Input 5 1b setting in the P5 Audio CD Ripping page to set up the effects busing In the example shown in the diagram Fig 2 3a the signal from AUDIO INPUT 1 and 2 is being sent to IFX1 Use the P8 Insert Effect page to select an insert effect and edit its parameters The following diagram Fig 2 3b shows an examp...

Страница 751: ...Insert Effects IFX1 IFX12 Routing 741 Fig 2 3a Fig 2 3b ...

Страница 752: ...ces to audio tracks In each mode use Audio Input P0 Audio Input Sampling page to make settings for external input from the AUDIO INPUT 1 2 3 4 and S P DIF IN jacks Alternatively you can check Use Global Settings and use the Global mode Audio settings Set Bus Select to specify the bus to which the external audio input will be sent You can select L R IFX1 12 1 8 1 2 7 8 or Off If you want to apply a...

Страница 753: ...els to the master effects are valid if Bus Select is set to L R or Off If Bus Select is set to IFX1 12 use the post IFX Send1 and Send2 settings to specify the send levels The diagram Fig 2 5a shows an example in which the input from the internal CD R RW driver or a USB connected external CD drive is panned to left and right and sent to insert effect 1 Fig 2 5a Disk mode In Disk mode P1 Play Audio...

Страница 754: ... hard right For more about effect types such as stereo in stereo out see In Out on page 734 You can control these parameters via CC 8 Bus Sel Bus Select This parameter enables you to specify the destination bus for the post IFX signals L R is a common setting to send signals to the Total Effects TFX1 TFX2 before they are routed to the OUTPUT MAIN L MONO and R outputs Select 1 8 or 1 2 7 8 to route...

Страница 755: ...cts can all be routed to the REC busses in addition to their main output IFX bus settings If you don t need to use the REC bus for a particular sound turn it Off Setting the REC bus to 1 2 3 or 4 lets you record up to four mono signals simultaneously Setting it to 1 2 or 3 4 lets you record stereo signals including the effects of the Pan CC 08 setting Send1 Send2 These parameters enable you to set...

Страница 756: ...ed at the right of the MIDI channel Ch01 16 of the track that is routed to each insert effect If two or more tracks with differing MIDI channels Ch01 16 are being sent to a single insert effect this parameter is used to specify the one track that will control the insert effect All Routed Select this option to control the parameters on all the channels channels 1 16 that have a mark that are routed...

Страница 757: ...re typically stereo in stereo out but they have a special structure The L channel and R channel of the stereo input each have their own independent mono effect Each mono output can then be panned to the desired position in the stereo field Normally you will use these as insert effects but you can also use them as master effects For details see Mono Mono Parallel Effects on page 734 Pressing the ON...

Страница 758: ...fects will not be applied page 755 Send1 responds to CC 93 and Send2 responds to CC 91 on the global MIDI channel At this time the actual send level uses the value of the Send 1 and 2 settings for Oscillators 1 and 2 multiplied by the Send 1 and 2 values received via MIDI If you have selected Drums for Oscillator Mode Program 1 1a of a Program the Use DKit Setting box Program 8 1b becomes availabl...

Страница 759: ...et for the corresponding timbres and tracks If the Send1 and Send2 parameters for the post IFX1 12 signals are effective they can be controlled on the MIDI channels assigned to IFX1 12 Note You can use the control surface to control Send1 and 2 For details see 8 1f OSC MFX Send on page 125 An example for Combination mode is given below In the upper figure Fig 2 2a Bus Select is set so that Timbre ...

Страница 760: ...h jack specifies the bus to which the external input source will be sent You can choose from L R IFX1 12 1 8 1 2 7 8 or Off If Bus Select is set to L R or Off use Send1 to MFX1 and Send2 to MFX2 to adjust the send levels to the master effects If Bus Select is set to IFX1 12 use the post IFX Send1 and Send2 to adjust the send levels to the master effects If you want to apply the master effects to t...

Страница 761: ...f Sampling mode In Disk mode effects will use the settings of the previously selected mode Mixer The input levels to the master effects are determined by the send levels In the P9 Routing page of each mode you can specify the output level and chaining series connection between the two master effects Return1 Return2 These adjust the amount of signal that is returned from the master effects MFX1 and...

Страница 762: ...om the sequencer Program and Sampling modes Effect parameters are controlled on the global MIDI channel Combination and Sequencer modes In Combination and Sequencer modes the control channel for MFX1 and MFX2 are specified by the Control Channel setting in the MFX1 and 2 pages You can choose Ch01 16 or Gch Ch01 16 Select this option if you wish to control the parameters for each Master Effect on d...

Страница 763: ... if 000 No Effect is selected Separately from this ON OFF button MIDI control change CC 95 can be received to turn TFX1 and TFX2 off A control change value of 0 turns them off and a value of 1 127 restores them to the prior setting You can also use Effect Global SW to turn off TFX1 and TFX2 in the same way This is controlled on the global MIDI channel Routing The total effects TFX1 and TFX2 are pl...

Страница 764: ...mance or from a sequencer Program and Sampling modes Effect parameters are controlled on the global MIDI channel Combination and Sequencer modes In Combination and Sequencer modes the control channel for TFX1 and TFX2 are specified by the Control Channel setting in the TFX1 and 2 pages You can choose Ch01 16 or Gch Ch01 16 Choose from these settings if you want to control each total effect on a se...

Страница 765: ...live performance setups If the signal is going through one or more insert effects the output is set at the last IFX in the chain via the Bus Select parameter on the P8 5 Insert Effects page If a Program Timbre or Track is not going through any insert effects the output is set using the Bus Select parameters on the P8 1 or 8 2 Routing page To assign audio inputs directly to outputs use Bus Select p...

Страница 766: ...fect Mixer Block Diagram in Program Mode P8 Insert Effect Post IFX Send1 2 P9 Master Total Effect Analog Input 1 Analog Input 2 Bus Select L R Bus Select IFX5 Program P0 Audio Input Sampling Program P0 Audio Input Sampling Input Send1 Send2 Analog Input 3 Bus Select L R Bus Select L R Bus Select L R IFX6 Bus IFX6 IFX7 Bus IFX7 Bus Select L R stereo stereo BUS Select L R IFX8 Bus IFX8 IFX9 Bus IFX9...

Страница 767: ... P9 Master Total Effect Analog Input 1 Analog Input 2 Bus Select L R Bus Select IFX5 Combi Seq P0 Audio Input Sampling Combi Seq P0 Audio Input Sampling Input Send1 Send2 Analog Input 3 Bus Select L R Bus Select L R Bus Select L R IFX6 Bus IFX6 IFX7 Bus IFX7 Bus Select L R stereo stereo IFX8 Bus IFX8 IFX9 Bus IFX9 Bus Select L R stereo stereo IFX10 Bus IFX10 IFX11 Bus IFX11 stereo stereo IFX12 Bus...

Страница 768: ... Audio Input Sampling Input Send1 Send2 Analog Input 3 Bus Select L R Bus Select L R Bus Select L R IFX6 Bus IFX6 IFX7 Bus IFX7 Bus Select L R stereo stereo Bus Select L R IFX8 Bus IFX8 IFX9 Bus IFX9 Bus Select L R stereo stereo Bus Select L R IFX10 Bus IFX10 IFX11 Bus IFX11 stereo stereo IFX12 Bus IFX12 stereo Bus Select L R Analog Input 4 S P DIF IN L S P DIF IN R Bus Select IFX10 Bus Select IFX...

Страница 769: ...ontal axis Frequency Hz Purple area This shows the frequency response after passing through all of the bands These sliders adjust the gain dB of each band The selected band is indicated by a thick red line Green line Shows the frequency response of the selected band alone without the results of the other bands This line shows the center frequencies of the selected Type The cutoff frequencies speci...

Страница 770: ...signal level is Under the threshold level or Over it This is a realtime indication of the gain adjustment level relative to the input signal Level changes in the opposite direction indicate negative values This is a realtime indication of the output signal level Indicates the output response relative to the input This will change according to the Ratio and Threshold settings Input below the Thresh...

Страница 771: ...he Soft Knee range Knee within the Soft Knee range or Over above the Soft Knee range Other items are the same as for Limiter Refer to Limiter Indicates the output response relative to the input This will change according to the Ratio Threshold and Soft Knee Width The expander compresses the input that is lower than the Threshold In the example shown here a 30 dB input is being output at 40 dB The ...

Страница 772: ...n reduction relative to the control input signal of each band Indicates the output response relative to the input This will change according to the Threshold setting The Mastering Limiter applies limiting at the Threshold level and optimizes the output level as high as possible For each channel L and R this is a realtime indication of the control input signal level Input the gain reduction produce...

Страница 773: ...ol input signal is below the Threshold level If the control input signal is above the Threshold level the input signal will be output The Polarity setting can be used to reverse this operation This is also affected by the Attack and Release settings For each band this is a realtime indication of the control input signal level Input and the gain reduction produced by the control input signal Gain R...

Страница 774: ...o signals this will cause the stereo image to shift Pre EQ Trim 0 100 This sets the input level for the EQ LEQ Fc Low Mid Low Selects the frequency of the EQ s low band LEQ Gain dB 15 0 15 0 Sets the gain of the Low EQ HEQ Fc High Mid High Selects the frequency of the EQ s high band HEQ Gain dB 15 0 15 0 Sets the gain of the High EQ COMPRESSOR Sensitivity 1 100 This controls the amount of compress...

Страница 775: ...l volume more consistent or choose Peak if you want to be sure that even sudden peaks are suppressed Side Chain Monitor Check box When this is On you ll hear the control signal as selected by the Source parameter through the sidechain EQ instead of the output of the limiter This can be helpful when you re tuning the EQ to emphasize or de emphasize specific frequencies To hear the output of the lim...

Страница 776: ...rce for the output gain Amount 63 63 Sets the amount of output gain modulation OUTPUT This is the standard effects output section with modulatable control over wet dry balance For more information see OUTPUT on page 764 003 Stereo Expander This is a stereo effect that adds expressiveness to the dynamics by lowering the output level when the input signal falls below a specified level ENVELOPE This ...

Страница 777: ...ander gate or EQ with each band performing a different function if desired The dynamics processing works somewhat differently than a standard compressor expander For more information see Range dB below XOVER FILTER Slope 6dB Oct 12dB Oct 18dB Oct 24dB Oct Selects the steepness of the crossover filters Frequency 1 2 Hz 40 240 Sets the frequency at which bands 1 and 2 are divided Frequency 2 3 Hz 10...

Страница 778: ...channels or use each channel individually ENVELOPE Source Input FX Control 1 FX Control 2 This selects the control signal for the limiter the input signal FX Control Bus 1 or FX Control Bus 2 For more information see Source on page 765 Select L R Mix L Only R Only L R Individually This determines how the left and right channels of the selected Source are used Note that this parameter applies only ...

Страница 779: ... dry balance For more information see OUTPUT on page 764 006 Multiband Limiter This mono effect provides separate limiters for the low mid and high frequencies You can control the dynamics for each range to adjust the relative levels of the low mid and high ranges with very different results from EQ Threshold Offsets The three bands share common settings for ratio attack and release times and outp...

Страница 780: ...t gain p 766 Source Off Tempo Selects the modulation source for the output gain Amount 63 63 Sets the modulation amount of the output gain LOW Offset dB 40 0 Sets the low range gain of trigger signal For more information see Threshold Offsets on page 769 MID Offset dB 40 0 Sets the mid range gain of trigger signal For more information see Threshold Offsets on page 769 HIGH Offset dB 40 0 Sets the ...

Страница 781: ...et the Out Ceiling to a value between 0 3dB and 3dB 4 Leave the Release at the default setting 5 Make sure that Wet Dry is set to Wet with no modulation 6 Go to the loudest part of the song 7 While playing the song adjust the Threshold and watch the gain reduction meter Set the Threshold so that the gain reduction meter rarely if ever shows more than 6dB of limiting You could also use a compressor...

Страница 782: ...vel You can use this if a guitar or mic signal from the audio input contains noise ENVELOPE Envelope Source Input FX Control 1 FX Control 2 Selects the trigger source to use the input signal FX Control Bus 1 or FX Control Bus 2 p 765 Envelope Select L R Mix Left Right Selects whether the compressor is linked between left right controlled only by the left signal only by the right signal or independ...

Страница 783: ...Sets the gain of Band 2 Band3 Fc Hz 300 10 00k Sets the center frequency of Band 3 Q 0 5 10 0 Sets the bandwidth of Band 3 p 773 Gain dB 18 0 18 0 Sets the gain of Band 3 Band4 Fc Hz 500 20 00k Sets the center frequency of Band 4 Q 0 5 10 0 Sets the bandwidth of Band 4 p 773 Gain dB 18 0 18 0 Sets the gain of Band 4 GAIN MOD Band2 Source Off Tempo Selects the modulation source for the Band 2 gain ...

Страница 784: ...Q and High EQ gain can be controlled in real time You can use this as a TFX to make final adjustments to the sound PARAMETRIC EQ Trim 0 100 Sets the input level Low Fc Hz 0 980 Sets the cutoff frequency of the Low EQ shelving type Gain dB 18 0 18 0 Sets the gain of the Low EQ Mid Cutoff Hz 100 10 00k Sets the cutoff frequency of the Mid EQ peaking type Q 0 5 10 0 Sets the bandwidth of the Mid EQ G...

Страница 785: ...n amount for the Exciter intensity ENHANCER L Delay Time msec 0 0 50 0 The L and R Delay Time parameters set the delay times for the Enhancer s left and right channels Specifying slightly different delay times for the left and right channels will add a stereo image depth and width to the sound R Delay Time msec 0 0 50 0 Sets the delay time for the Enhancer s right channel For more information see ...

Страница 786: ...ation to auto wah simulation and much broader range settings CONTROL Sweep Mode Auto Dmod LFO This parameter selects how the wah will be controlled Auto makes the sweeps follow the input signal s volume envelope Auto wah is frequently used for funk guitar parts and clav sounds Dmod lets you control the filter directly via a modulation source just like a wah pedal LFO uses an LFO to create cyclic s...

Страница 787: ...difference relative to the selected Common FX LFO It applies only when Type is set to Common 1 or Common 2 WAH Frequency Bottom 0 100 This sets the wah frequency when the modulation signal selected by Sweep Mode is at its minimum level To reverse the sweep direction you can set this to be higher than the Frequency Top below Frequency Top 0 100 This sets the wah frequency when the modulation signal...

Страница 788: ... 2 this lets you offset the phase from the master LFO WAH Mode Preset Custom Selects either preset or custom settings Frequency Bottom 0 100 Sets the lower limit of the wah center frequency when Mode is set to Custom p 777 Frequency Top 0 100 Sets the upper limit of the wah center frequency when Mode is set to Custom p 777 Resonance Bottom 0 100 Sets the lower limit of resonance amount when Mode i...

Страница 789: ...rs how modulation is applied to the left and right channels creating a swelling effect Frequency These parameters apply when MIDI Tempo Sync is Off un checked Frequency Hz 0 02 20 00 This sets the speed of the triangle waveform in Hz Step Frequency Hz 0 05 50 00 This sets the speed of the steps in Hz Source Off Tempo This selects a modulation source for both the Frequency and the Step Frequency Yo...

Страница 790: ...toff Amount 100 Sets the modulation amount of the cutoff Depth 0 100 Sets the depth to which the LFO will modulate the cutoff frequency Resonance 0 100 Sets the resonance amount Source Off Tempo Selects the source that will modulate the amount of resonance Amount 100 Sets the amount by which the resonance will be modulated DRIVER Bypass Check box Switches distortion on off within the filter Gain 0...

Страница 791: ...sitivity with which very low harmonics are added Shape 100 Sets the oscillator s volume envelope curve SUB OSCILLATOR OSC Mode Note Key Follow Fixed This determines whether the oscillator frequency follows the note number or stays at a fixed value Note Key Follow The oscillator s frequency is based on MIDI note number on the effect s MIDI channel allowing you to use it as an octaver The Note Inter...

Страница 792: ...is applied If you wish to apply the effect to a higher range sound set this parameter to a higher value to apply the effect to a lower range sound set this to a lower value Resonance 0 100 Sets the Level of resonance of the voice pattern This parameter sets the intensity of resonance for the voice pattern A larger value will add more character to the sound LFO Frequency Hz 0 02 20 00 This sets the...

Страница 793: ... With lower settings the sound may be distorted and the volume may increase You can use the Output Level parameter below to adjust the volume as necessary Output Level 0 100 Sets the output level Source Off Tempo Selects the modulation source for the output level Amount 100 Sets the modulation amount of the output level LFO Frequency Hz 0 02 20 00 This sets the LFO speed in Hz It applies only when...

Страница 794: ... This parameter enables you to set the level of the click noise that occurs once every rotation of the turntable This simulation reproduces record noise and the noise generated after the music on a vinyl record finishes Source Off Tempo Selects the modulation source for the click noise level Amount 100 Sets the modulation amount of the click noise level OUTPUT This is the standard effects output s...

Страница 795: ...Output Level 0 100 Sets the output level Source Off Tempo Selects the modulation source for the Output Level Amount 100 Sets the modulation amount for the Output Level OUTPUT This is the standard effects output section with modulatable control over wet dry balance For more information see OUTPUT on page 764 00 Sine 06 Double Sine 01 2 Cycle 02 Frequency3 03 Frequency7 07 Phase 04 10 Cycle 08 20 Cy...

Страница 796: ...ects For instance you can produce the classic talking synthesizer sound by using a voice as a modulator and a bright synthesizer pad as a carrier This is only part of the effect s potential however You can use vocoders to combine practically any two sounds as long as the frequency ranges overlap sufficiently Drums make particularly good modulators for instance A vocoder is essentially a combinatio...

Страница 797: ...0 Sets the modulation amount for the Noise Level MODULATOR Trim 0 100 This controls the input level of the Modulator Source Input FX Control 1 FX Control 2 Selects the signal to use as the Modulator input Input uses the input to the Vocoder effect This is good when you want the input to vocode itself FX Control 1 and 2 use the signal from the FX Control Buses For classic vocoding effects such as a...

Страница 798: ...te a sharper tone Drive Mode Overdrive Hi Gain This switches between two different distortion timbres overdrive and hi gain distortion Drive 1 100 The amount of distortion is determined by the combination of the input level and the Drive setting Higher input levels and or higher Drive settings mean more distortion Raising the Drive setting will also increase the volume you can compensate for this ...

Страница 799: ... 120 Sets the degree of distortion For more information see DRIVE on page 788 Direct Mix 0 50 Amount of the dry sound mixed to the distortion Speaker Simulation Check box Speaker simulation on off Output Level 0 50 Sets the output level For more information see DRIVE on page 789 Source Off Tempo Selects the modulation source for the output level Amount 50 50 Sets the modulation amount of the outpu...

Страница 800: ...Tempo Selects the modulation source for the output level Amount 100 Sets the modulation amount of the output level Bass 0 100 Sets the bass low range level Middle 0 100 Sets the middle mid range level Treble 0 100 Sets the treble high range level Cut Presence 0 100 This controls the high frequency tone If the Type is AC15 AC30TB the Cut high frequency attenuation parameter is available For other T...

Страница 801: ...12 2x12 combo amp indispensable for country or blues players TWEED 1x12 Combo amp covered in tweed cloth TWEED 4x10 4x10 combo amp designed for bass guitar Gain 0 100 Sets the input gain Volume 0 100 Sets the output level Source Off Tempo Selects the modulation source for the output level Amount 100 Sets the modulation amount of the output level Bass 0 100 Sets the bass low range level Middle 0 10...

Страница 802: ...ee OUTPUT on page 764 033 Bass Amp Model This simulates a bass amp BASS AMP MODEL Type LA STUDIO JAZZ GOLD PANEL SCOOPED VALVE2 VALVE CLASSIC Selects the type of the amplifier For more information see 034 Bass Amp Model Cabinet on page 793 Volume 0 100 Sets the output level Source Off Tempo Selects the modulation source for the output level AMP MODEL CABINET AC15 AC15 AC15TB AC15 AC30 AC30 AC30TB ...

Страница 803: ...po Selects the modulation source for the output level Amount 100 Sets the modulation amount of the output level Bass 0 100 Sets the bass low range level Middle 0 100 Sets the middle mid range level Mid Range 0 4 Sets the mid frequency range Treble 0 100 Sets the treble high range level Presence 0 100 Sets the presence high frequency tone CABINET SIMULATOR Cabinet Sim SW Check box Switches the cabi...

Страница 804: ...00 Sets the treble high range level Presence 0 100 Sets the presence high frequency tone CABINET SIMULATOR Cabinet Sim SW Check box Switches the cabinet simulator on off Cabinet Type LA 4x10 MDN 4x10 MTL 4x10 CLS 8x10 UK 4x12 STD 1x15 JAZ 1x15 AC 2x15 US 2x15 UK 4x15 LA 1x18 COMBI Selects the cabinet type p 793 p 794 OUTPUT This is the standard effects output section with modulatable control over ...

Страница 805: ...53 20 00k Thru Sets the cutoff frequency for the high cut filter of stage 2 Gain dB 24 0 24 0 Sets the input gain for stage 2 Saturation 0 100 Sets the input output response for stage 2 p 796 Bias 0 100 Sets the bias voltage for stage 2 p 796 Output Level dB 48 0 0 0 Sets the output level OUTPUT Wet Dry Dry 1 99 99 1 Wet Sets the balance between the effect and the dry input Source Off Tempo Select...

Страница 806: ...expresses the effect that changes in vacuum tube bias have on the distortion of the waveform Higher settings of this value will produce distortion even at low gain levels Since this will also change the overtone structure you can use it to control the tonal character Output Level dB 48 0 0 0 Sets the output level of the preamp OUTPUT This is the standard effects output section with modulatable con...

Страница 807: ...t in Hz MIDI Tempo Sync Check box BPM MIDI 40 00 240 00 Base Note Times x1 x32 When MIDI Tempo Sync is on the LFO speed is set by BPM Base Note and Times instead of Frequency For more information see MIDI Tempo Sync on page 777 Type Individual Common1 Common2 This controls whether the effect uses its individual LFO or one of the Common FX LFOs For more information see LFO Type on page 777 Common L...

Страница 808: ...is Off Source Off Tempo This selects a modulation source for the Frequency Amount 20 00 20 00 This sets the Frequency modulation amount in Hz MIDI Tempo Sync Check box BPM MIDI 40 00 240 00 Base Note Times x1 x32 When MIDI Tempo Sync is on the LFO speed is set by BPM Base Note and Times instead of Frequency For more information see MIDI Tempo Sync on page 777 Type Individual Common1 Common2 This c...

Страница 809: ... the LFO2 Frequency modulation amount in Hz LFO1 Type Individual Common1 Common2 This controls whether the effect uses its individual LFO1 or one of the Common FX LFOs For more information see LFO Type on page 777 Common LFO Phase Offset degrees 180 When Type is set to Common FX LFO 1 or 2 this lets you offset the phase from the master LFO LFO2 Type Individual Common1 Common2 This controls whether...

Страница 810: ...t LFO phases You can produce a complex stereo image by setting a different delay time and depth for each block You can control the delay output level via a modulation source MODULATION DELAY Taps 1 6 There are six delay taps each with separate settings for delay time chorus depth and on off modulation status The chorus LFO phases are different for each tap Tap 1 0 degrees Tap 2 180 degrees Tap 3 6...

Страница 811: ...he chorus 2 LFO modulation depth will be controlled Feedback 0 100 Sets the feedback amount for chorus 2 When Routing is set to Serial this feeds back into Chorus 1 and Chorus 1 s own Feedback setting is ignored LFO1 2 LFO1 2 Lock Unlock Lock LFO1 Lock Common1 Lock Common2 This selects the LFO s used by the two choruses Unlock LFO 1 and LFO 2 will operate independently Lock LFO 1 both choruses wil...

Страница 812: ... output section with modulatable control over wet dry balance For more information see OUTPUT on page 764 046 Ensemble This Ensemble effect has three chorus blocks that use LFO to create subtle shimmering and gives three dimensional depth and spread to the sound because the signal is output from the left right and center ENSEMBLE Depth 0 100 Sets the depth of the LFO modulation Source Off Tempo Se...

Страница 813: ...r both positive or both negative this emphasizes the flanger s harmonic peaks High Damp 0 100 This parameter sets the amount of damping of the feedback in the high range Increasing the value will cut high range harmonics LFO Waveform Triangle Sine Selects the LFO Waveform Shape 100 Changes the curvature of the LFO Waveform p 780 Phase degrees 180 180 Sets the LFO phase difference between the left ...

Страница 814: ...Amount 100 Sets the modulation amount for Wet Dry 050 Stereo Envelope Flanger This Flanger uses a MIDI triggerable envelope generator for modulation This lets you create sequences with flanger sweeps which always happen on the same beat for instance You can also control the Flanger directly using a modulation source CONTROL Sweep Mode EG Dmod When Sweep Mode is set to EG the envelope generator con...

Страница 815: ...o sounds You can add spread to the sound by offsetting the phase of the left and right LFOs from each other PHASER Manual 0 100 Sets the phaser s center frequency Depth 0 100 Sets the depth of LFO modulation Source Off Tempo Selects the modulation source for the LFO modulation depth Amount 100 Sets the modulation amount of the LFO modulation depth Resonance 100 This controls the intensity of the p...

Страница 816: ...nformation see Resonance on page 805 High Damp 0 100 Sets the resonance damping amount in the high range p 805 LFO Waveform Step Tri Step Sin Random Selects the LFO Waveform For more information see Waveform on page 779 Phase degrees 180 180 Sets the LFO phase difference between the left and right See Phase degrees on page 779 Frequency Hz 0 02 20 00 Step Frequency Hz 0 05 50 00 Source Off Tempo A...

Страница 817: ... more information Attack and Release see the graphic under Attack msec on page 766 Decay 1 100 Sets the EG decay time PHASER Resonance 100 This controls the intensity of the phaser For more information see Resonance on page 805 High Damp 0 100 This sets the amount of high frequency damping in the phaser s feedback loop Increasing the value will cut high range harmonics OUTPUT Wet Dry Wet 1 99 Dry ...

Страница 818: ...r in series If Routing is set to Serial the Phaser 1 Output Level and Phaser 2 Output Level settings are ignored Output Mode Mono Stereo Selects whether phaser 1 and 2 will be routed separately to the left and right channels or summed to mono Phaser1 Output Level 0 100 Sets the output level for phaser 1 This applies only if Routing is set to Dual Phaser2 Output Level 0 100 Sets the output level fo...

Страница 819: ...ether the LFO will be modulated by the normal Frequency Dmod source or by the Autofade envelope VIBRATO Depth 0 100 Sets the depth of LFO modulation Source Off Tempo Selects the modulation source of the LFO modulation depth Amount 100 Sets the modulation amount of the LFO modulation depth LFO Waveform Triangle Sine Selects the LFO Waveform Shape 100 Changes the curvature of the LFO Waveform p 780 ...

Страница 820: ...y time Depth 0 200 Sets the depth of LFO modulation Feedback 100 Sets the feedback amount p 798 High Damp 0 100 Sets the feedback damping amount in the high range p 803 LFO Waveform Triangle Sine Selects the LFO Waveform Shape 100 Changes the curvature of the LFO Waveform p 780 Phase degrees 40 40 Sets the LFO phase difference between the left and right See Phase degrees on page 779 Frequency Hz 0...

Страница 821: ...mount for the high frequencies of the resonant sound Lower values create a metallic sound with a higher range of harmonics Level 0 100 Sets the Voice1 output level Pan L6 L1 C R1 R6 Sets the Voice1 stereo image VOICE2 The parameters for Voice2 are the same as those for VOICE1 above OUTPUT This is the standard effects output section with modulatable control over wet dry balance For more information...

Страница 822: ...e that this requires you to manually trigger the effect otherwise you won t hear the Doppler at all Dmod Sync Check box When this is On and Mode is set to Loop you can reset the LFO via Dmod as specified by the Source parameter below Source Off Tempo Selects the LFO reset modulation source The effect is triggered when the MIDI value changes from 63 or smaller to 64 or higher Frequency Hz 0 02 20 0...

Страница 823: ... level is over the Threshold value The maximum recording time is 2 730msec If this is exceeded the recorded data will start being erased from the top RECORD Response This sets the speed of the response to the end of recording Set a smaller value when you are recording a phrase or rhythm pattern and set a higher value if you are recording only one note PLAYBACK Scratch Source and Response The Scrat...

Страница 824: ...e 777 Common LFO Phase Offset degrees 180 When Type is set to Common FX LFO 1 or 2 this lets you offset the phase from the master LFO OUTPUT This is the standard effects output section with modulatable control over wet dry balance For more information see OUTPUT on page 764 061 Stereo Tremolo This effect modulates the volume level of the input signal The effect is stereo and offsetting the LFO of ...

Страница 825: ...nvelope s sensitivity to the input signal Shape 100 Sets the envelope s curvature TREMOLO Depth 0 100 Sets the initial amount of tremolo Envelope Amount 100 Sets the amount added to or subtracted from the Depth when the envelope is at maximum Modulation Example The graphic below shows an example of tremolo modulation with negative modulation of both Depth and Frequency At the start of the note the...

Страница 826: ... true stereo with different signals in the left and right channels Frequency Hz 0 02 20 00 This sets the LFO speed in Hz It applies only when MIDI Tempo Sync below is Off Source Off Tempo This selects a modulation source for the Frequency Amount 20 00 20 00 This sets the Frequency modulation amount in Hz MIDI Tempo Sync Check box BPM MIDI 40 00 240 00 Base Note Times x1 x32 When MIDI Tempo Sync is...

Страница 827: ...z It applies only when MIDI Tempo Sync below is Off Source Off Tempo This selects a modulation source for the Frequency Amount 20 00 20 00 This sets the Frequency modulation amount in Hz MIDI Tempo Sync Check box BPM MIDI 40 00 240 00 Base Note Times x1 x32 When MIDI Tempo Sync is on the LFO speed is set by BPM Base Note and Times instead of Frequency For more information see MIDI Tempo Sync on pa...

Страница 828: ...n OSC Mode is set to Fixed Note Offset 48 48 This sets a pitch offset from the received MIDI note number in semitones It applies only when OSC Mode is set to Note Key Follow Try using offsets of octaves 12 24 etc or fifths 7 19 5 etc Note Fine 100 This adjusts the frequency in cents 1 100 of a semitone It applies only when OSC Mode is set to Note Key Follow LFO Depth 0 100 Sets the depth of LFO mo...

Страница 829: ...cts a modulation source for the Frequency Amount 20 00 20 00 This sets the Frequency modulation amount in Hz MIDI Tempo Sync Check box BPM MIDI 40 00 240 00 Base Note Times x1 x32 When MIDI Tempo Sync is on the LFO speed is set by BPM Base Note and Times instead of Frequency For more information see MIDI Tempo Sync on page 777 Type Individual Common1 Common2 This controls whether the effect uses i...

Страница 830: ...edback INPUT Input Level Dmod 100 Sets the modulation amount of the input level p 820 Source Off Tempo Selects the modulation source for the input level p 820 PITCH SHIFTER Mode Slow Medium Fast Switches Pitch Shifter mode p 821 Pitch Shift 1 2 steps 24 24 Sets the pitch shift amount by steps of a semitone p 821 Fine cents 100 Sets the pitch shift amount by steps of a cent p 821 Source Off Tempo S...

Страница 831: ...69 Stereo Pitch Shifter This is a stereo pitch shifter The pitch shift amount for the left and right channels can be reversed from each other INPUT Input Level Dmod 100 Sets the modulation amount of the input level p 820 Source Off Tempo Selects the modulation source for the input level p 820 PITCH SHIFTER Mode Slow Medium Fast Switches Pitch Shifter mode p 821 L R Pitch Normal Up Down Determines ...

Страница 832: ...e error message OVER will appear If this occurs change the delay time parameters so that this message no longer appears Base Note Selects the type of notes to specify the delay time p 822 Times x1 x32 Sets the number of notes to specify the delay time p 822 Feedback Position Pre Post Switches the feedback connection p 821 Feedback 100 Sets the feedback amount p 821 High Damp 0 100 Sets the damping...

Страница 833: ...ceeds the upper limit p 822 L Base Note Selects the type of notes to specify the left channel delay time p 822 Times x1 x32 Sets the number of notes to specify the left channel delay time p 822 R Base Note Selects the type of notes to specify the right channel delay time p 822 Times x1 x32 Sets the number of notes to specify the right channel delay time p 822 Feedback Position Pre Post Switches th...

Страница 834: ... or Common LFO2 p 777 Common LFO Phase Offset degrees 180 Sets the phase offset when Type Common 1 or Common 2 p 777 OUTPUT Wet Dry Dry 1 99 99 1 Wet Sets the balance between the effect and the dry input Unlike most effects when this is set to Wet the dry and effected signals will be heard at equal volume Source Off Tempo Selects a modulation source for Wet Dry Amount 100 Sets the modulation amoun...

Страница 835: ...tch Slow Fast Switches the speaker rotation speed between slow and fast Source Off Tempo Selects a modulation source for Slow Fast Mode Toggle Moment This parameter controls how the modulation source switches the rotation speed between slow and fast When Mode Toggle the speed will switch between slow and fast each time you press the pedal or move the joystick Via MIDI the speed will switch each ti...

Страница 836: ...ess the pedal or move the joystick Via MIDI overdrive turns on or off each time the modulation amount exceeds 64 When Mode Moment short for Momentary the overdrive is normally off and turns on only when you press the pedal or move the joystick Via MIDI modulation values above 64 turn it on and values below 64 turn it off Gain 0 100 Determines the degree of distortion Level 0 100 Sets the overdrive...

Страница 837: ...d if the Mode Switch is set to Stop the rotors will always stay stopped regardless of the Speed Switch Horn Stop Phase degrees Free 180 180 When the Mode Switch is set to Stop the Horn gradually comes to rest pointing one way or another This allows you to control where it will stop Free lets it come to rest naturally at a more or less random spot The other settings 180 to 180 let you force it to l...

Страница 838: ...re Amp turn this parameter Off If you re layering two CX 3s together you may wish to use 133 Rotary Speaker as an IFX insert effect for both Programs together instead of using the Rotary Speakers within the individual Programs Use this parameter to adjust the tone in such cases MIC These settings model two pairs of stereo microphones recording the rotary speaker one pair each for the horn and roto...

Страница 839: ... widest with a value of 50 and the effect sound of both channels is output from the center with a value of 0 OUTPUT This is the standard effects output section with modulatable control over wet dry balance For more information see OUTPUT on page 764 DELAY High Damp and Low Damp These parameters set the damping amount of high range and low range The tone of the delayed sound becomes darker and ligh...

Страница 840: ... 820 Source Off Tempo Selects the modulation source for the input level p 820 DELAY Stereo Cross Stereo Cross Switches between stereo delay and cross feedback delay L Delay Time msec 0 0 1360 0 Sets the delay time for the left channel R Delay Time msec 0 0 1360 0 Sets the delay time for the right channel L Feedback 100 Sets the feedback amount for the left channel R Feedback 100 Sets the feedback ...

Страница 841: ...ad 50 50 Sets the width of the stereo image of the effect sound p 829 OUTPUT This is the standard effects output section with modulatable control over wet dry balance For more information see OUTPUT on page 764 081 Stereo Multitap Delay The left and right Multitap Delays have two taps respectively Changing the routing of feedback and tap output allows you to create various patterns of complex effe...

Страница 842: ...mod Switches between LFO modulation control and modulation source control Dmod Modulation L R L R Reversed L R control by modulation source p 833 Source Off Tempo Selects the modulation source that controls delay time Response 0 30 Sets the rate of response to the modulation source LFO Waveform Triangle Sine Selects the LFO Waveform Shape 100 100 Changes the curvature of the LFO Waveform p 780 L L...

Страница 843: ...n the value changes from 63 or smaller to 64 or higher 083 Stereo Dynamic Delay This stereo delay controls the level of delay according to the input signal level You can use this as a ducking delay that applies delay to the sound only when you play keys at a high velocity or only when the volume level is low CONTROL Target None Output Level Feedback Selects the modulation target for the input sign...

Страница 844: ...e curvature of the LFO Waveform p 780 Phase degrees 180 180 Sets the LFO phase difference between the left and right p 814 Frequency Hz 0 02 20 00 This sets the LFO speed in Hz It applies only when MIDI Tempo Sync below is Off MIDI Tempo Sync Check box BPM MIDI 40 00 240 00 Base Note Times x1 x32 When MIDI Tempo Sync is on the LFO speed is set by BPM Base Note and Times instead of Frequency For mo...

Страница 845: ...0 100 Sets the delay time of Tap 3 as a percentage of Tap 1 s delay time Level and Pan 1 3 Each tap has its own controls for level and pan Tap1 3 Level 0 100 Sets the tap s output level Pan L 1 99 R Sets the tap s stereo position Feedback Tap1 3 Feedback Amount 100 Sets the individual tap s feedback level Negative values invert the phase These individual levels are summed together and then the fin...

Страница 846: ...feedback amount for band 1 Amt Feedback Amount 100 Sets the amount of modulation for the band 1 feedback Low Damp 0 100 Sets the amount of low frequency attenuation for band 1 High Damp 0 100 Sets the amount of high frequency attenuation for band 1 Output Level 0 100 Sets the output level for band 1 Amt Output Level Amount 100 Sets the amount of modulation for the band 1 output level BAND2 DELAY B...

Страница 847: ... Reverse Forward Reverse the feedback plays in reverse Reverse Forward the feedback alternates between playing backwards and forwards as shown below Feedback 100 Sets the feedback amount Source Off Tempo Selects the modulation source of feedback amount Amount 100 Sets the feedback amount High Damp 0 100 Sets the damping amount in the high range Sync Source Off Tempo Selects the modulation source t...

Страница 848: ...MIDI 40 00 240 00 MIDI syncs to the system tempo 40 240 sets the tempo manually for this individual effect p 822 Time Over OVER The maximum delay time is 5 400msec If the combination of BPM Base Note and Times exceeds this limit the error message OVER will appear If this occurs change the delay time parameters so that this message no longer appears Base Note Selects the type of notes to specify th...

Страница 849: ...pushing the joystick in the Y direction forward you can also overdub performances over the phrase that is being held 089 Auto Reverse This effect records the input signal and automatically plays it in reverse the effect is similar to a tape reverse sound CONTROL Envelope Select Dmod Input This selects whether the start and end of recording is controlled via the modulation source or the input signa...

Страница 850: ... 99 R Sets the panning of Tap1 Tap2 Pan L 1 99 R Sets the panning of Tap2 Tap3 Pan L 1 99 R Sets the panning of Tap3 Tap4 Pan L 1 99 R Sets the panning of Tap4 Feedback 100 Sets the feedback amount Source Off Tempo Selects the modulation source of feedback amount Amount 100 Sets the feedback amount High Damp 0 100 Sets the damping amount in the high range p 829 Low Damp 0 100 Sets the damping amou...

Страница 851: ...eft Delay C Delay Base Note Selects the type of notes to specify the delay time for the Center Delay p 822 Times x1 x32 Sets the number of notes to specify the delay time for the Center Delay p 822 Level 0 50 Sets the output level of the Center Delay R Delay Base Note Selects the type of notes to specify the delay time for the Right Delay p 822 Times x1 x32 Sets the number of notes to specify the ...

Страница 852: ...r Tap R Delay Base Note Selects the type of notes to specify the delay time for the Right Tap p 822 Times x1 x32 Sets the number of notes to specify the delay time for the Right Tap p 822 Level 0 50 Sets the output level of the Right Tap Feedback C Delay 100 Sets the feedback amount of the Center Tap Source Off Tempo Selects the modulation source for the Center Tap feedback Amount 100 Sets the mod...

Страница 853: ...he modulation amount of the left channel feedback R Amount 100 Sets the modulation amount of the right channel feedback High Damp 0 100 Sets the damping amount in the high range p 829 Low Damp 0 100 Sets the damping amount in the low range p 829 OUTPUT This is the standard effects output section with modulatable control over wet dry balance For more information see OUTPUT on page 764 094 Stereo BP...

Страница 854: ...tem tempo 40 240 sets the tempo manually for this individual effect p 822 Time Over OVER The maximum delay time is 1 360msec If the combination of BPM Base Note and Times exceeds this limit the error message OVER will appear If this occurs change the delay time parameters so that this message no longer appears Mode Normal Cross Feedback Cross Pan1 Cross Pan2 Switches the left and right delay routi...

Страница 855: ...ies only when MIDI Tempo Sync below is Off MIDI Tempo Sync Check box BPM MIDI 40 00 240 00 Base Note Times x1 x32 When MIDI Tempo Sync is on the LFO speed is set by BPM Base Note and Times instead of Frequency For more information see MIDI Tempo Sync on page 777 Type Individual Common1 Common2 This controls whether the effect uses its individual LFO or one of the Common FX LFOs For more informatio...

Страница 856: ...right channel delay time p 822 Times x1 x32 Sets the number of notes to specify the right channel delay time p 822 L Feedback 100 Sets the feedback amount for the left channel R Feedback 100 Sets the feedback amount for the right channel High Damp 0 100 Sets the damping amount in the high range p 829 Low Damp 0 100 Sets the damping amount in the low range p 829 LFO Waveform Triangle Sine Selects t...

Страница 857: ...lues range from a 32nd note to a whole note including triplets Also Taps 2 and 3 are specified as a percentage of this delay time Taps 2 and 3 always stay in proportion to Tap 1 even when the delay time is modulated Times x1 x32 This multiplies the length of the Base Note For instance if the Base Note is set to a sixteenth note and Times is set to 3 the delay time will be a dotted eighth note Sour...

Страница 858: ...cify the length of reverse playback delay time p 822 Times x1 x32 Sets the number of notes to specify the delay time p 822 Level 0 100 Sets the output level of the reverse playback L Post Delay Base Note Selects the type of notes to specify the delay time for the Left Tap p 822 Times x1 x32 Sets the number of notes to specify the delay time for the Left Tap p 822 Level 0 100 Sets the output level ...

Страница 859: ...e of the initial reflections Setting both diffusers to around 50 generally produces sufficient diffusion for smooth reverbs extremely high levels may cause ringing Some source material such as vocals may also benefit from lower settings of diffusion allowing for more discrete echoes Diffusion1 and Diffusion2 differ in how the reflections are spaced and the balance between these two parameters will...

Страница 860: ...rt halls or ensemble halls For detailed explanations of the parameters see 104 Reverb Dry Plate on page 850 102 Reverb Smooth Hall This hall type reverb simulates the reverberation of larger halls and stadiums and creates a smooth release For detailed explanations of the parameters see 104 Reverb Dry Plate on page 850 103 Reverb Wet Plate This plate reverb simulates warm dense reverberation For de...

Страница 861: ...gain of the Low EQ HEQ Fc High Mid High Selects the cutoff frequency high or mid high of the high range equalizer HEQ Gain dB 15 0 15 0 Sets the gain of the High EQ REVERB Reverb Time sec 0 1 3 0 Sets the reverberation time High Damp 0 100 Sets the damping amount in the high range Pre Delay msec 0 200 Sets the delay time from the dry sound p 851 Pre Delay Thru 0 100 Sets the mix ratio of non delay...

Страница 862: ...dulatable control over wet dry balance For more information see OUTPUT on page 764 108 Early Reflections Hi Dens This early reflection effect has more precise early reflections with twice the maximum length of 107 Early Reflections You can create a very smooth and dense sound Pre EQ Trim 0 100 Sets the input level of EQ applied to the effect sound LEQ Fc Low Mid Low Selects the cutoff frequency lo...

Страница 863: ...se Selects the decay curve for the early reflections For more information see Type on page 852 ER Time msec 10 1600 Sets the time length of early reflection OUTPUT This is the standard effects output section with modulatable control over wet dry balance For more information see OUTPUT on page 764 ...

Страница 864: ...775 Exciter Blend 100 Sets the intensity depth of the Exciter effect p 775 OUTPUT This is the standard effects output section with modulatable control over wet dry balance For more information see OUTPUT on page 764 110 P4EQ Wah This effect combines a mono four band parametric equalizer and a wah You can change the order of the connection Routing Routing P4EQ Wah Wah P4EQ Changes the order of the ...

Страница 865: ... Dry modulation source for the wah Amount 100 Sets the Wet Dry modulation amount for the wah OUTPUT This is the standard effects output section with modulatable control over wet dry balance For more information see OUTPUT on page 764 111 P4EQ Chorus Flanger This effect combines a mono four band parametric equalizer and a chorus flanger PARAMETRIC EQ Trim 0 100 Sets the parametric EQ input level Ba...

Страница 866: ...rol over wet dry balance For more information see OUTPUT on page 764 112 P4EQ Phaser This effect combines a mono four band parametric equalizer and a phaser PARAMETRIC EQ Trim 0 100 Sets the parametric EQ input level Band1 Fc Hz 20 1 00k Sets the center frequency of Band 1 Q 0 5 10 0 Sets the bandwidth of Band 1 p 773 Gain dB 18 18 Sets the gain of Band 1 Band2 Fc Hz 50 5 00k Sets the center frequ...

Страница 867: ...ets the bandwidth of Band 2 p 773 Gain dB 18 18 Sets the gain of Band 2 Band3 Fc Hz 300 10 00k Sets the center frequency of Band 3 Q 0 5 10 0 Sets the bandwidth of Band 3 p 773 Gain dB 18 18 Sets the gain of Band 3 Band4 Fc Hz 500 20 00k Sets the center frequency of Band 4 Q 0 5 10 0 Sets the bandwidth of Band 4 p 773 Gain dB 18 18 Sets the gain of Band 4 MULTITAP DELAY Tap1 Time msec 0 0 1360 0 S...

Страница 868: ...quency Top 0 100 Sets the upper limit of the wah center frequency p 777 Resonance 0 100 Sets the resonance amount Low Pass Filter Check box Switches the wah low pass filter on and off Wet Dry Dry 1 99 99 1 Wet Sets the wah effect balance Source Off Tempo Selects the Wet Dry modulation source for the wah Amount 100 Sets the Wet Dry modulation amount for the wah OUTPUT This is the standard effects o...

Страница 869: ...rdrive Hi Gain Switches between overdrive and high gain distortion Drive 1 100 Sets the degree of distortion See DRIVE on page 789 Output Level 0 50 Sets the overdrive output level Source Off Tempo Selects the modulation source for the overdrive output level Amount 50 50 Sets the modulation amount of the overdrive output level Wet Dry Dry 1 99 99 1 Wet Sets the overdrive effect balance Source Off ...

Страница 870: ...in of Band 2 Band3 Fc Hz 300 10 00k Sets the center frequency of Band 3 Q 0 5 10 0 Sets the bandwidth of Band 3 p 773 Gain dB 18 18 Sets the gain of Band 3 Band4 Fc Hz 500 20 00k Sets the center frequency of Band 4 Q 0 5 10 0 Sets the bandwidth of Band 4 p 773 Gain dB 18 18 Sets the gain of Band 4 OUTPUT This is the standard effects output section with modulatable control over wet dry balance For ...

Страница 871: ...ets the Wet Dry modulation amount for the chorus flanger OUTPUT This is the standard effects output section with modulatable control over wet dry balance For more information see OUTPUT on page 764 119 Comp Phaser This effect combines a mono compressor and a phaser You can change the order of the effects Routing Routing Comp Phaser Phaser Comp Switches the order of the compressor and phaser p 860 ...

Страница 872: ...level LEQ Gain dB 15 15 Sets the gain of the Low EQ HEQ Gain dB 15 15 Sets the gain of the High EQ COMPRESSOR Sensitivity 1 100 Sets the sensitivity p 764 Attack 1 100 Sets the attack level p 764 Output Level 0 100 Sets the compressor output level p 764 MULTITAP DELAY Tap1 Time msec 0 0 1360 0 Sets the Tap1 delay time Tap2 Time msec 0 0 1360 0 Sets the Tap2 delay time Tap1 Level 0 100 Sets the Tap...

Страница 873: ...of Band 3 Q 0 5 10 0 Sets the bandwidth of Band 3 p 773 Gain dB 18 18 Sets the gain of Band 3 Band4 Fc Hz 500 20 00k Sets the center frequency of Band 4 Q 0 5 10 0 Sets the bandwidth of Band 4 p 773 Gain dB 18 18 Sets the gain of Band 4 OUTPUT This is the standard effects output section with modulatable control over wet dry balance For more information see OUTPUT on page 764 122 Limiter Chorus Fla...

Страница 874: ...langer Amount 100 Sets the Wet Dry modulation amount for the chorus flanger OUTPUT This is the standard effects output section with modulatable control over wet dry balance For more information see OUTPUT on page 764 123 Limiter Phaser This effect combines a mono limiter and a phaser You can change the order of the effects Routing Routing Limiter Phaser Phaser Limiter Switches the order of the lim...

Страница 875: ...766 Attack 1 100 Sets the attack time p 766 Release 1 100 Sets the release time p 766 Gain Adjust dB Inf 38 24 Sets the limiter output gain p 766 MULTITAP DELAY Tap1 Time msec 0 0 1360 0 Sets the Tap1 delay time Tap2 Time msec 0 0 1360 0 Sets the Tap2 delay time Tap1 Level 0 100 Sets the Tap1 output level p 832 Feedback 100 Sets the Tap2 feedback amount High Damp 0 100 Sets the damping amount in t...

Страница 876: ... of the effects Routing Routing Exciter Limiter Limiter Exciter Switches the order of the exciter and limiter EXCITER Pre EQ Trim 0 100 Sets the EQ input level LEQ Gain dB 15 15 Sets the gain of the Low EQ HEQ Gain dB 15 15 Sets the gain of the High EQ EXCITER Emphasis Frequency 0 70 Sets the frequency range to be emphasized p 775 Exciter Blend 100 Sets the intensity depth of the Exciter effect p ...

Страница 877: ...of the chorus flanger p 780 p 804 Source Off Tempo Selects the Wet Dry modulation source for the chorus flanger Amount 100 Sets the Wet Dry modulation amount for the chorus flanger OUTPUT This is the standard effects output section with modulatable control over wet dry balance For more information see OUTPUT on page 764 128 Exciter Phaser This effect combines a mono limiter and a phaser EXCITER Pr...

Страница 878: ...0 100 Sets the EQ input level LEQ Gain dB 15 15 Sets the gain of the Low EQ HEQ Gain dB 15 15 Sets the gain of the High EQ EXCITER Emphasis Frequency 0 70 Sets the frequency range to be emphasized p 775 Exciter Blend 100 Sets the intensity depth of the Exciter effect p 775 MULTITAP DELAY Tap1 Time msec 0 0 1360 0 Sets the Tap1 delay time Tap2 Time msec 0 0 1360 0 Sets the Tap2 delay time Tap1 Leve...

Страница 879: ...cy for Mid High EQ 2 peaking type Q 0 5 10 0 Sets the band width of Mid High EQ 2 p 773 Gain dB 18 18 Sets the gain of Mid High EQ 2 AMP SIM Amplifier Type SS EL84 6L6 Selects the type of guitar amplifier OUTPUT This is the standard effects output section with modulatable control over wet dry balance For more information see OUTPUT on page 764 131 OD Hi Gain Cho Flanger This effect combines a mono...

Страница 880: ...Invert Selects whether the chorus flanger output is mono or pseudo stereo For more information see Output Mode on page 857 When Routing is set to Flanger OD HG Output Mode will automatically be set to Normal Wet Dry Dry 1 99 99 1 Wet Sets the effect balance of the chorus flanger p 780 p 804 Source Off Tempo Selects the Wet Dry modulation source for the chorus flanger Amount 100 Sets the Wet Dry mo...

Страница 881: ...t Selects whether the phaser output is mono or pseudo stereo For more information see Output Mode on page 857 When Routing is set to Phaser Comp Output Mode will automatically be set to Normal Wet Dry Dry 1 99 99 1 Wet Sets the phaser effect balance p 780 p 806 Source Off Tempo Selects the Wet Dry modulation source for the phaser Amount 100 Sets the Wet Dry modulation amount for the phaser OUTPUT ...

Страница 882: ...p delay OUTPUT This is the standard effects output section with modulatable control over wet dry balance For more information see OUTPUT on page 764 134 Wah Amp Sim This effect combines a mono wah and an amp simulation You can change the order of the effects Routing Routing Wah Amp Amp Wah Switches the order of the wah and amp simulation WAH CONTROL Sweep Mode Auto Dmod LFO Selects the control fro...

Страница 883: ...is is the standard effects output section with modulatable control over wet dry balance For more information see OUTPUT on page 764 136 Decimator Comp This effect combines a mono decimator and a compressor You can change the order of the effects Routing Routing Decimator Comp Comp Decimator Switches the order of the decimator and compressor DECIMATOR Pre LPF Check box Enables and disables a filter...

Страница 884: ...effect combines a mono chorus flanger and a multitap delay CHORUS FLANGER Pre EQ Trim 0 100 Sets the EQ input level LEQ Gain dB 15 15 Sets the gain of the Low EQ HEQ Gain dB 15 15 Sets the gain of the High EQ LFO Waveform Triangle Sine Selects the LFO Waveform Frequency Hz 0 02 20 00 Sets the LFO speed FLANGER Delay Time msec 0 0 1350 0 Sets the delay time Depth 0 100 Sets the depth of LFO modulat...

Страница 885: ...balance p 780 p 806 CHORUS FLANGER Pre EQ Trim 0 100 Sets the EQ input level LEQ Gain dB 15 15 Sets the gain of the Low EQ HEQ Gain dB 15 15 Sets the gain of the High EQ LFO Frequency Hz 0 02 20 00 Sets the LFO speed Waveform Triangle Sine Selects the LFO Waveform FLANGER Delay Time msec 0 0 1350 0 Sets the delay time Depth 0 100 Sets the depth of LFO modulation Feedback 100 Sets the feedback amou...

Страница 886: ...urce that controls the gate when Envelope Select is set to Dmod Input Reverb Mix Dry 1 99 99 1 Wet This mixes the dry input and reverb output signals for controlling the gate Normally set Input Reverb Mix to Dry so that the gate is controlled only by the dry input If you wish to extend the gate time increase the Input Reverb Mix value to include some of the wet mix as well and adjust the Threshold...

Страница 887: ...Sets the bandwidth of Band 4 p 773 Gain dB 18 0 18 0 Sets the gain of Band 4 OUTPUT Pan L000 C064 R127 Sets the stereo image Wet Dry Dry 1 99 99 1 Wet Sets the balance between the effect and the dry input Source Off Tempo Selects a modulation source for Wet Dry Amount 100 Sets the modulation amount for Wet Dry Compressor Pre EQ Trim 0 100 Sets the EQ input level LEQ Gain dB 15 15 Sets the gain of ...

Страница 888: ...ets the degree of distortion Output Level 0 50 Sets the output level Source Off Tempo Selects the modulation source for the output level Amount 50 50 Sets the modulation amount of the output level EQ Low Fc Hz 20 1 00k Sets the center frequency for Low EQ shelving type Gain dB 18 18 Sets the gain of the Low EQ Mid1 Fc Hz 300 10 00k Sets the center frequency for Mid High EQ 1 peaking type Q 0 5 10 ...

Страница 889: ...3 OUTPUT Pan L000 C064 R127 Sets the stereo image Wet Dry Dry 1 99 99 1 Wet Sets the balance between the effect and the dry input Source Off Tempo Selects a modulation source for Wet Dry Amount 100 Sets the modulation amount for Wet Dry Phaser LFO Waveform Triangle Sine Selects the LFO Waveform Frequency Hz 0 02 20 00 Sets the LFO speed PHASER Manual 0 100 Sets the frequency to which the effect is...

Страница 890: ...ge 877 142 P4EQ Comp This effect connects a four band EQ and a compressor in parallel The pan and effect balance can be adjusted independently for each For detailed information on the effects parameters see 4 band EQ on page 877 and Compressor on page 877 143 P4EQ Limiter This effect connects a four band EQ p 877 and a limiter p 877 in parallel The pan and effect balance can be adjusted independen...

Страница 891: ...ers see 4 band EQ on page 877 and WAH on page 878 147 P4EQ Chorus Flanger This effect connects a four band EQ and a chorus flanger in parallel The pan and effect balance can be adjusted independently for each For detailed information on the effects parameters see 4 band EQ on page 877 and Chorus Flanger on page 879 Left Right Wet Dry Pan Wet Dry Pan Stereo In Stereo Out Trim Exciter Parametric 4Ba...

Страница 892: ...page 877 151 Comp Limiter This effect connects a compressor and a limiter in parallel The pan and effect balance can be adjusted independently for each For detailed information on the effects parameters see Compressor on page 877 and Limiter on page 877 Left Right Wet Dry Pan Wet Dry Pan Stereo In Stereo Out Trim Parametric 4Band EQ Phaser Parametric 4Band EQ Phaser Resonance LFO Tri Sine Left Rig...

Страница 893: ...page 878 155 Comp Chorus Flanger This effect connects a compressor and a chorus flanger in parallel The pan and effect balance can be adjusted independently for each For detailed information on the effects parameters see Compressor on page 877 and Chorus Flanger on page 879 Left Right Wet Dry Pan Wet Dry Pan Stereo In Stereo Out Trim LEQ HEQ Output Level Envelope Control Compressor Compressor Exci...

Страница 894: ...eters see Limiter on page 877 159 Limiter Exciter This effect connects a limiter and an exciter in parallel The pan and effect balance can be adjusted independently for each For detailed information on the effects parameters see Limiter on page 877 and Exciter on page 878 Left Right Wet Dry Pan Wet Dry Pan Stereo In Stereo Out Phaser Phaser Resonance LFO Tri Sine Trim LEQ HEQ Output Level Envelope...

Страница 895: ... parameters see Limiter on page 877 and Chorus Flanger on page 879 163 Limiter Phaser This effect connects a limiter and a phaser in parallel The pan and effect balance can be adjusted independently for each For detailed information on the effects parameters see Limiter on page 877 and Phaser on page 879 Left Right Wet Dry Pan Wet Dry Pan Stereo In Stereo Out Gain Adjust Envelope Control Limiter L...

Страница 896: ...parameters see Exciter on page 878 and OD HI GAIN on page 878 167 Exciter Wah This effect connects an exciter and a wah in parallel The pan and effect balance can be adjusted independently for each For detailed information on the effects parameters see Exciter on page 878 and WAH on page 878 Left Right Wet Dry Pan Wet Dry Pan Stereo In Stereo Out Multitap BPM Delay Feedback High Damp Delay 2 1 Tem...

Страница 897: ... the effects parameters see Exciter on page 878 and Multi tap BPM Delay on page 879 171 OD Hi Gain OD Hi Gain This effect connects two overdrives in parallel The pan and effect balance can be adjusted independently for each For detailed information on the effects parameters see OD HI GAIN on page 878 Left Right Wet Dry Pan Wet Dry Pan Stereo In Stereo Out Trim LEQ HEQ Chorus Flanger Chorus Flanger...

Страница 898: ...BPM Dly This effect connects an overdrive and a multitap BPM delay in parallel The pan and effect balance can be adjusted independently for each For detailed information on the effects parameters see OD HI GAIN on page 878 and Multi tap BPM Delay on page 879 Left Right Wet Dry Pan Wet Dry Pan Stereo In Stereo Out Overdrive Hi Gain Wah Auto Wah Wah D mod LFO Sweep Mode Envelope Output Level 3 Band ...

Страница 899: ...ah Multitap BPM Dly This effect connects a wah and a multitap BPM delay in parallel The pan and effect balance can be adjusted independently for each For detailed information on the effects parameters see WAH on page 878 and Multi tap BPM Delay on page 879 D mod D mod Left Right Wet Dry Pan Wet Dry Pan Stereo In Stereo Out Wah Auto Wah Wah LFO LFO Sweep Mode Sweep Mode Envelope Envelope Wah Auto W...

Страница 900: ...multitap BPM delay in parallel The pan and effect balance can be adjusted independently for each For detailed information on the effects parameters see Chorus Flanger on page 879 and Multi tap BPM Delay on page 879 Left Right Wet Dry Pan Wet Dry Pan Stereo In Stereo Out Chorus Flanger Chorus Flanger Chorus Flanger Feedback LFO Tri Sine Trim LEQ HEQ Chorus Flanger Feedback LFO Tri Sine Trim LEQ HEQ...

Страница 901: ...ects two multitap BPM delays in parallel The pan and effect balance can be adjusted independently for each For detailed information on the effects parameters see Multi tap BPM Delay on page 879 Left Right Wet Dry Pan Wet Dry Pan Stereo In Stereo Out Phaser Phaser Phaser Resonance LFO Tri Sine LFO Tri Sine Phaser Resonance Left Right Wet Dry Pan Wet Dry Pan Stereo In Stereo Out Phaser LFO Tri Sine ...

Страница 902: ...Effect Guide 892 ...

Страница 903: ...meter value of the GE parameters You can use the 7 5 GE Real Time Parameters page to check the group name and parameter name of the GE parameter you wish to look up and then find it in the GE Guide Here s an example from Program mode Access the Program 7 5 GE Real Time parameters page and display the GE parameters in the LCD screen For more information see 7 5 GE Real Time Parameters on page 110 T...

Страница 904: ...1 2 and 3 are controlled No VE Velocity TA Tempo Absolute TR Tempo Relative PB Pitch Bend DU Duration RT Repeat Time 000 121 CC 000 121 Drum parameter name Pat Parameters of the Drum Group also indicate the drum pattern being controlled by that GE parameter Some parameters in the Drum Group that are not related to the individual Drum Patterns will not display this information Display example 1 Pat...

Страница 905: ...sound of a specific musical instrument and these relationships remain fixed no matter how many times you play back the performance For example in most if not all auto accompaniment instruments to achieve a variation in the accompaniment pattern the instrument essentially switches to a different pre recorded sequence of musical events again with specific relationships that are fixed in the data In ...

Страница 906: ... 1 Phase 1 Phase 1 Phase 1 Phase 1 Phase 1 Phase 2 Phase 2 Phase 2 Phase 2 Phase 2 Phase 2 WaveSeq Phase 1 Phase 2 Note Series Drum Pattern 1 Drum Pattern 2 Drum Pattern 3 DATA to be read out of GE Generated Effect KARMA Module A KARMA Module B KARMA Module C KARMA Module D GE Parameters KARMA Module Parameters GE Number KARMA Module Real Time Parameters Dynamic MIDI Program KARMA Module A Combina...

Страница 907: ...Patterns but also to create controlled musical patterns Effects are generated based on the Rhythm Pattern as it relates to the clock source or tempo envelope Riffs based on the notes in the Note Series can be applied as pitch bend to create wave sequence and other unique effects and also to control other things such as the length of Phases 3 Real Time Different from the previous types in that the ...

Страница 908: ...etrigger when entering Phase2 Same as CC T above with the exception that the pad will be retriggered when striking the keyboard and every time that the Phase Pattern enters a step containing Phase 2 You can use this to have the notes retriggered occasionally while moving through the Phase Pattern 5 CC A sustain notes retrigger when entering any Phase Same as CC T above with the exception that the ...

Страница 909: ...y late as a result of Humanize it is possible for overlapping repeated notes to arrive slightly before them and then the main notes get masked out while the repeated notes take precedence Since Humanize is a randomly varied amount this results in a completely unpredictable sequence of notes in this case that cannot produce consistent results By removing the Humanize amount when Force Mono is on wi...

Страница 910: ...arent if the Note Series is being applied as pitch bend in the Phase Group Bend Group or riff length is being used in the Drum Group The following 3 parameters will have an effect on when Phases change if the Phase Length Mode p 905 is set to 0 AC Actual Replications p 901 Filter Steps Filter Template and Filter Dupes See Phase Group Note Type 0 9 Selects one of several modes for supplying the ini...

Страница 911: ... semitones prior to the creation of the Note Series The transposed input notes are then replicated and shifted according to the other parameters described below This can be used in conjunction with other Note Series Parameters to shift and flip the Note Series into other configurations or inversions in real time Inversion 24 24 Allows different inversions of the input notes after they are sorted p...

Страница 912: ...rtain range Voicing 0 8 Selects one of several options for spreading out the input notes before creating the Note Series This can be used to widen the voicing create guitar like voicings or produce interesting variations 0 Closed The Note Series is created with no further modification from this setting 1 Open 1A 8 Open4B The Note Series has certain notes shifted up by an octave as it is created th...

Страница 913: ...gs of the GE while still allowing a wide variety of Filter Templates to be substituted In this case the available range is 1 77 You can assign the full range of all 77 Templates with indicating Restore or only a portion of the range and still have the ability to restore the original internal settings About Filter Steps A 12 step grid corresponds to the scale tones with regard to a current key whic...

Страница 914: ... will start when it is triggered Closer to 0 starts nearer the beginning while closer to 100 starts nearer the end beginning end relates to highest lowest depending on the Phase Direction p 906 setting This can be applied just once when first triggering the effect or as various steps of the Phase Pattern are entered in conjunction with the Start Mode described below Not available when GE Type p 89...

Страница 915: ...he setting of the Cycle Mode parameter described below Useful for constraining effects to a certain number of specific events such as 4 strums per Phase Cycle Mode 0 3 Determines what will happen when either end of the playback portion of the Phase specified by the Phase Beginning End Offsets p 907 and or the length of the Note Series is reached during note generation If the Length Mode is 1 TS Ti...

Страница 916: ...be transposed individually This applies to each time the Phase occurs in the overall Phase Pattern unlike the Step Transpose Value Has no effect on Direct Indexing effects which have a separate Transpose parameter see Direct Index Group or when GE Type p 897 2 Generated Drum The Phase Transpose value is cumulative with the Step Transpose value discussed above For example if a Step Transpose Value ...

Страница 917: ...if the End Loop On Off is set to 0 Off End Loop Length 1 96 Determines how many events notes or clusters will be moved forward backward while looping according to various other parameters such as the Index Pattern Not available if the End Loop On Off is set to 0 Off Pattern Parameters Pattern Items 1 16 steps Sets the number of steps in the Phase Pattern Pattern Step1 16 0 1 Sets which phase Phase...

Страница 918: ...rectly accessible in each Phase Pattern Step as a GE RT Parameter it may be set as part of a GE and varied by the following two GE RT Parameters Step Transpose On Off 0 1 Allows the effect of the Step Transpose Values in each Phase Pattern Step to be turned on or off for the entire Phase Pattern Step Transp Template 0 17 Allows one of 18 different templates for the 16 steps of a Phase Pattern to b...

Страница 919: ...possibility of a random offset in time of between 0 to 10 ms This affects all of the notes in the cluster at the same time This can be used to impart a more human less machine like precision to generated notes This can also be used to totally destroy the timing Swing Note Value 0 3 Selects the base note value to be used in calculating swing For example if you want to add a swing feel to a steady s...

Страница 920: ...ings for the whole effect For example if generating 16th notes in both phases with both Phase s Rhythm Multipliers set to 100 and Swing Note Value set to 1 16th note the resulting 16th notes will be swung with a 16th note feel If Phase 1 s Rhythm Multiplier is changed to 200 the resulting 8th notes in Phase 1 and 16th notes in Phase 2 will all be swung with an 8th note feel If the Rhythm Multiplie...

Страница 921: ... will be logarithmically weighted towards the shorter rhythms With a negative Factor choices will be logarithmically weighted towards the longer rhythms 2 Exp S Exponential S With a positive Factor choices will be exponentially weighted towards the middle rhythms and away from the shorter and longer rhythms With a negative Factor choices will be exponentially weighted towards the shorter and longe...

Страница 922: ...nd using a Multiplier of 150 changes it to dotted 8th dotted Qtr dotted Qtr Straight Multipliers 0 5 Selects from a quantized set of straight values for the Rhythm Multiplier field In other words when applied to a Rhythm Pattern containing values such as 16th notes the resulting rhythmic values will be straight values such as 8th notes quarter notes etc Straight Trip Mults 0 10 Selects from a quan...

Страница 923: ... assigned as a GE Real Time Parameter you specify a range where the Min Value restores the internal settings and the rest of the range selects Templates replacing the internal settings So if the Min value was 5 and the Max value was 10 choosing 5 would restore the internal settings and 6 through 10 would select the corresponding Rhythm Template You can use this to keep the internal settings of the...

Страница 924: ...in the 2nd column yields either an 8th note or two 16th notes When at least one random tie has been selected a weighting curve is available which allows choices to be slanted towards more ties or less ties as described later ties abs Absolute Tie always ties the rhythmic value in same column to the previous column s rhythmic value For example a 16th note in the first column followed by a 16th note...

Страница 925: ...ring of 16th notes separated by 16th note rests each 8th note will have the duration of a 16th note or 50 Note that this value is therefore relative to tempo 6 Pattern Overlap Duration Value 500 500 ms The Duration Pattern is used to construct a Duration Pattern in a similar fashion to the Rhythm Pattern Each step in the pattern indicates the duration for notes that are currently to be generated T...

Страница 926: ...es Weighting Curve The following table summarizes the effect of the various Weighting Curves and the Factor field on random ties Associated Parameters Template Parameters The two Template Parameters select from 63 or 64 different Duration Pattern Templates and load the parameters into the current Phase s Pattern Grid and associated parameters A Duration Pattern Template consists of the configurati...

Страница 927: ... not set to 0 AC Actual since in this mode it waits for the end of the Note Series to be reached and this will never happen if there is no forward movement A Index Pattern will loop as long as note generation continues It normally will not reset to the beginning of the Pattern unless a new Trigger is received or the Phase Pattern has been configured to restart it at the beginning of certain Phases...

Страница 928: ...uster Each time a note cluster of notes or group of drum notes is generated one Index Pattern Value will be chosen for the resulting note or cluster of notes after which the Index Pattern advances to the next value For example a cluster of six notes will all be generated from the next six adjacent notes in the Note Series or Drum Pattern and advance the pattern by one to the next step In other wor...

Страница 929: ...ecomes available and the index will be doubled by the interval indicated and generated again thereby generating twice as many notes at a time This will also cause any clusters to be doubled Note When using Double and Invert at the same time four times as many notes will be generated Double Amount 0 12 This parameter becomes available when Double is 1 On The index will be doubled by the interval in...

Страница 930: ... An Index Pattern Template consists of the configuration of the Index Pattern Grid Random Weighting Parameters Template 1 63 p 912 Rhythm Group Template Template Restore 0 As Stored 63 p 913 Rhythm Group Template Restore ...

Страница 931: ... will not reset to the beginning of the Pattern unless a new Trigger is received or unless the Phase Pattern has been configured to restart it at the beginning of certain Phases This means that a four step Rhythm Pattern can be looping while an eight step Velocity Pattern and a twelve step Cluster Pattern are also independently looping for example Strum 0 1000 ms Sets the value in milliseconds tha...

Страница 932: ...n page 961 The following table summarizes the effect of the various Weighting Curves and the Factor field on the choices from the Cluster Pattern Pools Associated Parameters Template Parameters The two Template Parameters select from 63 or 64 different Cluster Pattern Templates and load the parameters into the current Phase s Pattern Grid and associated parameters A Cluster Pattern Template consis...

Страница 933: ...Mode is 2 Constant the Velocity Value parameter is available 0 Actual The actual velocities received are used as the Initial Velocity for each note as they are generated Loud notes and their generated counterparts will play loud and vice versa The Velocity Range Bottom and Top parameters are operable allowing you to scale the amount of sensitivity 1 Average The notes received as input have their v...

Страница 934: ...rn grids cannot be viewed or edited on the OASYS Random Weighting Parameters The Random Weighting Parameters are made available when at least one step column in the Velocity Pattern has multiple values selected constituting a random pool of values p 911 Rhythm Group Random Weighting Parameters Pools Pools Random Factor 99 99 p 911 Rhythm Group Pools Random Factor Pools Weighting Curve 0 3 For more...

Страница 935: ...de to disappear or drop out using large positive values large negative values with a very soft initial velocity can create interesting reversed effects Note that this can be used to increase the resolution of the Velocity Pattern Grid for example at 100 the offsets match the values displayed on the vertical axis at 50 the offsets would be divided by two for a difference of four between each value ...

Страница 936: ...se Group has been configured to restart it at the beginning of certain Phases This means that a four step CC Pattern can be looping while an eight step Velocity Pattern and a twelve step Cluster Pattern are also independently looping for example Pattern Grid Associated Parameters CC grid when being used for CCs or Pitch Bend CC Pattern A CC Pattern represents a series of values indicating a MIDI C...

Страница 937: ... in two different directions Random Weighting Parameters The Random Weighting Parameters are made available when at least one step column in the CC Pattern has multiple values selected constituting a random pool of values For more information see Rhythm Group on page 909 and Random Weighting Parameters Pools on page 911 Pools Random Factor 99 99 For more information see Rhythm Group on page 909 an...

Страница 938: ...e in a cluster or each note of a drum pattern that is generated simultaneously can be given its own CC value but only if your synth supports this type of behavior This will also affect the Note Number Pattern Type options If 0 Single a cluster of notes will be preceded by one CC value according to the pitch of the first note if 1 Multi each note will get a corresponding CC value For example if gen...

Страница 939: ...nature and has more passing tones than 1 Scalic Will not have any effect unless internal settings of the GE specify that Pitch Offsets are being used Template Parameters The two Template Parameters select from 63 or 64 different CC Pitch Pattern Templates and load the parameters into the current Phase s Pattern Grid and associated parameters A CC Pitch Pattern Template consists of the configuratio...

Страница 940: ... either by varying the Wave Offset parameter or by tracking it with the keyboard Since the results are totally dependent on the destination synth s waveform order completely unexpected and unplanned results can be achieved that would be impossible to get any other way For example a WaveSeq Pattern of mallet like sounds could be shifted instantly into a group of guitar or industrial noise waveforms...

Страница 941: ...sc 1 2 are changed as specified by the Pattern with the same values For example you can set up a complex pattern of up to 16 waveforms in Phase 1 and a different complex pattern with different waveforms in Phase 2 and let the Phase Pattern control switching between them Every time Osc 1 is changed Osc 2 will also change to the same waveform Pattern Grid Associated Parameters A WaveSeq Pattern spec...

Страница 942: ...attern that is loaded even when changing Waveform Templates set this to 32 Random Weighting Parameters The Random Weighting Parameters are made available when at least one step column in the WaveSeq Pattern Grid contains multiple values selected constituting a random pool of values Whenever a random pool is encountered in playing through the pattern a random choice is made from the values in that ...

Страница 943: ...WaveSeq Group Associated Parameters 933 Template Restore 0 As Stored 63 For more information see Rhythm Group on page 909 and Template Restore on page 913 ...

Страница 944: ... value the envelope will produce is the Initial Velocity received However when low Initial Velocities are received the Envelope is automatically scaled so that a consistent shape is maintained regardless of the value In other words the Envelope will be compressed to the degree that the Initial Velocity is less than 127 For more information on Initial Velocity see Velocity Group Velocity Mode When ...

Страница 945: ...he length of the Duration Pattern Value represents the maximum duration and the envelope s 0 99 range represents 0 100 of that value with 1 ms being the minimum duration To adjust the minimum duration you would adjust the envelope s level settings to only move between the higher values i e 50 99 Timed Duration Value range 1 5000 ms The Duration Value represents the maximum duration in milliseconds...

Страница 946: ...resulting envelopes to be slower faster Note that if the Phase Length Mode is set to 1 TS Time Signature then the length of a Phase is determined by the Time Signature and not the number of notes played so the results of setting this to 0 R Riff Length may not be noticeable in that case Attack Smooth 0 1 When set to 0 Off retriggering an envelope will start it at its preset Start Level regardless ...

Страница 947: ...r CC 11 Expression Level Combinations Sta Att Level Start Attack Level 0 99 Controls an Envelope s Start and Attack Levels at the same time both will be set to the same value Sta Sus Level Start Sustain Level 0 99 Controls an Envelope s Start and Sustain Levels at the same time both will be set to the same value Sta Rel Level Start Release Level 0 99 Controls an Envelope s Start and Release Levels...

Страница 948: ...y Release Time 0 99 Controls an Envelope s Decay and Release Times at the same time both will be set to the same value All Times 0 99 Controls an Envelope s Attack Decay and Release Times at the same time all will be set to the same value ...

Страница 949: ...ated may each start strings of repeating notes When the GE Type is 3 Real Time the actual input notes may each start strings of repeating notes Repeats can not be generated when GE Type 1 Generated Gated and Gate Type p 897 is one of the CC Types since notes are not actually generated in this mode but a sustained set of notes is manipulated by a selected CC i e chopped by CC 11 Expression General ...

Страница 950: ...he amount by which each successive repeated note changes in velocity Negative numbers cause the delayed notes to decrease in volume more common while positive numbers cause the delayed notes to increase in volume Interesting effects can be created by a combination of a high negative Initial Velocity i e 120 and a small positive Decay i e 4 Note that this operates in conjunction with the Velocity P...

Страница 951: ... next chord note will discard any pending repeated notes Note A MIDI Controller can also be assigned to perform the stopping of repeats by using the Repeat Stop Dynamic MIDI Destination PG p 237 When a Dynamic MIDI destination 7 7 Dynamic MIDI Destination is set to Trigger Notes or Trigger Notes Envs Stop Mode also applies to whether the repeats will be stopped when triggered by the Dynamic MIDI a...

Страница 952: ...that are being transposed The Bottom and Top values are Note Numbers in the range 0 127 C 1 G7 When the pitches of repeated notes exceed this range the setting of the Rebound parameter comes into effect Note These settings are only effective when the Range Mode parameter is 0 Absolute Range Bottom Rel 64 63 semitones Range Top Rel 64 63 semitones Specifies a relative sliding pitch range within whi...

Страница 953: ...T parameter 4 As Played Delay No Overlap The original note will have the duration as played and so will the delays as long as they are shorter than the repeat time If the original note is longer than the repeat time it will not get cut off but the delays will limit their lengths to the repeat time Duration Value RT 2 5000 ms Specifies the length of the durations of the repeated notes in millisecon...

Страница 954: ...ats will be triggered when the key s are released so they will be quantized together at that point to occur simultaneously anyway with no slop But depending where you released them overall in time they may be out of sync with the rhythm or groove that may be being generated This corresponds to the Chord Quantize RT setting of 0 Off When Chord Quantize RT is set to 1 On the release and generation o...

Страница 955: ...ing 0 12 12 12 12 semitones Bends each note the selected semitone size 13 Next Note Bends each note to what will be the next note For example if the notes to be generated were C E G B C then the C will bend to the E the E will bend to the G etc This is very useful for simulation of portamento or effects like sliding from one bass note to another within a phrase 14 Next Note 1 Bends each note to wh...

Страница 956: ...Next Previous Note Bending is selected it will alternate between Next and Previous For example if 13 Next Note is selected in the size Menu then the bends will be Next Prev Next Prev etc Step Mode 0 12 Sets whether the bends will be smooth continuous or divided into steps glissando bends 0 Smooth Bends will be continuous with a value sent out every n milliseconds as specified by the Rate parameter...

Страница 957: ...wo different bending effects 0 Generated generate shape for each note Causes bending to be generated for each drum note the same as with any other GE Type All of the parameters described above operate as described 1 Arpeggiated use Note Series for stepped bends Disables most of the other bend parameters and instead uses the pitches of the notes in the Note Series to generate stepped pitch bend seq...

Страница 958: ...1 Up When 24 Off no delay is added Rel Delay Damping RT 0 1 When 1 On starting new notes while others are still sustaining because of a delayed note off from the Rel Delay Length RT parameter above will shut the sustaining notes off This is useful for creating monophonic style bending effects using Key Mode RT and Rel Delay Length RT When 0 Off the notes are allowed to overlap Vel Range Bottom RT ...

Страница 959: ...r Percussion Pattern etc They normally will not reset to the beginning of the Pattern unless a new Trigger is received or unless the Phase Pattern has been configured to restart them at the beginning of certain Phases This also means that a sixty four step Drum Pattern can be looping while an eight step Velocity Pattern and a twelve step Cluster Pattern are also independently looping for example T...

Страница 960: ...hythm Group This means that each Drum Pattern can have a different Rhythm Multiplier p 912 For example if you set the Rhythm Pattern to 32nds you could drive one Drum Pattern with a Rhythm Multiplier of 100 at 32nd note speed and another Drum Pattern at 200 for 16th note speed If they were the same number of steps it would take twice as long to perform the entire 16th based pattern as the 32nd bas...

Страница 961: ...earest octave or fifth so that when being changed by a KARMA Real time Control only transposition by octaves or fifths is possible In this case the value of the parameter changes by semitones but the actual transpose value will only change at certain points within the range Note Series Length 0 1 When 1 On the Pattern uses the GE s actual Note Series Length as the length of the Drum Pattern For ex...

Страница 962: ...ted Parameters Pools Poly 0 1 Chooses one of 2 modes of operation for the entire grid when columns contain more than one Drum Sound and or a rest 0 Poly If there is more than one Drum Sound selected in a column and no rest then all of the Drum Sounds at that step will be played if you had a kick snare and hi hat in the same column all 3 would be played when that step was reached This is the typica...

Страница 963: ...ly Note The Root Position parameter PG p 104 can be used to cause different inversions of the same chord to always transpose the notes as if the chord was played in root position Link To Next 0 1 The 3 Drum Patterns can be linked together to form longer Drum Patterns in this case they do not play simultaneously but back to back Drum Pattern 1 can be linked to Drum Pattern2 Drum Pattern 2 can be li...

Страница 964: ...ating new variations often with a free form improvisational feel While quite useful this can often feel too syncopated as the pattern can become completely disconnected from its original placement However as playback of the Phase Pattern enters a particular step if the Resync Index button ri is On then the selected Drum Pattern s playback index will be reset to the position that it normally would ...

Страница 965: ...associated parameters Each Drum Template Bank contains 63 or 64 different Drum Pattern Templates A Drum Pattern Template consists of the configuration of the Drum Pattern Grid poly pools setting the 7 choices in the Drum Sounds menus Random Weighting Parameters Pools if applicable Random Weighting Parameters Rest if applicable the setting of the Always Column Template Bank 1 3 1 63 p 912 Rhythm Gr...

Страница 966: ...ndexes in a way that prevents adjacent controller indexes from selecting the same note In addition in the case of using a CC to sweep through the Note Series values that would cause duplicate notes will be filtered out This means you can comfortably use a CC with a range of 0 127 to sweep through a 15 note Note Series 0 Top If the length of the Note Series is greater than the range of the selected...

Страница 967: ...ffset CCs 0 200 When a CC such as a joystick or ribbon is being used as a Direct Index controller there is no velocity associated with moving it so the last received keyboard velocity is used or a default Velocity Offset CCs specifies an amount by which the velocity of the indexed notes will be offset from the GE s internal velocity setting This allows you to make them a bit softer or louder than ...

Страница 968: ...Bend Group However the bend specified here will only happen for Direct Indexing notes This means that a GE can have one type of Auto Bend effect for notes that are being generated and a different Auto Bend effect for Direct Index notes Alternatively Direct Indexing notes can have bending while notes generated automatically by the same GE do not etc There are several differences between Direct Inde...

Страница 969: ...an up or down bend depending on how the Note Series is constructed and sorted For example if the Note Series contains C E G B C then when the B is Direct Indexed it will bend to the E 18 Prev Index 2 Bends each note to the index in the Note Series that is 3 indexes backward note that this may be an up or down bend depending on how the Note Series is constructed and sorted For example if the Note S...

Страница 970: ...ay next However by using the Bend Direction parameter you can bend either To the previous note or From the previous note to the one you are playing now The Bend Shape you are using probably determines which one makes more sense For example for Hammer ons you will probably want to bend To the previous note because the Hammer Shape bends it back afterwards while for the Bend Shape you will probably ...

Страница 971: ...ion following the End setting and is determined by a ratio of the Width Even when Width is at 100 and the Hammer On and Hammer Off Bends are instantaneous the final 3rd bend will still be an audible bend The following diagrams illustrate the shape of a Hammer Bend A Hammer is the same thing without the final 3rd bend at the end Hammers and Hammer Bends follow the same behavior with Duration as dis...

Страница 972: ...hted towards the lower and upper values in the pool and away from the values in the center of the pool Using negative Factors not only inverts but rotates the curve The following table summarizes the effect of the Factor field on the curves and the pools Exponential Curves with Positive Negative Factors Exp Factor choose from upper values more often Exp S Factor choose from center values more ofte...

Страница 973: ...the top and bottom curves in both the Log and Exp diagrams Factor 40 and 40 above are shown together below Y CURVE LOG Factor 40 X Factor 20 Factor 10 Factor 0 Factor 10 Factor 20 Factor 40 Y CURVE LOG S Factor 40 X Factor 20 Factor 10 Factor 0 Factor 10 Factor 20 Factor 40 Y CURVE EXP Factor 40 X Factor 20 Factor 10 Factor 0 Factor 10 Factor 20 Factor 40 X Axis random choice with equal probabilit...

Страница 974: ...p 75 chance of a choice from the lower 10 of the pool 25 chance of a choice from the upper 90 of the pool Logarithmic Curve Log 90 chance of a choice from the lower 25 of the pool 10 chance of a choice from the upper 75 of the pool In general as the negative factor decreases the Exp Curve will produce choices more from the very lowest part of the pool with a choice from the remaining portion more ...

Страница 975: ...combine two AMS sources into one or process an AMS source to make it into something new For instance they can add two AMS sources together or use one AMS source to scale the amount of another You can also use them to change the shapes of LFOs and EGs in various ways modify the response of realtime controllers and more The AMS Mixer outputs appear in the list of AMS sources just like the LFOs and E...

Страница 976: ...y Mod Intensity Mod Pan Mod Pan Mod Intensity Mod Intensity Mod Intensity Mod Multi Filter Mode1 2 Xfade Intensity Mod Intensity Mod Intensity Mod Intensity Mod Common LFO Amp Mod 2 Intensity Mod Intensity Mod Level Mod Time Mod 1 Time Mod 2 Time Mod 3 EG4 EG3 EG2 EG1 Amp EG Intensity Mod Filter LFO Mod Filter EG Mod Common Step Seq Reset Mod AMS Input Start Mod Step Seq Reset Mod AMS Input Start ...

Страница 977: ...ed intensity Foot Pedal CC 04 This AMS source receives MIDI CC 04 It can also be generated by a foot pedal connected to the rear panel ASSIGNABLE PEDAL input if the Global Foot Pedal Assign parameter is set to Foot Pedal CC 04 For more information see Foot Pedal Assignments on page 982 Ribbon CC 16 This is the side to side movement of the ribbon controller which corresponds to MIDI CC 16 Value Sli...

Страница 978: ...ch is the default for assignable front panel switch 1 SW1 To use SW1 and SW2 as AMS sources 1 Go to the Set Up Controllers page 2 Under Panel Switch Assign assign SW1 to SW1 Mod CC 80 and SW2 to SW2 Mod CC 81 These assignments are stored separately for each Program Combination and Song For more information see SW1 2 Assignments on page 979 SW2 Mod CC 81 This isCC 81 which is the default for assign...

Страница 979: ... the output of the oscillator s Filter EG For more information see 3 4 Filter1 EG on page 68 Amp EG This is the output of the oscillator s Amp EG For more information see 4 3 Amp1 EG on page 78 LFO1 2 These are the outputs of the oscillator s two LFOs For more information see 5 1 OSC1 LFO1 on page 83 Common LFO This is the output of the Common LFO which is shared by all voices of both oscillators ...

Страница 980: ...se are the String Track generators for Damping and Dispersion which can be used as AMS sources elsewhere in the STR 1 For more information see String Track on page 252 String Track1 2 These are the assignable String Track generators 1 and 2 For more information see 9 9 String Track on page 276 Fret Position The Fret Position is mostly used to shift the relationship between incoming notes and the S...

Страница 981: ... sequencer HD 1 AMS AMS source value range Amp EG 0 99 Pitch Filter EGs 99 0 99 LFO1 2 99 0 99 Common LFO 99 0 99 Filter Amp Key Track 99 0 99 Common Key Track 1 2 99 0 99 Wave Seq AMS Out 1 2 99 0 99 Note Number C 2 C4 C9 EXT 1 Max 0 Max EXT Tempo 2 60 120 240 EXT 3 0 127 Parameter AMS Intensity Pitch 4 12 00 0 1 Octave 1 0 1 Octaves Filter EG as AMS dedicated parameter for Pitch EG dedicated par...

Страница 982: ...h EG to a maximum of 1 octave If Intensity has a negative value the effect of the Pitch EG will be inverted Pitch LFO 1 2 Intensity Program 2 2c Pitch modulation intensity of the LFO1 2 can be controlled by the wave sequence s AMS Out Common LFO an EG keyboard tracking controllers or tempo etc If you select EG as the AMS the pitch change width of LFO modulation etc can be controlled in synchroniza...

Страница 983: ...eparately for Filter A and B You can set AMS to a controller and operate the controller only when desired to control the depth of the filter sweep produced by the Common LFO Driver Drive Program 4 1a Driver Low Boost Program 4 1a You can use the wave sequence s AMS Out EG LFO keyboard tracking controllers and tempo etc to control the driver s boost and low boost Although you can use separate AMS t...

Страница 984: ...each EG segment Attack Decay Slope Release EG times are determined by the Alternate Modulation value when the preceding point is reached For example the Alternate Modulation value at the moment the envelope reaches the attack level will determine the decay time If Intensity is set to a value of 8 17 25 33 41 or 49 the corresponding time can be multiplied by a maximum of 2 4 8 16 32 or 64 times or ...

Страница 985: ...ate 1 you can make the Common LFO reset when a note is played from a state in which all notes are off For example this will ensure that a filter sweep always starts from the same place You can set AMS to a controller such as JS Y and operate the controller when you want to reset the LFO ...

Страница 986: ...ax Zero Higher D mod Dry Wet 60 40 10 90 Dynamic Modulation Example Wet Dry 10 90 Amt 50 Wet Dry 60 40 Amt 50 Off dynamic modulation is not used Gate1 note on off p 977 Gate1 Damper note on damper on off p 977 Gate2 note on off retrigger p 977 Gate2 Damper note on damper on off retrigger p 977 Note Number note number Velocity Velocity Exponential Velocity exponential velocity p 977 After Touch aft...

Страница 987: ... Amount is set to a positive value rotating the knob toward the right will produce a positive change in the effect and rotating it toward the left will produce a negative change With negative settings the opposite effect will result Knob Mod 5 CC 17 Knob Mod 6 CC 19 Knob Mod 7 CC 20 Knob Mod 8 CC 21 These differ from Knob Mod 5 CC 17 Knob Mod 8 CC 21 in the knob position and direction of the effec...

Страница 988: ... modulation will be zero at 120 BPM the maximum positive value at 240 BPM and the maximum negative value at 60 BPM Many effects LFOs and delays can also be synchronized to tempo For more information see Tempo Synchronization on page 729 ...

Страница 989: ...o will always be off Octave Down When the switch is on LED lit the pitch will be transposed down by one octave Octave Up When the switch is on LED lit the pitch will be transposed up by one octave Lock functions The Lock functions let you use SW1 or SW2 to lock the current position of the joystick or ribbon controller or the current aftertouch value This leaves your hands free to play on the keybo...

Страница 990: ...the panning after the last Insert Effect in the chain and transmits CC 8 Pan CC 10 Controls stereo pan and transmits CC 10 Expression CC 11 Expression is a secondary volume control which you can use to scale level without affecting the main volume settings or CC 7 values When used one at a time MIDI Volume and Expression affect level in exactly the same way a MIDI value of 127 is equal to Program ...

Страница 991: ...affects both Filters A and B Knob3 EG INTENSITY Filter EG Intensity CC 79 This scales the effect of the Filter EG on the cutoff frequency It affects all of the filters at once for instance in the HD 1 it affects both Filters A and B Knob4 EG RELEASE Filter Amplifier EG Release CC 72 This scales the release times of the Filter and Amp EGs Foot Switch Assignments You can connect a footswitch such as...

Страница 992: ... of the KARMA CONTROLS slider KARMA RTC SW1 8 The foot switch will control the effect of the KARMA SWITCHES PAD1 8 This lets you trigger any of the Pads from the foot switch When playing notes the footswitch triggers the pad as if it had been hit at maximum velocity Note that this can also be used to select a chord when Chord mode is on Value Inc The switch will duplicate the function of the front...

Страница 993: ...d to assign FX Control 1 or 2 to control the desired parameter within the Effect MFX Send 1 2 CC s 93 91 These control the send levels to Master Effects 1 and 2 respectively CC s 93 and 91 actually control send levels in two different places the sends directly from the Program OSC or EXi and the send levels of the last Insert Effect in the chain which matches the CC s MIDI channel JS Y CC 01 This ...

Страница 994: ...sing them through Dynamic MIDI can be useful For example the KARMA SCENE switches can be used to retrigger the groove at a scene change stop any melodic repeats so that they don t overlap the scene change or change a parameter value in the Real Time Parameters of a GE etc Pads can be set to repeatedly trigger modules each time they are pressed yet the module can be in 1st Trigger Mode so that play...

Страница 995: ... Global 2 1 Controller Scale page this will be controlled by reception of the assigned MIDI control change Pad 1 8 Pad Any CC110 117 Note Number The Pads 1 8 will be the source If you choose Pad Any the pad you operated will be the source Note If a MIDI control change or Note Number is assigned in the Global 2 1 Controller Scale page this will be controlled by reception of the assigned MIDI contro...

Страница 996: ...roller group This will operate irrespective of the module The Combination and Sequencer mode Perf Real Time Parameters A B C D 7 6 settings will be ignored Setting examples Joystick operations in the Y direction will control GE Parameter1 Program mode Dynamic MIDI 1 Source 7 7b JS Y CC 01 Dynamic MIDI 1 Bottom 7 7b 000 Dynamic MIDI 1 Top 7 7b 127 Dynamic MIDI 1 Action 7 7b Continuous Dynamic MIDI ...

Страница 997: ...ty Velocity Outside Zone velocity group it will not be possible to control the transpose amount of the auto transpose function Examples of use Settings Program mode Dynamic MIDI 1 Source 7 7b KARMA Switch 1 Dynamic MIDI 1 Bottom 7 7b 000 Dynamic MIDI 1 Top 7 7b 127 Dynamic MIDI 1 Action 7 7b Momentary Dynamic MIDI 1 Destination 7 7b AutoTranspose On Off Dynamic MIDI 1 Polarity 7 7b Dynamic MIDI 2 ...

Страница 998: ... NTT Note Table Transposition On Off For KARMA modules affected by the Chord Scan specified here the key zone note input specified for each module will not be used for chord detection on that module Note Select the Note Note Inside Zone or Note Outside Zone note group as the source The Polarity 7 7b setting will be ignored Chord analysis cannot be controlled if you select a source from the JS Y CC...

Страница 999: ...ed to Dyn Auto Dyn1 or Auto Dyn2 Note If you select the source from the Short Note Black Note note group or Velocity Velocity Outside Zone Velocity group set Action 7 7b to C p 36 Examples Setting 1 Program mode Control by joystick operations Dynamic MIDI 1 Source 7 7b JS Y CC 01 Dynamic MIDI 1 Bottom 7 7b 000 Dynamic MIDI 1 Top 7 7b 127 Dynamic MIDI 1 Action 7 7b Momentary Dynamic MIDI 1 Destinat...

Страница 1000: ...sly switch to realtime note generation by Direct Index BufferLatch Momentary Toggle When on allows input notes to be added to the group of input notes that is causing the KARMA phrase to be generated even if you release the notes while playing them Note Normally you should select a source from the JS Y CC 01 JS X controller group Normally playing a single C4 note will input just C4 to the KARMA mo...
Страница 1001: ... mode MIDI Messages and physical controllers VJS VJS CC Control Realtime Knob 5 8 KARMA Pads 1 8 Foot Switch Foot Pedal Available for AMS Available for Dmod CC MIDI messages On Off Latch Scene SW 1 8 Sliders 1 8 Note off Note on note number Note on velocity Program change Channel after touch Poly after touch Pitch Bend 0 Bank select MSB 1 Modulation 1 2 Modulation 2 3 4 Foot controller 5 Portament...

Страница 1002: ...r joystick modulation Y 89 90 91 Effect depth 1 send 2 level 92 Effect depth 2 Insert Effect 1 12 On Off 93 Effect depth 3 send 1 level 94 Effect depth 4 master effect 1 2 On Off 95 Effect depth 5 total effect 1 2 On Off 96 Data increment 97 Data decrement 98 NRPN LSB 99 NRPN MSB 100 RPN LSB 0 Bend range 1 Fine tune 2 Coarse tune 101 RPN MSB 0 102 KARMA SW1 SW1 1 103 KARMA SW2 SW2 1 104 KARMA SW3 ...

Страница 1003: ... Combination P3 to enable or disable control changes and controllers for each timbre When checked the above operations will be enabled Effect dynamic modulation can be controlled when the Ch Combination 8 7a 9 2a 9 3 9 4 9 5 setting for IFX1 12 MFX1 2 or TFX 1 2 is either set to Gch or to the same channel as the global MIDI channel In the case of All Routed control is possible on the MIDI channel ...

Страница 1004: ...uencer 8 7a 9 2a 9 3 9 4 setting for IFX1 12 MFX1 2 or TFX1 2 matches the MIDI channel of the track selected by Track Select In the case of All Routed control is possible on the MIDI channel of all routed tracks If one of the OASYS s controllers is operated during realtime recording the corresponding or assigned control change will be recorded KARMA modules A B C and D can be controlled if the Inp...

Страница 1005: ...n 17 Knob modulation 5 0 127 corresponds to when Knob Mod 5 is assigned as the REALTIME knob 5 8 18 Controller CC 18 0 127 for control of Alternate Modulation or Effect Dynamic Modulation 8 19 Knob modulation 6 0 127 corresponds to when Knob Mod 6 is assigned as the REALTIME knob 5 8 20 Knob modulation 7 0 127 corresponds to when Knob Mod 7 is assigned as the REALTIME knob 5 8 21 Knob modulation 8...

Страница 1006: ...On Off 0 63 Off 64 127 On corresponds to on off when the SW2 function is set to SW2 Mod 82 Foot switch On Off 0 63 Off 64 127 On corresponds to on off when the function of the assignable foot switch is set to Foot SW 83 Controller CC 83 0 127 for controlling Alternate Modulation or Effect Dynamic Modulation 84 85 Vector joystick modulation X 0 127 Equivalent to when the vector joystick CC control ...

Страница 1007: ...ltime control SW1 On Off 0 63 Off 64 127 On Equivalent to on off when CC 102 is assigned to KARMA realtime control SW1 7 103 KARMA realtime control SW2 On Off 0 63 Off 64 127 On Equivalent to on off when CC 103 is assigned to KARMA realtime control SW2 7 104 KARMA realtime control SW3 On Off 0 63 Off 64 127 On Equivalent to on off when CC 104 is assigned to KARMA realtime control SW3 7 105 KARMA r...

Страница 1008: ...red CC These settings are made in the Global P2 Controller page You can assign them to any desired MIDI control change message CC 00 119 but normally you will use CC 118 and CC 119 which are the default settings Choose the Global P2 page menu command Reset Controller MIDI Assign and use the CC Default settings When you assign the desired CC to the X axis and Y axis of the vector joystick and opera...

Страница 1009: ...page 187 72 Release time EG 1 Filter Release see page 200 Amp EG Release see page 197 73 Attack time EG Times EG 1 Filter Attack see page 200 Amp EG Attack see page 197 Amp EG Time Modulation Attack see page 197 EG Levels Amp EG Start see page 196 Amp EG Attack see page 196 Amp EG Level Modulation Start see page 197 74 Filter cutoff frequency Filter A B Frequency see page 187 75 Decay time EG 1 Fi...

Страница 1010: ...ANCE see page 312 72 Release time PolysixEX EG RELEASE see page 313 73 Attack time PolysixEX EG ATTACK see page 313 74 Filter cutoff frequency VCF CUTOFF see page 312 75 Decay time PolysixEX EG DECAY see page 313 76 LFO1 speed LFO1 Frequency see page 206 77 LFO1 Pitch intensity VIBRATO INT see page 311 78 LFO1 delay LFO1 Delay see page 207 79 Filter EG intensity VCF EG INTENSITY see page 312 ...

Страница 1011: ...t a larger number of MIDI devices we recommend that you use a MIDI patch bay as shown in the second diagram below You can also use a MIDI patch bay to control multiple MIDI devices The Convert Position setting On the OASYS Key Transpose Velocity Curve and After Touch Curve Global 0 1a allow you to transpose the pitch adjust the velocity sensitivity and adjust the after touch sensitivity The effect...

Страница 1012: ...es that trigger the KARMA function and control the KARMA function using the notes that are echoed back during recording or playback When the KARMA function is turned on playing the OASYS keyboard will not trigger the KARMA function the notes you play on the keyboard will only be transmitted The KARMA function will operate only on the notes that are echoed back and received at MIDI IN This prevents...

Страница 1013: ...l Control On settings on page 1002 However most instruments do not receive or transmit note off velocity and neither does the OASYS Program Change Bank Select Changing the program bank Program change Cn pp n channel pp program number that allows 128 sounds to be selected Programs 000 127 in banks I A I F and banks E A E G correspond to program changes Cn 00 Cn 7F Programs 001 128 in banks G g 1 g ...

Страница 1014: ...the OASYS s joystick is moved in the X axis left right a pitch bend effect will be applied and pitch bender messages will also be transmitted When these messages are received a pitch bend effect will be applied The range of pitch change that is produced by pitch bend messages can also be adjusted via MIDI See Changing the pitch bend range on page 1009 Control change Bn cc vv Transmitted and receiv...

Страница 1015: ... is assigned to the ASSIGNABLE PEDAL or as the REALTIME KNOBS 5 8 or as the vector joystick CC control function operating that controller will transmit Expression messages and the volume will change When this message is received the result will be the same as when the controller is operated The volume of the OASYS is determined by multiplying the value of the Volume message with the value of the E...

Страница 1016: ...result will be the same as when the controller is operated On the corresponding MIDI channels this will simultaneously control the timbre track setting as well as the setting following the Insert Effect In Combination and Sequencer modes the actual send level of the timbre track is determined by multiplying this value with the send 1 2 settings for each oscillator Program 8 1f When you adjust Send...

Страница 1017: ...ansmission reception of this message can be turned on off independently for each timbre track Enable Foot Switch Combination Sequencer 3 3a Sostenuto CC 66 Bn 42 vv If the above CC is assigned as the function of the ASSIGNABLE SWITCH operating the switch will transmit this message with vv 127 7F for ON and vv 00 00 for OFF and the sostenuto effect will be turned on off When this message is receive...

Страница 1018: ...mitted when you operate the OASYS and the OASYS itself will be controlled simultaneously When these messages are received the result will be the same as if you operated the OASYS itself The CC settings for each knob and switch are made in the Global P2 Controller page Normally you will leave these Off However you can use these settings if you need to assign MIDI control change messages to these co...

Страница 1019: ...ceived the value of all controllers on that channel will be reset Using RPN Registered Parameter Numbers RPN Registered Parameter Numbers are a type of message that allow settings to be made in a way that is common between instrument manufacturers NRPN Non registered Parameter Numbers and exclusive messages can be freely used in non compatible ways by different manufacturers and models of instrume...

Страница 1020: ...tive panning between timbres tracks Master fine tuning F0 7F nn 04 03 vv mm F7 A value of 8192 mm vv 40 00 is center 4096 mm vv 20 00 is 50 cents and 12288 mm vv 60 00 is 50 cents When this is received the Master Tune Global P0 0 1a parameter will be set Master coarse tuning F0 7F nn 04 04 vv mm F7 Normally only the upper byte mm is used A value of 8192 mm vv 40 00 is center 6656 mm vv 34 00 is 12...

Страница 1021: ...certain interval of time the receiving device will decide that the connection has been broken and will turn off any notes that had been sounded via MIDI and reset its controller values Playing the OASYS multi timbrally from an external device The OASYS can be connected to an external device and played multi timbrally in the following ways MIDI messages from the external device can play a combinati...

Страница 1022: ...re recording However tempo changes during the performance will not be recorded so you will have to insert any tempo changes later For normal multi track recording you will use this method For more information see Multi multitrack recording on page 87 of the Operation Guide Recording the MIDI output of the OASYS s controllers KARMA function and internal sequencer to an external sequencer computer I...

Страница 1023: ... Standard MIDI files SMF make it possible for different computer programs or musical instruments made by different manufacturers to exchange time based MIDI data Each standard MIDI file contains one song The OASYS supports format 0 type 0 in which all of the MIDI data is combined into one track and format 1 type 1 in which the data is separated by track When a SMF is loaded into a song in Disk mod...

Страница 1024: ...Depth Master FX1 2 Off On C Bg 5F 95 00 7F 00 127 Effect 5 Depth Total FX1 2 Off On C Bn 66 102 vv vv KARMA SW1 ASW 3 C Bn 67 103 vv vv KARMA SW2 ASW 3 C Bn 68 104 vv vv KARMA SW3 ASW 3 C Bn 69 105 vv vv KARMA SW4 ASW 3 C Bn 6A 106 vv vv KARMA SW5 ASW 3 C Bn 6B 107 vv vv KARMA SW6 ASW 3 C Bn 6C 108 vv vv KARMA SW7 ASW 3 C Bn 6D 109 vv vv KARMA SW8 ASW 3 C Bn 6E 110 vv vv Pad1 ASW 3 C Bn 6F 111 vv ...

Страница 1025: ...MS FX Dmod Src Vector Mod X C Bn 56 86 vv vv as AMS FX Dmod Src Vector Mod X C Bn 57 87 vv vv as AMS FX Dmod Src Vector Mod Y C Bn 58 88 vv vv as AMS FX Dmod Src Vector Mod Y C Bn 5B 91 vv vv Effect 1 Depth for Send 2 Level control C Bg 5C 92 00 00 00 000 Efect 2 Depth for All Insert FX Off On C Bn 5D 93 vv vv Effect 3 Depth for Send 1 Level control C Bg 5E 94 00 00 00 000 Effect 4 Depth for Maste...

Страница 1026: ... 1 g 9 001 128 78 00 00 7F g d 001 128 38 00 00 7F G 001 128 3E 00 00 7F g d 001 128 When Bank Map in Global mode is GM 2 MIDI In Hex Program Combination mm bb pp 3F 00 00 7F Bank INT A 000 127 Bank INT A 000 127 3F 01 00 7F INT B 000 127 INT B 000 127 3F 02 00 7F INT C 000 127 INT C 000 127 3F 03 00 7F INT D 000 127 INT D 000 127 3F 04 00 7F INT E 000 127 INT E 000 127 3F 05 00 7F INT F 000 127 I...

Страница 1027: ...vv mm F7 3rd byte g Global Channel 6th byte vv Value LSB 7th byte mm Value MSB mm vv 00 00 Left 40 00 Center 7F 7F Right Master Fine Tune Control Master Tune cent in Global F0 7F 0g 04 03 vv mm F7 3rd byte g Global Channel 6th byte vv Value LSB 7th byte mm Value MSB mm vv 20 00 50 40 00 00 60 00 50 Master Coarse Tune Control Transpose chromatic step in Global F0 7F 0g 04 04 vv mm F7 3rd byte g Glo...

Страница 1028: ...play into another folder and then execute the operation again Note Playback may not be possible because of the media you re using Please use the recommended types of media Media that can be used on the OASYS C Can t calibrate Completed Can t calibrate Meaning Calibration could not be performed correctly Try again Can t execute Audio Track recording Meaning You attempted to record audio tracks when...

Страница 1029: ...hen you set System Clock to Word Clock in Global mode Make sure that there is no problem with the BNC cable Completed Meaning Execution of the command ended normally D Destination Disk Destination and source are identical Meaning When copying or bouncing the same song track or pattern was selected for both the source and destination To solve this problem Select a different song track or pattern fo...

Страница 1030: ...ccurred while rewriting the UDF area To solve this problem Use other media Error in reading from medium Meaning An error occurred while reading data from media This error may also appear when data is being written to media by a Save or Copy operation To solve this problem Execute the reading operation once again If the same error occurs it is possible that the data on the disk has been damaged Err...

Страница 1031: ...he directory in which the WAVE file used by the region is to be saved already contains a directory named first six characters of the specified filename _A and that directory contains an identically named WAVE file Meaning When saving a SNG file the WAVE files being saved are such that some of them would have the same filenames as files in the save destination Using the text edit field shown below ...

Страница 1032: ...instead of the Master Track Master Track is empty Meaning You cannot open Audio Event Edit because the Master Track is empty To solve this problem Execute the Sequencer P4 Track Edit page menu command Set Song Length etc with an appropriate length to create a master track and then open Audio Event Edit Measure number over limit Meaning The attempted edit operation would cause the track length to e...

Страница 1033: ...you executed Samples in One Multisample in Export Smpl as AIFF WAVE command in the Disk mode Save page there were no samples To solve either of these problems Create sample data No medium Meaning When executing a command in Disk mode no media was inserted in the drive To solve this problem Insert media such as a mount the drive No recording track specified Meaning When performing realtime multi tr...

Страница 1034: ...ient sample memory for sample parameters or sample waveform data Delete samples to increase the amount of free memory Meaning This message will appear when you execute Global mode Expansion Sample Setup if the settings would exceed the amount of memory EXs1 and EXs2 cannot be loaded simultaneously Not enough sample multisample locations available Meaning The data you attempted to load would exceed...

Страница 1035: ...YS received a bank whose bank type did not match Only banks of the matching bank type will be received If you re receiving USER A G banks set Global Set Program User Bank Type to the same bank type as the transmitting source Then try the operation again Program Type conflicts Meaning This message will appear when you execute Copy Tone Adjust if the copy source and copy destination program types ar...

Страница 1036: ...ecify a track or pattern that contains musical data Source sample is empty Meaning When executing Insert Mix or Paste the source sample is empty Execute the Copy operation before executing Insert Mix or Paste T The clock Track The clock battery voltage is low Please replace the battery and set the date and time in Disk mode Meaning The battery for the clock calendar function has run low To solve t...

Страница 1037: ...ear when you execute the Global mode command Update System Software if the update could not be performed correctly Try again Alternatively try again using a different CD USB HUB Power exceeded Please disconnect USB device Meaning The power consumption of your USB devices has exceeded the capacity of the hub to which they are connected The USB hub will not be recognized correctly in this state To s...

Страница 1038: ... not allocated If you wish to keep the data that was just recorded or edited press the OK button If you wish to return to the previous data i e to delete the data that was just recorded or edited press the Cancel button Meaning When editing in Sequencer mode memory area for Undo Compare function cannot be allocated If you wish to execute the edit press the OK button It will not be possible to retu...

Страница 1039: ...mono or two stereo channels are supported Sample sizes of 1 16 bits are supported If the sample data is 8 bits or less it will be loaded as 16 bit data with the lower 8 bits always at 0 Sample Chunk Only the loop data is referenced If there is multiple loop data the loop with the greatest number of loop playback times Play Count will be used Even if the Type is Alternating or Backward it will be h...

Страница 1040: ...n parentheses Only the approximately 80 types of sampling frequencies supported by the Triton will be loaded if the sampling frequency is not supported the next lowest frequency will be selected KMP KORG Multisample Parameter files These consist of the following chunks Multisample parameter chunk Attributes Multisample name chunk Relative parameter chunk 1 Filter cutoff RLP1 chunk Transpose RLP2 c...

Страница 1041: ...PL it will be treated as a sample skipped during loading If the KSF filename is INTERNALnnnn internal samples will be used Pan 0 127 currently unused 1 byte Filter cutoff 99 99 currently unused 1 byte KSF filename including period and extension 12 bytes number of samples in the multisample Chunk ID RLP2 4 bytes Chunk size 4 4 bytes Transposing 64 63 1 byte Resonance 99 99 1 byte Attack 99 99 1 byt...

Страница 1042: ...onvention Likewise when data is saved using Save All or Save All Samples the individual KSF files are automatically given filenames according to the following convention Chunk ID SPD1 4 bytes Chunk size 12 4 bytes The following up to the sample size is the same as in the SMD1 chunk Sampling frequency 4 bytes Attributes 1 byte Loop tune 1 byte Number of channels 1 byte Sample size 1 byte Number of ...

Страница 1043: ...ession CD RW media Quick Format Use this option to erase the contents of a previously formatted CD RW This cannot be used with blank CD RW media It takes about two minutes to complete Full Format Use this option to format blank media or media which has been formatted as a non UDF disk You can also use Full Format if writing errors occur frequently when writing to the disk Full Format takes about f...

Страница 1044: ...rted into ISO9660 format it will be in the divided file format supported by ISO9660 level 3 Such disks cannot be read by devices that do not support ISO9660 level 3 such as the original TRITON line and some older computer operating systems These disks can be read on newer computer operating systems as long as you can install software which supports ISO9660 level 3 or packet writing Troubleshooting...

Страница 1045: ...ards memory Drop ping them or applying pressure to them may damage the components Avoid touching exposed metal edges of the circuit board or portions that need not be handled during installation Be careful not to lose the screws and washers that you remove Do not use screws other than those that are installed in the option board memory and the OASYS Using screws of a different shape or length may ...

Страница 1046: ...lease contact your local Korg distributor Calendar battery This battery maintains the date and time that are recorded when data is saved Use a CR2032 type battery CR2032 batteries that can be used in the OASYS CR2032 batteries manufactured by Maxell Sony or Panasonic Checking after installation When the OASYS is turned on the currently installed option boards will be shown in the LCD screen After ...

Страница 1047: ... the front edge of the front panel to open it Carefully raise the panel opening it as far as it will go Be careful not to pinch your fingers when opening or closing the front panel Note You can also grasp the frame of the LCD screen to open or close the front panel 7 Install the desired item as directed in the following sections Installing the EXB DI Installing memory or 2 3 Installing the calenda...

Страница 1048: ...XB DI protruding from the rear panel of the OASYS support the EXB DI with one hand and use the two screws you removed to fasten the EXB DI from the rear of the OASYS 6 Attach the cable as shown in the diagram Firmly press the cable all the way into the connector Do not touch any part of the circuit board other than the connector to which you are connecting the cable 7 Close the front panel as desc...

Страница 1049: ...ning the memory module in place Note If the security latches do not close use your finger to push them closed 8 Close the memory calendar battery cover Insert the lip at the front of the cover into the groove and align the screw holes Use the two screws to fasten the cover in place 9 Close the front panel as described in Opening and closing the front panel steps 8 and 9 10 When you are finished tu...

Страница 1050: ...ps 8 and 9 8 When you ve finished all of the steps turn on the power In this state the calendar has not yet been set to the correct date and time so the following message will appear The clock battery voltage is low Please replace the battery and set the date and time in Disk mode 9 Use the Disk mode page menu command Set Date Time to specify the correct date and time Press the MODE DISK switch to...

Страница 1051: ...s ADAT output to the ADAT input of an ADAT compatible digital mixer 2 Use ADAT OPTICAL cables to connect the respective inputs and outputs of the digital mixer and the ADAT 3 Make connections as shown in the following diagram so that an Alesis BRC Remote Controller or other digital audio device can be used as the master for digital signal synchronization and connect the WORD CLOCK output of the mi...

Страница 1052: ...g box 4 Press the OK button to execute the update A dialog box will ask you for confirmation Press the OK button to begin updating the system software While the system is being updated do not touch the OASYS switches and never turn off the power If the power is accidentally turned off while the system is being loaded the OASYS may become inoperable If this occurs please contact Korg customer servi...

Страница 1053: ... initialize the internal memory or to restore the operating system to its original state These three options will not alter any user data stored on the disk as long as it is not stored in the FACTORY folder If absolutely necessary you can also re format the entire internal hard disk and then restore the operating system and factory sounds This will destroy all user data on the internal hard disk a...

Страница 1054: ...rnal hard disk has been completely corrupted and using Restore OS and factory sounds does not fix the problem this will allow you to restore the hard drive to its initial state This function requires all four CDs IMPORTANT after using this function you will need to re authorize the OASYS as described below You will not be able to use the OASYS until the re authorization is complete Re authorizing ...

Страница 1055: ... A061 Skippy Wants to Dance LeadSplits A062 Dynamic Mallet Bell Mallet Perc A063 Horror World Complex SFX A064 Advanced VJS Groove Synth A065 Pensive EP Pad Keyboard A066 Small Orchestra Orchestral A067 Bass Wurly Split BassSplits A068 Galactic Journey MotionSynth A069 Tangerine Skies LeadSplits A070 Velvety Strings Strings A071 Guitar Hold 4 the Angels Guitar Plucked A072 Tone Adjusted EP Keyboar...

Страница 1056: ...eed B061 Step On This LeadSplits B062 Cute Music Box Bell Mallet Perc B063 Miracle at Stormy Cove Complex SFX B064 Fresh Air Pad Synth B065 Stereo E Piano Keyboard B066 ScoreSketcher p Hits f Orchestral B067 You re Too Late BassSplits B068 Dust Storm on Mars MotionSynth B069 and she started crying LeadSplits B070 4 Vector Bowing Strings B071 12 String Guitar Guitar Plucked B072 Hybrid E Piano 3 Ke...

Страница 1057: ...t An EXi bition EXs1 LeadSplits C062 Warm Pad Strings EXs1 Strings C063 New Copland EXs1 Pads Vocal C064 Compressed Air EXs1 Synth C065 Galactic Excursion EXs1 Keyboard C066 Dyna Slow Fast Orch EXs1 Orchestral C067 She Walks into EXs1 BassSplits C068 Oboe Orchestra EXs1 LeadSplits C069 Retro Fusion EXs1 LeadSplits C070 Dynamic Strings EXs1 Strings C071 Winter Guitar EXs1 Guitar Plucked C072 Waterf...

Страница 1058: ... A059 Deep AmbiChill Kit Drums A060 D Slow Sine Pad SlowSynth A061 D Fear Not LeadSynth A062 D Perfect Storm SFX A063 D Finger Cymbal Bells Bell Mallet d d d d d A064 D Sparkling Piano Keyboard A065 D Mellow Electric MotionSynth A066 D Glassy Strat Guitar Plucked A067 D Beautiful Camera Strings Strings A068 Original Perc Kit Drums A069 D Storm Chaser FastSynth A070 D Slap Bass Sting SW1 Noiz Bass ...

Страница 1059: ...9 D Timpani Splits SW2 Roll Drums B060 D Film Score Pad SlowSynth B061 D Round Poppy Lead LeadSynth B062 D Steam Sweeps SFX B063 D FM Tubular Bells Bell Mallet d d d d B064 D Pure Stereo Piano Keyboard B065 D Pulsatronik MotionSynth B066 S New Age Hybrid Guitar Guitar Plucked B067 D Few Bows Stereo Strings B068 Cuban Perc Kit Drums B069 D FM Fever FastSynth B070 D Thumb Bass 1 SW1 Bass Synth Bass ...

Страница 1060: ...SlowSynth C061 S Harmonica SW1 Distortion Woodwind Reed C062 D New Voyage SFX C063 S Tubular Bells Rack Bell Mallet d d d C064 D Romance Piano Bell Knob5 Keyboard C065 S Orbit Blip MotionSynth C066 S Fly Studio Guitar Guitar Plucked C067 D Intimate Strings Strings C068 Brazilian Perc Kit Drums C069 D Are See A Vector FastSynth C070 D Thumb Bass 2 SW1 Bass Synth Bass C071 D Gating Voice Pad MotionS...

Страница 1061: ...hina Gong Tam Tam Drums D060 D Sad Wood Pad SlowSynth D061 D Syn Pipes LeadSynth D062 S New North Wind SFX D063 D Bali Gamelan Bell Mallet d d d d D064 D Stereo Dyno E Piano Keyboard D065 D Running Out of Time MotionSynth D066 D E Guitar XF OpenTone Guitar Plucked D067 D Supreme Strings Strings D068 D Jiffy Popper Lines MotionSynth D069 D Pulse Morph Comp FastSynth D070 D Thumb Bass 4 SW1 Bass Syn...

Страница 1062: ...cay Hit E060 D Virtual Orchestra EXs1 SlowSynth E061 D Fretless SW1 NeckNoise Bass Synth Bass E062 D Passed Out MotionSynth E063 D Calm Bell Synth Bell Mallet d d d d d d d E064 D 2 Way Stereo Grand SW1 Keyboard E065 D Windy Atmosohere EXs1 MotionSynth E066 D Power Guitar FX EXs1 Guitar Plucked E067 D Stereo Oct Strings EXs1 Strings E068 Misc Perc Kit EXs1 Drums E069 D Metal is Everywhere EXs1 Fas...

Страница 1063: ... F058 A A Dirty Little Girl Bass Synth Bass F059 A A Upbeat Bass Morpher Bass Synth Bass F060 A DanceBassMenu Bass Synth Bass F061 A A Timpanic Bass Bass Synth Bass F062 A Aggro Bass SW1 2 Bass Synth Bass F063 A Velocity Filter Bassss Bass Synth Bass F064 A Silver Bass Bass Synth Bass F065 A A TeKnoLife Split Bass Synth Bass F066 A A 80 s Stereo Bass SW1 Bass Synth Bass F067 A TuBaSs Xtras Bass Sy...

Страница 1064: ... Pad FastSynth D059 P6 P6 Dark Poly Stack FastSynth D060 P6 FAP7 Morph Y FastSynth D061 P6 Polysynth FastSynth D062 P6 Big Sleep FastSynth D063 P6 String Pad Y FastSynth D064 P6 S STR 1 Poly6 Pad Layer FastSynth D065 P6 VCF Oscillation FastSynth D066 MS P6 Air Mallet FastSynth D067 MS Dilated Pupils Lead LeadSynth D068 MS Simple Saw Lead LeadSynth D069 P6 Unison Tek Lead LeadSynth D070 MS Grit Lea...

Страница 1065: ...ess Dark Bass Bass Synth Bass E057 S Fretless Bass STR 1 Bass Synth Bass E058 S E Bass STR 1 Bass Synth Bass E059 S Modified P Bass Bass Synth Bass E060 S Stein Bass STR 1 Bass Synth Bass E061 S Slap Bass 1 STR 1 Bass Synth Bass E062 S Slap Bass 2 STR 1 Bass Synth Bass E063 S Prime Time Slapper Bass Synth Bass E064 S A Thing Bass Bass Synth Bass E065 S Stanky Hybrid Slap Bass Synth Bass E066 S Phy...

Страница 1066: ...structo SW1 2 LeadSynth F067 A A The Fly Bee on Knob6 LeadSynth F068 A A Tearing Sync JS Y LeadSynth F069 A A 4 Guys Whistling LeadSynth F070 A Long Period Complexity MotionSynth F071 A Life on Mars MotionSynth F072 A Sequence Bounce MotionSynth F073 A A Scatter Synth MotionSynth F074 A Clock Dance MotionSynth F075 A Vector Victor MotionSynth F076 A A WindSong MotionSynth F077 A A Harmonic DubbleB...

Страница 1067: ...tr Body Guitar Plucked GM027 S Jazz Guitar Guitar Plucked g 1 027 S Pedal Steel Gtr Guitar Plucked GM028 S Clean Guitar Guitar Plucked g 1 028 D Detuned Clean Gt Guitar Plucked g 2 028 D Mid Tone Guitar Guitar Plucked GM029 S Muted Guitar Guitar Plucked g 1 029 S Funky Guitar Guitar Plucked g 2 029 D Muted Guitar v Guitar Plucked g 3 029 D Jazz Man Guitar Plucked GM030 S Overdrive Guitar Guitar Pl...

Страница 1068: ...ynth GM101 D Brightness FastSynth GM102 D Goblins MotionSynth GM103 S Echo Drops FastSynth g 1 103 D Echo Bell FastSynth g 2 103 D Echo Pan FastSynth GM104 D Star Theme FastSynth GM105 S Sitar 1 Guitar Plucked g 1 105 D Sitar 2 Guitar Plucked GM106 S Banjo Guitar Plucked GM107 S Shamisen Guitar Plucked Name Category GM108 S Koto Guitar Plucked g 1 108 D Taisho Koto Guitar Plucked GM109 S Kalimba B...

Страница 1069: ...dard Kit INT12 Acoustic Pop Kit INT13 Wild Rock Kit INT14 New Processed Kit INT15 Jazz Brush Kit INT16 Funk Kit INT17 Orch Ethnic Kit INT18 Original Perc Kit INT19 Brazilian Perc Kit INT20 Cuban Perc Kit INT21 Studio Standard Kit EXs1 INT22 Acoustic Pop Kit EXs1 INT23 Wild Rock Kit EXs1 INT24 New Processed Kit EXs1 INT25 Jazz Brush Kit EXs1 INT26 Funk Kit EXs1 INT27 Orch Ethnic Kit EXs1 INT28 Orig...

Страница 1070: ...0 16 On On 8 1 2 1 2 1 2 1 2 32 Computer 1 GV1 Gated Vel Pat 1 Generated Gated Regular 010 On On 4 1 1 1 1 33 Computer 2 GV1 Gated Vel Pat 1 Generated Gated Regular 010 On On 4 1 1 1 1 34 Echo Arp 1 CL1 Comp Lead 1 Generated Riff Regular 10 On On 8 1 2 1 2 1 2 1 2 35 Euro Bureau CL1 Comp Lead 1 Generated Riff Regular 10 81 1 On On 6 1 1 2 1 1 2 36 Exp Triad GV1 Gated Vel Pat 1 Generated Gated Regu...

Страница 1071: ...nerated Riff Regular 10 16 On On 4 2 1 2 1 107 MalletGame 02 CL1 Comp Lead 1 Generated Riff Regular 10 16 On On 4 1 1 1 2 108 MalletGame 03 CL1 Comp Lead 1 Generated Riff Regular 10 16 VE On On 8 1 1 1 1 1 1 1 1 109 Minor 3rds Up Down GV1 Gated Vel Pat 1 Generated Gated Regular 010 On On 16 1 1 1 1 1 1 1 1 1 1 1 1 1 1 1 1 110 NewAge Ostinato CL1 Comp Lead 1 Generated Riff Regular 64 On On 8 1 1 1 ...

Страница 1072: ...n On 8 1 2 2 2 2 2 2 2 177 Gliss Down 1 CL1 Comp Lead 1 Generated Riff Regular 10 VE TR On On 1 2 178 Going Up CL1 Comp Lead 1 Generated Riff Chromatic 2 11 On On 8 1 1 1 1 1 1 1 1 179 Gong Roller CL1 Comp Lead 1 Generated Riff Regular 10 71 VE PB On On 8 1 2 1 2 1 2 1 2 180 HH Mono CL1 Comp Lead 1 Generated Riff Regular 10 17 74 11 On On 8 1 2 1 2 1 2 1 2 181 Happiness Seq CL1 Comp Lead 1 Generat...

Страница 1073: ... On 8 1 2 2 2 2 2 2 2 250 Dbl Reed Scales CL1 Comp Lead 1 Generated Riff Scalic2 16 1 On On 8 1 2 1 2 1 2 1 2 251 Echo Melody GV1 Gated Vel Pat 1 Generated Gated Regular 010 On On 4 1 1 1 1 252 English Horn 2 CL1 Comp Lead 1 Generated Riff Scalic2 16 VE On On 16 1 2 1 1 1 2 1 1 1 2 1 1 1 2 1 1 253 Ethnic Sitar DM1 Drum Melodic 1 Generated Drum WholeTone PB PB On On 16 1 1 1 1 1 1 1 1 1 1 1 1 1 1 1...

Страница 1074: ... GV1 Gated Vel Pat 1 Generated Gated Regular 010 On On 4 1 1 1 1 322 A Piano Comp CL1 Comp Lead 1 Generated Riff Scalic2 64 64 VE 72 On On 1 1 323 Acid Jazz GV1 Gated Vel Pat 1 Generated Gated Regular 010 On On 4 1 1 1 1 324 Analog Pad Mover CL1 Comp Lead 1 Generated Riff Regular 16 20 21 On On 4 1 1 1 2 325 Arco Strings CL1 Comp Lead 1 Generated Riff Regular 16 20 19 74 71 On On 2 2 1 326 Arctic ...

Страница 1075: ...0 21 74 11 On On 8 1 1 1 1 1 1 1 1 393 Organ 1 CL1 Comp Lead 1 Generated Riff Regular 11 On On 8 1 2 1 2 1 2 1 2 394 Pad Helper 02 CL1 Comp Lead 1 Generated Riff Scalic 10 16 On On 8 1 1 1 1 1 1 1 1 395 Pad Helper 03 CL1 Comp Lead 1 Generated Riff Scalic 10 16 On On 8 1 2 1 2 1 2 1 2 396 Pad Helper 04 CL1 Comp Lead 1 Generated Riff Regular 10 16 73 72 74 On On 8 1 2 1 2 1 2 1 2 397 Pad Motion CL1 ...

Страница 1076: ... Gated Regular 010 On On 8 1 1 1 1 1 1 1 1 467 Dance Gospel Organ CL1 Comp Lead 1 Generated Riff Regular 10 16 1 11 2 On On 8 1 1 1 1 1 1 1 1 468 Dancing Classical CL1 Comp Lead 1 Generated Riff Scalic2 10 On On 4 1 2 1 2 469 Dancing Pluck CL1 Comp Lead 1 Generated Riff Scalic 10 On On 8 1 2 1 2 1 2 1 2 470 Dark Night MR1 Melodic Repeat Real Time WholeTone 74 71 10 On On 1 1 471 Dial Up Modem Emer...

Страница 1077: ...1 Comp Lead 1 Generated Riff Scalic2 On On 8 1 1 1 1 1 1 1 1 542 Organ Fingers maj min CL1 Comp Lead 1 Generated Riff Scalic2 10 16 1 2 On On 8 2 2 2 2 2 2 2 2 543 Organ 2 CL1 Comp Lead 1 Generated Riff Regular 11 On On 8 1 1 1 1 1 1 1 1 544 Organ Riff CL1 Comp Lead 1 Generated Riff Regular 10 2 74 11 64 On On 1 1 545 OrganRiff 1 CL1 Comp Lead 1 Generated Riff Regular 11 On On 8 1 1 1 1 1 1 1 1 54...

Страница 1078: ... 2 1 2 1 2 1 2 614 Trance Riff 5 GV1 Gated Vel Pat 1 Generated Gated Regular 010 On On 4 1 1 1 1 615 Trance Riff 6 GV1 Gated Vel Pat 1 Generated Gated Regular 072 On On 4 1 1 1 1 616 TranceComp 1 GV1 Gated Vel Pat 1 Generated Gated Regular 010 On On 4 1 1 1 1 617 Tremolo Tension Chromatic CL1 Comp Lead 1 Generated Riff Regular 79 16 79 17 11 On On 8 1 2 1 2 1 2 1 2 618 Tripl Balzando CL1 Comp Lead...

Страница 1079: ...n 8 1 1 1 1 1 1 1 1 685 E Piano 12 CL1 Comp Lead 1 Generated Riff Regular 10 16 VE On On 1 1 686 Echo Chords 1 GV1 Gated Vel Pat 1 Generated Gated Regular 010 On On 4 1 1 1 1 687 Echo Chords 2 GV1 Gated Vel Pat 1 Generated Gated Regular 010 On On 4 1 1 1 1 688 Echo Chords 3 GV1 Gated Vel Pat 1 Generated Gated Regular 010 On On 4 1 1 1 1 689 Echo Chords 4 GV1 Gated Vel Pat 1 Generated Gated Regular...

Страница 1080: ...1 1 1 1 1 1 1 1 759 String Offbeat CL1 Comp Lead 1 Generated Riff Regular On On 8 1 1 1 1 1 1 1 1 760 StringsRit 4 GV1 Gated Vel Pat 1 Generated Gated Regular 010 On On 4 1 1 1 1 761 StringsRit 5 GV1 Gated Vel Pat 1 Generated Gated Regular 010 On On 4 1 1 1 1 762 Super Sweeper 2 CL1 Comp Lead 1 Generated Riff Regular 10 16 21 70 2 On On 8 1 2 1 2 1 2 1 2 763 Suspended Riff CL1 Comp Lead 1 Generate...

Страница 1081: ...y Comp CL1 Comp Lead 1 Generated Riff Regular 10 64 73 72 On On 8 1 2 1 2 1 2 1 2 835 LA EP2 CL1 Comp Lead 1 Generated Riff Regular 72 16 72 On On 8 1 2 1 2 1 2 1 2 836 MalletGame 10 CL1 Comp Lead 1 Generated Riff Scalic2 10 16 72 On On 2 1 2 837 Military Rhythm GV1 Gated Vel Pat 1 Generated Gated Regular 10 On On 8 1 1 1 1 1 1 1 1 838 Moving Bellz CL1 Comp Lead 1 Generated Riff Regular 72 73 74 7...

Страница 1082: ...1 1 1 1 1 904 Frets Riff Strum 2 CL1 Comp Lead 1 Generated Riff Regular 10 11 On On 8 1 1 1 1 1 1 1 1 905 Funk Gtr CL1 Comp Lead 1 Generated Riff Scalic 10 16 On On 8 1 1 1 1 1 1 1 1 906 Funky Strums GV1 Gated Vel Pat 1 Generated Gated Regular 010 On On 4 1 1 1 1 907 GTR Strum CL1 Comp Lead 1 Generated Riff Scalic2 72 74 On On 8 1 1 1 1 1 1 1 1 908 Gtr 5ths CL1 Comp Lead 1 Generated Riff Chromatic...

Страница 1083: ...omp Lead 1 Generated Riff Regular 10 16 On On 8 1 1 1 1 1 1 1 1 977 Country Picker 2 GV1 Gated Vel Pat 1 Generated Gated Regular 010 On On 4 1 1 1 1 978 E Gtr Cutting CL1 Comp Lead 1 Generated Riff Scalic2 72 72 74 On On 8 1 1 1 1 1 1 1 1 979 Finger Pick 1 CL1 Comp Lead 1 Generated Riff Regular 10 VE On On 8 1 2 1 2 1 2 1 2 980 FingerPicker CL1 Comp Lead 1 Generated Riff Regular 10 VE On On 4 1 2 ...

Страница 1084: ...1 1 1 1 1045 HipHop Bass 2 DM1 Drum Melodic 1 Generated Drum WholeTone 10 16 16 On On 16 1 2 1 2 1 2 1 2 1 2 1 2 1 2 1 2 1046 Reso Bass 1 BL1 Bass Lead 1 Generated Riff Regular 16 On On 4 1 1 1 2 1047 Reso Bass 2 BL1 Bass Lead 1 Generated Riff Regular 16 On On 4 1 1 1 2 1048 RootÅc FifthÅc GV1 Gated Vel Pat 1 Generated Gated Regular 010 On On 4 1 1 1 1 1049 Simple Bass 1 BL1 Bass Lead 1 Generated ...

Страница 1085: ...Gated Vel Pat 1 Generated Gated Regular 010 On On 4 1 1 1 1 1118 Stein Bass 1 BL1 Bass Lead 1 Generated Riff Scalic 10 74 On On 8 1 2 1 2 1 2 1 2 1119 Stein Bass 2 BL1 Bass Lead 1 Generated Riff Fifths 10 74 On On 8 1 2 1 2 1 2 1 2 1120 SynBass Line 01 BL1 Bass Lead 1 Generated Riff Scalic2 2 16 71 On On 4 1 1 1 2 1121 SynBass Line 02 BL1 Bass Lead 1 Generated Riff Scalic 2 16 On On 8 1 1 1 1 1 1 ...

Страница 1086: ...1 2 1192 Jungle Liar DM1 Drum Melodic 1 Generated Drum WholeTone 16 2 PB 71 On On 16 1 1 1 1 1 1 1 1 1 1 1 1 1 1 1 2 1193 Komplicate GV1 Gated Vel Pat 1 Generated Gated Regular 010 On On 4 1 1 1 1 1194 Kreeper GV1 Gated Vel Pat 1 Generated Gated Regular 010 On On 4 1 1 1 1 1195 Latin Bass 3 GV1 Gated Vel Pat 1 Generated Gated Regular 010 On On 4 1 1 1 1 1196 Latin Bass 4 BL1 Bass Lead 1 Generated ...

Страница 1087: ... 1 2 1 2 1263 Gated Thing 1 GC1 Gated CCs 1 Generated Gated Regular 002 1 1 83 71 On 8 1 2 1 2 1 2 1 2 1264 Gator GC1 Gated CCs 1 Generated Gated Regular 010 74 On 4 1 2 1 2 1265 Intransity GC1 Gated CCs 1 Generated Gated Regular 010 79 On 2 1 2 1266 Meditate 2 GC1 Gated CCs 1 Generated Gated Regular 010 16 21 On 4 1 1 1 2 1267 New Reggae GC1 Gated CCs 1 Generated Gated Regular 020 PB On 4 1 1 1 1...

Страница 1088: ...eTone 10 16 On On 16 1 1 1 1 1 1 1 1 1 1 1 1 1 1 1 2 1333 Ride Pop 1 All Kits DP1 Drum Perc 1 Generated Drum WholeTone 10 16 On On 16 1 1 1 1 1 1 1 1 1 1 1 1 1 1 1 2 1334 Ride Pop 2 All Kits DP1 Drum Perc 1 Generated Drum WholeTone 10 16 On On 16 1 1 1 1 1 1 1 1 1 1 1 1 1 1 1 2 1335 Ride Rock All Kits DP1 Drum Perc 1 Generated Drum WholeTone 10 16 On On 16 1 1 1 1 1 1 1 1 1 1 1 1 1 1 1 2 1336 Ride...

Страница 1089: ...rated Drum WholeTone 10 16 74 71 On On 16 1 1 1 1 1 1 1 1 1 1 1 1 1 1 1 2 1407 HipHop 08 All Kits DP1 Drum Perc 1 Generated Drum WholeTone 10 16 74 71 On On 16 1 1 1 1 1 1 1 1 1 1 1 1 1 1 1 2 1408 HipHop 09 All Kits DP1 Drum Perc 1 Generated Drum WholeTone 10 16 74 71 On On 16 1 1 1 1 1 1 1 1 1 1 1 1 1 1 1 2 1409 HipHop 10 All Kits DP1 Drum Perc 1 Generated Drum WholeTone 10 16 74 71 On On 16 1 1 ...

Страница 1090: ...16 1 1 1 1 1 1 1 1 1 1 1 1 1 1 1 2 1481 Synco hiphop Dance Kits DP1 Drum Perc 1 Generated Drum WholeTone 10 16 On On 16 1 1 1 1 1 1 1 1 1 1 1 1 1 1 1 2 1482 Tiktok Dance Kits DP1 Drum Perc 1 Generated Drum WholeTone 74 71 74 72 PB On On 16 1 1 1 1 1 1 1 1 1 1 1 1 1 1 1 2 1483 Tricki Beat All Kits DP1 Drum Perc 1 Generated Drum WholeTone 10 16 On On 16 1 1 1 1 1 1 1 1 1 1 1 1 1 1 1 2 1484 Tricki Li...

Страница 1091: ...55 D n B Gate 3 Dance Kits DP1 Drum Perc 1 Generated Drum WholeTone 74 71 72 PB On On 16 1 1 1 1 1 1 1 1 1 1 1 1 1 1 1 2 1556 D n B Gate 4 All Kits DP1 Drum Perc 1 Generated Drum WholeTone 74 71 72 PB On On 16 1 1 1 1 1 1 1 1 1 1 1 1 1 1 1 2 1557 Dance Rock Acoustic Kits DP1 Drum Perc 1 Generated Drum WholeTone 10 16 On On 16 1 1 1 1 1 1 1 1 1 1 1 1 1 1 1 2 1558 DanceHall 1 All Kits DP1 Drum Perc ...

Страница 1092: ...ttin Down All Kits DP1 Drum Perc 1 Generated Drum WholeTone 016 On On 16 1 1 1 1 1 1 1 1 1 1 1 1 1 1 1 2 1629 Goa Drums Dance Kits DP1 Drum Perc 1 Generated Drum WholeTone 010 On On 16 1 1 1 1 1 1 1 1 1 1 1 1 1 1 1 2 1630 Groove w RptTimeEnv All Kits DP1 Drum Perc 1 Generated Drum WholeTone 1 PB RT On On 16 1 1 1 1 1 1 1 1 1 1 1 1 1 1 1 2 1631 Groovy Garage Dance Kits DP1 Drum Perc 1 Generated Dru...

Страница 1093: ...eTone PB On On 16 1 1 1 1 1 1 1 1 1 1 1 1 1 1 1 2 1703 NuSkoolBreaks All Kits DP1 Drum Perc 1 Generated Drum WholeTone 10 16 74 71 On On 16 1 1 1 1 1 1 1 1 1 1 1 1 1 1 1 2 1704 NuStep Garage All Kits DP1 Drum Perc 1 Generated Drum WholeTone 010 On On 16 1 1 1 1 1 1 1 1 1 1 1 1 1 1 1 2 1705 Nuclear Acoustic Kits DP1 Drum Perc 1 Generated Drum WholeTone 10 On On 16 1 1 1 1 1 1 1 1 1 1 1 1 1 1 1 2 17...

Страница 1094: ...1 1 1 1 2 1777 Trance4Floor Dance Kits DP1 Drum Perc 1 Generated Drum WholeTone 010 On On 16 1 1 1 1 1 1 1 1 1 1 1 1 1 1 1 2 1778 TranceHouse Dance Kits DP1 Drum Perc 1 Generated Drum WholeTone PB On On 16 1 1 1 1 1 1 1 1 1 1 1 1 1 1 1 2 1779 Trbl Skool All Kits DP1 Drum Perc 1 Generated Drum WholeTone 010 On On 16 1 1 1 1 1 1 1 1 1 1 1 1 1 1 1 2 1780 Trbl Think Dance Kits DP1 Drum Perc 1 Generate...

Страница 1095: ...Loop Kit DP1 Drum Perc 1 Generated Drum WholeTone 83 16 On On 16 1 1 1 1 1 1 1 1 1 1 1 1 1 1 1 2 1852 OldSkool Vinyl Vinyl Loop Kit DP1 Drum Perc 1 Generated Drum WholeTone 83 16 On On 16 1 1 1 1 1 1 1 1 1 1 1 1 1 1 1 2 1853 Session Funk Vinyl Loop Kit DP1 Drum Perc 1 Generated Drum WholeTone 83 16 On On 16 1 1 1 1 1 1 1 1 1 1 1 1 1 1 1 2 1854 Shaker Pat 1 Vinyl Loop Kit DP1 Drum Perc 1 Generated ...

Страница 1096: ...1 1 1 1 2 1925 Shaker 1 Brazil Perc Kit DP1 Drum Perc 1 Generated Drum WholeTone 10 16 On On 16 1 1 1 1 1 1 1 1 1 1 1 1 1 1 1 2 1926 Shaker 2 Brazil Perc Kit DP1 Drum Perc 1 Generated Drum WholeTone 10 16 On On 16 1 1 1 1 1 1 1 1 1 1 1 1 1 1 1 2 1927 Shaker 3 Cuban Perc Kit DP1 Drum Perc 1 Generated Drum WholeTone 10 16 On On 16 1 1 1 1 1 1 1 1 1 1 1 1 1 1 1 2 1928 Shaker 4 Cuban Perc Kit DP1 Drum...

Страница 1097: ...1 2 1 2 1 2 1 2 1 2 1991 Duration Bass WS BL1 Bass Lead 1 Generated Riff Scalic 10 On On 4 1 1 1 1 1992 Ethereal Twinklings WS CL1 Comp Lead 1 Generated Riff Scalic 10 1 On On 8 1 2 1 2 1 2 1 2 1993 Improvise It WS CL1 Comp Lead 1 Generated Riff Scalic2 10 1 On On 8 2 2 1 2 2 2 1 2 1994 Melodic Chords WS DM1 Drum Melodic 1 Generated Drum WholeTone 8 83 On On 16 1 1 1 1 1 1 1 1 1 1 1 1 1 1 1 1 1995...

Страница 1098: ...hift MR1 Melodic Repeat Real Time Chromatic 16 74 2 10 On On 1 1 2036 Cyborg Hit MR1 Melodic Repeat Real Time WholeTone 74 1 10 On On 1 1 2037 Direct Index 1 CL1 Comp Lead 1 Generated Riff Scalic2 10 On On 8 1 2 1 2 1 2 1 2 2038 Direct Index 2 CL1 Comp Lead 1 Generated Riff Scalic 10 On On 8 1 2 1 2 1 2 1 2 2039 Distant Lights MR1 Melodic Repeat Real Time Chromatic 16 74 1 10 On On 1 1 2040 Dyno T...

Страница 1099: ...ime Scale 2 151 Env Time Scale 3 152 Env Trigger Mode 153 Envelope s Level 154 Envelope s On Off Name 155 Envelope s TimeScale 156 FX Ctl Nte Pat 1 157 FX Ctl Nte Pat 2 158 FX Ctl Pat Polarity 1 159 FX Ctl Pat Polarity 2 160 FX Ctrl CC Number 161 FX Ctrl CC Number 1 162 FX Ctrl CC Number 2 163 FX Ctrl Depth 164 FX Ctrl Depth 0 165 FX Ctrl Depth 1 166 FX Ctrl Depth 2 167 FX Ctrl Env Latch On 168 FX...

Страница 1100: ...Tuning 441 Repeat Transpose 442 Repeat Trigger By Vel 443 Repeat Velocity Range 444 Repeat Velocity Decay 445 Repeat Volume Decay 446 Resync To Downbeat 447 Resync To Downbeat 1 448 Resync To Downbeat 2 449 Resync To Downbeat 3 450 Resynchronize Indexes 451 Reverb Control 452 Rhythm Complexity 453 Rhythm Complexity 1 454 Rhythm Complexity 2 455 Rhythm Complexity 3 456 Rhythm Humanize 457 Rhythm Mu...

Страница 1101: ...lider 7 Slider 8 Slider 9 Name Layer A Level Layer B Level Master Filter Cutoff Master Filter Res onance Amp Attack Amp Decay Amp Sustain Amp Release Glide Time CC CC 081 CC 082 CC 074 CC 071 CC 073 CC 075 CC 076 CC 072 CC 005 Controller Knob1 Knob2 Knob3 Knob4 Knob5 Knob6 Knob7 Knob8 Name Expression Tube Drive Tube Body Tube Brightness Key Click Perc Volume Perc Decay Perc Harmonic CC CC 011 CC 0...

Страница 1102: ...ame Amp Attack Amp Decay Amp Release Mod Env Decay Master Volume CC CC 073 CC 009 CC 072 CC 015 Off Off Off Off CC 007 Controller Knob1 Knob2 Knob3 Knob4 Knob5 Knob6 Knob7 Knob8 Name Filter Cutoff Filter Resonance Filter Env Amount Amp Level LFO Amount LFO Rate Pitch Fine Tune Transpose CC CC 074 CC 071 CC 018 CC 007 CC 027 CC 026 CC 023 CC 022 Controller SW1 SW2 SW3 SW4 SW5 SW6 SW7 SW8 Name CC Of...

Страница 1103: ...ider 4 Slider 5 Slider 6 Slider 7 Slider 8 Slider 9 Name Filter Env Amount Filter Attack Filter Decay Filter Sustain Filter Release Shaper Amount OscA Level OscB Level Master Volume CC CC 018 CC 014 CC 015 CC 016 CC 017 CC 058 CC 091 CC 053 CC 007 Controller Knob1 Knob2 Knob3 Knob4 Knob5 Knob6 Knob7 Knob8 Name Channel1 Pan Channel2 Pan Channel3 Pan Channel4 Pan Channel5 Pan Channel6 Pan Channel7 P...

Страница 1104: ...8 Slider 9 Name EG Attack EG Decay EG Sustain EG Release Arp Speed Arp Range Arp Mode Effect Speed Intensity Master Volume CC CC 073 CC 075 CC 070 CC 072 CC 021 CC 023 CC 026 CC 093 CC 007 Controller Knob1 Knob2 Knob3 Knob4 Knob5 Knob6 Knob7 Knob8 Name Controller 1 Controller 2 Controller 3 Controller 4 Pan CC CC 020 CC 021 CC 022 CC 023 CC 010 Controller SW1 SW2 SW3 SW4 SW5 SW6 SW7 SW8 Name CC Of...

Страница 1105: ...are the trademarks or registered trademarks of KORG INC 015 USB Ultra Focus This product name is a trademark or a registered trademark of Ultimate Sound Bank Controller Knob1 Knob2 Knob3 Knob4 Knob5 Knob6 Knob7 Knob8 Name Channel1 Pan Channel2 Pan Channel3 Pan Channel4 Pan Channel5 Pan Channel6 Pan Channel7 Pan Channel8 Pan CC CC 010 CC 010 CC 010 CC 010 CC 010 CC 010 CC 010 CC 010 Controller SW1 ...

Страница 1106: ...y Off 0162 Harmonica 0163 Bagpipe 0164 Bagpipe Drone 0165 Uilleann Pipe 0166 Woodwind Ensemble 0167 Trumpet mp 0168 Trumpet ff 0169 Trumpet Overblown 0170 Trumpet Cup 0171 Trumpet Cup Muted 0172 Piccolo Trumpet Staccato 0173 Trombone 1 mf 0174 Trombone 1 ff 0175 Trombone 2 0176 Trombone Muted 0177 French Horn 0178 Tuba f 0179 Tuba ff 0180 Trumpet Fall 0181 Trombone Trumpet Fall 0182 French Horn En...

Страница 1107: ...2 0432 Detuned Super 2 REV 0433 POWER SAW 0434 POWER SAW REV 0435 Detuned Quiet 0436 Detuned Quiet REV 0437 StrEns Slina 0438 StrEns Slina REV 0439 SynEns A2600 0440 SynEns A2600 REV 0441 Detuned PWM 0442 Detuned PWM REV 0443 Flug Pad 0444 Flug Pad REV 0445 White Pad 0446 White Pad REV 0447 Glass Vox REV 0448 Syn Air Vox 0449 Syn Air Vox REV 0450 Syn Vocalscape 0451 Syn Vocalscape REV 0452 Syn Gho...

Страница 1108: ...resx021 0787 resx022 0788 resx023 0789 resx024 0790 resx025 0791 resx026 0792 resx027 0793 resx028 0794 resx029 0795 resx030 0796 resx031 0797 resx032 0798 Min1 01a 0799 Min1 02a 0800 Min1 04a 0801 Min1 05a 0802 Min1 06a 0803 Min1 07a 0804 Min1 08a 0805 Min1 09a 0806 Min1 12a 0807 Min1 13a 0808 Pres321 0809 Pres335 0810 Pres349 0811 Pres363 0812 Pres377 0813 Pres384 0814 Pres391 0815 Pres398 0816 ...

Страница 1109: ... Pulse 05 1104 Pulse 08 1105 Pulse 16 1106 Pulse 33 1107 Pulse 40 1108 Pulse 15 MG 1109 Pulse 25 MG 1110 Pulse 10 A2600 1111 Pulse 30 A2600 1112 Pulse 90 A2600 1113 Pulse 10 Pro5 1114 Pulse 20 Pro5 1115 Pulse 30 Pro5 1116 Pulse 40 Pro5 1117 Pulse 10 MX12 1118 Pulse 20 MX12 1119 Pulse 35 MX12 1120 Pulse 20 OB 1121 Pulse 35 OB 1122 Pulse 30 Poly6 1123 Pulse 40 Poly6 1124 Pulse EXB 1125 Square 1126 S...

Страница 1110: ...DistFretNoise 1 b 1374 El Gtr DistFretNoise 2 a 1375 El Gtr DistFretNoise 2 b 1376 El Gtr DistFretNoise 2 c 1377 El Gtr DistFretNoise 2 d 1378 Ac Bs Slide Up Down 1 1379 Ac Bs Slide Up Down 2 1380 Ac Bs Slide Up Down 3 1381 Ac Bs Slide Down 1 1382 Ac Bs Slide Down 2 1383 Ac Bs Slide Down 3 1384 Ac Bs Slide Down 4 1385 Ac Bs Slide Up 1386 Ac Bs BumpThud 1 1387 Ac Bs BumpThud 2 1388 Ac Bs DeadNote 1...

Страница 1111: ...128 PC Voice 1 08 Four 0129 PC Voice 1 09 Six 0130 PC Voice 1 10 Seven 0131 PC Voice 1 11 Eight 0132 PC Voice 1 12 Nine 0133 PC Voice 1 13 Ten 0134 PC Voice 1 14 0135 PC Voice 1 15 0136 PC Voice 1 16 0137 PC Voice 1 17 0138 PC Voice 1 18 0139 PC Voice 1 19 0140 PC Voice 1 20 0141 PC Voice 1 21 0142 PC Voice 1 22 0143 PC Voice 1 23 0144 PC Voice 1 24 0145 PC Voice 1 25 0146 PC Voice 2 01 One 0147 P...

Страница 1112: ...ry mf 0155 SD 11 dry ff 0156 SD 11 amb mf 0157 SD 11 amb ff 0158 SD 12 dry p 0159 SD 12 dry mp 0160 SD 12 dry mf 0161 SD 12 dry f 0162 SD 12 dry ff 0163 SD 12 dry fff 0164 SD 12 amb mp 0165 SD 12 amb f 0166 SD 12 amb fff 0167 SD 13 dry mp 0168 SD 13 dry mf 0169 SD 13 dry ff 0170 SD 14 dry mf 0171 SD 14 dry f 0172 SD 14 dry ff 0173 SD 15 dry mp 0174 SD 15 dry mf 0175 SD 15 dry f 0176 SD 16 dry f 01...

Страница 1113: ...c 5 Open 0457 Hi Hat Brush Closed mp 0458 Hi Hat Brush Closed mf 0459 Hi Hat Brush Closed f 0460 Hi Hat Brush Pedal mf 0461 Hi Hat Brush Pedal ff 0462 Hi Hat Brush Open mp 0463 Hi Hat Brush Open mf Name 0464 Hi Hat Brush Open f 0465 Hi Hat Brush Open ff 0466 Hi Hat Dance 01 0467 Hi Hat Dance 02 0468 Hi Hat Dance 03 0469 Hi Hat Dance 04 0470 Hi Hat Dance 05 0471 Hi Hat Dance 06 0472 Hi Hat Dance 07...

Страница 1114: ...b g 0758 Tri Tamb h 0759 Tri Tamb i 0760 Tri Tamb j 0761 Tri Tamb k 0762 Tri Tamb l 0763 Tri Tamb m 0764 Cabasa 1 L a Down 0765 Cabasa 1 L a Up 0766 Cabasa 1 L b Down 0767 Cabasa 1 L b Up 0768 Cabasa 1 S a Down 0769 Cabasa 1 S a Up 0770 Cabasa 1 S b Down 0771 Cabasa 1 S b up 0772 Cabasa 2 L Stack b 0773 Cabasa 2 L Stack a 0774 Cabasa 2 L Roll 0775 Cabasa 2 S Stack a Name 0776 Cabasa 2 S Stack b 07...

Страница 1115: ... Vinyl Sliced 15 1071 DJ Vinyl Sliced 16 1072 DJ Vinyl Sliced 17 1073 DJ Vinyl Sliced 18 1074 DJ Scratch 1 1075 DJ Scratch 2 1076 DJ BD Rub 1077 DJ SD Rub 1078 DJ Record Stop 1079 DJ Reverse 1080 Industry Hit 01 1081 Industry Hit 02 1082 Industry Hit 03 1083 Industry Hit 04 1084 Pot Hit 1085 Industry Hit 05 1086 Industry Hit 06 1087 Industry Hit 07 Name 1088 Industry Hit 08 1089 Thonk 1090 Industr...

Страница 1116: ...mbau Wah Hi 1376 Berimbau HO 1377 Berimbau PO 1378 Berimbau Phrase1 Loop 1379 Berimbau Phrase1 1 1380 Berimbau Phrase1 2 1381 Berimbau Phrase1 3 1382 Berimbau Phrase1 4 1383 Berimbau Phrase2 Loop 1384 Berimbau Phrase2 1 1385 Berimbau Phrase2 2 1386 Berimbau Phrase2 3 1387 Berimbau Phrase2 4 Name Name 0000 BD 01 amb mp L 0001 BD 01 amb mp R 0002 BD 01 amb mf L 0003 BD 01 amb mf R 0004 BD 01 amb f L...

Страница 1117: ...22 SD 23 dry GhostRoll R 0323 SD 24 dry mp L 0324 SD 24 dry mp R 0325 SD 24 dry mf L 0326 SD 24 dry mf R 0327 SD 24 dry f L 0328 SD 24 dry f R 0329 SD 24 dry ff L 0330 SD 24 dry ff R 0331 SD 24 dry GhostRoll L 0332 SD 24 dry GhostRoll R 0333 SD 25 dry Brush Tap mp L 0334 SD 25 dry Brush Tap mp R 0335 SD 25 dry Brush Tap mf L 0336 SD 25 dry Brush Tap mf R 0337 SD 25 dry Brush Tap f L 0338 SD 25 dry...

Страница 1118: ...h Cymbal 07 f L 0615 Crash Cymbal 07 f R 0616 Crash Cymbal 07 ff L 0617 Crash Cymbal 07 ff R 0618 Crash Cymbal 08 mf L 0619 Crash Cymbal 08 mf R 0620 Crash Cymbal 08 f L 0621 Crash Cymbal 08 f R 0622 Cymbal Reverse 2 L Name 0623 Cymbal Reverse 2 R 0624 Ride Cymbal 01 mp L 0625 Ride Cymbal 01 mp R 0626 Ride Cymbal 01 mf L 0627 Ride Cymbal 01 mf R 0628 Ride Cymbal 01 f L 0629 Ride Cymbal 01 f R 0630...

Страница 1119: ...926 Okonkolo Cha Open mp L 0927 Okonkolo Cha Open mp R 0928 Okonkolo Cha Open mf L 0929 Okonkolo Cha Open mf R 0930 Okonkolo Cha Open f L 0931 Okonkolo Cha Open f R 0932 Okonkolo Cha Open ff L 0933 Okonkolo Cha Open ff R 0934 Okonkolo Cha Slap mp L Name 0935 Okonkolo Cha Slap mp R 0936 Okonkolo Cha Slap mf L 0937 Okonkolo Cha Slap mf R 0938 Okonkolo Cha Slap f L 0939 Okonkolo Cha Slap f R 0940 Tim...

Страница 1120: ...40 Tabla Na c R 1241 Tabla Tun a L 1242 Tabla Tun a R 1243 Tabla Tun b L 1244 Tabla Tun b R 1245 Tabla Tele a L 1246 Tabla Tele a R Name 1247 Tabla Tele b L 1248 Tabla Tele b R 1249 Tabla Tele c L 1250 Tabla Tele c R 1251 Tabla Ti a L 1252 Tabla Ti a R 1253 Tabla Ti b L 1254 Tabla Ti b R 1255 Tabla Ti c L 1256 Tabla Ti c R 1257 Tabla Tira L 1258 Tabla Tira R 1259 Baya GheUp a L 1260 Baya GheUp a R...

Страница 1121: ...b mp 0072 SD 07 amb mf Name 0073 SD 07 amb f 0074 SD 07 amb ff 0075 SD 08 dry mp 0076 SD 08 dry mf 0077 SD 08 dry f 0078 SD 08 dry ff 0079 SD 09 dry mp 0080 SD 09 dry mf 0081 SD 09 dry f 0082 SD 09 dry ff 0083 SD 09 amb mp 0084 SD 09 amb mf 0085 SD 09 amb f 0086 SD 09 amb ff 0087 SD 10 dry mp 0088 SD 10 dry mf 0089 SD 10 dry f 0090 SD 10 dry ff 0091 SD 11 dry mp 0092 SD 11 dry mf 0093 SD 11 dry f ...

Страница 1122: ...a Lo Toe 0381 Conga Hi Basstone mf 0382 Conga Hi Basstone f 0383 Conga Hi Open mp 0384 Conga Hi Open mf Name 0385 Conga Hi Open f 0386 Conga Hi OpenFlam 0387 Conga Hi OpenSlap 0388 Conga Hi OpenSlapFlam 0389 Conga Hi CloseSlapFlam 0390 Conga Hi Muffled 0391 Conga Hi Closed 0392 Conga Hi ClosedSlap 0393 Conga Hi Heel 0394 Conga Hi Toe 0395 Quinto Basstone 0396 Quinto Open mp 0397 Quinto Open f 0398...

Страница 1123: ... c 0584 Udo HalfOpen a 0585 Udo HalfOpen b 0586 Udo HalfOpen c 0587 Udo Open a 0588 Udo Open b 0589 Udo Open c 0590 Udo Open d 0591 Udo Bell a 0592 Udo Bell b 0593 Udo Slide a 0594 Udo Slide b 0595 Caxixi 1 a 0596 Caxixi 1 b 0597 Caxixi 1 c 0598 Caxixi 2 a 0599 Caxixi 2 b 0600 Caxixi 2 c 0601 Tabla Tin a 0602 Tabla Tin b 0603 Tabla Na a 0604 Tabla Na b 0605 Tabla Na c 0606 Tabla Tun a 0607 Tabla T...

Страница 1124: ...INT068 Pulstronik Rhythm 3 INT069 Random Pitch INT070 Recorder Flutes Sel INT071 Res SEQ 1 INT072 Res SEQ 2 INT073 Res SEQ 3 INT074 Romance Bell INT075 Saw Suite INT076 Sax Shaper INT077 Sax Shaper Y INT078 Sea Glass A INT079 Sea Glass B INT080 Shifting Bells INT081 Ski Jam INT082 Slow 1 2th Waves INT083 Slow 8th Waves INT084 Soft Waves INT085 Solar 1 INT086 Solar 2 INT087 Spectra INT088 SpectrumF...

Страница 1125: ...Cool House 10 House P089 Cool House 11 House P090 Hard House 1 HardHouse P091 Hard House 2 HardHouse P092 Hard House 3 HardHouse P093 Hard House 4 HardHouse P094 Hard House 5 HardHouse P095 Hard House 6 HardHouse P096 Hard House 7 HardHouse P097 Hard House 8 HardHouse P098 Hard House 9 HardHouse P099 Hard House 10 HardHouse P100 Hard House 11 HardHouse P101 Drum n Bass 1 D n B P102 Drum n Bass 2 D...

Страница 1126: ...s1 by Peter Schwartz 2005 Peter Schwartz all rights reserved Song 01 Love Embraces All EXs1 by Rogers Benjamin Dowling 2005 Visionsound Music www visionsound com all rights reserved Song 03 Night On The Town by Paul Barrere Fred Tackett 2004 feat music remixed for the OASYS by Gil Morales Song 04 Primitive by MAS Anai 2005 Cosmic Factory all rights reserved ...

Страница 1127: ...have purchased this product via the internet through mail order and or via a telephone sale you must verify that this product is intended to be used in the country in which you reside WARNING Use of this product in any country other than that for which it is intended could be dangerous and could invalidate the manufacturer s or distributor s warranty Please also retain your receipt as proof of pur...

Отзывы: