Sequencer mode
544
3. In From Measure select the
fi
rst measure that you
wish to delete, and in To End of Measure select the
last measure that you wish to delete.
By default, the range of measures will be set as
specified on the Track Edit page.
4. Specify the track(s) on which you want to execute
the command.
If you execute with
All Tracks
,
All MIDI Tracks
,
and
All Audio Tracks
unchecked, the specified
measures of data will be deleted only from the track
that’s selected in
Track Select
.
If you check
All Tracks
, the specified measures of
data will be deleted from all tracks.
If you check
All MIDI Tracks
(when a MIDI track is
selected), the specified measures of data will be
deleted from all MIDI tracks.
If you check
All Audio Tracks
(when an Audio
track is selected), the specified measures of data will
be deleted from all audio tracks.
5. To execute the Delete Measure command, press
the OK button. To cancel, press the Cancel button.
If in step 4 you uncheck
All Tracks
and execute this
operation, the measures will not be deleted from the
master track. Time signature and tempo data will
remain unchanged, and the time signature and
tempo of the measures that were moved forward as
a result of the Delete operation will change.
If in step 4 you check
All Tracks
and execute this
operation, the specified measures of musical data
will be deleted from all tracks including the master
track, and the time signature and tempo will also
move forward by the number of measures that were
deleted.
If note data extends across several measures, and
you delete a measure that falls in the middle of the
note, that note data will disappear from the
subsequent measures as well.
If you erase a portion of an audio event that extends
across several measures, a new region that changes
the region of the WAVE file that is played back will
automatically be created and named.
Note:
The WAVE file will not be deleted.
Insert Measure
This command inserts the specified number of
measures into the specified track. Existing data
following the insert location will be moved backward.
If you insert measures between note events that are
connected by a tie, a note-off will be created
immediately before the inserted measure, and the
subsequent portion will be deleted.
1. Use Track Select to select the MIDI track (MIDI
Track 01–16) or audio track (Audio Track 01–16)
into which you want to insert measures.
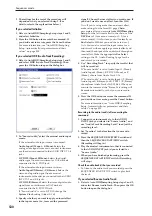
2. Select “Insert Measure” to open the dialog box.
MIDI tracks
Audio tracks
3. In “At Measure,” specify the measure location at
which the data will be inserted. (The measure you
speci
fi
ed in Track Edit page From Measure will be
set as a default.)
4. In “Length,” specify the number of measures that
will be inserted.
5. In Meter, specify the time signature of the
measures that will be inserted.
If you want the inserted measures to match the
existing time signature, specify **/**. With any
setting other than **/**, the time signature of the
inserted measures will change, and the specified
time signature will apply to all tracks for those
measures.
6. Specify the track(s) for which you want to execute
the command.
If you execute with
All Tracks
,
All MIDI Tracks
,
and
All Audio Tracks
unchecked, the measures will
be inserted into the track that’s selected in
Track
Select
. Be aware that at this time, the playback data
that follows the insert location will move toward the
end of the song according to the number of inserted
measures, but the time signature and tempo will not
move.
If you check
All Tracks
, the measures will be
inserted into all tracks including the Master Track.
1
2
3
4
5
6
2
1
7
8
5
4
3
Before
Delete
After
Delete
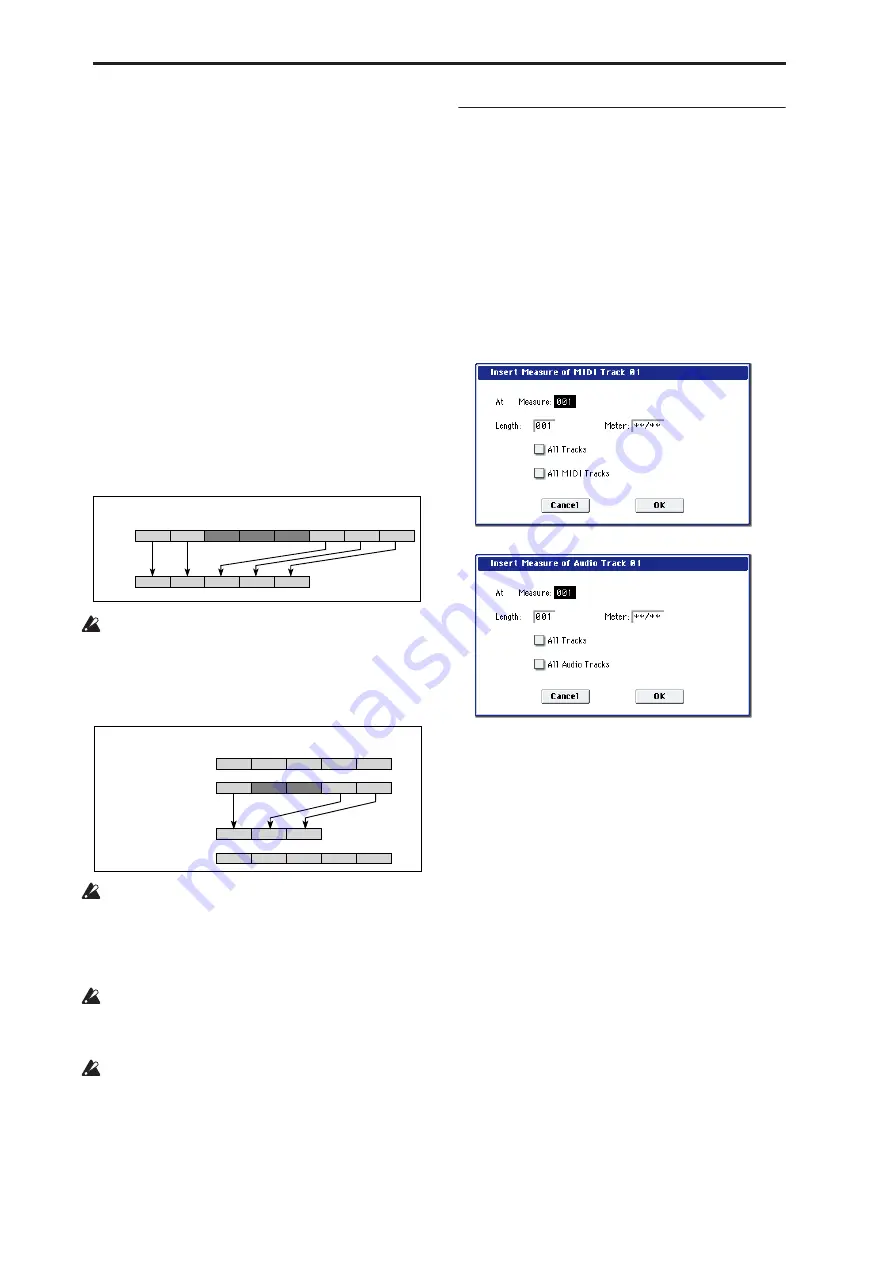
Example: When measures 3–5 are deleted, measures 6–8 are moved forward.
Track 2
2 (3/4)
1 (4/4)
3 (3/4)
Track 1
2 (3/4)
1 (4/4)
3 (3/4)
4 (4/4)
5 (4/4)
1 (4/4)
3 (3/4)
5 (4/4)
2 (3/4)
4 (4/4)
Track 2
1 (4/4)
3 (3/4)
5 (4/4)
2 (3/4)
4 (4/4)
Track 1
Before Delete
After Delete
Example: When measures 2 and 3 (3/4 time) of track 2 are deleted, the measures that were
at 4 and 5 are moved forward, and their time signature will change to 3/4.
Содержание Electronic Keyboard
Страница 1: ...Parameter Guide Parameter Guide ...
Страница 2: ......
Страница 180: ...Program mode EXi 170 ...
Страница 290: ...EXi STR 1 Plucked String 280 ...
Страница 572: ...Sequencer mode 562 ...
Страница 700: ...Global mode 690 ...
Страница 751: ...Insert Effects IFX1 IFX12 Routing 741 Fig 2 3a Fig 2 3b ...
Страница 902: ...Effect Guide 892 ...


