CHAP
. 9
GE Healthcare
Senographe 2000 D Acquisition System
REV 1
OM 5179217–1–100
105
4-5
Quality Check
The Quality Check function is used with
Auto Print
to allow the user to discard images before printing
from the AWS. Images are allocated into two groups:
OK,
and
NOT OK
. Only images allocated as
good (
OK
) are automatically printed, but all images are kept in the exam file.
D
When first acquired, all images are given the default Quality Check value of
OK
. If required, the
default value can be set to
NOT OK
, using the Medical Application preferences
Quality Check
panel (see Chapter 7).
D
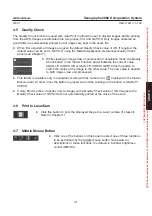
While viewing an image (raw or processed) in acquisition mode, the Quality
Check button in the Viewer Function panel indicates the current value
(
QUALITY CHECK OK
or
QUALITY CHECK NOK
). Click the button to
switch the status of the image to the other value. The new value is applied
to both images (raw and processed).
D
This facility is available only in acquisition mode (with the camera icon
displayed in the Viewer
Mosaic area). At other times the button is grayed out and the wording on the button is
QUALITY
CHECK
.
D
If
Auto Print
is active, it applies only to images with a Quality Check value of
OK
. Images with a
Quality Check value of
NOT OK
are not automatically printed at the close of the exam.
4-6
Print to LaserCam
D
Click this button to print the displayed image to a Laser camera (if present).
Refer to Chapter 11.
4-7
Middle Mouse Button
D
Click one of the buttons on this panel to select one of three functions
to be performed by the middle mouse button. See below for
descriptions of these functions; the default is Contrast brightness
control (WW/WL).
QUALITY
CHECK OK
QUALITY
CHECK NOK
FOR
TRAINING
PURPOSES
ONLY!
NOTE:
Once
downloaded,
this
document
is
UNCONTROLLED,
and
therefore
may
not
be
the
latest
revision.
Always
confirm
revision
status
against
a
validated
source
(ie
CDL).


