• 8 - 7
We suggest that you read the remainder of this section to understand what the menu
items can control. If you decide that you can usefully change some settings, we advise
that you first print out a Help page (described below).
The Help page shows the current settings of all menus. Items in bold are the current
settings. Menus which cannot be accessed in the current configuration are grayed
out.
If you change settings, make a note on the Help page of the setting(s) that you have
changed. This gives you a record of changes and may help you understand what
needs to be done if your printer behaves in a way users do not expect.
Note: Your printer and each individual port can be set to accept jobs in PostScript
only, PCL only, or to switch automatically between the two. If you set the printer to
Auto Switch, it will accept either PostScript or PCL documents without you having
to change settings. You do this by changing settings in the Emulations menu.
Your printer will work more efficiently if you change only the ports that actually
need Auto Switch. This means that any other ports that only need to accept a single
standard will not examine each print job to see whether it is PostScript or PCL.
However, if you choose Auto Switch for any port (or the entire printer), you will use
more printer RAM than if you choose PostScript only or PCL only. GCC recom-
mends that you only use Auto Switch if you are certain that you will be printing both
PostScript and PCL jobs.
1. Language
This menu lets you change the language of the messages in the display window.
Languages are
English
, Français, and Deutsch.
2. Print Help Page
This prints a chart of all the items on the menus. Press the Enter key to print this
chart. You cannot print this chart if the PS/PCL Sensing submenu is set to PCL only.
The Help page shows the current settings of all menus.
Menus which cannot be
accessed in the current configuration are grayed out.
3. Print (1) Sample Page(s)
You can print a sample page showing graphics and text. If you want to print more
than one copy of this sample page, press the + or - key to increase or decrease the
Содержание Elite XL 20ppm
Страница 1: ...USER S MANUAL GCC TECHNOLOGIES EliteTM XL20ppm ...
Страница 148: ...11 4 Maintenance and Troubleshooting 6 Place the remaining packing materials on top of the printer 7 Tape the box shut ...
Страница 168: ...A 5 G H F Skew 2 0mm 0 0787in E 2 0mm 0 0787in E F G H 245mm Paper feed direction ...
Страница 169: ...A 6 Lead Edge Registration 4 0 2 0mm 0 1575 0 0787in A 4 0 2 0mm 0 1575 0 0787in B B A Paper feed direction B B ...
Страница 170: ...A 7 Side Edge Registration 4 0 2 5mm 0 1575 0 0984in C 4 0 2 5mm 0 1575 0 0984in D D Paper feed direction D D C ...
Страница 171: ...A 8 Parallelism 2 0mm 0 0787in T 2 0mm 0 0787in T U V U 390mm W 245mm Paper feed direction U W V ...
Страница 172: ...A 9 Squareness 1 3mm 0 0512in J 1 3mm 0 0512in K L M 210mm M L Paper feed direction K J 90 ...
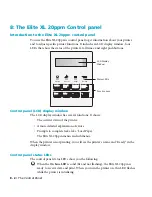
Страница 187: ...D 3 On Line Comm Paper Servic e ...


