•
When the TAD picks up the call, the printer monitors and takes the line if fax tones are
received and then starts receiving the fax.
• If the answering device is off, the printer automatically goes into Fax mode after a
predefined number of rings.
• If you answer the call and hear fax tones, the printer will answer the fax call if you
access
Fax
→
On Hook Dial
and press
Start
( ) and then hang up the receiver, or
press the remote receive code *9* and hang up the receiver.
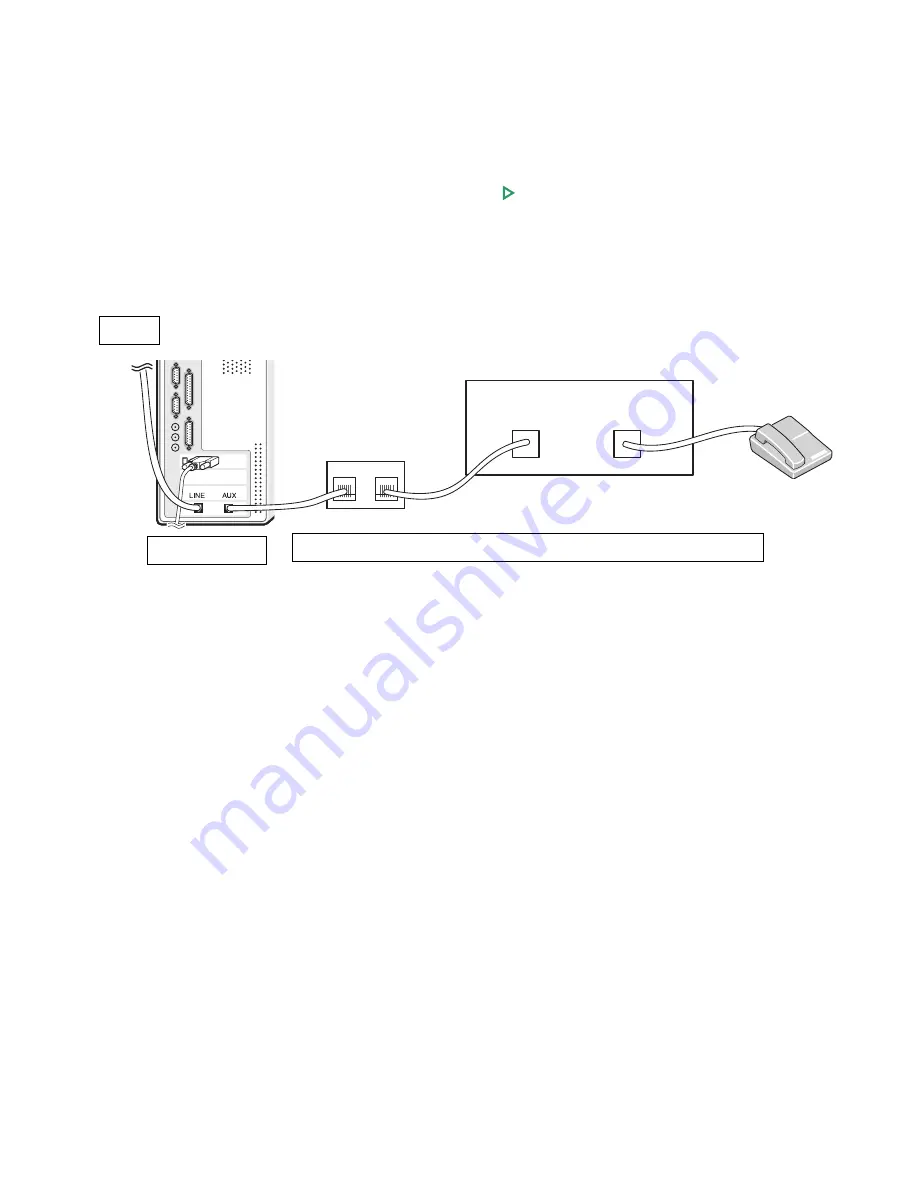
Using a Computer Modem
Line
Telephone Answering Device
LINE
EXT
Line
Phone
Dell B2375dfw Mono MFP / Dell B2375dnf Mono MFP
Computer
Figure 2
If you want to use your computer modem for faxing or for a dial-up internet connection,
connect the computer modem directly to the back of your printer with the TAD as shown
here in Figure 2.
• Set your printer to
Ans/Fax
mode and set the
Ring to Answer
to a digit greater than
the rings to answer setting for the TAD.
• Turn off the computer modem's fax-receive feature.
• Do not use the computer modem if your printer is sending or receiving a fax.
• To fax via the computer modem, follow the instructions provided with your computer
modem and fax application.
• You can capture images using your printer and Dell ScanDirect and send them using
your fax application with the computer modem.
- 266
Содержание B2375dfw
Страница 1: ...Dell B2375dfw Mono MFP Dell B2375dnf Mono MFP User s Guide ...
Страница 179: ...3 Click the Advanced tab and click Edit in the Overlay section 4 In the Edit Overlays window click Create 178 ...
Страница 215: ...3 Select Setup in New Printer area 4 Select Ethernet 214 ...
Страница 225: ...4 Click New Printer 5 Choose Wireless 224 ...
Страница 226: ...6 The software searches for printers 7 Set your printer name and click Next 225 ...
Страница 229: ...4 Select New Printer 5 Choose Wireless 228 ...
Страница 268: ...Mac Installing Software for Mac Printing Scanning Wireless network setup 267 ...
Страница 348: ...Installing Accessories Installing Printer Accessories Installing an Optional Tray 2 347 ...
Страница 350: ...3 Grasp the control board cover and open it 4 Connect the cable as below 349 ...
Страница 351: ...5 Close the control board cover 6 Combine machine and optional tray 2 as below 350 ...
Страница 353: ...Specifications General Specifications Dell technical support policy Contacting Dell Warranty and return policy 352 ...
Страница 359: ...USB memory managing 51 W watermarks printing 175 358 ...


