background image

2-25

Compaq ProLiant 6000 Setup and Installation Guide

For use with Pentium II Xeon and Pentium III Xeon processor-based servers only

Writer: Sam Ogden   Project: Compaq ProLiant 6000 Setup and Installation Guide   Comments: 312237-003 (February 1999)

File Name: C-CH02.DOC   Last Saved On: 2/4/99 1:18 PM

COMPAQ CONFIDENTIAL - NEED TO KNOW REQUIRED

Placing the Server in the Rack

WARNING:

   To reduce the risk of personal injury or damage to

the equipment, a minimum of two people 

MUST 

lift the server

into the rack. If the unit is to be loaded above chest level, a third
person must assist in aligning the rails while the other two
support the unit.

IMPORTANT:

   Compaq recommends that all power supplies and hot-plug

drives should be removed from the system before loading in onto the rails.

CAUTION:

   If server hard drives were pre-configured, make sure

that hard drives and bays are labeled. This will ensure the hard
drives are reinstalled in the same location.

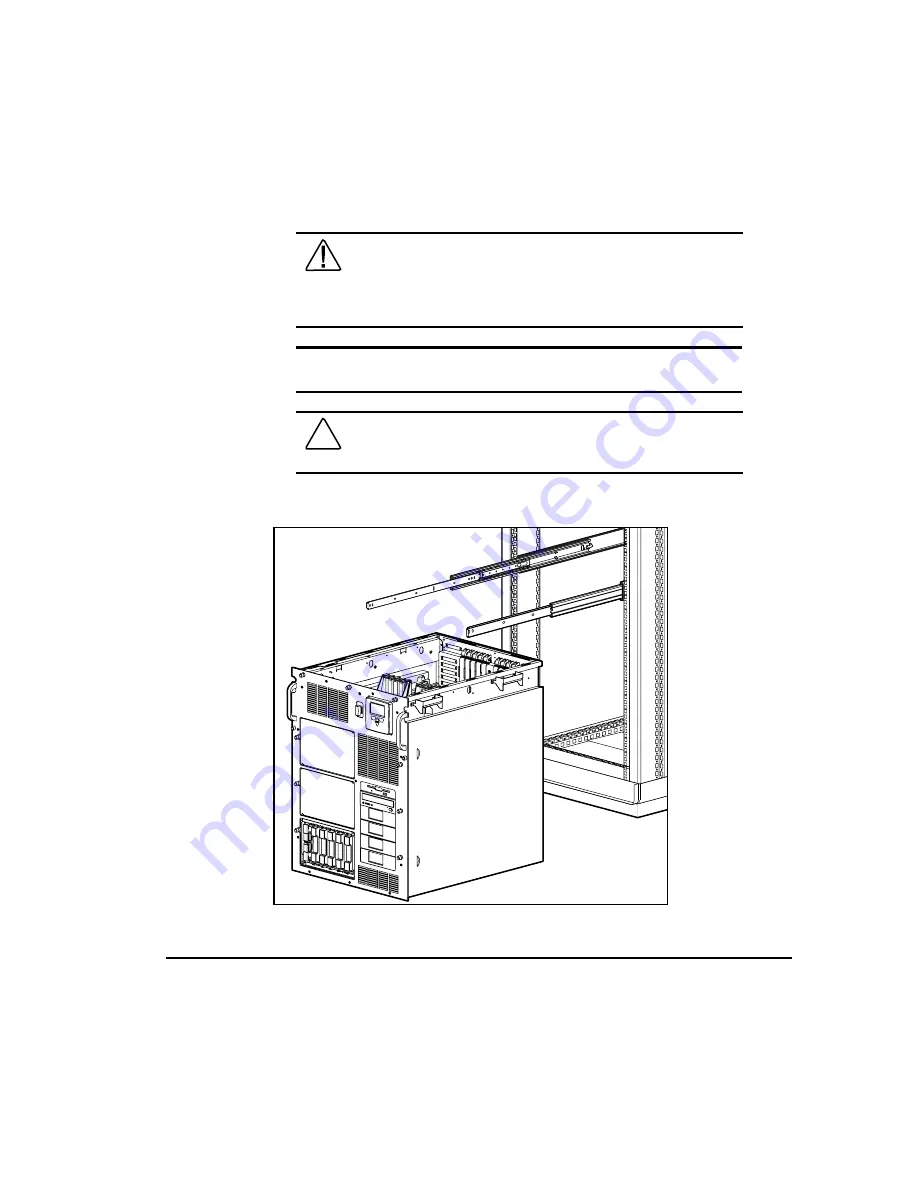
1.


Extend the slides fully.

Figure 2-16.    Extending the slides

Содержание ProLiant 6000 Series

Страница 1: ...ProLiant 6000 Setup and Installation Guide For Pentium II Xeon and Pentium III Xeon Processor based Servers Third Edition February 1999 Part Number 312237 003 Compaq Computer Corporation ...

Страница 2: ...ved Printed in the U S A The software described in this guide is furnished under a license agreement or nondisclosure agreement The software may be used or copied only in accordance with the terms of the agreement Compaq Deskpro Fastart Compaq Insight Manager Systempro Systempro LT ProLiant ROMPaq QVision SmartStart NetFlex QuickFind PaqFax and ProSignia are registered with the United States Paten...

Страница 3: ...Compaq Management CD xi Text Conventions xi Symbols in Text xii Symbols on Equipment xii Server Warnings and Precautions xiii Getting Help xiv Compaq Website xiv Telephone Numbers xiv Chapter 1 Introduction Compaq ProLiant 6000 1 1 Features 1 2 Processor and Redundant Processor Power Modules 1 2 System Memory 1 2 Expansion Slots 1 3 Internal Hot Plug Drive Bays 1 3 Internal Removable Media Drive B...

Страница 4: ...Requirements 2 2 Power Requirements 2 3 Grounding 2 4 Temperature Requirements 2 5 Airflow Requirements 2 6 Unpacking the Shipping Boxes 2 6 Removing the Power Supply Shipping Bracket 2 8 Locating the Server Access Panel Labels 2 9 Using the Security Provisions 2 10 Securing the Front Bezels with the Keylock Tower Models Only 2 10 Securing the Power Supply Area with the Security Bar 2 11 Installin...

Страница 5: ...oubleshooting Interlock Power 3 8 Troubleshooting Interlock Connection in the I O Area 3 8 Troubleshooting Interlock Connection in the Processor Area 3 9 System Short 3 9 Hard Drive LEDs 3 11 Server Access Panels 3 12 Opening the Right Front Bezel Tower Models Only 3 14 Opening the Left Front Bezel Tower Models Only 3 15 Removing the Top Access Panel 3 15 Removing the Right Side Access Panel 3 17 ...

Страница 6: ...I O Expansion Slots 4 40 Installing a PCI Expansion Board Slots 3 11 4 43 Adding PCI Expansion Boards with Extended SCSI Slots 10 and 11 4 45 Installing Non Plug and Play Boards 4 47 Bus Distribution 4 47 ISA Modem Installation Slot 1 4 49 Replacing Fans 4 52 Replacing the I O Fans Fans 1 and 2 4 52 Replacing the Redundant Hot Plug External Processor Fan Assembly Fan 4 4 54 Chapter 5 Server Config...

Страница 7: ...nce Notices Regulatory Compliance Identification Numbers A 1 Federal Communications Commission Notice A 1 Class A Equipment A 2 Class B Equipment A 2 Declaration of Conformity for products marked with the FCC logo United States only A 3 Modifications A 4 Cables A 4 Canadian Notice Avis Canadien A 4 Class A Equipment A 4 Class B Equipment A 4 Mouse Compliance Statement A 5 European Union Notice A 5...

Страница 8: ...ONFIDENTIAL NEED TO KNOW REQUIRED Appendix C Power Cord Set Requirements General Requirements C 1 Country Specific Requirements C 2 Appendix D Server Specifications and Connector Interfaces Server Specifications D 1 Connector Interfaces D 3 Appendix E Internal CD ROM Drive Opening the Tray Manually E 3 Appendix F Processor Board I O Board and Standard Peripheral Board Processor Board F 1 I O Board...

Страница 9: ...rs servers Compaq assumes you are qualified in the servicing of computer equipment and trained in recognizing hazards in products with hazardous energy levels WARNING There is a risk of personal injury from hazardous energy levels The installation of options and routine maintenance and service of this product shall be performed by individuals who are knowledgeable about the procedures precautions ...

Страница 10: ...des for the following Compaq options that might be included with your server or purchased separately Some of the information you will find includes Array controllers Updating firmware Installing and configuring controllers Understanding drive arrays Troubleshooting problems Tape drives Installing and configuring tape drives Operating the hardware Obtaining software drivers Troubleshooting problems...

Страница 11: ...ompaq Insight Manager features such as reboot control server failure alerting and paging capabilities Text Conventions This document uses the following conventions to distinguish elements of text Keys Keys appear in boldface A plus sign between two keys indicates that they should be pressed simultaneously USER INPUT User input appears in a different typeface and in uppercase FILENAMES File names a...

Страница 12: ...quipment or loss of information IMPORTANT Presents clarifying information or specific instructions NOTE Presents commentary sidelights or interesting points of information Symbols on Equipment These icons may be located on equipment in areas where hazardous conditions may exist Any surface or area of the equipment marked with these symbols indicates the presence of electrical shock hazards Enclose...

Страница 13: ...WARNING To reduce the risk of injury from a hot component allow the surface to cool before touching Power Supplies marked with these symbols indicate the equipment is supplied by multiple sources of power WARNING To reduce the risk of injury from electrical shock remove all power cords to completely disconnect power from the system Server Warnings and Precautions 59 86 kg 130 190 lbs WARNING Any p...

Страница 14: ...e power supply from the server If the system has multiple power supplies disconnect power from the system by unplugging all power cords from the power supplies Getting Help If you have a problem and have exhausted the information in this guide you can get further information and other help in the following locations Compaq Website The Compaq website has information on this product as well as the l...

Страница 15: ...ction Compaq ProLiant 6000 IMPORTANT These instructions are for use with Pentium II Xeon and Pentium III Xeon processor based servers only The Compaq ProLiant 6000 family of servers delivers unprecedented room for growth and an innovative design that significantly reduces the lifetime costs of system upgrades and maintenance Optimized for expansion high availability and ease of service the ProLian...

Страница 16: ...ter cooled heat pipes attached to the processor One redundant processor power module per processor IMPORTANT You cannot mix Pentium III Xeon processors in a server that has Pentium II Xeon processors System Memory ECC Error Checking and Correcting Memory with single bit error correction and detection down to a single DIMM and multi bit error detection down to the memory bank Expandable to 8 GB 32 ...

Страница 17: ... hard drive cages that can be configured with six 1 inch hot plug hard drives four 1 6 inch hot plug hard drives or a combination of both 1 inch and 1 6 inch drives Drives may be of any supported storage capacity but must be mounted on Compaq hot plug drive trays Each cage is capable of supporting a maximum of six 1 inch hot plug drives totaling eighteen drives with all three drive cages installed...

Страница 18: ...bays and internal hard drive cages Integrated Wide Ultra SCSI 3 controllers provide one Wide Ultra SCSI 3 external connector for use with external mass storage devices Each Wide Ultra SCSI 3 controller performs at a maximum data transfer rate of 40 MB s For more information on supported disk controller options refer to the Storage and Options Documentations Library CD or the ProLiant 6000 informat...

Страница 19: ... with 2 MB memory From 16 to more than 256 colors depending on graphics mode Supports SVGA VGA and EGA graphics resolution Power Supplies Supports up to three hot plug redundant power supplies IMPORTANT Hot plug power supplies are not designed to be installed with AC current connected Be sure to disconnect from AC current prior to removal or installation of hot plug power supplies Power supplies a...

Страница 20: ...B to 8 GB 3 to 10 2 220 1 to 4 12 to 18 256 MB to 8 GB 3 to 10 NOTE Table 1 1 does not imply that a given power supply configuration can support the maximum number of processors hard drives memory and PCI expansion boards listed See Guidelines in the next section Power supply advanced features include Auto Line Sensing capability no switch is needed to select the appropriate line voltage Power Sup...

Страница 21: ...ption documentation to obtain the most accurate power capacity and assessment of power margin Comparing processor and hard drive power two processors draw as much current as five to six hard drives Comparing memory and 3 3V powered PCI Expansion Board power each additional 512 MB draws approximately as much current as one to two PCI boards Comparing hard drive and 5V powered PCI Expansion Board Po...

Страница 22: ...it This guide also provides basic installation instructions for the following server options Redundant hot plug power supplies Pentium II Xeon and Pentium III Xeon processors Redundant processor power modules EDO DIMM memory Hot plug hard drives Tape and CD ROM drives I O expansion boards Integrated Management Display IMD Redundant hot plug fans 56K NA modem NOTE For information on using the optio...

Страница 23: ...rt Software CD is the intelligent way to configure your Compaq server with Microsoft Novell and SCO system software SmartStart uses a step by step process to configure the server and to load the system software thereby achieving a well integrated server that ensures maximum dependability and supportability The SmartStart and Support Software CD also holds the Compaq System Configuration Utility Fo...

Страница 24: ...es that provide detailed information and offer special capabilities Compaq Power Down Manager Compaq Power Supply Viewer Compaq Integrated Management Log Viewer The utilities are provided on the Compaq Support Software for Microsoft Windows NT 4 0 diskettes Windows NT SSD For more detailed information refer to the Systems Reference Library and the NTREADME HLP file on Diskette 1 Compaq Insight Man...

Страница 25: ... Integrated Management Log IML records events and stores them in an easily viewable form The IML records hundreds of events and then marks each event with a time stamp For more information concerning the IML see Chapter 6 Integrated Management Display Compaq Integrated Remote Console The Compaq Integrated Remote Console IRC is a hardware based remote console solution for enhanced out of band remot...

Страница 26: ...ower On Self Test messages User defined administrative information Configuration information System alerts and event description For information concerning the Integrated Management Display see Chapter 6 Integrated Management Display Security For detailed information concerning security features refer to the Systems Reference Library CD included in the Reference Information pack shipped with your ...

Страница 27: ...ty These hardware security features are provided One key provides easy assess to all areas of the server Power supply security bar with padlock Front bezel security keylock to limit access to the screws securing the side and top panels Diagnostics Tools Some of the software and firmware diagnostics tools include Power On Self Test POST Diagnostics DIAGS ROMPaq utilities to upgrade flash ROMs Drive...

Страница 28: ...ONFIDENTIAL NEED TO KNOW REQUIRED Server Registration Registering your server provides Compaq with valuable information on server installation This information helps Compaq serve your needs better now and in the future Visit www compaq com register to register your server Routine Maintenance For information concerning routine maintenance and safety precautions refer to the Systems Reference Librar...

Страница 29: ...irst time Depending on the hardware options you are installing or the configuration requirements of your system some of these steps may not be performed in the sequence listed 1 Select a site and unpack the server keyboard if included mouse if included and monitor if included Refer to the next sections Optimum Environment and Unpacking the Shipping Boxes in this chapter 2 Remove the power supply s...

Страница 30: ...s chapter 6 Connect the cables keyboard if included mouse monitor network and power See Connecting the Power Cord s and Peripheral Devices later in this chapter 7 Turn on the server and insert the SmartStart and Support Software CD to configure the server To load the CD see Chapter 5 Server Configuration For the SmartStart and Support Software CD installation procedures refer to the Server Setup a...

Страница 31: ...n requirements IMPORTANT Because of the 100 to 120 VAC electrical rating of each power supply some local electrical authorities may require either one 15 Ampere circuit for each power supply or one 20 Ampere circuit for each pair of power supplies The power load needs to be balanced between available AC supply branch circuits The overall system AC current load must not exceed 80 percent of the bra...

Страница 32: ... this equipment is not recommended For proper operation and safety this equipment is required to be properly grounded In the United States install the equipment in accordance with NFPA 70 1993 National Electric Code Article 250 as well as any local and regional building codes In Canada the equipment should be installed in accordance with Canadian Standards Association CSA C22 1 Canadian Electrical...

Страница 33: ... TMRA for each piece of equipment should be checked before installation For rack models the operating temperature inside the rack will always be higher than the room temperature and is dependent on the configuration of equipment in your rack The TMRA for each piece of equipment should be checked before installation The maximum internal rack temperature for your configuration should not exceed the ...

Страница 34: ... Front The rack door should have 120 square inches of holes evenly distributed from top to bottom to permit adequate air flow Side The clearance between the installed module and the side panels of the rack should be a minimum of 2 75 inches Rear The clearance between the back of the rack and the wall should be a minimum of 30 inches and the equipment should be operating without a rear door CAUTION...

Страница 35: ...abels which are attached to the inside of the side access panels and the top access panel of the server Hardware documentation and software packs inside the country kit Server Setup and Management Reference Information Installing Rack Products if included and Software Products In addition to these supplied items you may need T 15 Torx screwdriver Options to be installed such as expansion boards mo...

Страница 36: ...CONFIDENTIAL NEED TO KNOW REQUIRED Removing the Power Supply Shipping Bracket To protect the power supply from damage during shipment each power supply is installed with a protective covering bracket Use the following illustration to remove the bracket s and screws IMPORTANT Save the bracket s and screws in a safe location The bracket s and screws will need to be replaced if you have to ship the s...

Страница 37: ...llation information is provided on the access panel labels As shown in the figure below these labels are located on the inside of the top access panel the left side access panel and the right side access panel To remove the appropriate panel see Chapter 4 Installing Hardware Options IMPORTANT These labels do not contain warning and caution information Refer to this guide or to the option documenta...

Страница 38: ...IRED Using the Security Provisions The ProLiant 6000 has two security access provisions one front bezel security keylock tower model only and one power supply security bar with padlock You or your Service Provider will need to install the power supply security bar Securing the Front Bezels with the Keylock Tower Models Only 1 Close the left front bezel and then the right front bezel 2 Turn the key...

Страница 39: ...18 PM COMPAQ CONFIDENTIAL NEED TO KNOW REQUIRED Securing the Power Supply Area with the Security Bar 1 Remove the power supply security bar from the package 2 Insert the end of the security bar into the slot located near the bottom of the server 3 Align the top of the bar into the padlock slot 4 Locate the padlock and keys in the country specific kit box and install the lock to secure the bar pat ...

Страница 40: ...n the back of the server identify the function of each connector Tie the AC cord s onto the loops provided on the power supplies to prevent the cord s from being disengaged Figure 2 5 Securing the power cord on the loop provided WARNING To reduce the risk of electric shock or damage to the equipment Install the power supply before connecting the power cord to the power supply Unplug the power cord...

Страница 41: ...autions Before beginning these procedures make sure you understand the following warnings WARNING To reduce the risk of personal injury or damage to the equipment be sure that The leveling jacks are extended to the floor The full weight of the rack rests on the leveling jacks The stabilizing feet are attached to the rack if it is a single rack installations The racks are coupled together in multip...

Страница 42: ... mated with the rails WARNING To reduce the risk of electric shock or damage to the equipment Do not disable the power cord grounding plug The grounding plug is an important safety feature Plug the power cord into a grounded electrical outlet that is easily accessible at all times Install the power supply before connecting the power cord to the power supply Unplug the power cord before removing th...

Страница 43: ...de Comments 312237 003 February 1999 File Name C CH02 DOC Last Saved On 2 4 99 1 18 PM COMPAQ CONFIDENTIAL NEED TO KNOW REQUIRED Removing the Top Access Panel To remove the top access panel 1 Loosen the top two thumbscrews and the slotted Torx screw 2 Slide the top access panel toward the rear of the unit about 1 0 inch 2 5 cm 3 Lift and remove the top access panel Figure 2 6 Removing the top acce...

Страница 44: ... Last Saved On 2 4 99 1 18 PM COMPAQ CONFIDENTIAL NEED TO KNOW REQUIRED Removing the Slide Fillers Two slide fillers cover the spaces on the right and left sides of the server chassis where the rack lift assists are to be installed and the slides mount To remove the slide fillers 1 With the top access panel removed locate and lift the slide filler tabs inside the chassis 1 2 Remove the slide fille...

Страница 45: ...tion Guide Comments 312237 003 February 1999 File Name C CH02 DOC Last Saved On 2 4 99 1 18 PM COMPAQ CONFIDENTIAL NEED TO KNOW REQUIRED Removing the Casters To remove the casters 1 Place the server on its left side 2 Remove the screws that attach each caster and then remove each caster Figure 2 8 Removing the casters 3 Place the server in its upright position 4 Replace the right side access panel...

Страница 46: ...2237 003 February 1999 File Name C CH02 DOC Last Saved On 2 4 99 1 18 PM COMPAQ CONFIDENTIAL NEED TO KNOW REQUIRED Installing the Rack Lift Assists To install the rack lift assists 1 Align the two rack lift assists with the right side of the chassis and secure each with two 6 32 self threading screws Figure 2 9 Installing the rack lift assists on the right side of the chassis 2 Repeat on the left ...

Страница 47: ...m assemblies that attach to the rack To attach the slide rails to the mounting bracket 1 Locate the slide rails and the mounting brackets 2 Position and insert a slide rail inside a mounting bracket making sure that the front of the slide rail is at the front of the mounting bracket To identify the front of the slide rail and mounting bracket The front of the slide rail allows the inner slide to m...

Страница 48: ...C Last Saved On 2 4 99 1 18 PM COMPAQ CONFIDENTIAL NEED TO KNOW REQUIRED 4 Fasten the slide rail to the mounting bracket with three 8 32 x 1 4 inch slotted screws supplied Retract the inner slide to access the fourth screw hole that was covered when you attached the first three screws Attach the fourth screw 1 2 Figure 2 11 Attaching the slide rail to the mounting bracket 5 Repeat steps 1 through ...

Страница 49: ...e template in the desired location on the front of the rack and secure it with two push tabs Make sure that you match the hole pattern printed on the template with the actual holes on the rack s vertical rails Figure 2 12 Measuring with the template 2 Use a pencil to mark the top four locations indicated on the template for the two mounting brackets These locations are for screws and not cage unit...

Страница 50: ...on Guide Comments 312237 003 February 1999 File Name C CH02 DOC Last Saved On 2 4 99 1 18 PM COMPAQ CONFIDENTIAL NEED TO KNOW REQUIRED Inserting Cage Nuts in the Rack Frame The cage nuts fit on the inside of the rails at the marked locations 1 Squeeze the cage nut with your fingers 1 to pry the cage nut into position 2 2 1 1 Figure 2 13 Inserting cage nuts 2 Repeat for each cage nut ...

Страница 51: ...e Name C CH02 DOC Last Saved On 2 4 99 1 18 PM COMPAQ CONFIDENTIAL NEED TO KNOW REQUIRED Attaching the Slide Rail Assembly to the Rack To install the slide rail assembly 1 Place a mounting bracket in position according to the pencil marks made earlier 2 Attach the front of the bracket on the inside of the front of the rack with two M6 x 1 0 12L Phillips screws Do not use washers Figure 2 14 Attach...

Страница 52: ...nts 312237 003 February 1999 File Name C CH02 DOC Last Saved On 2 4 99 1 18 PM COMPAQ CONFIDENTIAL NEED TO KNOW REQUIRED 3 Secure the back of each mounting bracket on the outside of the back of the rack with two M6 x 1 0 12L Phillips screws and cage units IMPORTANT Make sure that the mounting bracket is level from front to back Figure 2 15 Attaching the slide rail assembly to the back of the rack ...

Страница 53: ...ersonal injury or damage to the equipment a minimum of two people MUST lift the server into the rack If the unit is to be loaded above chest level a third person must assist in aligning the rails while the other two support the unit IMPORTANT Compaq recommends that all power supplies and hot plug drives should be removed from the system before loading in onto the rails CAUTION If server hard drive...

Страница 54: ...etup and Installation Guide Comments 312237 003 February 1999 File Name C CH02 DOC Last Saved On 2 4 99 1 18 PM COMPAQ CONFIDENTIAL NEED TO KNOW REQUIRED 2 Lift the server with the rack lift assists 3 Set the server on top of the extended slides Figure 2 17 Setting the server on the slide rails 4 Slide the server in between the extended slides as far as it will go ...

Страница 55: ...en sliding the component rails into the slide rails Tilting the component up or down could result in damage to the rails Figure 2 18 Attaching the server 6 Remove the rack lift assists Store the rack lift assists and screws for future use if the server needs to be removed from the rack WARNING To reduce the risk of personal injury be careful when pressing the component rail release latches and sli...

Страница 56: ...ble Management Arm The cable management bracket and arm assembly lets you organize and secure the cables in the back of the server The cable management arm attaches to the cable management arm bracket on the server and to the rack All cables to and from the server are tied to this arm and swing out of the way when you access the server Installing the Cable Management Arm Bracket 1 Slide the server...

Страница 57: ...NTIAL NEED TO KNOW REQUIRED Installing the Cable Management Arm 1 Slide the server into the rack 2 Attach the cable management arm to the cable management arm bracket using two M6 x 1 0 12L Phillips head screws Figure 2 20 Attaching the cable management arm to its bracket 3 Align the other end of the cable management arm on the outside of the rear rack frame Align the nut bar metal plate on the in...

Страница 58: ... processor based servers only Writer Sam Ogden Project Compaq ProLiant 6000 Setup and Installation Guide Comments 312237 003 February 1999 File Name C CH02 DOC Last Saved On 2 4 99 1 18 PM COMPAQ CONFIDENTIAL NEED TO KNOW REQUIRED Figure 2 21 Attaching the cable management arm to the rack ...

Страница 59: ... the loop provided on the power supply to prevent the cord from being accidentally disengaged Figure 2 22 Securing the power cord on the loop provided WARNING To reduce the risk of electric shock or damage to the equipment Install the power supply before connecting the power cord to the power supply Unplug the power cord before removing the power supply from the server If the system has multiple p...

Страница 60: ...electrical outlet grasp the cord by the plug WARNING To reduce the risk of electrical shock or fire do not plug telecommunications telephone connectors into the Network Interface Card NIC receptacles 2 Connect all external cables to the server 3 If you install a switch box in the rack route the CPU to switch box cables to the switch box 4 Bundle all of the cables including the power cable and tie ...

Страница 61: ... Saved On 2 4 99 1 18 PM COMPAQ CONFIDENTIAL NEED TO KNOW REQUIRED Rear Panel Connectors 2 1 8 3 4 5 6 7 9 Figure 2 24 Rear panel connectors with one power supply installed Table 2 2 Rear Panel Connectors Ref Connector Ref Connector 1 Wide Ultra SCSI Very High Density Connector Interface VHDCI Connector 6 Serial Connector B 2 Parallel Connector 7 RJ 45 Ethernet 3 Monitor Connector 8 Mouse Connecto...

Страница 62: ...ocks are met see Chapter 3 Server Operation 2 Slide the Power On Standby switch cover plate to the right 1 2 pat 28 eps Figure 2 25 Turning on power to the server 3 Press the Power On Standby switch to on 4 Verify that the system LED lights You should be able to hear fans starting Observe post messages on the IMD if installed and system monitor if connected When the system is first powered on the ...

Страница 63: ...ystem selection on subsequent reboots Powering Down the Server The system power in the ProLiant 6000 does not shut off completely with the front panel Power On Standby switch The two positions of the switch function as ON and STANDBY rather than ON and OFF The STANDBY position removes power from most of the electronics and the drives but portions of the power supply the Integrated Management Displ...

Страница 64: ... Slide the Power On Standby switch cover plate to the right 1 2 pat 28 eps Figure 2 26 Turning off power to the server 2 Press the Power On Standby switch to STANDBY This places the server in standby thereby disabling the main power supply output and providing auxiliary power 5V to the server Standby does not disable main output power 3 Verify the system LED on the front panel near the power on st...

Страница 65: ...e information below provides details concerning system power and power supply indicators and removal of the server access panels WARNING The power supplies in the ProLiant 6000 produce hazardous energy levels The installation of options and the routine maintenance and service of this product should be performed by individuals who are knowledgeable of the procedures precautions and hazards associat...

Страница 66: ...nics and the drives but portions of the power supply the system interlock circuitry and some internal circuitry remain active To remove all power from the system completely you must disconnect all power cords from the server WARNING To reduce the risk of electric shock or damage to the equipment Disconnect power from the system by unplugging all power cords from the power supplies Do not disable t...

Страница 67: ...nd AC power indicators See Figure 3 1 and Table 3 1 for a detailed description of both indicators 1 2 Figure 3 1 Power supply indicators Table 3 1 Power Supply Indicators Indicator Condition Meaning Status Green Green Amber alternating Green flashing Amber Amber flashing Off Normal operation Power supply failed to restart after a prolonged fault Power supply will restart within 20 seconds Fault de...

Страница 68: ...umbering of Power Supplies The ProLiant 6000 can be configured with up to three hot plug redundant power supplies See Chapter 4 Installing Hardware Options or the option documentation to install additional power supplies 1 2 3 Figure 3 2 Numbering of power supplies CAUTION To prevent loss of data or damage to the equipment any power supply bay that is not populated with a power supply must be cove...

Страница 69: ... visual assistance in isolating components to check if the server will not power up due to a broken interlock chain The I O board is located directly beneath the top access panel You can use the System Interlock LEDs to troubleshoot problems in the server IMPORTANT This section assumes that A power supply is installed in the server The AC cord is installed in the power supply and in a working grou...

Страница 70: ...Setup and Installation Guide Comments 312237 003 February 1999 File Name D CH03 DOC Last Saved On 2 22 99 8 46 AM COMPAQ CONFIDENTIAL NEED TO KNOW REQUIRED 1 2 3 Figure 3 4 System Interlock LEDs on I O board Table 3 2 System Interlock LEDs on I O Board Number LED 1 System Interlock LED 2 Aux 5V LED interlock power 3 Processor Board Interlock LED ...

Страница 71: ...ower section ON OFF OFF System interlock status is normal OR 1 If the server will not power up then the I O board power cable is disconnected from the I O board or the power backplane Verify the power cable is not damaged and is properly installed to the I O board and the power backplane board 2 A software shutdown will place the server in Standby even when the On Standby switch is in the ON posit...

Страница 72: ... LED 3 If Aux 5V LED is still not on replace the power supply 4 Recheck the Aux 5V LED 5 If Aux 5V LED is still not on contact Compaq or your service provider The problem could be with the backplane a burned out LED or broken ribbon cable Troubleshooting Interlock Connection in the I O Area 1 Remove top and left access panels 2 Reseat the standard peripheral board 3 Verify the power cable is not d...

Страница 73: ... damaged and are properly installed in the processor board and power backplane 7 Verify the processor board and I O board are properly mated and that the four service screws are installed 8 Check LEDs or the symptom again 9 If the problem is not resolved contact Compaq or your service provider System Short If the System LED blinks once every 10 20 seconds the system is trying to start but may have...

Страница 74: ... a short exists use the table to determine which loads to investigate first to clear the short Also look in the area for foreign material or obvious damage Table 3 4 Power Plane Loads Power Plane Area 1 5V 2 5V Processor Chipset Core and Cache voltage Processor PPMs 3 3V Memory PCI Slots AUX5V IMD Interlock Chain 5V Storage media PCI Slots Modem Slot 12V Storage media PPMs PCI Slots Modem Slot 12V...

Страница 75: ...rd Drive LEDs NOTE If the drive chassis is not a part of a drive array only the center green LED will function In this case the center green LED shows drive access 1 2 3 Figure 3 5 Hard drive LEDs Table 3 5 Hard Drive LEDs LED ID Status Means Left Green 1 ON Hard drive online Power to hard drive Do not remove hard drive Flashing Hard drive being rebuilt Do not remove hard drive OFF Hard drive off ...

Страница 76: ...some situations there could be a problem with the drive cage the SCSI cable or the controller Server Access Panels The Compaq ProLiant 6000 server chassis facilitates the installation of hardware upgrades Use the following table to determine how to access the server components Table 3 6 Quick Reference List for Gaining Access to Server Components To Gain Access To You Will Need To ISA Modem Slot S...

Страница 77: ...access panel and the left side access panel CAUTION Never operate the server with an access panel removed or partially installed Doing so could cause thermal damage to the hard drives or system and could void your server warranty WARNING To reduce the risk of personal injury disconnect all power cords and unplug any telecommunications cables before removing any access covers Disconnect the power c...

Страница 78: ...d Installation Guide Comments 312237 003 February 1999 File Name D CH03 DOC Last Saved On 2 22 99 8 46 AM COMPAQ CONFIDENTIAL NEED TO KNOW REQUIRED Opening the Right Front Bezel Tower Models Only To open the right front bezel 1 If the keylock is locked turn the key clockwise 2 Open the right front bezel 1 2 pat 03a Figure 3 6 Opening the right front bezel ...

Страница 79: ...RED Opening the Left Front Bezel Tower Models Only To open the left front bezel 1 Open the right front bezel Refer to the instructions described in the previous section of this chapter 2 Open the left front bezel pat 03b Figure 3 7 Opening the left front bezel Removing the Top Access Panel To remove the top access panel 1 If the server is on place the server in Standby mode and disconnect the powe...

Страница 80: ... Lift and remove the panel to locate the I O board the Standard Peripheral Board and the I O fan WARNING To reduce the risk of personal injury from hot surfaces allow the internal system components to cool before touching them CAUTION Never operate the server with an access panel removed or partially installed Doing so will cause thermal damage to the system and could void your warranty 6 Turn the...

Страница 81: ...r cord s See Chapter 2 Server Installation 2 Unlock and open the front bezels 3 Loosen the two thumbscrews and the slotted Torx screw located on the right side of the chassis 4 Slide the right side access panel toward the rear of the unit 1 0 inch 2 5 cm Figure 3 9 Removing the right side access panel 5 Pull and remove the panel to locate the processor board and the memory expansion boards WARNING...

Страница 82: ...ess panel labels provide instructions on installing processors DIMMs processor power modules and fans 7 To reassemble the server reverse steps 1 through 5 Removing the Left Side Access Panel To remove the left side access panel 1 If the computer is on place it in Standby mode and disconnect the power cord s See Chapter 2 Server Installation 2 Unlock and open the front bezels 3 Loosen the two thumb...

Страница 83: ... 22 99 8 46 AM COMPAQ CONFIDENTIAL NEED TO KNOW REQUIRED 5 Lift and remove the panel to locate the hard drive and power supply backplanes WARNING To reduce the risk of personal injury from hot surfaces allow the internal system components to cool before touching them CAUTION Never operate the server with an access panel removed or partially installed Doing so will cause thermal damage to the syste...

Страница 84: ...o the Compaq ProLiant 6000 Hardware Installation and Configuration poster included in the shipping box or the labels attached to the inside of the server access panels WARNING To reduce the risk of personal injury or damage to the equipment heed all warnings and cautions throughout the installation instructions WARNING To reduce the risk of personal injury or damage to the equipment the installati...

Страница 85: ...f to install the second or third hot plug power supply WARNING To reduce the risk of electric shock or damage to the equipment Install the power supply before connecting the power cord to the power supply Unplug the power cord before removing the power supply from the server Disconnect power from the server by unplugging all power cords from either the electrical outlet or the server To install a ...

Страница 86: ...ast Saved On 2 22 99 8 55 AM COMPAQ CONFIDENTIAL NEED TO KNOW REQUIRED 2 From the rear of the server locate and remove the blanking panel from the available power supply cage by removing the retaining screw and lifting the blanking panel from its position 1 2 Figure 4 2 Removing the power supply cage blanking panel CAUTION Do not leave the blanking panel off for prolonged periods System airflow co...

Страница 87: ... COMPAQ CONFIDENTIAL NEED TO KNOW REQUIRED 3 Remove the protective cover from the new power supply connector Keep for future handling 4 Press the button and lower the handle on the new hot plug power supply 5 Slide the hot plug power supply into the power supply cage until seated securely 6 Raise the handle to lock the power supply into place The power supply fan will start immediately if the syst...

Страница 88: ... TO KNOW REQUIRED 7 Plug in the power cord Tie wrap the AC cord to the plastic loop provided on the power supply Leave an 8 service loop for the plug This will prevent the plug from becoming disengaged Figure 4 4 Securing the AC cord to the loop 8 Verify the AC status LED is green If installation is performed with the system power on the power supply indicators should activate immediately 9 For a ...

Страница 89: ...an be used in the event a processor fails so that the server will run with the remaining processors Processor terminator cards must be installed in all processor sockets not occupied by processors IMPORTANT You cannot mix Pentium III Xeon processors in a server that has Pentium II Xeon processors CAUTION Handle the processor only by the ejectors and only if necessary lay the processor on its back ...

Страница 90: ... 8 7 5 4 2 1 3 6 9 12 Figure 4 6 Processor board layout Table 4 1 Processor Processor Power Module Socket and Associated Bus Core Ratio Switch Locations Item Component Item Component 1 Processor 1 Bus Core Ratio Switch 7 Processor 3 Bus Core Ratio Switch 2 Processor Socket 1 8 Processor Socket 3 3 Processor Power Module Socket 1 9 Processor Power Module Socket 3 4 Processor 2 Bus Core Ratio Switch...

Страница 91: ...Hardware Installation and Configuration poster included in the shipping box or to the Processor Board Label located on the inside of the side access panel For an overview of processor installation see the procedure below 1 If the server is on place it in Standby and disconnect the power cord s See Chapter 2 Server Installation and Start Up 2 Remove the right side access panel See Chapter 3 Server ...

Страница 92: ...sor the processor terminator board must be re installed before powering up the server 1 1 2 Figure 4 8 Removing the processor terminator board 5 Locate the processor bus core ratio switch for the processor socket that will receive the new processor See Table 4 1 or the right side access panel label 6 Set the processor bus core ratio switch to the appropriate setting Table 4 2 Processor Bus Core Ra...

Страница 93: ...odule components pointing up with the processor power module socket Install and secure the processor power module by pushing it into the socket and rotating the ejector levers inward You should hear the ejectors click into a locked position CAUTION The redundant processor power module must be installed before the accompanying processor Attempting to install the processor power module after the pro...

Страница 94: ...o avoid touching it 2 2 1 Figure 4 10 Installing the processor 9 Replace the right side access panel and reconnect the power cord s 10 Remove the top access panel and verify the interlock LEDs are normal See System Interlock LED Status in Chapter 3 11 Replace the top access panel 12 Turn on the server See Chapter 2 Server Installation 13 Verify that the processor was installed correctly Check the ...

Страница 95: ...ng processor it is necessary to remove the processor to replace the processor power module Installing the processor power module with the processor already in place could damage the electronic components of the processor power module 1 If the server is on place the server in Standby and disconnect the power cord s See Chapter 2 Server Installation and Start Up 2 Remove the right side access panel ...

Страница 96: ... CONFIDENTIAL NEED TO KNOW REQUIRED 4 Remove the processor by rotating the ejector levers outward 1 grasping the processor by the ejector levers and pulling the processor straight out of the socket 2 NOTE Grasp the processor on either side of the heat pipe to avoid touching it 1 1 2 Figure 4 11 Removing the processor 5 Remove the redundant power processor module by rotating the ejector levers outw...

Страница 97: ... components pointing up with the processor power module socket Install and secure the processor power module by pushing it into the socket and rotating the ejector levers inward You should hear a click 2 2 1 Figure 4 13 Installing the new redundant processor power module 7 Align the processor heat pipe facing down with the processor socket Reinstall the processor pushing firmly until fully seated ...

Страница 98: ... of the IMD See Chapter 6 Integrated Management Display EDO Memory You can expand server memory by installing industry standard Dual Inline Memory Modules DIMMs into the memory expansion boards The following requirements must be met when installing additional memory Supports 60 ns 16 MB 32 MB 64 MB 128 MB or 256 MB EDO DIMMs Expandable to 8 GB 32 x 256 MB DIMMs Groups of four DIMMs of the same siz...

Страница 99: ...server is on place the server in Standby and disconnect the power cord s See Chapter 2 Server Installation and Start Up 2 Remove the right side access panel See Chapter 3 Server Operation WARNING To reduce the risk of personal injury from hot surfaces allow the internal system components to cool before touching them 3 Remove the memory expansion board service bracket by removing the orange service...

Страница 100: ... 2 Figure 4 16 Removing a memory expansion board 5 To install DIMMs refer to the Hardware Installation and Configuration Poster included in the shipping box the Processor Board Configuration Label located on the inside of the right side access panel or the procedure in the following section 6 To reassemble the server reverse steps 1 through 4 NOTE The memory expansion boards are part of the system...

Страница 101: ...ccess panel See Chapter 3 Server Operation WARNING To reduce the risk of personal injury from hot surfaces allow the internal system components to cool before touching them 3 Remove the appropriate memory expansion board See Removing and Replacing a Memory Expansion Board earlier in this chapter 4 Place the memory expansion board components facing up on a flat surface CAUTION The ejectors prevent ...

Страница 102: ...03 February 1999 File Name E CH04 DOC Last Saved On 2 22 99 8 55 AM COMPAQ CONFIDENTIAL NEED TO KNOW REQUIRED 5 Open the DIMM socket latches 6 Align the key slot on the bottom edge of each DIMM with the tab in the DIMM socket 7 Insert each DIMM directly into the socket until the module is properly seated 1 3 2 Figure 4 17 Installing DIMM memory module in memory expansion board 8 Secure the DIMM by...

Страница 103: ...e the memory expansion board See Removing and Replacing a Memory Expansion Board earlier in this chapter 11 Replace the right side access panel See Chapter 3 Server Operation Reconnect the power cord s NOTE The DIMMs are part of the system interlock chain and must be seated properly for server start up Ensure that the memory expansion board service bracket is reinstalled after installing the DIMMs...

Страница 104: ...is improved NOTE All banks must contain four EDO DIMMs of the same capacity and speed Address Bit Permuting ABP is an option that distributes memory addresses across two or four banks of memory Therefore an ABP group may be two or four banks in size Below are the memory configuration rules that permit ABP Memory Configuration Rules for Address Bit Permuting 2 or 4 banks on a memory expansion board...

Страница 105: ...illustrates the four banks of memory on each memory expansion board In this figure banks are identified by letters for clarity Each board will continue to be reported by slot number 21 and 22 and each DIMM will be reported by bank number 1 4 and DIMM number 1 16 Memory Configuration Rules for Card to Card Interleaving The memory expansion boards must be identically populated with DIMMs of the same...

Страница 106: ...e Comments 312237 003 February 1999 File Name E CH04 DOC Last Saved On 2 22 99 8 55 AM COMPAQ CONFIDENTIAL NEED TO KNOW REQUIRED Table 4 3 Address Bit Permuting Configuration Key Slot 21 Memory Expansion Board Slot 22 Memory Expansion Board Bank 1 a Bank 1 b Bank 2 c Bank 2 d Bank 3 w Bank 3 x Bank 4 y Bank 4 z 4 3 2 1 Figure 4 19 Memory expansion boards configuration with Card to Card Interleavin...

Страница 107: ...g a maximum of Six 1 inch hard drives SCSI IDs 0 5 or Four 1 6 inch hard drives SCSI IDs 0 1 3 and 4 NOTE The three drive cages can support a total of eighteen 1 inch hard drives twelve 1 6 inch hard drives or a mixture of the two A mixture of 1 inch and 1 6 inch hard drives can be supported within the same internal drive cage The server ships with the top two removable media drive bays occupied b...

Страница 108: ...rives installed in the hard drive cage CAUTION If a hard drive is removed a blanking panel must be added for static immunity and air flow improvement Hard Drive Cage Installation Guidelines To install or replace a hard drive cage Removing a Drive Cage 1 If the server is on place it in Standby mode and disconnect the power cord s See Chapter 2 Server Installation and Start Up 2 Label each hard driv...

Страница 109: ...t Saved On 2 22 99 8 55 AM COMPAQ CONFIDENTIAL NEED TO KNOW REQUIRED 5 Disconnect the power connector and SCSI cable from the back of the drive cage cage 08 eps Figure 4 22 Disconnecting the drive cage from the server 6 Using a T 15 Torx screwdriver remove the two screws from the front of the drive cage Retain the screws for use with the replacement drive cage 7 Pull the drive cage out of the chas...

Страница 110: ...the server and to prevent component damage 9 If no replacement drive cage is to be installed turn on the server See Chapter 2 Server Installation Installing a New Drive Cage 1 If the server is on place it in Standby mode and disconnect the power cord s See Chapter 2 Server Installation 2 Remove the left side access panel See Chapter 3 Server Operation 3 If the new drive cage is to be installed in ...

Страница 111: ... Saved On 2 22 99 8 55 AM COMPAQ CONFIDENTIAL NEED TO KNOW REQUIRED 4 Align the drive cage with the empty bay The power connector 1 should be at the top of the drive cage and the SCSI connector 2 should be at the bottom 1 2 Figure 4 25 Connectors on the drive cage 5 Slide the drive cage into the chassis as far as it will go 6 Connect the power cable and SCSI cable to the drive cage cage 08 eps Fig...

Страница 112: ...ee ProLiant 6000 internal drive cages SCSI ID 6 is not used within the internal drive cage and SCSI ID 7 is reserved for the controller If only one SCSI hard drive is used it should be installed in the lowest numbered bay If several drives are installed the system boot drive should be installed in the lowest numbered bay In order to maintain proper system cooling blanking panel should be installed...

Страница 113: ...O KNOW REQUIRED Installing a Hot Plug SCSI Hard Disk Drive CAUTION Before adding or removing any hot plug SCSI drives consult your operating system instructions Failure to do so could result in loss of data or damage to equipment To install a hot plug SCSI hard drive 1 Unlock and open the front bezels 2 Remove the blanking panel in an unused drive bay by pushing both sides of the retaining clips i...

Страница 114: ...nstallation Guide Comments 312237 003 February 1999 File Name E CH04 DOC Last Saved On 2 22 99 8 55 AM COMPAQ CONFIDENTIAL NEED TO KNOW REQUIRED 3 Pinch both sides of the SCSI hard drive ejector levers to unlock then swing the ejector levers outward 4 Insert the SCSI hard drive into the empty drive bay pushing until securely seated 1 1 2 3 pat 22 eps Figure 4 29 Installing a SCSI hard drive ...

Страница 115: ...IRED 5 Secure the SCSI hard drive in the drive cage by swinging the ejector levers inward as shown below Locking Hinge See Caution Below pat 23 eps Figure 4 30 Securing a hot plug SCSI hard drive CAUTION Make sure locking hinges are properly seated 6 Place the hot plug SCSI hard drive online as directed by your operating system instructions CAUTION Before removing any hot plug hard drive read the ...

Страница 116: ...o reconstruct data on the replacement drive s Never remove a working drive when another drive has failed Drives that have been failed by the controller are indicated by the amber Drive Failure LED on the drive tray Permanent data loss will occur if a working drive is removed when replacing a failed drive Never remove a drive while another drive is being rebuilt A drive s Online LED will be flashin...

Страница 117: ...rive F2 should be pressed only if all of the drives have been replaced or if complete data loss is desired NOTE When a drive configured for fault tolerance is replaced the replacement drive will automatically begin restoring when it is installed When a drive is in the process of being restored the Online LED will flash green The LED will continue to flash until the drive is completely restored Ins...

Страница 118: ...d Installation Guide Comments 312237 003 February 1999 File Name E CH04 DOC Last Saved On 2 22 99 8 55 AM COMPAQ CONFIDENTIAL NEED TO KNOW REQUIRED 3 To install a full height device remove two of the blanking panels pat 20b eps Figure 4 31 Removing two removable media blanking panels 4 Install a full height tape drive in the open media bays pat 20b eps Figure 4 32 Installing a tape drive ...

Страница 119: ...em Operation WARNING To reduce the risk of personal injury from hot surfaces allow the internal system components to cool before touching them 7 Attach one of the media power cables and the pre installed terminated SCSI cable to the media drive NOTE The ProLiant 6000 supports a 5 device terminated SCSI cable pre attached to SCSI Port 3 and stored on top of the removable media cage 8 Replace the ri...

Страница 120: ...mments 312237 003 February 1999 File Name E CH04 DOC Last Saved On 2 22 99 8 55 AM COMPAQ CONFIDENTIAL NEED TO KNOW REQUIRED 2 Unlock and open the front bezels 3 Remove one media blanking panel Figure 4 33 Removing one removable media blanking panel 4 Install an IDE CD ROM drive in the open media bay Figure 4 34 Installing an IDE CD ROM drive 5 Remove the right side access panel See Chapter 3 Serv...

Страница 121: ... External Storage Devices Optional mass storage devices can be connected to the ProLiant 6000 by Using the external Very High Density EXT SCSI connector located at the rear of the chassis above Slot 1 Installing a PCI expansion board with an external connector Connecting a PCI expansion board internal SCSI connector to one of the system s SCSI knockouts For information on attaching to PCI expansio...

Страница 122: ...REQUIRED 4 Connect the other end of the SCSI cable to the appropriate external SCSI connector on the rear panel of the external storage device Figure 4 35 Connecting the external mass storage device 5 Reconnect the power cords and take the server out of Standby See Chapter 2 Server Installation and Start Up 6 Restore power to the external storage device 7 To configure the device run the System Con...

Страница 123: ... Board 1 ISA Modem beneath plastic protective cover 2 Compaq Standard Peripheral Board beneath plastic protective cover 3 9 Industry Standard 32 bit or 64 bit PCI Board universal or 5 volt keying 10 11 Industry Standard 32 bit or 64 bit PCI Board universal or 5 volt keying or Compaq Array Controllers with Extended SCSI architecture NOTE Do not remove the Compaq Standard Peripheral Board It is requ...

Страница 124: ...oLiant 6000 Setup and Installation Guide Comments 312237 003 February 1999 File Name E CH04 DOC Last Saved On 2 22 99 8 55 AM COMPAQ CONFIDENTIAL NEED TO KNOW REQUIRED 4 Remove the top access panel WARNING To reduce the risk of personal injury from hot surfaces allow the internal system components to cool before touching them Figure 4 36 Removing the top access panel ...

Страница 125: ...tup and Installation Guide Comments 312237 003 February 1999 File Name E CH04 DOC Last Saved On 2 22 99 8 55 AM COMPAQ CONFIDENTIAL NEED TO KNOW REQUIRED 32 bit Slots 3 6 64 bit Slots 7 9 64 bit with Extended SCSI Slots 10 11 ISA Modem Slot 1 Standard Peripheral Board Slot 2 Figure 4 37 Top view of I O slots with plastic Standard Peripheral board cover removed ...

Страница 126: ...nsion board refer to one of the following installation sources For a detailed text and illustration procedure refer to the documentation that came with the option kit For an illustration overview of the installation procedure refer to the Hardware Installation and Configuration poster included in the shipping box and on the label located on the inside of the top access panel of the server For an o...

Страница 127: ...release levers it may be necessary to push the lever from outside the server to open it 1 If the server is on place the server in Standby and disconnect the power cord s Refer to Chapter 2 2 Unlock and open the front bezels 3 Remove the top access panel Refer to the instructions as described earlier in this chapter 4 Press on the top of the expansion slot latch and open the latch toward the rear o...

Страница 128: ...unit to secure the board 8 Replace the top access panel 9 Close and lock the front bezels 10 Turn on the server 11 Run the Compaq System Configuration Utility Refer to the Server Setup and Management pack shipped with your server to run the System Configuration Utility Adding PCI Expansion Boards with Extended SCSI Slots 10 and 11 Slots 10 and 11 of the ProLiant 6000 I O board are designed to supp...

Страница 129: ...f installing the SMART 2DH Array Controller into Slots 10 or 11 This will ensure the board will be installed completely into the slot Figure 4 41 Removing the SMART 2DH Array Controller cache board shipping bracket NOTE Use the procedure for installing an expansion board to install the array controller NOTE The procedures when used for adding a Smart Array 3100ES Controller assume the server boot ...

Страница 130: ...r the System Configuration Utility has been run To install 1 Run the System Configuration Utility 2 Select the option to add or remove the board 3 Follow the software instructions 4 Save the changes 5 Power off the server 6 Add the board 7 Power on the server Bus Distribution The I O board in the ProLiant 6000 uses three 33 MHz PCI buses The following table illustrates the PCI expansion slots asso...

Страница 131: ...p and Installation Guide Comments 312237 003 February 1999 File Name E CH04 DOC Last Saved On 2 22 99 8 55 AM COMPAQ CONFIDENTIAL NEED TO KNOW REQUIRED 3 2 1 4 5 6 7 8 9 10 11 1 2 3 Figure 4 42 PCI bus assignments No known issues require special bus balancing guidelines Compaq recommends dividing the PCI adapters among the buses when installing multiple adapters ...

Страница 132: ... install an ISA modem into Slot 1 of the I O board NOTE For additional information about your modem refer to the Compaq Storage and Options Documentation Library CD To install an ISA modem into Slot 1 IMPORTANT If installing a non Plug and Play modem you must first run the Compaq System Configuration Utility to manually add the board as a configured component For more detailed instructions see the...

Страница 133: ...ant 6000 Setup and Installation Guide Comments 312237 003 February 1999 File Name E CH04 DOC Last Saved On 2 22 99 8 55 AM COMPAQ CONFIDENTIAL NEED TO KNOW REQUIRED 3 To gain access to Slot 1 disconnect the SCSI port 1 ribbon cable from rear of chassis using a small slotted screwdriver Figure 4 43 Disconnecting the SCSI Port 1 cable to access Slot 1 ...

Страница 134: ...TO KNOW REQUIRED 4 Press the top of the appropriate expansion slot release lever and open the lever toward the rear of the expansion slot cage 5 Remove the expansion slot cover Save for future use 1 2 3 Figure 4 44 Preparing the expansion slot for installation 6 Insert the ISA modem into Slot 1 pushing until securely seated Figure 4 45 Inserting ISA modem into Slot 1 7 Close the slot release lever...

Страница 135: ...e internal processor fan assembly Fan 3 and a redundant hot plug external processor fan assembly Fan 4 Replacing the I O Fans Fans 1 and 2 CAUTION If only one fan is installed never remove the I O fan while the server is powered up If both fans are installed never remove both fans while the server is powered up Overheating and damage to hardware could result If the appropriate Compaq software driv...

Страница 136: ...04 DOC Last Saved On 2 22 99 8 55 AM COMPAQ CONFIDENTIAL NEED TO KNOW REQUIRED 4 Remove the failed I O fan by pulling the locking latch toward the thumb strap and lifting the fan out of the fan cage 1 2 Figure 4 46 Removing I O Fan 1 5 Lower the new I O fan into the fan cage until it rests on the fan board connector holding the locking latch and thumb strap Push the locking latch and bracket down ...

Страница 137: ... 7 Close and lock the front bezels 8 If the server was powered down reconnect all power cords and turn on the server 9 Verify that the fan is producing air flow Replacing the Redundant Hot Plug External Processor Fan Assembly Fan 4 WARNING To reduce the risk of injury or of damage to the equipment do not remove the internal processor fan assembly Fan 3 while the server is powered up Fan 3 is NOT h...

Страница 138: ...me E CH04 DOC Last Saved On 2 22 99 8 55 AM COMPAQ CONFIDENTIAL NEED TO KNOW REQUIRED To replace the redundant hot plug external processor fan assembly 1 Turn the thumbscrew counterclockwise to release pivot the hot plug processor fan assembly outward and lift upwards to remove 1 Figure 4 48 Releasing the redundant hot plug processor fan assembly from the chassis 2 3 Figure 4 49 Removing the redun...

Страница 139: ...E CH04 DOC Last Saved On 2 22 99 8 55 AM COMPAQ CONFIDENTIAL NEED TO KNOW REQUIRED 2 Insert the new processor fan assembly toe locks into the slots of the internal processor fan assembly Fan 3 3 Pivot the redundant hot plug processor fan assembly into place and secure with thumbscrew 1 2 Figure 4 50 Installing the redundant hot plug processor fan assembly 3 Figure 4 51 Securing the redundant hot p...

Страница 140: ...4 DOC Last Saved On 2 22 99 8 55 AM COMPAQ CONFIDENTIAL NEED TO KNOW REQUIRED 4 Verify that the fan is producing air flow and interpret the hot plug fan indicators located on the Fan 4 assembly as follows No light power is not applied to the fan Green light power is applied to the fan and fan is functional Amber light fan has failed NOTE Upon correct installation fans will activate and an event me...

Страница 141: ... ensure maximum dependability and supportability To use the SmartStart and Support Software CD refer to the Server Setup and Management pack The first time the server is configured the SmartStart program automatically creates a system partition and installs the Compaq System Configuration Utility and other Compaq utilities in that partition NOTE Until you run the System Configuration program an in...

Страница 142: ...or based servers only Writer Sam Ogden Project Compaq ProLiant 6000 Setup and Installation Guide Comments 312237 003 February 1999 File Name F CH05 DOC Last Saved On 2 4 99 1 26 PM COMPAQ CONFIDENTIAL NEED TO KNOW REQUIRED 2 1 pat 32 eps Figure 5 1 Installing a CD in the CD ROM drive ...

Страница 143: ...t and Support Software CD in the tray label facing up handling the CD from the edges not by the flat surfaces of the disc 4 Close the tray by again pressing the load unload button When the CD ROM busy indicator is lit the SmartStart installation sequence begins To configure the system and load the operating system refer to the SmartStart documentation provided in the Server Setup and Management pa...

Страница 144: ...play mounted on the front of the server This display provides easy to use menu driven access to server information The following sections provide information on navigating and using the menus Installing the Integrated Management Display Option Use the steps in this section to install the IMD option Installation Materials You will need the following materials T 15 Torx screw driver Flat head screw ...

Страница 145: ...ning any installation procedure See Appendix B Electrostatic Discharge for more information Removing the Blanking Panel To remove the blanking panel 1 If the server is on place the server in Standby and disconnect the power cord s 2 Unlock and open the front bezels front doors Refer to the steps in Chapter 3 3 Remove the top access panel Refer to the steps in Chapter 3 4 Remove blanking panel scre...

Страница 146: ...D TO KNOW REQUIRED Installing the Integrated Management Display To install the Integrated Management Display 1 Insert the cable through the display opening and route the cable through the cable slot See below Figure 6 2 Inserting and routing cable 2 The LCD display area should be above the buttons After verifying the display orientation snap the Integrated Management Display into place Make sure t...

Страница 147: ...D Connector on the system board Insert cable into connector See figure below Figure 6 3 Connecting the cable 4 Replace the top access panel and secure with thumbscrew and slotted Torx screw 5 Remove the plastic panel that covers the Integrated Management Display from the front bezel 6 Close the front bezel 7 Reconnect the power cord and reboot 8 The ProLiant 6000 ROM comes with IMD support You are...

Страница 148: ... Management Display The Compaq Integrated Management Display can be configured to display a variety of menus that you can customize to meet your specific needs This section provides information on how to configure and customize the Integrated Management Display Setup with the System Configuration Utility After installing the hardware you need to configure the Integrated Management Display using th...

Страница 149: ...hat you want to modify You must press Enter to edit the highlighted item then type the text for that field After entering the text press Enter to accept the modifications Each field is discussed in detail later in this section See Customizing Management Display Fields 8 Repeat step 7 for each menu item to be modified 9 Press F10 to exit the View or Edit Details screen 10 Select Step 5 Save and Exi...

Страница 150: ...ions define each of the menu choices and include examples of some fields Idle Screen Text After the display has been idle for five minutes the Integrated Management Display shows the following default screen text COMPAQ ProLiant XXXX MAIN MENU LCD 012 EPS ESC Figure 6 4 Idle screen text You can change this text by entering up to 3 lines with no more than 16 characters on each line One suggestion w...

Страница 151: ...nu Custom Menu Screen This is a user defined field that can be used for customizing your server You can enter up to 4 lines of 14 characters each Server Information Server Name Enter up to 2 lines of no more than 14 characters each An example might be to name the server by department for example CUST SERVICE WESTERN REGION Asset Tag Enter the server asset tag Enter up to 2 lines of 16 characters e...

Страница 152: ... characters each Pager Number This field contains the pager number of the system administrator Enter up to 2 lines of no more than 14 characters each Other This is a user defined field You can enter any additional administrator information An example might be listing an additional administrator that serves as a backup to the primary administrator Enter up to 2 lines of no more than 14 characters e...

Страница 153: ...e you might enter server history information such as SERVICE CONTRACT 1C2002 Standard Integrated Management Display Fields In addition to the user defined fields customized during configuration the Integrated Management Display automatically provides the following standard fields System Information Events Selecting this menu choice enables you to scroll through a list of all error events starting ...

Страница 154: ...u driven and easy to use This section provides information on how to navigate and use the menus Normal Run time Behavior After configuring the display and rebooting the server a series of server POST Power On Self Test operations appears The first screen you will see after rebooting the server shows the model number and IMD firmware revision of your display then the POST screen appears During POST...

Страница 155: ...scroll through the menus These symbols are the Up Down and Selector arrows Table 6 2 Integrated Management Display Symbols Type of Symbol Symbol Meaning Arrow Selector arrow shows current menu item Press Enter on the IMD to select the menu item to the right of this arrow Up Arrow If present in upper right corner indicates previous information exists Press the Up Arrow on the IMD to view the inform...

Страница 156: ...26 PM COMPAQ CONFIDENTIAL NEED TO KNOW REQUIRED Navigation To navigate through the menus use the four buttons shown in the Figure 6 2 The Down and Up arrow keys and allow you to move through the menu screens and choose menu items The right button acts as an Enter key and allows you to travel down through the menus The left button acts as an Escape key and allows you to travel back up the menu COMP...

Страница 157: ...MD flashes the message ESC ALERT Press Any Key to View New Events LCD 013 EPS Figure 6 6 New event message At this point you must scroll through each screen of the event information menu before the IMD will allow you to move on to other menu choices The display will not allow you to escape out of the Unviewed Events section until you have examined all of the information stored there After you have...

Страница 158: ...Liant 6000 Setup and Installation Guide Comments 312237 003 February 1999 File Name G CH06 DOC Last Saved On 2 4 99 1 26 PM COMPAQ CONFIDENTIAL NEED TO KNOW REQUIRED Administration Information Server Server Name Asset Tag Operating System Other Administrator Name Phone Pager Other Service Name Phone Pager Other Custom Menu Item if entered Custom Menu Screen if entered ...

Страница 159: ...ur ProLiant 6000 Server Federal Communications Commission Notice Part 15 of the Federal Communications Commission FCC Rules and Regulations has established Radio Frequency RF emission limits to provide an interference free radio frequency spectrum Many electronic devices including computers generate RF energy incidental to their intended function and are therefore covered by these rules These rule...

Страница 160: ...ired to correct the interference at personal expense Class B Equipment This equipment has been tested and found to comply with the limits for a Class B digital device pursuant to Part 15 of the FCC Rules These limits are designed to provide reasonable protection against harmful interference in a residential installation This equipment generates uses and can radiate radio frequency energy and if no...

Страница 161: ...bject to the following two conditions 1 this device may not cause harmful interference and 2 this device must accept any interference received including interference that may cause undesired operation For questions regarding your product contact Compaq Computer Corporation P O Box 692000 Mail Stop 530113 Houston Texas 77269 2000 Or call 1 800 652 6672 1 800 OK COMPAQ For questions regarding this F...

Страница 162: ... operate the equipment Cables Connections to this device must be made with shielded cables with metallic RFI EMI connector hoods in order to maintain compliance with FCC Rules and Regulations Canadian Notice Avis Canadien Class A Equipment This Class A digital apparatus meets all requirements of the Canadian Interference Causing Equipment Regulations Cet appareil numérique de la classe A respecte ...

Страница 163: ... conditions 1 this device may not cause harmful interference and 2 this device must accept any interference received including interference that may cause undesired operation European Union Notice Products with the CE Marking comply with both the EMC Directive 89 336 EEC and the Low Voltage Directive 73 23 EEC issued by the Commission of the European Community Compliance with these directives impl...

Страница 164: ...roduct The product does not emit hazardous light the beam is totally enclosed during all modes of customer operation and maintenance Laser Safety Warnings WARNING To reduce the risk of exposure to hazardous radiation Do not try to open the laser device enclosure There are no user serviceable components inside Do not operate controls make adjustments or perform procedures to the laser device other ...

Страница 165: ...mpaq systems equipped with CD ROM drives comply with appropriate safety standards including IEC 825 Laser Product Label The following label or equivalent is located on the surface of Compaq CD ROM drives This label indicates that the product is classified as a CLASS 1 LASER PRODUCT This label appears on a laser device installed in your product Laser Information Laser Type Semiconductor GaAIAs Wave...

Страница 166: ...duct For more information about battery replacement or proper disposal contact your Compaq Authorized Reseller or your Authorized Service Provider WARNING Your computer contains an internal Lithium Manganese Dioxide or a Vanadium Pentoxide or an alkaline battery pack There is risk of fire and burns if the battery pack is not handled properly To reduce the risk of personal injury Do not attempt to ...

Страница 167: ...omments 312237 003 February 1999 File Name H APPA DOC Last Saved On 2 4 99 1 27 PM COMPAQ CONFIDENTIAL NEED TO KNOW REQUIRED Regulatory Compliance Label Location The Regulatory Compliance label for your ProLiant 6000 server is located inside the Right Side Access Panel as shown in the below figure To view this information remove right side access panel COMP ACT Figure A 1 Location of agency label ...

Страница 168: ... in static safe containers Keep electrostatic sensitive parts in their containers until they arrive at static free workstations Place parts on a grounded surface before removing them from their containers Avoid touching pins leads or circuitry Always be properly grounded when touching a static sensitive component or assembly Grounding Methods There are several methods for grounding Use one or more...

Страница 169: ...de Comments 312237 003 February 1999 File Name I APPB DOC Last Saved On 2 12 99 2 24 PM COMPAQ CONFIDENTIAL NEED TO KNOW REQUIRED If you do not have any of the suggested equipment for proper grounding have an Authorized Compaq Reseller install the part NOTE For more information on static electricity or assistance with product installation contact your Authorized Compaq Reseller ...

Страница 170: ...ower cord sets for use in other countries must meet the requirements of the country where you use the server For more information on power cord set requirements contact your Authorized Compaq Dealer General Requirements The requirements listed below are applicable to all countries The length of the power cord must be at least 6 0 feet 1 8 m and a maximum of 12 feet 3 7 m The power cord set must be...

Страница 171: ...ore PSB or PUB 1 Sweden SEMKO 1 Switzerland SEV 1 United Kingdom BSI 1 United States UL 2 NOTES 1 Flexible cord must be HAR Type HO5VV F 3 conductor 1 0 mm2 conductor size Power cord set fittings appliance coupler and wall plug must bear the certification mark of the agency responsible for evaluation in the country where it will be used 2 Flexible cord must be Type SJ or equivalent No 16 AWG 3 con...

Страница 172: ...Specifications Table D 1 ProLiant 6000 Server Specifications Dimensions Height 24 25 in 61 6 cm Depth 22 8 in 57 9 cm Width 17 5 in 44 5 cm Weight no drives and two power supplies 136 lbs 68 8 kg Input Requirements per power supply Low Range High Range Rated Input Voltage 100 to 120 V 200 to 240 V Rated Input Frequency 50 to 60 Hz 50 to 60 Hz Rated Input Current 8 A 6 A Input Power W 780 W 1100 W ...

Страница 173: ...nstallation Guide Comments 312237 003 February 1999 File Name K APPD DOC Last Saved On 2 19 99 4 15 PM COMPAQ CONFIDENTIAL NEED TO KNOW REQUIRED ProLiant 6000 Server Specifications Continued Operating 50 to 95 F 10 to 35 C Shipping 22 to 122 F 30 to 60 C Relative Humidity non condensing Operating 20 to 80 20 to 80 Non operating 5 to 90 5 to 90 Maximum Wet Bulb Temperature 101 7 F 38 7 C ...

Страница 174: ...paq ProLiant 6000 Setup and Installation Guide Comments 312237 003 February 1999 File Name K APPD DOC Last Saved On 2 19 99 4 15 PM COMPAQ CONFIDENTIAL NEED TO KNOW REQUIRED Connector Interfaces The following are supported connectors for your server Keyboard Mouse Serial 2 Parallel Monitor SCSI 3 or Very High Density Connector Interface Ethernet RJ 45 10 100 2 ...

Страница 175: ...omments 312237 003 February 1999 File Name L APPE DOC Last Saved On 2 4 99 1 29 PM COMPAQ CONFIDENTIAL NEED TO KNOW REQUIRED Appendix E Internal CD ROM Drive The Internal CD ROM drive is a random access read only storage device capable of retrieving data from removable compact disc media and storing up to 680 MB of digital information COMPACT 1 2 3 4 5 6 8 7 pat 30 eps Figure E 1 Internal CD ROM f...

Страница 176: ...ED Table E 1 Internal CD ROM Ref Component Function Drive Rail Supports the CD ROM drive Headphone Jack Connects the headphone Headphone Volume Control Increases or decreases the headphone volume Busy Indicator Turns green when a disc is present flashes amber when the drive is reading a CD 5 Disc Tray Slides in and out Holds the CD in place 6 Manual Eject Hole Ejects a CD if the load unload button...

Страница 177: ... open it manually by using the emergency load unload button NOTE Certain applications or operating system software may disable the load unload button to prevent accidental damage to the disc If the load unload button is disabled by the application software it will not operate CAUTION Before beginning this procedure place the server in STANDBY 1 Insert a metal rod such as a straightened paper clip ...

Страница 178: ...ject Compaq ProLiant 6000 Setup and Installation Guide Comments 312237 003 February 1999 File Name M APPF DOC Last Saved On 2 12 99 10 36 AM COMPAQ CONFIDENTIAL NEED TO KNOW REQUIRED Appendix F Processor Board I O Board and Standard Peripheral Board Processor Board 1 11 12 13 14 15 16 17 18 19 20 21 22 23 5 6 7 8 9 10 3 4 1 2 Figure F 1 Processor board ...

Страница 179: ...tio Switch 5 Internal Fan Connector u Processor Socket 1 6 Hot Plug External Fan Connector i Processor 1 Bus Core Ratio Switch 7 Processor Power Module Socket 1 o Power Connector 5V and 12V 8 Processor Power Module Socket 2 p Interlock Air Sensor Connector 9 Processor Power Module Socket 3 a Memory Expansion Board Slot 22 Processor Power Module Socket 4 s Memory Expansion Board Slot 21 q Processor...

Страница 180: ...ED TO KNOW REQUIRED I O Board 1 3 4 5 6 7 8 9 10 11 15 16 17 18 20 19 21 22 14 13 12 23 24 25 26 27 28 2 Figure F 2 I O Board Table F 3 I O Board Components Item Component Item Component 1 ISA Modem Connector Slot 1 y Power Connector 2 Standard Peripheral Board Connector Slot 2 u Fan Speaker Connector 3 32 Bit PCI Slot 3 i Power Switch Interlock Connector 4 32 Bit PCI Slot 4 o Aux 5V LED IMD Inter...

Страница 181: ... TO KNOW REQUIRED I O Board Components Continued Item Component Item Component 7 64 Bit PCI Slot 7 s Internal SCSI Port 3 Bus B 8 64 Bit PCI Slot 8 d Internal SCSI Port 2 9 64 Bit PCI Slot 9 f 12V LED 64 Bit PCI with Extended SCSI Slot 10 g 5V LED q 64 Bit PCI with Extended SCSI Slot 11 h 3 3V LED w Slot 10 11 SCSI Port 3 internal j 5V LED e Slot 10 11 SCSI Port 2 internal k 12V LED r Slot 10 11 S...

Страница 182: ...UIRED Table F 4 Standard Peripheral Board Components Item Component Item Component 1 IMD Connector 6 Mouse Connector 2 Configuration Switch 7 Keyboard Connector 3 SCSI Port 1 for external use 8 Internal External Battery Switch 4 Parallel Connector 9 IDE CD ROM Connector 5 Video Connector Diskette Drive Connector Table F 5 Standard Peripheral Board Configuration Switch Settings Switch Function 1 Di...

Страница 183: ... drive status 3 11 appliance coupler C 1 Array controllers Documentation x information on 1 8 ASR 2 1 10 Auto Line Sensing 1 6 automatic line switching feature C 1 Automatic Server Recovery See ASR 2 Aux 5 LED Steps for troubleshooting with 3 8 AUX 5 Volt LED Settings 3 7 B Blank Panel How to remove ProLiant 6000 6 2 blanking panels system cooling 4 29 boards non plug and play 4 47 boot default co...

Страница 184: ...ug SCSI drives 4 30 locking hinges 4 32 power supplies 3 4 procesor power module 4 6 processor 4 6 processor power modules 4 10 system unit cover 2 14 thermal damage 3 16 3 17 3 19 ventilation 2 6 CD ROM installing 4 34 CD ROM drive 5 1 E 2 CDs Compaq Management 5 3 channels cable 2 32 chassis 2 18 Compaq authorized dealer C 1 authorized reseller xv authorized service provider 1 8 Insight Manager ...

Страница 185: ...xpansion boards 1 9 connector interfaces D 3 connectors 2 33 interfaces D 1 VHDCI 1 5 controllers 10 100 RX UTP 1 4 video 1 5 CPU installing 4 8 custom menu item 6 8 custom menu screen 6 8 D DAAD 1 10 data loss 4 33 default configuration 2 34 overview 2 34 System Configuration Utility 5 1 System Configuration Utility Continued diagnostics 1 13 ASR 2 1 10 DAAD 1 10 1 13 default configuration 2 34 D...

Страница 186: ...lling 4 45 expansion slots See I O expansion slots installing an expansion board 4 43 external processor fan assembly Hot Plug installing 4 55 4 57 F F2 4 34 fan 4 installing 4 55 Fans 3 accessing 3 12 fault tolerance 4 34 features disk controllers 1 4 hardware security 1 13 Features Continued I O expansion slots 1 3 Insight Manager 1 10 network controllers 1 4 power supplies 1 5 processor 1 2 red...

Страница 187: ...x Hot Plug drive trays 1 3 fan 4 4 54 power supplies 1 5 4 2 hot surfaces xiii 4 8 4 12 4 16 4 18 4 25 Hot plug drives Troubleshooting 3 12 http www compaq com xv See Compaq website I I O board accessing 3 12 components F 3 locating 3 16 I O expansion slots features 1 3 locating 4 40 I O Fan Replacing 4 52 I O fans locating 3 16 icons See Symbols on Equipment IDE CD ROM 4 36 idle screen text 6 7 i...

Страница 188: ... processor 4 14 removable media blanking panel 4 37 removable media blanking panels 4 35 right side access panel 3 17 SCSI hard drive 4 31 SCSI Port 1 cable to access Slot 1 4 50 single processor installed in socket 1 4 8 tape drive 4 35 top access panel 3 16 illustrations attaching cable management arm 2 30 IMD 3 2 administration information 6 14 6 15 configuring 6 5 custom menu item 6 8 custom m...

Страница 189: ...er module 4 6 SCSI hard drives 4 29 tape drives 4 34 Integrated Management Display See IMD Integrated Management Display Installation 6 3 Integrated Remote Console 1 11 See IRC Integrated Wide Ultra SCSI 3 controllers 1 4 interface parallel control 1 12 serial control 1 13 interfaces connector D 1 standard 1 5 interlock chain 3 5 Interlock connection Troubleshooting I O area problems 3 8 Troublesh...

Страница 190: ...cing 1 5 load configurations 1 6 locating expansion slots 3 16 I O board 3 16 I O fans 3 16 ISA slot 3 16 standard peripheral board 3 16 logs Integrated Management Log See IML M maintenance 1 14 maintenance instructions ix management 1 9 mass storage installation overview 4 24 memory configuration rules 4 21 EDO 4 15 installation overview 4 16 nonvolatile 1 10 optimum efficiency 4 22 power supplie...

Страница 191: ...onfiguration and management 1 9 standby 2 35 system interlocks 3 5 P panels rack mount front thumbscrews 2 21 right side access replacing 2 17 top access removing 2 15 replacing 2 27 parallel interface control 1 12 part numbers ix PCI ISA expansion cards power supplies 1 6 port addresses 1 9 POST messages 1 12 power cord current capacity C 1 power cord grounding plug 3 2 power cords approved C 1 d...

Страница 192: ...failed 4 6 installation overview 4 8 sockets 4 6 processor CPU sockets accessing 3 12 processor board components F 1 Processor Board LEDs Settings 3 7 processor bus core ratio switch accessing 3 12 processor power module redundant 4 6 ProLiant 6000 Compaq ProLiant 6000 6 2 Q QuickLock 1 13 R rack maximum internal temperature 2 5 rack lift assists 2 26 installing 2 18 removing 2 27 securing 2 18 ra...

Страница 193: ...urity lock 1 5 Security provisions 2 10 serial interface control 1 13 server accessing components 3 12 configuration 1 9 features 1 2 management 1 9 overview 1 1 registering 1 14 registration 1 14 specifications D 1 warnings and precautions xiii 2 14 Server Continued server configuration and management overview 1 9 server information 6 8 server management IML 1 11 IRC 1 11 server performance 1 10 ...

Страница 194: ...nt NIC software 1 4 switch processor bus core 4 9 switch and jumper settings 1 9 switch box installing 2 32 Switches 2 2 bus core ratio switch settings F 2 On Standby 2 36 Power On Standby 3 2 Switches Continued processor bus core ratio 3 12 standard peripheral board configuration switch settings F 5 symbols in text xii on equipment xii Symbols in Text xii system cooling 4 29 system alerts 1 12 Sy...

Страница 195: ...configurations 1 6 processor bus core ratio switch settings 4 9 processor processor power module socket and associated bus core ratio switch locations 4 7 rack internal temperature maximums 2 5 standard peripheral board components F 5 standard peripheral board configuration switch settings F 5 supported I O expansion boards 4 40 Tables Continued switch configurations 1 4 bus core ratio switch sett...

Страница 196: ...GS 1 10 INSPECT 1 10 Power Down 1 6 Power Supply 1 6 System Configuration See Systems Configuration Utility V Very High Density Connector Interface connector 1 5 See VHDCI VHDCI 4 29 standard interfaces 1 5 video 1 5 features 1 5 overview 1 5 W warnings disconnecting power 3 2 electric shock 2 35 3 2 4 2 ESD 3 2 hot surfaces 3 16 3 17 3 19 4 36 4 38 4 41 NICs xii power cord grounding plug 3 2 powe...

Отзывы: