


Specifies the objects to extrude. You can extrude planar 3D faces, closed
polylines, polygons, circles, ellipses, closed splines, donuts, and regions. You
cannot extrude objects contained within a block or polylines that have crossing
or self-intersecting segments.
A polyline must contain at least 3 but not more than 500 vertices. If a selected
polyline has width, the width is ignored and the polyline is extruded from
the center of the polyline path. If a selected object has thickness, the thickness
is ignored.
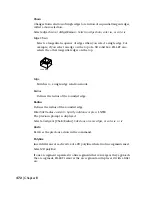
Height of Extrusion
Extrudes the objects along the positive Z axis of the object’s coordinate system
if you enter a positive value. If you enter a negative value, the objects are
extruded along the negative Z axis.
height
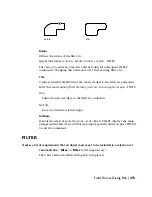
Specify angle of taper for extrusion <0>: Specify an angle between –90 and +90
degrees or press ENTER
taper angle
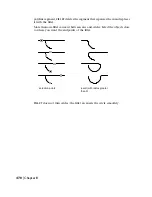
Positive angles taper in from the base object. Negative angles taper out. The
default angle, 0, extrudes a 2D object perpendicular to its 2D plane. All objects
and loops in the selection set are tapered to the same value. Tapered extrusions
are possible only with loops that are continuous at the vertices.
Specifying a large taper angle or a long extrusion height can cause the object
or portions of the object to taper to a point before reaching the extrusion
height.
Individual loops of a region are always extruded to the same height.
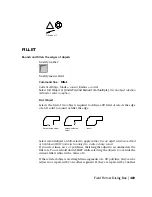
When an arc is part of a tapered extrusion, the angle of the arc remains
constant, and the radius of the arc changes. On a straight extrusion, each arc
results in a single cylindrical face. Whenever possible, EXTRUDE uses the taper
angle as the angle by which it slants faces from the Z axis.
ETRANSMIT Command Line | 461
Содержание AUTOCAD 2006
Страница 1: ...February 2005 AutoCAD 2006 Command Reference ...
Страница 24: ......
Страница 30: ...6 ...
Страница 212: ...188 ...
Страница 448: ...424 ...
Страница 554: ...530 ...
Страница 584: ...560 ...
Страница 588: ...564 ...
Страница 660: ...636 ...
Страница 750: ...726 ...
Страница 760: ...736 ...
Страница 889: ...You can display more options in the Plot dialog box by clicking the More Options button Plot Dialog Box 865 ...
Страница 960: ...936 ...
Страница 1194: ...1170 ...
Страница 1244: ...Undo Reverses the most recent change made by TRIM 1220 Chapter 21 ...
Страница 1310: ...1286 ...
Страница 1328: ...1304 ...
Страница 1354: ...Zoom Window Zooms to display an area specified by a rectangular window 1330 Chapter 26 ...
Страница 1490: ......