Watchdog Timer
Am186™CC/CH/CU Microcontrollers User’s Manual
11-3
11.4
REGISTERS
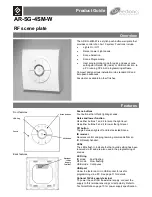
The register shown in Table 11-2, WDTCON, programs the watchdog timer. Figure 11-2
illustrates the rules for accessing the WDTCON register. Appendix A summarizes the bits
in all the registers. For a complete description of all the peripheral registers, see the
Am186™CC/CH/CU Microcontrollers Register Set Manual, order #21916.
Figure 11-2
Access to the WDTCON Register
11.5
OPERATION
11.5.1
Usage
1. Enable the watchdog timer by writing the keyed sequence of 3333h followed by CCCCh
to the WDTCON register address.
This sequence opens the WDTCON register for a single write. Any number of processor
cycles, including memory and I/O reads and writes, can be inserted between the two
halves of the key or between the key and the writing of data as long as they do not read
or write the WDTCON register. The write key sequence must be repeated for each single
write.
2. After enabling the watchdog timer, periodically reset it by writing the keyed sequence of
AAAAh followed by 5555h to the WDTCON register address.
As with the write key, any number of processor cycles, including memory and I/O reads
and writes, can be inserted between the two halves of the key as long as they do not
access the WDTCON register. The key itself resets the counter; no further writes are
necessary. Note that the clear-count key cannot be initiated while the write key is active.
This would result in the value of AAAAh being written to the WDTCON register.
Table 11-2
Watchdog Timer Register Summary
Offset
Register
Mnemonic
Register Name
Description
3E0h
WDTCON
Watchdog Timer Control
Controls the watchdog timer.
ENA = 1
Timer enabled
(after external or internal
reset); software can use
write key to write any
value
ENA = 0
Timer disabled;
software can use write
key to write any value
Notes:
Only one write is allowed to the WDTCON register after each write key sequence of 3333h followed by CCCCh.
ENA = 1
Timer enabled;
software can use write key
to clear RSTFLAG and
NMIFLAG bits only
Write key plus
RSTFLAG = 0 or
NMIFLAG = 0 only
Write key plus
any value with
ENA = 1
Write key plus
any value with
ENA = 0
Write key plus
any value with
ENA = 1
Reset
Write key plus
any value with
ENA = 0
Reset
Содержание Am186 CC
Страница 1: ...Am186 CC CH CU Microcontrollers User s Manual Order 21914B...
Страница 4: ...iv Am186 CC CH CU Microcontrollers User s Manual...
Страница 18: ...Table of Contents xviii Am186 CC CH CU Microcontrollers User s Manual...
Страница 24: ...Introduction xxiv Am186 CC CH CU Microcontrollers User s Manual...
Страница 39: ...Architectural Overview Am186 CC CH CU Microcontrollers User s Manual 1 15 Figure 1 6 32 Channel Linecard CH CC...
Страница 40: ...Architectural Overview 1 16 Am186 CC CH CU Microcontrollers User s Manual...
Страница 86: ...System Overview 3 36 Am186 CC CH CU Microcontrollers User s Manual...
Страница 92: ...Emulator Support 4 6 Am186 CC CH CU Microcontrollers User s Manual...
Страница 112: ...DRAM Controller 6 8 Am186 CC CH CU Microcontrollers User s Manual...
Страница 134: ...Interrupts 7 22 Am186 CC CH CU Microcontrollers User s Manual...
Страница 186: ...Programmable I O Signals 9 8 Am186 CC CH CU Microcontrollers User s Manual...
Страница 200: ...Watchdog Timer 11 6 Am186 CC CH CU Microcontrollers User s Manual...
Страница 232: ...Asynchronous Serial Ports UARTs 13 24 Am186 CC CH CU Microcontrollers User s Manual...
Страница 242: ...Synchronous Serial Port SSI 14 10 Am186 CC CH CU Microcontrollers User s Manual...
Страница 264: ...High Level Data Link Control HDLC 15 22 Am186 CC CH CU Microcontrollers User s Manual...
Страница 332: ...Universal Serial Bus USB 18 34 Am186 CC CH CU Microcontrollers User s Manual...
Страница 348: ...Register Summary A 16 Am186 CC CH CU Microcontrollers User s Manual...
Страница 376: ...Index Index 18 Am186 CC CH CU Microcontrollers User s Manual...