Maintenance to be carried out by the customer
Maintenance
13.2.3.4
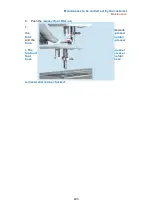
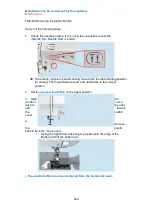
Removing the needle plate
Carry out the following steps:
1.
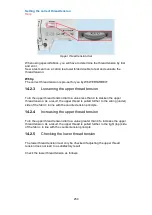
Loosen the two screws on the
‹needle plate›
using the round
metal screwdriver, please see “Standard accessories”.
2.
Pull out the
‹needle plate›
to the right.
3.
Clean and remove threads or lint from under the
‹needle plate›
and in the feed dogs area using a W6 cleaning brush.
4.
Check the
‹needle plate›
for needle strikes or other damage.
!
The stitch quality may be affected significantly by the lower thread
getting caught on a needle strike.
» The needle plate has been removed.
W6 tip
Minor needle strikes on the needle plate can be removed using fine emery paper
(for example 800 grit).
If the needle plate is severely damaged by needle strikes, it must be replaced.
You can order a new needle plate from our W6 Wertarbeit online shop (Spare
Parts category).
245
Summary of Contents for N 9500C QPL
Page 1: ...1 W6 N 9500C QPL sewing machine 1...
Page 2: ...Manual 2...
Page 50: ...50...
Page 52: ...52...
Page 86: ...86...
Page 94: ...Stretch 75 94...
Page 97: ...97...
Page 114: ...114...
Page 154: ...154...
Page 181: ...181...
Page 184: ...184...
Page 187: ...187...
Page 192: ...192...
Page 196: ...196...
Page 202: ...202...
Page 204: ...204...
Page 206: ...206...
Page 209: ...209...
Page 211: ...211...
Page 213: ...213...
Page 215: ...215...
Page 255: ...255...
Page 259: ...259...
Page 261: ...261...
Page 263: ...263...
Page 265: ...265...
Page 269: ...269...

