17
The Sapling Company, Inc.
670 Louis Drive
Warminster, PA 18974
USA
P. (+1) 215.322.6063
F. (+1) 215.322.8498
www.sapling-inc.com
Wall Mount Installation
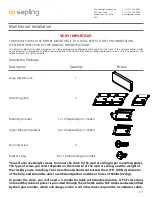
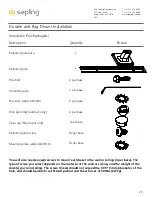
Included in Package
You will also need eight screws to mount the clock to the wall or ceiling (4 per mounting plate).
The type of screw you select depends on the material of the wall or ceiling, and the weight of
the clock(s) you’re installing. The screw thread should not exceed the 0.375” (0.95cm) diameter
of the hole, and should be able to withstand pullout and sheer forces of 500lbs (227kg).
VERY IMPORTANT:
CONFIGURE YOUR CLOCK BEFORE MOUNTING IT TO A WALL. REFER TO THE SYNCHRONIZATION
SYSTEM SETUP SECTION OF THIS MANUAL FOR INSTRUCTIONS.
All network and/or master clock equipment must be powered and configured before you install the clock. If the network and/or master
clock equipment is not properly installed and powered, and if the clocks have not been configured to communicate with this equipment, the
secondary clocks will not synchronize.
Description
Large Digital Clock
Mounting plate
Mounting bracket
Upper Mounting bracket
Securing Screw
Bracket Screw
Quantity
1
2
1 or 2 (depending on model)
0 or 2 (depending on model)
2
8 or 16 (depending on model)
Picture
To power the clock, you will need a 3-conductor cable with double isolation. A PoE clock does
not need this cable as power is provided through the network cable. PoE clocks can be identified
by their part number, which will always end in 0. All other clocks require the 3-conductor cable.

