Chapter 5: Management with the CLU
203
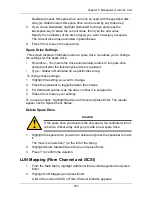
Dedicated means this spare drive can only be used with the specified disk
array(s). Global means this spare drive can be used by any disk array.
5.
If you chose Dedicated, highlight
Dedicated to Arrays
and press the
backspace key to erase the current value, then type the new value.
Specify the number(s) of the disk array(s) you want to assign your spare.
The current disk arrays are listed in parentheses.
6.
Press Ctrl-A to save the spare drive.
Spare Drive Settings
This screen displays information about a spare drive. It enables you to change
the settings for this spare drive:
•
Revertible – Yes means the drive automatically returns to its spare drive
assignment after the failed physical drive is replaced.
•
Type – Global or Dedicated (to a specific disk array)
To change these settings:
1.
Highlight the setting you want to change.
2.
Press the spacebar to toggle between the choices.
3.
For dedicated spares, type the array number it is assigned to.
4.
Press Ctrl-A to save your settings.
To run spare check, highlight
Start Spare Check
and press Enter. The results
appear next to Spare Check Status.
Delete Spare Drive
1.
Highlight the spare drive you want to delete and press the spacebar to mark
it.
The mark is an asterisk (*) to the left of the listing.
2.
Highlight
Delete Marked Spare Drives
and press Enter.
3.
Press Y to confirm the deletion.
LUN Mapping (Fibre Channel and iSCSI)
1.
From the Main Menu, highlight
Additional Info and Management
and press
Enter.
2.
Highlight
LUN Mapping
and press Enter.
A list of the current iSCSI or Fibre Channel initiators appears.
Caution
If the spare drive you delete is the only spare, the controller will not
rebuild a critical array until you provide a new spare drive.
Summary of Contents for VTrack M-Class M200f
Page 18: ...VTrak M Class Product Manual 10 ...
Page 36: ...VTrak M Class Product Manual 28 ...
Page 61: ...Chapter 3 Setup 53 13 When you have finished specifying logical drives click the Next button ...
Page 64: ...VTrak M Class Product Manual 56 ...
Page 164: ...VTrak M Class Product Manual 156 ...
Page 246: ...VTrak M Class Product Manual 238 ...
Page 304: ...VTrak M Class Product Manual 296 ...


