background image

Setting up network printing

3

cm4521

3-1

3

Setting up network printing

3.1

Overview of network functions

Network functions

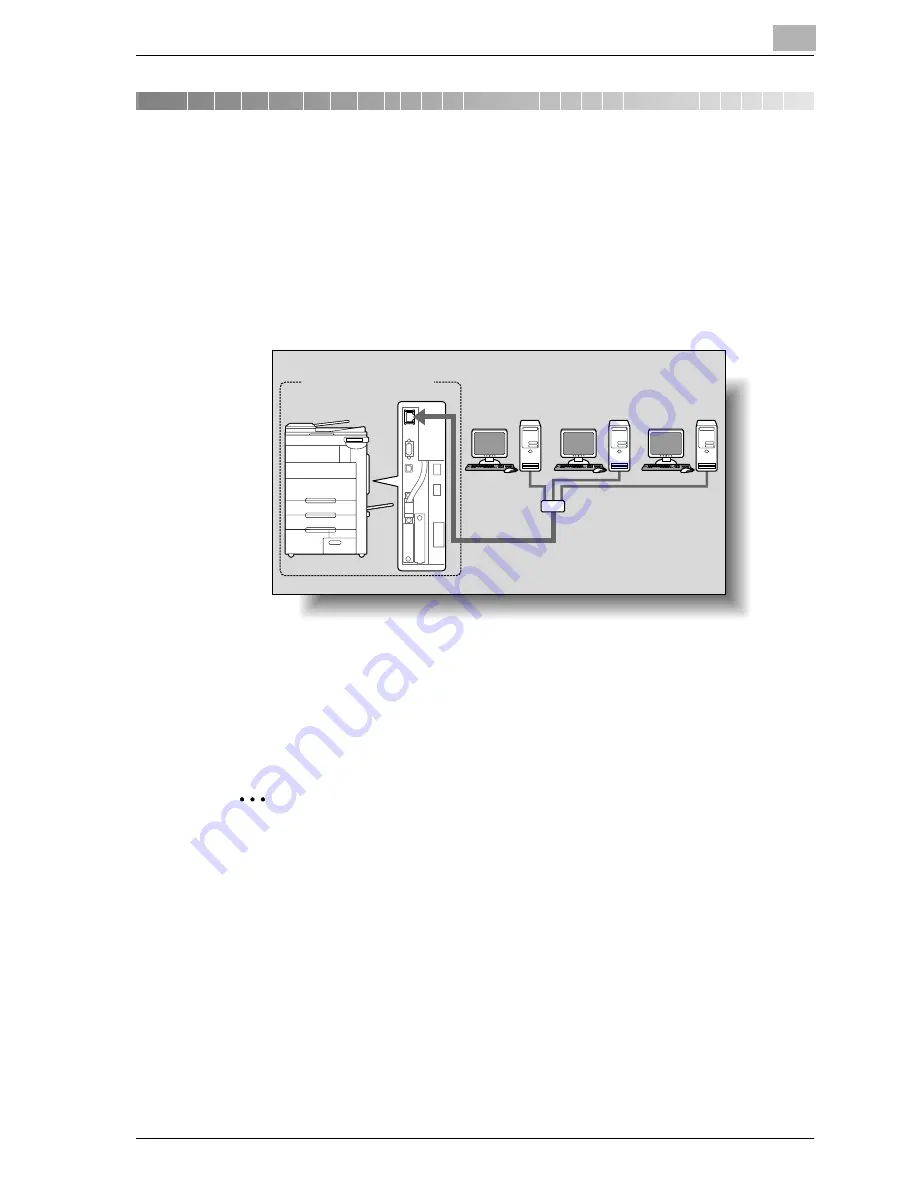
By connecting this machine to a network through the Ethernet port, this 
printing system can be used as a network printer.

This printing system supports 10Base-T, 100Base-TX and 1000Base-T 
standards. In addition, the Ethernet interface supports the TCP/IP (LDP/LPR, 
IPP, SMB), NetBEUI (SMB), IPX/SPX (NetWare), and AppleTalk (EtherTalk) 
protocols.

2

Note 

When setting up the network, the administrator password is required to 
enter Administrator mode.

Ask the administrator of this machine for the administrator password.

Printing system

This machine

Ethernet

Network

Hub

Summary of Contents for cm4521

Page 1: ...Oc cm4521 Print Operations User s Guide Printing for Professionals...

Page 2: ...registered trademarks of Novell Inc in the United States and other countries Microsoft Windows and Windows NT are either registered trademarks or trademarks of Microsoft Corporation in the United Sta...

Page 3: ...his list of conditions and the following disclaimer in the documen tation and or other materials provided with the distribution 3 All advertising materials mentioning features or use of this software...

Page 4: ...The implementation was written so as to conform with Netscapes SSL This library is free for commercial and non commercial use as long as the fol lowing conditions are aheared to The following conditi...

Page 5: ...BUSINESS INTERRUPTION HOWEVER CAUSED AND ON ANY THEORY OF LIABILI TY WHETHER IN CONTRACT STRICT LIABILITY OR TORT INCLUDING NEGLIGENCE OR OTHERWISE ARISING IN ANY WAY OUT OF THE USE OF THIS SOFTWARE...

Page 6: ...ce this list of conditions and the following disclaimer in the documen tation and or other materials provided with the distribution Neither the name of the Networks Associates Technology Inc nor the n...

Page 7: ...TERRUPTION HOWEVER CAUSED AND ON ANY THEO RY OF LIABILITY WHETHER IN CONTRACT STRICT LIABILITY OR TORT INCLUDING NEGLIGENCE OR OTHERWISE ARISING IN ANY WAY OUT OF THE USE OF THIS SOFTWARE EVEN IF ADVI...

Page 8: ...g disclaimer Redistributions in binary form must reproduce the above copyright no tice this list of conditions and the following disclaimer in the documen tation and or other materials provided with t...

Page 9: ...permission THIS SOFTWARE IS PROVIDED BY THE COPYRIGHT HOLDERS AND CONTRIBUTORS AS IS AND ANY EXPRESS OR IMPLIED WARRANTIES INCLUDING BUT NOT LIMITED TO THE IMPLIED WARRANTIES OF MER CHANTABILITY AND...

Page 10: ...ts styles and versions of letters numerals characters and sym bols Typefaces on the display or monitor for your own internal busi ness purposes 3 You may make one backup copy of the Host Software prov...

Page 11: ...TION IMPLIED WARRANTIES OF MERCHANTABILITY FITNESS FOR A PAR TICULAR PURPOSE TITLE AND NON INFRINGEMENT OF THIRD PAR TY RIGHTS SOME STATES OR JURISDICTIONS DO NOT ALLOW THE EXCLUSION OR LIMITATION OF...

Page 12: ...ncluding upgrades or future versions of the Software or other items No title to the intellectual proper ty in the Software is transferred to you under the terms of this Agreement You do not acquire an...

Page 13: ...SOEVER OR ANY CONSEQUENTIAL INDIRECT INCIDENTAL DAMAGES OR ANY LOST PROFITS OR LOST SAVINGS EVEN IF AN ADOBE REPRESENTATIVE HAS BEEN ADVISED OF THE POSSIBILITY OF SUCH LOSS DAMAGES CLAIMS OR COSTS OR...

Page 14: ...f which is expressly excluded All disputes aris ing out of under or related to this Agreement will be brought exclusively in the state Santa Clara County California USA 10 GENERAL You may not assign y...

Page 15: ...per 2 Any and all copyrights of this ICC Profile shall remain in TOYO INK there fore you shall not transfer provide rent distribute disclose or grant any rights in this ICC Profile to any third party...

Page 16: ...in this License Agreement 2 Ownership The foregoing license gives you limited license to use the Profile You will own the rights in the media containing the recorded Profile but DIC re tains all right...

Page 17: ...rk trade names product names logo copyright or other proprietary notices legends symbols or labels in the Profile This License Agreement does not authorize you to use DIC s or its licensors names or a...

Page 18: ...orced to the maximum extent permissible and the remaining provisions of this License Agreement will remain in full force and effect You hereby consent to the exclusive jurisdiction and venue of Tokyo...

Page 19: ...iew 1 1 Printer controller 1 1 Role of the printer controller 1 1 Available printer controller functions 1 1 Machine modes 1 2 Printing flow 1 3 Flow of the PC FAX operation 1 4 1 2 Operating environm...

Page 20: ...ctions 3 1 Features of the network functions 3 2 Network connection methods that can be selected in each Windows operating system 3 3 Network printing from a Windows operating system 3 3 Network print...

Page 21: ...he Bonjour settings 3 37 Setting the Macintosh computer 3 38 For Mac OS X 3 39 For Mac OS 9 2 3 39 4 Various printing methods 4 1 Printing operations 4 1 For Windows 4 1 Test printing 4 2 For Macintos...

Page 22: ...Basic tab 5 2 Layout tab 5 3 Finish tab 5 3 Cover Mode tab 5 3 Stamp Composition tab 5 4 Quality tab 5 4 Other tab 5 4 Configure tab 5 5 Settings tab 5 5 5 2 Specifying the Basic tab settings 5 6 Pri...

Page 23: ...lay file 5 31 Registering an overlay file 5 33 Printing with copy protection 5 34 Printing the date and page numbers 5 36 Printing a header and a footer 5 37 5 7 Specifying the Quality tab settings 5...

Page 24: ...18 Chapters 6 19 Specifying duplex booklet printing 6 19 Setting the binding margin 6 20 Shifting images 6 21 6 4 Specifying the Finish tab settings 6 22 Stapling 6 22 Specifying the center staple an...

Page 25: ...he default settings 6 48 6 11 Saving the driver settings 6 50 Saving the driver settings 6 50 Recalling the settings 6 52 Editing the settings 6 52 Importing and exporting the driver settings 6 54 7 S...

Page 26: ...7 Cover Mode Transparency Interleave 8 28 8 8 Per Page Setting 8 30 Adding and editing the settings in Per Page Setting 8 31 8 9 Stamp Composition 8 33 Printing with copy protection 8 33 Printing the...

Page 27: ...atermark 9 24 9 7 Specifying the Configure tab settings 9 26 Selecting an option 9 26 Changing an encryption passphrase 9 27 9 8 Using a phone book 9 28 Adding a recipient to the phone book 9 28 Editi...

Page 28: ...ncryption Setting 10 40 10 3 Print job management 10 42 Specifying job operations 10 42 Specifying settings for Windows 10 42 Specifying settings for Mac OS X 10 44 Job storage 10 45 Recalling jobs Pr...

Page 29: ...3 11 3 Error message 11 5 12 Appendix 12 1 Specifications 12 1 12 2 Configuration page 12 3 12 3 Font list 12 4 PCL font list 12 4 PS font list 12 5 Demo page 12 6 12 4 PPD driver Linux and applicati...

Page 30: ...immediately be used In addition this manual contains notes and precautions that should be fol lowed for safe use of the machine Be sure to read this manual before using the machine User s Guide Enlar...

Page 31: ...and Scan to SMB operations User s Guide Web Connection Operations This manual contains descriptions on the machine settings that can be spec ified remotely with Web Connection from a Web browser on a...

Page 32: ...Introduction cm4521 x 31 Screen images in this user s guide Unless stated otherwise the printer driver functions are described using the printer driver for Windows XP Using this user s guide...

Page 33: ...Introduction x 32 cm4521...

Page 34: ...e printer controller provides the following functions Printing from a computer using the PCL printer driver or PS printer driver Support of network protocols including TCP IP IPv4 IPv6 NetBEUI IPX SPX...

Page 35: ...x and scanning operations can be used by switching the mode To switch between modes press the mode keys on the control panel Copy This machine can be used as a copier Fax Scan This machine can be used...

Page 36: ...rms image rasterization development of output characters and images to bitmap data Finally this data is printed from this machine Original documents can be scanned in the copy function or network scan...

Page 37: ...using a USB connection or through the Ethernet TCP IP or IPX SPX when using a network connection and then the data is transferred from this machine to the printer controller Image rasterization bitmap...

Page 38: ...em and application being used Drive CD ROM Web Browser when using Web Connection Microsoft Internet Explorer 6 or later recommended JavaS cript enabled Cookies enabled Microsoft XML Parser MSXML3 X mu...

Page 39: ...e T 100Base TX and 1000Base T standards In addition the Ethernet interface supports the TCP IP LDP LPR peer to peer IPX SPX NetWare and AppleTalk EtherTalk USB interface Connect when using this printi...

Page 40: ...Overview 1 cm4521 1 7 Connection diagram The printer cables can be connected to each port at the back of this ma chine Machine rear view Ethernet port 10Base T 100Base TX 1000Base T USB port...

Page 41: ...er on page 2 1 4 Check the setup by printing a test page Refer to Test printing on page 4 2 5 Install the screen fonts The CD ROM contain the Latin TrueType fonts as screen fonts Install the screen fo...

Page 42: ...he existing printer driver first For details refer to Uninstalling the printer driver on page 2 13 and page 2 21 As necessary set the interface timeout settings in the Utility mode on the control pane...

Page 43: ...1 Overview 1 10 cm4521...

Page 44: ...L6 Windows NT 4 0 Service Pack 6a Windows 2000 Professional Service Pack 4 or later Windows XP Home Edition Professional Serv ice Pack 2 or later Windows XP Professional x64 Windows Server 2003 and Wi...

Page 45: ...gs in advance when installing the printer driv er using a network connection install it using a local connection at this time To install the printer driver under Windows XP Windows Server 2003 Windows...

Page 46: ...4 When installing on Windows NT 4 0 2000 XP or Server 2003 adminis trator permissions are required If the wizard starts up in order to add new hardware with a USB connec tion click Cancel Installer op...

Page 47: ...ith step 3 2 Click Printer Install The installation of the printer driver starts 3 Click the AGREE button if you agree with all terms and conditions of the license agreement If you do not agree with t...

Page 48: ...r the Above IP Address Host Name and then specify this machine directly In addition to Print Internet Printing IPP or Secure Printing IPPS can also be selected as the printing method Secure Print IPPS...

Page 49: ...s on installing the printer driver in a network environment refer to Setting up network printing on page 3 1 Because it is necessary to specify other network settings in advance when installing the pr...

Page 50: ...Wizard starts up 4 Click the Next button 5 Select Local printer attached to this computer and then click the Next button Clear the Automatically detect and install my Plug and Play print er check box...

Page 51: ...r PS driver FAX driver 10 Click the OK button The Printers list appears 11 Click the Next button 12 Follow the on screen instructions When the Digital Signature dialog box appears click the Continue A...

Page 52: ...e screen for selecting the printer connection select Local Printer 6 Click the Next button If the screen for specifying the port appears select LPT1 here 7 Click the Have Disk button 8 Click the Brows...

Page 53: ...e on screen instructions When the Digital Signature dialog box appears click the Yes but ton When using a network connection perform a test print after the net work settings have been specified 14 Whe...

Page 54: ...ed and then click the Next button 5 Select Specify location and then click the Next button 6 Specify the desired folder on the CD ROM that contains the printer driver and then click the OK button Sele...

Page 55: ...d then click the Next button If the Windows connect to Windows Update dialog box appears select NO 5 From Search for the best driver in these locations select Include this location in the search and t...

Page 56: ...r driver contains the delete function If the printer driver was installed with an installer the delete function of the printer driver is included 1 Click the Start button point to All Programs or Prog...

Page 57: ...you want to delete 3 Press the Delete key on the computer keyboard to delete the printer driver 4 Follow the on screen instructions When the printer driver has been deleted the printer icon will dis a...

Page 58: ...drivers w32x86 folder and delete the folder of the corresponding model if it is available If the PCL driver the PostScript driver and the fax driver are all installed the model information of all dri...

Page 59: ...lect the specified folder according to the printer driver to be used the operating system and the language 4 Select the Mac OS version being used and then copy the drive file onto the desktop Mac OS X...

Page 60: ...Next select a printer Selecting a printer For Mac OS X After connecting this machine to a Macintosh computer it can be used as a printer by selecting it in Print Center or Printer Setup Utility as the...

Page 61: ...onnecting using Bonjour with Mac OS X 10 4 the Bonjour set tings must be specified on this machine For specifying the Bonjour settings refer to Printing with Macintosh on page 3 36 4 Select the applic...

Page 62: ...rinter by selecting Post Script printer under Chooser and by specifying the printer description PPD File First copy the printer description PPD file onto the Macintosh computer 1 Insert the printer dr...

Page 63: ...file has already been selected click the Setup button in step 6 and then click the Select PPD button from the screen that is already displayed The PostScript printer description PPD file selection scr...

Page 64: ...Center located in Applications Utilities of Hard Disk 2 Select the name of the printer to be deleted and then click the Delete button The selected printer is deleted 3 Close the printer list 4 Drag t...

Page 65: ...Drag PPD file Generic45C 2UVxxx ppd which is located in System Folder Extensions Printer Descriptions of Hard Disk to the Trash icon The related printer driver files are deleted 2 Restart the compute...

Page 66: ...rinter This printing system supports 10Base T 100Base TX and 1000Base T standards In addition the Ethernet interface supports the TCP IP LDP LPR IPP SMB NetBEUI SMB IPX SPX NetWare and AppleTalk Ether...

Page 67: ...ith Port 9100 Windows 2000 XP Server 2003 You can print with Port 9100 in Windows 2000 Windows XP or Windows Server 2003 Supports Novell NetWare PServer and Rprinter Nprinter Supports the Novell NetWa...

Page 68: ...n installing the printer driver refer to Installing the printer driver on page 2 1 To perform network printing change the printer port for the installed printer driver to one for a network connection...

Page 69: ...follow the instructions of the network administrator 1 Press the Utility Counter key in this machine s control panel touch Administrator Settings and then enter the administrator password The adminis...

Page 70: ...to which you are connecting Default Gateway Specify the default gateway address for the net work to which you are connecting 7 Touch OK 8 To apply the settings restart this machine turn the main power...

Page 71: ...ing when setting DHCP Settings to ON Check with the network administrator that the DHCP server exists If the DHCP server does not exist be sure to specify settings for IP Address Subnet Mask and Defau...

Page 72: ...92 168 1 20 http 192 168 1 20 If IPv6 is enabled and a Web browser other than Internet Explorer is used enter the IPv6 address enclosed in brackets to access Web Connection http IPv6_address_for_this_...

Page 73: ...pecified from Web Connection 1 Press the Utility Counter key in this machine s control panel touch Administrator Settings and then enter the administrator password The administrator password is requir...

Page 74: ...ters and Faxes If Printers and Faxes does not appear in the Start menu open the Control Panel from the Start menu select Printers and Other Hard ware and then select Printers and Faxes 2 Right click t...

Page 75: ...r in the Start menu open the Control Panel from the Start menu select Printers and Other Hard ware and then select Printers and Faxes 2 Right click the icon of the installed printer and then click Pro...

Page 76: ...rt button If LPR Port is not in the list click the Start button point to Con trol Panel and then click Network Then on the Service tab click the Add button and install the Microsoft TCP IP Printing Se...

Page 77: ...utton and then click Printers and Faxes If Printers and Faxes does not appear in the Start menu open the Control Panel from the Start menu select Printers and Other Hard ware and then select Printers...

Page 78: ...Setting up network printing 3 cm4521 3 13 2 Note If the RAW port is not specified to be used in the TCP IP setting printing cannot be performed...

Page 79: ...ting the IP address for this machine on page 3 4 Next specify the IPP settings for this machine as described below 2 Note The settings can also be specified from Web Connection 1 Press the Utility Cou...

Page 80: ...Information and then specify settings for the following After specifying the settings touch Close Printer Name Specify the printer name up to 127 characters Printer Location Specify the printer locat...

Page 81: ...specify the print operations sup ported by IPP After specifying the settings touch OK 7 Touch Forward 8 Specify settings for the following After specifying the settings touch Forward IPP Authenticatio...

Page 82: ...stall the printer driver 1 Insert the printer driver CD ROM into the computer s CD ROM drive 2 For Windows 2000 click the Start button point to Settings and then click Printers For Windows XP Server 2...

Page 83: ...ired folder on the CD ROM that contains the printer driver and then click the OK button Select the specified folder ac cording to the printer driver to be used the operating system and the language Pr...

Page 84: ...up and then click the Enter button 4 Enter the appropriate names in the Printer Server Name Printer Name Print Queue Name and Print Queue Volume fields select Other Unknown from the Printer type field...

Page 85: ...rator password The administrator password is required to enter Administrator mode Ask the administrator of this machine for the administrator password 2 Touch Network Settings then NetWare Settings 3...

Page 86: ...cify settings for the following NetWare Print Settings Select ON NetWare Print Mode Select Nprinter Rprinter 5 Specify settings for the following After specifying the settings touch Close Print Server...

Page 87: ...e server console to display the print server screen and then check that the created printer is shown as Waiting for Job for the connected printer 0 2 Reminder When turning the power off then on again...

Page 88: ...spec ified settings 5 Click the Esc button to quit Pconsole Next specify the NetWare settings for this machine as described below 2 Note The settings can also be specified from Web Connection 1 Press...

Page 89: ...ng Select ON Ethernet Frame Type Select Auto Detect Select the frame type according to the network environment 4 In the NetWare Settings screen touch NetWare Print Settings and then specify settings f...

Page 90: ...tting from the NetWare server Polling Interval Specify 1 Change as necessary NDS Bindery Setting Select NDS Bindery 6 Specify settings for the following After specifying the settings touch Close File...

Page 91: ...he NetWare server console to load MONITOR NLM 12 Select the connection information and in the active connection col umn check that the created PServer is connected 2 Reminder When turning the power of...

Page 92: ...and passwords refer to the NetWare documentation and specify the settings as necessary Next specify the NetWare settings for this machine as described below 2 Note The settings can also be specified...

Page 93: ...lect ON Ethernet Frame Type Select Auto Detect Select the frame type according to the network environment 4 In the NetWare Settings screen touch NetWare Print Settings and then specify settings for th...

Page 94: ...t Au to 6 Touch Close 7 In the NetWare Settings screen touch User Authentication Setting NDS and then specify settings for the following After specifying the settings touch Close User Authentication S...

Page 95: ...istrator from a client computer 2 Start up NWadmin 3 Select either the organization or organizational unit container that of fers the print service and then click Print Services Quick Setup non NDPS o...

Page 96: ...r password is required to enter Administrator mode Ask the administrator of this machine for the administrator password 2 Touch Network Settings then NetWare Settings 3 Touch IPX Settings and then spe...

Page 97: ...screen switches automatically NetWare Print Settings Select ON NetWare Print Mode Select PServer 5 Specify settings for the following After specifying the settings touch Close Print Server Name Specif...

Page 98: ...onnects to the PServer NDS Tree Name Specify the name of the tree that PServer logs on to 7 Touch Close 8 In the NetWare Settings screen touch User Authentication Setting NDS and then specify settings...

Page 99: ...erver and check that the IP ad dress has been set for this machine and that this machine is on 1 Log on to NetWare as an administrator from a client computer 2 Start up NWadmin 3 Right click the organ...

Page 100: ...s XP Server 2003 click the Start button and then click Printers and Faxes If Printers and Faxes does not appear in the Start menu open the Control Panel from the Start menu select Printers and Other H...

Page 101: ...ss for this machine on page 3 4 Next specify the AppleTalk or Bonjour settings for this machine as described below 2 Note The settings can also be specified from Web Connection Specifying the AppleTal...

Page 102: ...e turning the power on again otherwise this machine may not function properly Specifying the Bonjour settings When connecting this machine to a Macintosh computer using Bonjour Ren dezvous the Bonjour...

Page 103: ...g the power off then on again wait at least 10 seconds be fore turning the power on again otherwise this machine may not function properly Setting the Macintosh computer Use the Macintosh computer tha...

Page 104: ...at the top left of the dialog box The Apply configuration changes message appears 8 Click the Apply button The changed setting are saved For Mac OS 9 2 1 On the Apple menu point to Control Panel and t...

Page 105: ...3 Setting up network printing 3 40 cm4521...

Page 106: ...o select the printer The Print dialog box differs depending on the application 3 Specify the print range and the number of copies to print 4 Click the Properties button or the Preferences button to ch...

Page 107: ...t button point to Settings and then click Printers For Windows XP Server 2003 click the Start button and then click Printers and Faxes If Printers and Faxes does not appear in the Start menu open the...

Page 108: ...e application click File and then click Print 2 Check that the printer name has been selected 3 Specify the print range and the number of copies to print and then click the Print button If the printer...

Page 109: ...he print range and the number of copies to print and then click the Print button The Data indicator of this machine flashes 2 Note If the printer name does not appear in the list select the printer fr...

Page 110: ...iew Printer driver PCL Post Script Mac OS X Mac OS 9 Original Orien tation Specifies the orientation of the original document o o o o Original Size Specifies the size of the original document o o o o...

Page 111: ...ire print image o o o Staple Specifies stapling o o o o Punch Specifies hole punching o o o o Fold Specifies folding o o o o Center Staple and Fold Specifies to saddle stitch a print ed document o o o...

Page 112: ...on No two color se lection No two color se lection Quality Adjust ment Adjusts the image quality o o o o Color Settings Prints with a quality suitable for the selected original document o o o o Patter...

Page 113: ...Landscape as the orientation of the page be ing printed Operating system Printer driver Refer to Windows PCL Specifying the Basic tab settings on page 5 6 PostScript Specifying the Basic tab settings...

Page 114: ...tio 2 Note Only the output paper sizes can be specified with the PostScript PPD driver for the Macintosh Operating system Printer driver Refer to Windows PCL Specifying the Basic tab settings on page...

Page 115: ...values Operating system Printer driver Refer to Windows PCL Specifying the Basic tab settings on page 5 6 PostScript Specifying the Basic tab settings on page 6 7 Mac OS X PostScript PPD Page Attribu...

Page 116: ...ted Operating system Printer driver Refer to Windows PCL Specifying the Basic tab settings on page 5 6 PostScript Specifying the Basic tab settings on page 6 7 Mac OS X PostScript PPD Paper Tray Outpu...

Page 117: ...driver Refer to Windows PCL Specifying the Basic tab settings on page 5 6 PostScript Specifying the Basic tab settings on page 6 7 Mac OS X PostScript PPD Output Method on page 8 11 Mac OS 9 2 Printe...

Page 118: ...per sources are used when a shift ing finisher is installed and when no finisher is installed Operating system Printer driver Refer to Windows PCL Specifying the Basic tab settings on page 5 6 PostScr...

Page 119: ...on multiple pages with Poster Mode printing N in 1 printing comes in handy when you want to reduce the number of out put pages Poster Mode printing allows you want to enlarge the print size when large...

Page 120: ...ystem Printer driver Refer to Windows PCL Specifying the Layout tab settings on page 5 17 PostScript Specifying the Layout tab settings on page 6 18 Mac OS X PostScript PPD Print dialog box on page 8...

Page 121: ...area can be specified by specifying the binding position Duplex printing Booklet printing Operating system Printer driver Refer to Windows PCL Specifying the Layout tab settings on page 5 17 PostScrip...

Page 122: ...tion For duplex printing the front side and back side of a page can be specified separately Operating system Printer driver Refer to Windows PCL Specifying the Layout tab settings on page 5 17 PostScr...

Page 123: ...ble only when the optional finisher is installed The hole punch function is available only when the punch kit is installed on the optional finisher Operating system Printer driver Refer to Windows PCL...

Page 124: ...le and fold function and fold function are available only when optional saddle stitcher is installed Operating system Printer driver Refer to Windows PCL Specifying the Finish tab settings on page 5 2...

Page 125: ...ector transparencies Operating system Printer driver Refer to Windows PCL Specifying the Finish tab settings on page 5 21 PostScript Specifying the Finish tab settings on page 6 22 Mac OS X PostScript...

Page 126: ...e being printed Watermark Operating system Printer driver Refer to Windows PCL Specifying the Cover Mode tab settings on page 5 24 PostScript Specifying the Cover Mode tab settings on page 6 25 Mac OS...

Page 127: ...rn appear to prevent an illegal copy Operating system Printer driver Refer to Windows PCL Specifying the Stamp Composition tab settings on page 5 27 PostScript Specifying the Stamp Composition tab set...

Page 128: ...Stamp Composition on page 8 33 OS Printer driver Refer to Windows PCL Specifying the Stamp Composition tab settings on page 5 27 PostScript Specifying the Stamp Composition tab settings on page 6 28 M...

Page 129: ...erver 2003 Printers and Faxes window Settings specified in the printer driver setup dialog box displayed using the procedure described below will be applied when printing from any applica tion 1 For W...

Page 130: ...Various printing methods 4 cm4521 4 25 PCL driver PostScript driver...

Page 131: ...page 6 1 Use each tab in the dialog box to set up the printer driver To specify custom settings click Print in the application and then click the Properties or the Preferences button in the Print dia...

Page 132: ...le using the application When the ap plication is quit the settings return to their default settings To specify the settings save the settings in the printer driver dialog box For Mac OS X In the Prin...

Page 133: ...S X on page 8 1 For Mac OS 9 x In the Print dialog box save the settings by clicking the Save Settings but ton 2 Note The settings cannot be saved from the Page Setup dialog box General cannot be save...

Page 134: ...been changed Cancel Click this button to cancel any settings that have been changed and close the dialog box Help Click this button to display the help for each item on the currently displayed dialog...

Page 135: ...es the output paper size Automatically enlarges or reduces when the Original Size setting is changed Zoom Specifies the enlargement and reduction ratio Paper Tray Selects the paper tray for printing P...

Page 136: ...hifting the entire print image Click the Image Shift Set tings button to specify the image shift values Item Function Staple Specifies stapling Center Staple and Fold Specifies to saddle stitch a prin...

Page 137: ...igures tables and graphs in the document Color Settings Prints with a quality suitable for the selected original document Pattern Specifies the graphic pattern details Image Compression Specifies the...

Page 138: ...with this machine to read the status of the installed options Acquire Settings Specifies the status of the connection that executes getting the option information Encrypt Passphrase Enters the encrypt...

Page 139: ...g to suit the paper size You can enlarge or reduce documents created when printing to match the output paper size 1 Click the Basic tab 2 From the Original Size and Paper Size drop down lists select t...

Page 140: ...e tray Tray 1 or Bypass Tray of this machine that was specified from the printer driver and then specify the settings described below from Basic Paper Change Tray Settings Wide Paper in the control pa...

Page 141: ...tails refer to Printing on banner paper on page 10 63 Selecting the paper tray You can specify the paper you want to use for printing by selecting the paper tray that contains the loaded paper 1 Click...

Page 142: ...paper type for a paper tray 1 Click the Basic tab 2 Click the Paper Settings for Each Tray button The Paper Settings for Each Tray dialog box appears 3 From Paper Type Settings select the desired pape...

Page 143: ...t method Not only can you print directly but you can select Secure Print which re quires a password to print or Save in User Box which saves data in the boxes that were created on the HDD 1 Click the...

Page 144: ...t appear when Secure Print is selected To print specify Secure Print Document Box from the Box mode in this machine s control panel and then enter the ID and password For details refer to Print job ma...

Page 145: ...Save in User Box can be preregistered by clicking the User Settings button under Output Method If the file name and box number are already registered the di alog box to enter the file name and box num...

Page 146: ...sword 2 Note If a job is printed using a user name or password that is not a registered account on this machine or if a job is printed without selecting a user un der User Authentication the operation...

Page 147: ...Verify button to communicate with this machine and to check whether authentication can be performed with the user that was entered You cannot use this function if you are not connected to or able to...

Page 148: ...s canceled When the account track settings are specified on this machine the au thentication operation restriction function is in mode 2 and the authenti cation information is not entered correctly th...

Page 149: ...hether authentication can be performed with the user that was entered You cannot use this function if you are not connected to or able to com municate with this machine If printing is not allowed prin...

Page 150: ...text on one page with N in 1 printing or print one sheet of an original document divided on multiple pages with Poster Mode printing 1 Click the Layout tab 2 Select the Combination check box and then...

Page 151: ...Chapters check box 3 Enter the page number of the page you want to print on the front side 2 Note When entering multiple page numbers separate the page numbers with commas such as 2 4 6 or enter a pag...

Page 152: ...et the width of the binding margin click the Binding Margin Set tings button and then specify the desired settings in the Binding Mar gin Settings dialog box that appears Shift Mode To add a binding m...

Page 153: ...Image Shift check box 3 To set the image shift settings click the Image Shift Settings button and then specify the desired settings in the Image Shift Settings dialog box that appears Unit Selects th...

Page 154: ...stapled 2 Reminder The staple function is available only when the optional finisher is installed 1 Click the Finish tab 2 Select the Staple check box 3 From the drop down list specify the number of st...

Page 155: ...e Finish tab 2 Select the Center Staple and Fold check box 2 Note The center staple and fold function cannot be specified when the staple punch or fold function is specified Hole punching Holes can be...

Page 156: ...ying the procedure for adjusting the binding position You can specify the procedure for adjusting the binding position for duplex printing If Prioritize Arranging Papers is selected all pages can be p...

Page 157: ...rint on the front cover and back cover select Print To only add a blank page select Blank 4 Select the paper tray that contains the loaded paper for the front cover and back cover Printing multiple pa...

Page 158: ...e numbers with commas such as 2 4 6 or enter a page range using a hyphen such as 6 10 Print Type Specifies Print Insert Insert Blank Sheet Print 1 Sid ed and Print 2 Sided Paper Tray Specifies the pap...

Page 159: ...cy interleave setting By selecting the Transparency Interleave check box overhead projector transparencies can be inserted between the printed pages 1 Click the Cover Mode tab 2 Select the Transparenc...

Page 160: ...eck box 3 From the list select the watermark that you want to print Editing a watermark You can change the fonts and position of the watermark and you can register a new one 1 Click the Stamp Composit...

Page 161: ...pecifies the watermark print angle Font Name Specifies the font Size Specifies the size Style Specifies the font style Frame Specifies the frame style Text Color Specifies the watermark text color Sha...

Page 162: ...register the overlay file to be printed For details refer to Editing an overlay file on page 5 30 1 Create the print data using any application 2 From the File menu select Print 3 Select this machine...

Page 163: ...e Print dialog box appears again 11 Click the Print button The printing of the overlay is performed Editing an overlay file To use an overlay an overlay file must be created and added to the overlay f...

Page 164: ...he File menu select Print 3 Select this machine in Printer Name and then click the Properties button or the Preferences button 4 Click the Stamp Composition tab 5 Select the Create Overlay File check...

Page 165: ...erlay file enter the file name in the File Name box and then enter the overlay name or a comment in the Overlay Name text box 9 Click the Save button Instead of executing a print the overlay file is s...

Page 166: ...in Overlay The Edit Print In Overlay dialog box appears 3 Click the Browse Files button to open the overlay file The overlay file is added to the Select Overlay File list 2 Note By clicking the Delete...

Page 167: ...3 Click the Edit button under Copy Protect The Edit Copy Protect dialog box appears 4 Specify the copy protection type and the position Multiple print items can be specified Characters Embeds the sele...

Page 168: ...Size Specifies the text size of a pattern Angle Specifies the pattern angle 5 Select the composition method for copy protection Select Copy Protect to specify the desired results when copying or simp...

Page 169: ...osition for the date time and page number Format Displays the format for the date and time to be printed By clicking the Edit button you can specify the display type or the time format Pages Specifies...

Page 170: ...elect the Header Footer setting To specify the header and the footer details continue with step 4 4 Click the Edit button under Header Footer The Edit Header Footer dialog box appears 5 Specify the pr...

Page 171: ...ach object in a doc ument Color Settings Specifies the contents of the original document Prints with a qual ity suitable for the original document Document Prints with a quality suitable for documents...

Page 172: ...ings for the following Download Font Format Selects the TrueType font downloading method Use Printer Fonts Replaces the TrueType fonts with the printer fonts 4 To use the printer fonts change the font...

Page 173: ...ence in the screen display and the print results By selecting the TrueType font download method from the Download Font Format drop down list you can select the TrueType font type to download when down...

Page 174: ...alog box is displayed from the Printers window for Windows XP Server 2003 Printers and Faxes window Excel Job Control Controls jobs so that they are not separated when printing in Mi crosoft Excel Rem...

Page 175: ...Configure tab the option functions cannot be used from the printer driver When installing options or using the authentication function be sure to make the proper settings 1 For Windows 2000 NT 4 0 cli...

Page 176: ...g the Acquire Settings button When the Mail Bin Kit is installed you can assign output tray 1 and output tray 2 as mail bins To assign the output destination of the mail bins select Bin Setting from A...

Page 177: ...ion and then specify the paper size paper orientation and paper type 4 Click the OK button 2 Note The paper type for a paper tray can also be specified from the Basic tab For details refer to Specifyi...

Page 178: ...hrase according to the encryption passphrase that was specified in Driver Password Encryption Setting of this ma chine For details refer to Driver Password Encryption Setting on page 10 40 1 Click the...

Page 179: ...hen click Printers and Faxes If Printers and Faxes does not appear in the Start menu open the Control Panel from the Start menu select Printers and Other Hard ware and then select Printers and Faxes 2...

Page 180: ...ed are not compatible Popup Authentication Dialog when printing Displays the User Au thentication Account Track dialog box when a print job is specified to enter a user name or a department name Regis...

Page 181: ...o 10 custom paper sizes can be registered Up to 16 characters can be entered in the Paper Name text box From the Save Custom Size dialog box the selected custom paper size can be deleted by clicking t...

Page 182: ...You can save the setting values of the changed driver and recall them as necessary Saving the driver settings 1 Change the driver settings from the Basic tab and the Layout tab 2 Click the Add button...

Page 183: ...st 2 Note Up to 30 shared settings and up to 20 private settings can be registered Up to 30 characters can be entered in the Name text box Up to 255 characters can be entered in the Comment text box O...

Page 184: ...Edit button next to the Favorite Setting drop down list 2 From the list select the specified name that you want to change and then change the setting To delete a setting click the Delete button To swi...

Page 185: ...n the Printing Preferences dialog box click the Edit button next to the Favorite Setting drop down list 2 From the list select the specified name that you want to export and then click the Export butt...

Page 186: ...hat have been changed Cancel Click this button to cancel any settings that have been changed and close the dialog box Help Click this button to display the help for each item on the currently displaye...

Page 187: ...cifies the output paper size Automatically enlarges or reduc es when the Original Size setting is changed Zoom Specifies the enlargement and reduction ratio Paper Tray Selects the paper tray for print...

Page 188: ...gs button to specify the image shift values Item Function Staple Specifies stapling Center Staple and Fold Specifies to saddle stitch a printed document Punch Specifies hole punching Fold Specifies fo...

Page 189: ...Color Specifies the color for printing Quality Adjustment Adjusts the image quality You can select Simple to ad just entire documents or Detailed to adjust the text pho tos and charts in the document...

Page 190: ...es whether to reset printer before printing Send CTRL D After Each Job Specifies whether to reset printer after printing Convert Gray Text to PostScript Gray Specifies whether to convert gray text in...

Page 191: ...the settings for each paper tray Acquire Device Information Communicates with this machine to read the status of the installed options Acquire Settings Specifies the status of the connection that exec...

Page 192: ...nting to suit the paper size You can enlarge or reduce documents created when printing to match the output paper size 1 Click the Basic tab 2 From the Original Size and Paper Size drop down lists sele...

Page 193: ...size paper in the tray Tray 1 or Bypass Tray of this machine that was specified from the printer driver and then specify the settings described below from Basic Paper Change Tray Settings Wide Paper i...

Page 194: ...r you want to use for printing by selecting the paper tray that contains the loaded paper 1 Click the Basic tab 2 From the Paper Tray drop down list select the desired paper tray 2 Note If Auto is spe...

Page 195: ...the paper type for a paper tray 1 Click the Basic tab 2 Click the Paper Settings for Each Tray button The Paper Settings for Each Tray dialog box appears 3 From Paper Type Settings select the desired...

Page 196: ...utput method Not only can you print directly but you can select Secure Print which re quires a password to print or Save in User Box which saves data in the boxes that were created on the HDD 1 Click...

Page 197: ...s not appear when Secure Print is selected To print specify Secure Print Document Box from the Box mode in this machine s control panel and then enter the ID and password For details refer to Print jo...

Page 198: ...or Save in User Box can be preregistered by clicking the User Settings button under Output Method If the file name and box number are already registered the di alog box to enter the file name and box...

Page 199: ...assword 2 Reminder If a job is printed using a user name or password that is not a registered account on this machine or if a job is printed without selecting a user un der User Authentication the ope...

Page 200: ...the Verify button to communicate with this machine and to check whether authentication can be performed with the user that was entered You cannot use this function if you are not connected to or able...

Page 201: ...eled When the account track settings are specified on this machine the au thentication operation restriction function is in mode 2 and the authenti cation information is not entered correctly the appl...

Page 202: ...uthentication can be performed with the user that was entered You cannot use this function if you are not connected to or able to com municate with this machine If printing is not allowed printing can...

Page 203: ...e N in 1 You can specify to print multiple pages of text on one page with N in 1 print ing 1 Click the Layout tab 2 Select the Combination check box and then specify the setting from the drop down lis...

Page 204: ...the Chapters check box 3 Enter the page number of the page you want to print on the front side 2 Note When entering multiple page numbers separate the page numbers with commas such as 2 4 6 or enter a...

Page 205: ...o set the width of the binding margin click the Binding Margin Set tings button and then specify the desired settings in the Binding Mar gin Settings dialog box that appears Shift Mode To add a bindin...

Page 206: ...the Image Shift check box 3 To set the image shift settings click the Image Shift Settings button and then specify the desired settings in the Image Shift Settings dialog box that appears Unit Selects...

Page 207: ...be stapled 2 Reminder The staple function is available only when the optional finisher is installed 1 Click the Finish tab 2 Select the Staple check box 3 From the drop down list specify the number o...

Page 208: ...Click the Finish tab 2 Select the Center Staple and Fold check box 2 Note The center staple and fold function cannot be specified when the staple punch or fold function is specified Hole punching Hole...

Page 209: ...cifying the procedure for adjusting the binding position You can specify the procedure for adjusting the binding position for duplex printing If Prioritize Arranging Papers is selected all pages can b...

Page 210: ...Click the Cover Mode tab 2 Select the Front Cover and Back Cover check boxes 3 From the Front Cover and Back Cover drop down lists select the desired print settings To print on the front cover and bac...

Page 211: ...age Setting drop down list select the desired list name 4 Click the Edit List button The Per Page Settings Edit List dialog box for specifying the print set tings appears 5 Click the Add button A new...

Page 212: ...page number starting with the smallest page number The list name can be changed by clicking the Edit List Name button Printing with transparency interleaves If Transparency is selected as the paper t...

Page 213: ...check box 3 From the list select the watermark that you want to print Editing a watermark You can change the fonts and position of the watermark and you can register a new one 1 Click the Stamp Compo...

Page 214: ...e Specifies the watermark print angle Font Name Specifies the font Size Specifies the size Style Specifies the font style Frame Specifies the frame style Text Color Specifies the watermark text color...

Page 215: ...preregister the overlay file to be printed For details refer to Editing an overlay file on page 6 31 1 Create the print data using any application 2 From the File menu select Print 3 Select this mach...

Page 216: ...The Print dialog box appears again 11 Click the Print button The printing of the overlay is performed Editing an overlay file To use an overlay an overlay file must be created and added to the overla...

Page 217: ...om the File menu select Print 3 Select this machine in Printer Name and then click the Properties button or the Preferences button 4 Click the Stamp Composition tab 5 Select the Create Overlay File ch...

Page 218: ...overlay file enter the file name in the File Name box and then enter the overlay name or a comment in the Overlay Name text box 9 Click the Save button Instead of executing a print the overlay file i...

Page 219: ...nt in Overlay The Edit Print In Overlay dialog box appears 3 Click the Browse Files button to open the overlay file The overlay file is added to the Select Overlay File list 2 Note By clicking the Del...

Page 220: ...ox 3 Click the Edit button under Copy Protect The Edit Copy Protect dialog box appears 4 Specify the copy protection type and the position Multiple print items can be specified Characters Embeds the s...

Page 221: ...ext Size Specifies the text size of a pattern Angle Specifies the pattern angle 5 Select the composition method for copy protection Select Copy Protect to specify the desired results when copying or s...

Page 222: ...nt position for the date time and page number Format Displays the format for the date and time to be printed By clicking the Edit button you can specify the display type or the time format Pages Speci...

Page 223: ...st select the Header Footer setting To specify the header and the footer details continue with step 4 4 Click the Edit button under Header Footer The Edit Header Footer dialog box appears 5 Specify th...

Page 224: ...pro file for the text photos and charts of each object in a document Color Settings Specifies the contents of the original document Prints with a quality suitable for the original document Document P...

Page 225: ...t can be selected when adjusting the details of the image 1 Click the Quality tab 2 Click the Quality Adjustment button The Quality Adjustment dialog box appears 3 Click the Manage Profile button The...

Page 226: ...t box The profile name can be changed in the File Name text box or the Profile Name text box To download the profile data to the printer use a download man ager program For details refer to the user s...

Page 227: ...aces the TrueType fonts with the printer fonts 2 Note Using the printer fonts will shorten the printing time however there may be a difference in the screen display and the print results By selecting...

Page 228: ...4 or Windows Server 2003 x64 The Excel Job Control setting can only be changed when the printer driver dialog box is displayed from the Printers window for Windows XP Server 2003 Printers and Faxes wi...

Page 229: ...nt track functions are not specified on the Configure tab the option functions cannot be used from the printer driver When installing options or using the authentication function be sure to make the p...

Page 230: ...Information button to communicate with this machine and read the status of the settings specified on this machine You cannot use this function if you are not connected to or able to com municate with...

Page 231: ...not be performed correctly Be sure to make the proper settings 1 Click the Configure tab 2 Click the Paper Tray Settings button The Paper Tray Settings dialog box appears 3 Select the desired tray in...

Page 232: ...assphrase according to the encryption passphrase that was specified in Driver Password Encryption Setting of this ma chine For details refer to Driver Password Encryption Setting on page 10 40 1 Click...

Page 233: ...For Windows XP Server 2003 click the Start button and then click Printers and Faxes If Printers and Faxes does not appear in the Start menu open the Control Panel from the Start menu select Printers a...

Page 234: ...his machine before printing A message appears if the results verified are not compatible Popup Authentication Dialog when printing Displays the User Au thentication Account Track dialog box when a pri...

Page 235: ...g the driver settings You can save the setting values of the changed driver and recall them as necessary Saving the driver settings 1 Change the driver settings from the Basic tab and the Layout tab 2...

Page 236: ...ion of the specified file if necessary 4 Click the OK button The specified settings are registered in the Favorite Setting drop down list 2 Note Up to 30 shared settings and up to 20 private settings...

Page 237: ...the printer driver are changed Editing the settings You can edit the recalled function items such as the specified names and comments 1 In the Printing Preferences dialog box click the Edit button nex...

Page 238: ...Windows 6 cm4521 6 53 3 Click the Option button select the check box of the function that you want to recall and then click the OK button 4 Click the OK button 2 Note The specified settings of the dr...

Page 239: ...settings on an other computer 1 In the Printing Preferences dialog box click the Edit button next to the Favorite Setting drop down list 2 From the list select the specified name that you want to exp...

Page 240: ...Setting up the PostScript driver Windows 6 cm4521 6 55 2 Note To read the specified file that was saved in the Favorite Setting drop down list click the Import button and specify the file...

Page 241: ...6 Setting up the PostScript driver Windows 6 56 cm4521...

Page 242: ...Setup items Menu Item Function Page Attributes Paper Specifies the paper size Orientation Specifies the orientation Scale Specifies the enlargement and reduction ratio PostScript Options Flip Horizont...

Page 243: ...Print items Custom Page Sizes Paper Size Specifies any paper size Margins Specifies the paper margins Custom Page Size Name Enters the registered name for the specified paper size and margin after the...

Page 244: ...itions to download fonts Layout Pages per sheet Specifies the number of pages to print on one page Layout direction Specifies the page order for printing multiple pages on one page Border Specifies th...

Page 245: ...Specifies whether to print in color or grayscale Glossy Mode Prints using a gloss finish Color Settings Prints with a quality suitable for the original document Color Matching Text Adjusts the color q...

Page 246: ...p from the File menu 2 Select Page Attributes 3 Specify settings for the following Paper Specifies the paper size Orientation Specifies the orientation Scale Specifies the enlargement and reduction ra...

Page 247: ...ings for the following Paper Size Specifies the paper size Margins Specifies the paper margins Custom Page Size Name Enter the registered name for the speci fied paper size and margins and then click...

Page 248: ...ettings for the following Visual Effects Provides Flip Horizontal Flip Vertical and Invert Image negative image Substitute Fonts Replaces some fonts with printer fonts Smooth Text Smooths text data Sm...

Page 249: ...l basic settings 1 From the File menu select Print 2 Select General 3 Specify settings for the following Copies Specifies the number of copies to print Collated Prints multiple copies in sets Pages Sp...

Page 250: ...print multiple pages on one page 1 From the File menu select Print 2 Select Layout 3 Specify settings for the following Pages per sheet Specifies the number of pages to print on one page Layout direct...

Page 251: ...een overhead pro jector transparencies Interleave Tray Selects the paper tray for the transparency inter leaves Output Method Stops printing temporarily after part of the docu ment has been printed so...

Page 252: ...ph in a document to the text or photo settings 2 Reminder The staple function is available only when the optional finisher is installed The hole punch function is available only when the punch kit is...

Page 253: ...make the proper settings 1 On the Apple menu click Chooser 2 Select the printer name 3 Click the Create button 4 Click the Configure button The setting screen for adding options appears 5 Select the o...

Page 254: ...n only be applied while using the application When the ap plication is quit the settings return to their default settings Page Setup dialog box Page Setup items Menu Item Function Page Attributes Pape...

Page 255: ...g box Print items Menu Item Function Copies Pages Copies Specifies the number of copies to print Collated Prints multiple copies in sets Pages Specifies the print range to print Layout Pages per Sheet...

Page 256: ...ollate Prints multiple copies in sets Offset Specifies offset Output Method Specifies output methods such as Secure Print and Save in User Box User Authentication Select to perform user authentication...

Page 257: ...page Back Cover Attaches a back cover page Transparency Inter leave Outputs and inserts interleaves when printing over head projector transparencies Per Page Setting Per Page Setting Inserts paper be...

Page 258: ...ncy Interleave and Per Page Setting for this ma chine Item Function Paper View A preview of the page layout as specified in the current settings is displayed and a preview image of the print job can b...

Page 259: ...Acquire Device Information button on the Printer Information dialog box to communicate with this machine and read the status of the settings specified on this machine You cannot use this function if y...

Page 260: ...Attributes basic settings 1 Select Page Setup or Paper Setup from the File menu 2 Select Page Attributes 3 Specify settings for the following Paper Size Specifies the paper size Orientation Specifies...

Page 261: ...nd Tray 1 or Bypass Tray as the paper tray from the printer driver To print load A3 size paper in the tray Tray 1 or Bypass Tray of this machine that is specified from the printer driver and then spec...

Page 262: ...ny paper size Printer Margins Specifies the paper margins 6 For Mac OS X 10 4 continue with step 7 For Mac OS 10 2 and Mac OS 10 3 click the Save button 7 Click the OK button This saves the custom pap...

Page 263: ...3 Printing General settings 1 From the File menu select Print 2 Select Copies Pages 3 Specify settings for the following Copies Specifies the number of copies to print Collated Prints multiple copies...

Page 264: ...ails refer to Selecting the output method on page 8 12 User Authentication Performs user authentication For details refer to Specifying the user authentication settings on page 8 15 Account Track Perf...

Page 265: ...ecure Print User Box of this machine When printing you are required to enter the ID and pass word in this machine s control panel Select when printing highly confidential documents Save in User Box Sa...

Page 266: ...anel and then enter the ID and password For details refer to Print job management on page 10 42 For details on the box functions of this machine refer to the User s Guide Box Operations When password...

Page 267: ...the box function of this machine For details on the box functions of this machine refer to the User s Guide Box Operations When password rules are enabled on this machine specify the box that was crea...

Page 268: ...out selecting a user un der User Authentication the operation is not authenticated by this ma chine and the job is canceled If the user authentication settings are specified on this machine and the au...

Page 269: ...tails on the user authentication function con sult the administrator of this machine If performing user authentication with an optional authentication unit en ter the user name and password in step 2...

Page 270: ...refer to Checking the Output Method setting details on page 8 17 If printing is not allowed printing cannot be performed even when used by a registered account For details on the account track functio...

Page 271: ...x number This is the same dialog box that appears when Save in User Box or Save in User Box and Print is specified from the Output Method drop down list User Authentication Displays the User Authentic...

Page 272: ...when a print job is specified to enter a user name or a department name Encryption Passphrase Specifies an encryption passphrase when it is user defined by communicating with this machine The encrypti...

Page 273: ...8 Setting up the PPD driver Mac OS X 8 20 cm4521 8 5 Layout Finish You can switch between the Layout dialog box and the Finish dialog box...

Page 274: ...Staple check box and then specify the number of staples and the stapling position from the drop down list Punch Specifies hole punching Select the Punch check box and then specify the number of punch...

Page 275: ...able only when the optional finisher is installed The hole punch function is available only when the punch kit is installed on the optional finisher The fold staple function and the fold function are...

Page 276: ...clearing the Same value for Front and Back sides check box you can set separate values for the front and back sides 2 Note By selecting the Save Settings check box the specified settings are saved In...

Page 277: ...want to print on the front side 2 Note When entering multiple page numbers separate the page numbers with commas such as 2 4 6 or enter a page range using a hyphen such as 6 10 The Chapters check box...

Page 278: ...shown by clicking the Expand All button By selecting a function and clicking the Settings button the dialog box for specifying the detailed settings for the selected function appears Image Shift Displ...

Page 279: ...ach Tray Specifies the paper type for each paper tray For details refer to Specifying the paper type for a paper tray on page 8 27 Output Tray Specifies the tray where to output the printed pages 2 No...

Page 280: ...paper tray and then select the paper type to be specified from the Paper Type drop down list 2 Note Click the Restore Device Status button to communicate with this ma chine and read the status of the...

Page 281: ...8 Setting up the PPD driver Mac OS X 8 28 cm4521 8 7 Cover Mode Transparency Interleave You can switch between the Cover Mode dialog box and the Transparency Interleave dialog box...

Page 282: ...ditions from the upper drop down list and the paper tray that contains the loaded paper to be used from the lower drop down list Transparency Interleave Outputs and inserts interleaves when printing o...

Page 283: ...sed as necessary Per Page Setting Enables the per page setting function List Displays the list of the settings that have been added to Per Page Set ting Add Adds settings to Per Page Setting For detai...

Page 284: ...on to add the setting to the list A new row for specifying the settings is added to the settings list 4 Select the row that was added to the list and then specify the print set tings in Add Edit Page...

Page 285: ...lect the desired row and change the settings To delete existing print settings select the desired row and then click the Delete button Click the button or the button to change the page number starting...

Page 286: ...nd time Page Number Prints the page number Header Footer Prints a header and a footer Printing with copy protection You can print a special pattern on an entire page while printing When copying a prin...

Page 287: ...stamp can be speci fied Date Time Embeds the selected date and time in a pattern Serial Number Embeds the serial number of this machine in a pat tern Distribution Control Number Embeds the number of c...

Page 288: ...ern Specifies the embedding method of a pattern Pattern Overwrite Specifies the order for printing a pattern on the original document Background Pattern Specifies the pattern background Adjust Color S...

Page 289: ...te and time Format Displays the format for the date and time to be printed Pages Specifies the pages to print the date and time Text Color Specifies the text color to print Print Position Specifies th...

Page 290: ...number Starting Page Number Specifies the start number for printing the page number Cover Mode If cover pages are attached specifies whether to print the page number on the front cover page or the bac...

Page 291: ...ed in this machine Distribution Control Number Displays the number of the copy in the header or the footer when printing multiple copies The start number or the number of digits that are displayed can...

Page 292: ...Prints with a quality suitable for documents with many charac ters Photo Prints with a quality suitable for photos DTP Prints with a quality suitable for documents produced using DTP Web Prints with a...

Page 293: ...color profiles that can be selected from Quality Ad justment 1 Click the Quality Adjustment button The Quality Adjustment dialog box appears 2 Click the Manage Profile button The Color Profile Managem...

Page 294: ...ext box The profile name can be changed in the File Name text box or the Profile Name text box To download the profile data to the printer use a download man ager program For details refer to the user...

Page 295: ...n function cannot be used with the printer driver When installing options be sure to make the proper settings 1 Open Printer Setup Utility or Print Center located in Applications Utilities of Hard Dis...

Page 296: ...driver settings 1 Change the driver settings in Copies Pages and Layout 2 From Presets click Save as 3 Enter the preset name in the Save Preset As text box 4 Click the OK button The settings are adde...

Page 297: ...ging the settings 1 Select Presets from the Print dialog box to change the settings 2 Change the driver settings in Copies Pages and Layout 3 From Presets click Save To delete click Delete To change t...

Page 298: ...on of this machine refer to the User s Guide Fax Operations 1 Create the data you want to send using any application 2 From the File menu select Print 3 From Printer Name select Generic 45C 2 FAX 4 Cl...

Page 299: ...steps 6 and 7 Up to 100 recipi ents can be added To delete a recipient from the list click the Delete From List but ton 8 If necessary click the Fax Mode Setting Details button to specify the fax mode...

Page 300: ...box cannot be cleared International Transmission Mode Slows the speed when sending faxes overseas Select this check box if errors occur when sending faxes over seas V 34 Mode Specifies the Super G3 f...

Page 301: ...n page 9 28 1 When sending a fax click the Add From Phone Book button in the FAX Transmission Popup dialog box To open the FAX Transmission Popup dialog box follow steps 1 to 5 under Fax operations Fo...

Page 302: ...to 100 recip ients can be added To delete a recipient click the Delete button If recipients have been added to a group all the members of the group can be added to Recipient List group transmission by...

Page 303: ...nding confidential faxes using F codes Sender ID Specifies the sender ID for sending confidential faxes using F codes 2 Note When using Timer Send check that the time set on the computer is syn chroni...

Page 304: ...ver Sheet Settings dialog box you can change the settings on the Basic Recipient Sender or Image tab by switching between each screen 1 Select the FAX Cover Sheet check box in the FAX Transmission Pop...

Page 305: ...s standard text Details Specifies the details described under Recipient Setting Details Load with Joint Name Lists the recipient with joint names The items listed are the items shown under Recipient L...

Page 306: ...names that were added are entered but titles cannot be added If a recipient is not specified on the FAX Transmission Popup dialog box Load Set Information cannot be selected In addition it can not be...

Page 307: ...m check box to specify the size and set the position with the values in the X and Y boxes 8 Check the specified settings Click the Check button to check an enlarged preview image Click the Add button...

Page 308: ...cel Click this button to cancel any settings that have been changed and close the dialog box Help Click this button to display the help for each item on the currently displayed dialog box Add Favorite...

Page 309: ...be checked Item Function Resolution Specifies the fax resolution Print Recipient File Prints the document after the fax was sent Timer Send Sets the transmission time By clicking the Reflect Current T...

Page 310: ...on Combination Prints multiple pages on one page or prints one sheet of an original document divided on multiple pages Details can be specified by clicking the Combination Details button Skip Blank Pa...

Page 311: ...en click Properties Item Function Display Constraint Mes sage Displays a message when functions that cannot be specified at the same time were enabled from the printer driver Display paper set in Prin...

Page 312: ...fax this function can be specified when spec ifying the transmission settings For details refer to Specifying the transmis sion settings on page 9 6 SUB Address Specifies the sub address for sending...

Page 313: ...time is earlier than the current time of this machine the fax is sent the next day If sending confidential faxes using F codes to another fax model enter the sub address and sender ID in the SUB Addre...

Page 314: ...of the original document Paper Size Specifies the output paper size of the recipient Automatically enlarges or reduces when the Original Size setting is changed Zoom Specifies the enlargement and redu...

Page 315: ...ed below 1 From the Original Size or the Paper Size drop down list select Custom Size The Custom Size Settings dialog box appears 2 Specify settings for the following Width Specifies the width of the...

Page 316: ...the user authentication settings are specified on this machine and the authentication operation restriction function is in mode 2 the applicable user is locked and cannot be accessed if the authentic...

Page 317: ...unit en ter the user name and password in step 3 For details refer to the oper ation manual of the authentication unit Specifying the account track settings If the account track settings have been spe...

Page 318: ...button to communicate with this machine and to check whether authentication can be performed with the user that was entered You cannot use this function if you are not connected to or able to com mun...

Page 319: ...the Layout tab settings Combination Prints multiple pages on one page or prints one sheet of an original document divided on multiple pages Details can be specified by clicking the Combination Details...

Page 320: ...number of out put pages Poster Mode printing comes in handy when the recipient s fax machine does not support large paper sizes 1 Click the Layout tab 2 Select the Combination check box and then spec...

Page 321: ...eck box 3 From the list select the watermark that you want to print Editing a watermark You can change the fonts and position of the watermark and you can register a new one 1 Click the Stamp Composit...

Page 322: ...ngle Specifies the watermark print angle Font Name Specifies the font Size Specifies the size Style Specifies the font style Frame Specifies the frame style Density Specifies the density of the text S...

Page 323: ...When installing options be sure to make the proper settings 1 For Windows 2000 NT 4 0 click the Start button point to Settings and then click Printers For Windows XP Server 2003 click the Start button...

Page 324: ...tings button Changing an encryption passphrase You can specify an encryption passphrase when it is user defined by com municating with this machine The encryption key is automatically generated accord...

Page 325: ...hem to a phone book A phone book can be added from the FAX tab in the FAX Printing Preferences dialog box 1 From the FAX tab in the FAX Printing Preferences dialog box click the Phone Book Entry butto...

Page 326: ...necessary ECM Specifies the ECM Error Correction Mode If the V 34 Mode check box is selected the ECM check box cannot be cleared International Transmission Mode Slows the speed when sending faxes over...

Page 327: ...as added also appears in Group 6 Click the OK button If a name was added the editing of the phone book is complete The first time you register a phone book a dialog box to confirm wheth er you want to...

Page 328: ...phone book file automatically appears the next time you open the phone book To open a different phone book select Open from the File menu in the Phone Book Entry dialog box If multiple phone books ha...

Page 329: ...al Information Personal List dialog box that appeared when you regis tered the phone book appears allowing you to change the information You can select the name that you want to change from Personal L...

Page 330: ...ipient s name from Personal List on the left side of the dialog box to the desired group However the name cannot be dragged out of the group Up to 100 recipients can be added to a group To change a gr...

Page 331: ...haracters can be entered for the folder name A folder can be up to three layers deep To edit a folder select the desired folder and then click the Edit button To delete a folder select the desired fol...

Page 332: ...ou can save the setting values of the changed driver and recall them as necessary Saving the driver settings 1 Change the driver settings from the Basic tab and the Layout tab 2 Click the Add button n...

Page 333: ...st 2 Note Up to 30 shared settings and up to 20 private settings can be registered Up to 30 characters can be entered in the Name text box Up to 255 characters can be entered in the Comment text box O...

Page 334: ...e Edit button next to the Favorite Setting drop down list 2 From the list select the specified name that you want to change and then change the setting To delete a setting click the Delete button To s...

Page 335: ...the FAX Printing Preferences dialog box click the Edit button next to the Favorite Setting drop down list 2 From the list select the specified name that you want to export and then click the Export bu...

Page 336: ...s settings 10 1 Print settings in Utility mode You can change the settings of the printer functions in this machine s control panel Default settings To display the User Settings screen 1 Press the Uti...

Page 337: ...touching Close in each screen until the screen for the Copy Fax Scan or Box mode appears To return to the Utility screen touch Close until the desired screen ap pears You can also touch the menus in...

Page 338: ...Various settings 10 cm4521 10 3 1 In the User Settings screen touch 5 Printer Settings 2 Touch 1 Basic Settings 3 Touch PDL Setting...

Page 339: ...lt number of copies when no setting has been specified from the printer driver Default setting 1 Detail For details on displaying the User Settings screen refer to To display the User Settings screen...

Page 340: ...ue within the allowable range 5 Touch OK The default number of copies is set Original Direction You can specify the default image orientation Default setting Portrait Portrait Prints the image vertica...

Page 341: ...used Default setting ON ON When the next job is received while processing a job the print data is stored in the HDD OFF The print data is not stored in the HDD 2 Reminder Be sure not to change the se...

Page 342: ...n HDD before RIP 4 Touch the button for the desired setting Paper size change You can specify whether similar paper sizes 8 1 2 11 and A4 and 11 17 and A3 are substituted for each other when there is...

Page 343: ...In the User Settings screen touch 5 Printer Settings 2 Touch 1 Basic Setting 3 Touch A4 A3 LTR LGR Auto Switch 4 Touch the button for the desired setting Banner Sheet Setting You can specify whether t...

Page 344: ...laying the User Settings screen refer to To display the User Settings screen on page 10 1 1 In the User Settings screen touch 5 Printer Settings 2 Touch 1 Basic Setting 3 Touch or and then touch Banne...

Page 345: ...ition to the most suitable position after all of the print data is received by this machine Productivity Priority Printing is performed efficiently because the data is printed simultaneously as it is...

Page 346: ...ecify the input tray to use when none has been specified from the printer driver Default setting Auto Detail For details on displaying the User Settings screen refer to To display the User Settings sc...

Page 347: ...10 Various settings 10 12 cm4521 3 Touch Paper Tray 4 Touch the button of the desired paper tray To select the paper tray automatically touch Auto 5 Touch OK...

Page 348: ...ult setting 8 1 2 11 2 Note For details on displaying the User Settings screen refer to To display the User Settings screen on page 10 1 1 In the User Settings screen touch 5 Printer Settings 2 Touch...

Page 349: ...g setting Default setting OFF Detail For details on displaying the User Settings screen refer to To display the User Settings screen on page 10 1 1 In the User Settings screen touch 5 Printer Settings...

Page 350: ...lex printing Default set ting Left Bind Detail For details on displaying the User Settings screen refer to To display the User Settings screen on page 10 1 1 In the User Settings screen touch 5 Printe...

Page 351: ...isplaying the User Settings screen refer to To display the User Settings screen on page 10 1 1 In the User Settings screen touch 5 Printer Settings 2 Touch 2 Paper Setting 3 Touch Staple 4 Touch the b...

Page 352: ...er Settings screen refer to To display the User Settings screen on page 10 1 1 In the User Settings screen touch 5 Printer Settings 2 Touch 2 Paper Setting 3 Touch or and then touch Punch 4 Touch the...

Page 353: ...rinting Default setting Auto Detail For details on displaying the User Settings screen refer to To display the User Settings screen on page 10 1 1 In the User Settings screen touch 5 Printer Settings...

Page 354: ...ting has been specified from the printer driver Default setting Courier Detail For details on displaying the User Settings screen refer to To display the User Settings screen on page 10 1 1 In the Use...

Page 355: ...downloaded fonts are available Download Font can also be se lected 5 Touch the button for the desired setting Touch or to switch the pages and then touch the button for the desired setting You can che...

Page 356: ...nds on the location Detail For details on displaying the User Settings screen refer to To display the User Settings screen on page 10 1 1 In the User Settings screen touch 5 Printer Settings 2 Touch 3...

Page 357: ...nt 12 00 point Bitmap Font 10 00 pitch Scalable Font Specifies the font size in points Bitmap Font Specifies the width of the fixed width font in pitches Detail For details on displaying the User Sett...

Page 358: ...allowable range is specified the message Input Error appears Type in a value within the allowable range 5 Touch OK The font size is set Line Page You can specify the number of lines per page when pri...

Page 359: ...ide of the allowable range is specified the message Input Error appears Type in a value within the allowable range 5 Touch OK The number of lines per page is set CR LF Mapping You can specify the data...

Page 360: ...tings screen refer to To display the User Settings screen on page 10 1 1 In the User Settings screen touch 5 Printer Settings 2 Touch 3 PCL Settings 3 Touch 5 CR LF Mapping 4 Select Yes or No If Yes i...

Page 361: ...r message when an error occurs during PS rasterization Default setting OFF Detail For details on displaying the User Settings screen refer to To display the User Settings screen on page 10 1 1 In the...

Page 362: ...pecify the profiles to use when no setting has been specified from the printer driver 2 Note For details on displaying the User Settings screen refer to To display the User Settings screen on page 10...

Page 363: ...put method here is explained in the PCL font list Configuration Page Outputs a list of this machine s settings Demo Page Outputs a test page PCL Font List Outputs the PCL font list PS Font List Output...

Page 364: ...s 10 cm4521 10 29 2 Touch 5 Print Reports 3 Touch the button for the desired setting 4 Touch the button for the desired paper tray and touch 1 Sided or 2 Sided 5 To print a report touch Start or press...

Page 365: ...10 Various settings 10 30 cm4521 10 2 Print settings in Administrator mode To display the Administrator Settings screen 1 Press the Utility Coun ter key 2 Touch 3 Administrator Settings...

Page 366: ...g or changing the password refer to the User s Guide Copy Operations The Administrator Settings screen appears 2 Note To quit specifying the Utility mode settings press the Utility Counter key Otherwi...

Page 367: ...tor Settings screen on page 10 30 1 In the Administrator Settings screen touch 1 System Settings 2 In the Systems Settings screen touch 2 Output Settings 3 In the Output Settings screen touch 1 Print...

Page 368: ...age Print is selected printing starts when the data for the first page is received and the print job is queued Output Tray Setting You can specify the output tray to use when none has been specified f...

Page 369: ...uch the button for the desired setting The output tray is set To delete secure print documents All saved secure print documents can be deleted 1 In the Administrator Settings screen touch 1 System Set...

Page 370: ...e secure document delete time The length of time for deleting a secure document after it is saved can be specified 1 In the Administrator Settings screen touch 1 System Settings 2 In the System Settin...

Page 371: ...name and password for User Authentication or a department name and password for Account Track are not specified The print job is counted as a public job Restrict Restricts print jobs to be printed whe...

Page 372: ...cified a job is not printed and it is can celed if the user name or password or department name or password that is specified to the job is incorrect 1 In the Administrator Settings screen touch 4 Use...

Page 373: ...ator Settings screen on page 10 30 1 In the Administrator Settings screen touch 7 Printer Settings 2 In the Printer Settings screen touch the button of the desired interface setting 3 Press the C clea...

Page 374: ...or Settings screen on page 10 30 For details on capturing a print job consult a service technician 1 In the Administrator Settings screen touch Security Settings 2 In the Security Settings screen touc...

Page 375: ...nistrator Settings screen refer to To display the Ad ministrator Settings screen on page 10 30 Encryption can be performed with an encryption common key however the passwords that can be used are the...

Page 376: ...efined was selected enter 20 characters for the encryption password and then touch OK Consecutive encryption passwords with the same characters are invalid 5 Reenter the encryption password and then t...

Page 377: ...rop down list select the output method Print Prints immediately Secure Print Enters the ID and password in the dialog box that ap pears and saves the print document in Secure Print User Box on this ma...

Page 378: ...Various settings 10 cm4521 10 43 For details refer to Selecting the output method on page 5 10 and page 6 11...

Page 379: ...ing you are required to enter the ID and password in this machine s control panel Select when printing highly confidential documents Save in User Box Enters the file name and box number in the dialog...

Page 380: ...red job you must recall the job using this machine s control panel Recalling jobs Proof Print Detail For details on using the keys in the control panel refer to the User s Guide Copy Operations For de...

Page 381: ...conditions skip to step 5 4 To check the print results select the job whose sample copy is to be printed from the job list and then press the Proof Copy key in the con trol panel Check the print resu...

Page 382: ...ys in the control panel refer to the User s Guide Copy Operations For details on the box functions of this machine refer to the User s Guide Box Operations 2 Note Secured documents are automatically d...

Page 383: ...10 48 cm4521 When Confidential Document Access Method is set to Mode 1 1 Press the Box key in this machine s control panel and then touch Use Document 2 Select System User Box then Secure Print User B...

Page 384: ...r the secure print document and then touch OK 4 Type in the password for the secure print document and then touch OK If the specified ID and password match the secure print document list appears 5 Sel...

Page 385: ...nts and a preview of the document can be checked by touching Document Details 6 If necessary change the print conditions 7 Touch Start or press the Start key in the control panel To cancel printing th...

Page 386: ...10 cm4521 10 51 When Confidential Document Access Method is set to Mode 2 1 Press the Box key in this machine s control panel and then touch Use Document 2 Select System User Box and then touch Secur...

Page 387: ...cure print document list appears 4 Select the document to be printed and then touch Enter Password The contents and a preview of the document can be checked by touching Document Details 5 Type in the...

Page 388: ...tions when Auth Error in Administrator mode is set to Mode 2 and an incorrect document password is entered the specified number of times the selected document is locked Contact the administrator to ca...

Page 389: ...he box functions of this machine refer to the User s Guide Box Operations 2 Note Box documents are automatically deleted after a set length of time after they are registered The default setting of thi...

Page 390: ...cm4521 10 55 If a password is not specified to a box skip to step 4 3 Type in the password for the box and then touch OK The specified box document list appears 4 Select the document to be printed an...

Page 391: ...ing a user name or password that is not a registered account on this machine or if a job is sent without specifying User Au thentication the operation is not authenticated by this machine and the job...

Page 392: ...operation man ual of the authentication unit Specifying settings for Windows 1 Click the Properties button or the Preferences button on the Print di alog box to display the Printing Preferences dialog...

Page 393: ...ered user name is a name registered on this machine the job is printed and counted as a job for the specified user Specifying settings for Mac OS X 1 From the File menu select Print 2 Select Output Me...

Page 394: ...ck the operation is not authenticated by this machine and the job is canceled When the account track settings are specified on this machine the au thentication operation restriction function is in mod...

Page 395: ...Click the Basic tab 3 Click the Authentication Account Track button 4 Enter the department name and password A default password can be registered and used rather than entering a password for each job...

Page 396: ...Various settings 10 cm4521 10 61 Specifying settings for Mac OS X 1 From the File menu select Print 2 Select Output Method 3 Select the Account Track check box 4 Enter the department name and password...

Page 397: ...ettings 10 62 cm4521 Job operations on Web Connection From Web Connection you can also check the status of the job being per formed by this machine For details refer to the User s Guide Web Connection...

Page 398: ...upported operating systems The following drivers are compatible with banner paper printing Paper width Paper length Paper type 210 to 297 mm 8 1 4 to 11 3 4 inch 457 3 to 1200 mm 18 to 47 1 4 inch Thi...

Page 399: ...tom Size The Custom Size Settings dialog box appears 3 Specify the width and length of the custom size according to the se lected measurement units 4 Specify Paper Type Specify other settings if neces...

Page 400: ...anner Printing 3 Touch Allow and then touch OK 4 Select a job to be printed from the computer and then click Print on the File menu 5 Specify the desired settings and then click the OK button 6 Open t...

Page 401: ...8 Slide the lateral guides to fit the size of paper being loaded Load one sheet at a time Print while supporting the loaded paper with your hands 9 When printing is finished touch Exit To continue pr...

Page 402: ...Various settings 10 cm4521 10 67 10 Touch Yes and then touch OK...

Page 403: ...10 Various settings 10 68 cm4521...

Page 404: ...ble or USB cable is disconnected Check that the cable is connected properly An error has occurred in this ma chine Check this machine s control panel Available memory space is not sufficient Perform a...

Page 405: ...reen of this machine s control panel Secure Print was selected for the print job Check if the print job is held on the Secure Print User Box screen of this machine s control panel If the account track...

Page 406: ...nctions al though possible in the printer driv er is not possible with this machine The paper size orientation and other settings specified in the ap plication have priority over those specified in th...

Page 407: ...loaded into the paper source with an incorrect orienta tion Check the orientation setting The hole punch posi tion is not as expect ed The orientation setting is not cor rect Check the punch position...

Page 408: ...and remedy Cannot connect to the network A connection to the network could not be established Check if the network cable is correctly connected In addition check that the Network Setting parameters on...

Page 409: ...11 Troubleshooting 11 6 cm4521...

Page 410: ...less monochrome and A4 paper Printer language PCL 5e c Emulation PCL6 XL 3 0 Emulation PostScript 3 Emulation 3016 XPS Ver 1 0 Operating environment condi tions Temperature 10 to 30 C Humidity 15 85...

Page 411: ...64 Printer Driver MacOS 9 2 PPD File MacOS X 10 2 Printer Driver MacOS X 10 3 or MacOS X 10 4 Printer Driver Utility Web Connection Web browsers Microsoft Internet Explorer 6 or later recommended Java...

Page 412: ...Appendix 12 cm4521 12 3 12 2 Configuration page...

Page 413: ...12 Appendix 12 4 cm4521 12 3 Font list PCL font list...

Page 414: ...Appendix 12 cm4521 12 5 PS font list...

Page 415: ...12 Appendix 12 6 cm4521 Demo page...

Page 416: ...driver About the PPD driver for Linux Operating environment Supported operating systems Red Hat Linux 9 SuSe Linux 8 2 Supported PostScript level 3 0 CUPS 1 1 17 To register the PPD driver for Linux...

Page 417: ...m the Please Select a Suitable driver list select Generic 45C 2 OpenOffice PPD and then click the Next button 8 In the Choose a command line dialog box select the printer that was added to CUPS and th...

Page 418: ...which is under the folder to which PageMaker is installed Adobe PageMaker 6 5 7 0 Copy the PPD file to RSRC Language PPD4 which is under the folder to which PageMaker is installed To print 1 From the...

Page 419: ...detecting devices connected to the network and for specifying settings Previously called Rendezvous the name was changed to Bonjour starting with Mac OS X v10 4 BOOTP Abbreviation for Bootstrap Protoc...

Page 420: ...he data can be stored even if the power is turned off Host name Displayed name of a device over a network HTTP Abbreviation for HyperText Transfer Protocol A protocol used to send and receive data bet...

Page 421: ...gement related to the network print er NDS Abbreviation for Novell Directory Services The servers and printers on a network and the shared resources of the user s information as well as the user s acc...

Page 422: ...heck the attribute information of the file Protocol The rules that allow computers to communicate with other comput ers or peripheral devices Proxy server A server that is installed to act as an inter...

Page 423: ...rnet Protocol The de facto standard protocol used by the Internet that uses IP ad dresses to identify each network device TrueType An outline font that was developed by Apple Computer and Micro soft I...

Page 424: ...ing paper sizes 10 7 Chapters 4 15 5 18 6 19 8 24 Collate 4 13 7 8 8 11 Color selection 5 38 6 39 7 10 8 39 Color settings 5 38 6 39 7 10 8 39 Combination 4 14 5 17 6 18 7 9 9 23 Configuration page 10...

Page 425: ...8 20 Layout tab 5 17 6 18 9 22 Line Page 10 23 LPR printing 3 10 M Mac OS 9 2 2 16 2 19 7 1 Mac OS X 2 16 8 1 Macintosh 1 5 2 16 3 36 N N in 1 4 14 5 17 6 18 9 23 NDPS 3 34 NDS 3 19 3 26 3 30 NetWare...

Page 426: ...iver 2 1 Printer fonts 4 23 Printer specific options 7 10 Printing 1 3 7 2 7 8 8 2 8 10 Printing methods 4 1 Printing operations 4 1 Printing reports 10 28 Printing without specifying the authenticati...

Page 427: ...6 37 8 36 Transmission settings 9 6 Transparency interleave 4 20 5 26 6 27 7 10 8 28 Troubleshooting 11 1 U Unable to print 11 1 Unable to specify desired settings 11 3 Uninstalling 2 13 2 21 USB 1 6...

Page 428: ...Printing for Professionals Beyond the Ordinary Oc 100 Oakview Drive Trumbull CT 06611 www oceusa com Oc 2007 All Rights Reserved...

Reviews: