7. Interfaces and Communication
- 216 -
7
Ɣ
Communication reference
Communication setting values include data set via communication such as frequency
reference, torque limit, V/F separation voltage, PID reference and PID feedback.
&RPPXQLFDWLRQDG7KHUDQJHLVíDQGFRUUHVSRQGLQJ
value range is -100.00% to 100.00%.
Ɣ
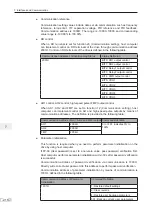
DO control
When a DO terminal is set for function 20 (Communication setting), host computer
can implement control on DO terminals of the drive through communication address
+&RQWURORQ'2WHUPLQDOVRIWKHGULYHLVGH¿QHGLQWKHIROORZLQJWDEOH
Communication Address of Drive Running Status
6WDWXV'H¿QLWLRQ
2001H
BIT0: DO1 output control
BIT1: DO2 output control
BIT2: Relay1 output control
BIT3: Relay2 output control
BIT4: FMR output control
BIT5: VDO1
BIT6: VDO2
BIT7: VDO3
BIT8: VDO4
BIT9: VDO5
Ɣ
AO1 control, AO2 control, high-speed pulse (FMP) output control
When AO1, AO2 and FMP are set to function 12 (Communication setting), host
computer can implement control on AO and high-speed pulse outputs by means of
FRPPXQLFDWLRQDGGUHVVHV7KHGH¿QLWLRQLVSURYLGHGLQWKHIROORZLQJWDEOH
Communication Address of AO1, AO2 and FMP Output
&RPPDQG'H¿QLWLRQ
AO1
2002H
0 to 7FFF indicates 0% to
100%
AO2
2003H
FMP
2004H
Ɣ
Parameter initialization
This function is required when you need to perform parameter initialization on the
drive by using host computer.
,I)38VHUSDVVZRUGLVVHWWRDQRQ]HURYDOXHSDVVSDVVZRUGYHUL¿FDWLRQ¿UVW
+RVWFRPSXWHUSHUIRUPVSDUDPHWHULQLWLDOL]DWLRQZLWKLQVDIWHUSDVVZRUGYHUL¿FDWLRQ
is successful.
Communication address of password verification via communication is 1F00H.
'LUHFWO\ZULWHFRUUHFWXVHUSDVVZRUGWRWKLVDGGUHVVWRSHUIRUPSDVVZRUGYHUL¿FDWLRQ
Communication address of parameter initialization by means of communication is
)+GH¿QHGLQWKHIROORZLQJWDEOH
Communication Address of Parameter
Initialization
&RPPDQG'H¿QLWLRQ
1F01H
1: Restore default settings
2: Clear records
4: Restore user backup parameters
501: Back up current user parameters
Summary of Contents for MD290 Series
Page 1: ......
Page 79: ...3 Electrical Installation 78 3 ...
Page 80: ...4 Operating Panel Keypad Display 4 1 Introduction 80 4 2 Inbuilt LED Operating Panel 80 ...
Page 92: ...5 Quick Setup 5 1 Get Familiar With Operating Panel 92 5 2 Setup Flowchart 93 ...
Page 227: ...7 Interfaces and Communication 226 7 ...
Page 285: ...10 Troubleshooting 284 11 ...
Page 349: ......
Page 350: ......


