


3 Operation Log Settings Dialog Box
15-16
SmartAXIS Touch User’s Manual
■
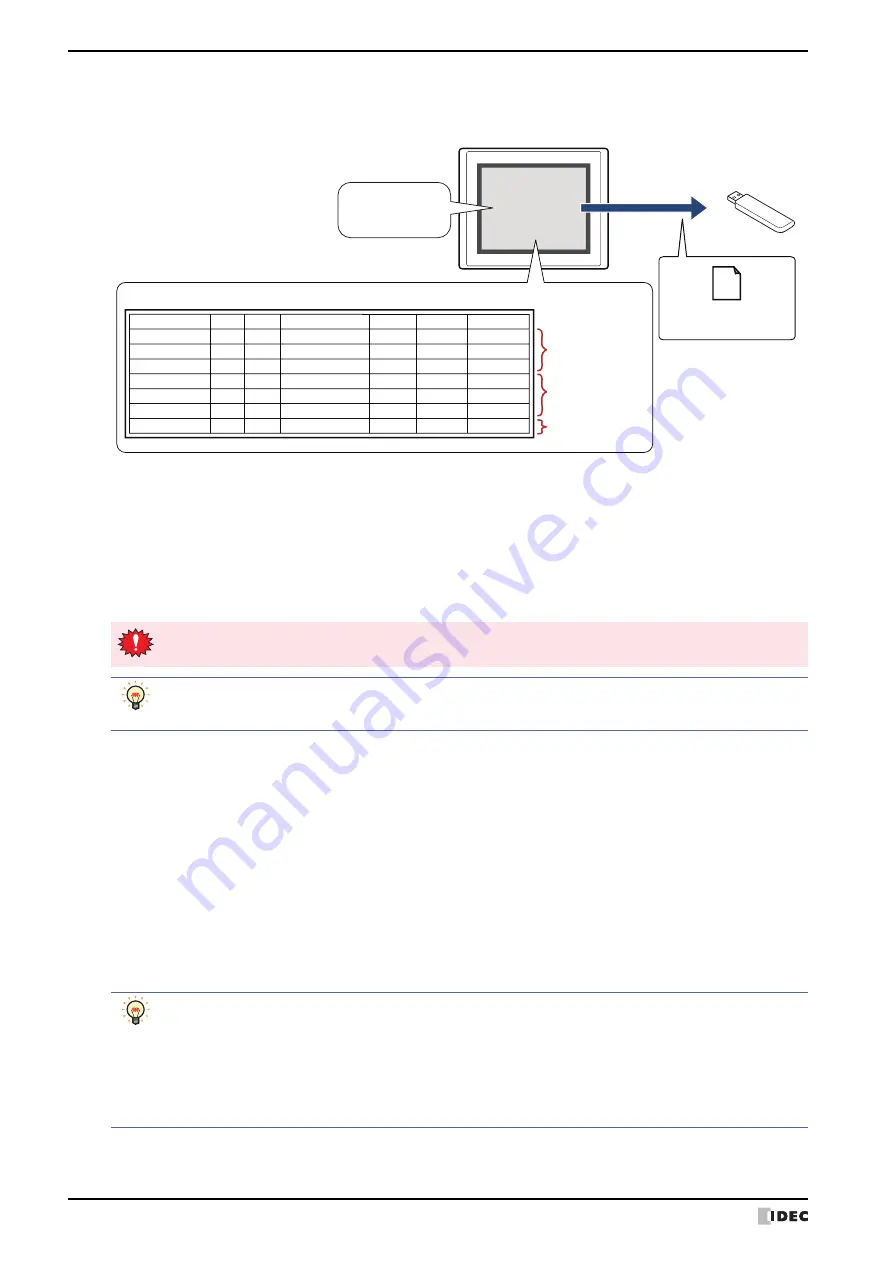
Real Time
Select this check box to output data to the external memory in real time.
With real time output, data is saved to the external memory in three minute intervals after the Touch starts running.
When there is already data with the same file name on the external memory, data is appended to that file. If there
was no update to the data during the three minutes, it is not output.
Data is appended to the file until the size of the file reaches the restriction size (256 MB), so the maximum amount of
output data varies based on the settings for the output channel such as the amount of data, the data size, and the
labels.
If the interval events occur more quickly than the time it takes to accomplish the real time output (the interval for
writing to the external memory), the Operation Log is recorded up to the data storage amount - 1, and then
afterwards, old data is discarded in order and replaced with new data.
*1 Advanced mode only
Touch
Operation Log data
(CSV)
Output to
USB flash drive
Operation Log data
Sampling
Time
User
Screen No.
Event Name
Part Name
Details
Changed to
12/01/2011 12:00:10
-
Base1
Power ON
-
-
-
12/01/2011 12:01:23
User1
Base1
Switch to Base Screen
-
-
Base2
12/01/2011 12:02:45
User1
Base2
Change Users
-
-
User2
12/01/2011 12:03:06
User2
Base2
Change Operation Modes
-
-
System Mode
12/01/2011 12:04:11
User2
Base2
Press buttons
BitSwitch
-
-
12/01/2011 12:04:11
User2
Base2
Write Data to any Devices
-
LDR 0
55
12/01/2011 12:07:30
User2
Base2
Switch to Base Screen
-
-
Base3
Data to be output
3 minutes after
operation starts
Data to be output
3 minutes after that
Data to be output
after another
3 minutes
3 minute interval
after operation starts
USB flash drive
Real time output stops when the file size of the Operation Log data exceeds 256 MB or when there is insufficient
space on the external memory. USB flash drive error information is stored in HMI Special Data Register LSD33.
• When the value of HMI Special Internal Relay LSM18 changes from 0 to 1, the data at that time is first
output in real time to the USB flash drive, and then access to the USB flash drive is stopped.
• You can check the free space on the USB flash drive with HMI Special Data Registers LSD34 and 35.
File Name:
Enter the file name for the output data or shows the file name.
The default is “OPLOGA.CSV”.
To change the file name, enter a new file name. The maximum number is 120 characters (including
the extension).
Add Device data to File Name
:
Select this check box to add the bottom three digits of the value of device configured by
File
Name Device
to the end of the file name for the output data.
Example: When the value of device configured by
File Name Device
is 123, the file name is
“OPLOGA123.CSV”.
File Name Device:
Specifies the word device that is the source for the value to add to the file name. For the device
address configuration procedure, refer to Chapter 2 “5.1 Device Address Settings” on page 2-62.
This option can only be configured when the
Add Device data to File Name
check box is
selected.
• The function to record data operates when Operation Log data is being saved to the external memory.
• The methods to erase Operation Log files saved on the external memory are as follows.
- To erase files during operation using parts, on the
External Memory
tab in the Project Settings dialog
box, select the
Remove Files stored in External Memory
check box and the
All Operation Log
data
check box, and then configure the trigger device. Assign that trigger device to a part.
- To erase files with WindO/I-NV3, click
Clear
on the
Online
tab, and then click
Stored Data in
External Memory
to open the Clear Data dialog box. Select the
Operation Log Data
check box, and
then click
OK
.
Summary of Contents for SmartAXIS Touch FT1A Series
Page 1: ...FT1A Series FT9Y B1390 4 SmartAXIS Touch User s Manual ...
Page 22: ...Contents Preface 21 SmartAXIS Touch User s Manual ...
Page 240: ...6 Using Library Screens 4 36 SmartAXIS Touch User s Manual ...
Page 416: ...2 Multi State Lamps 8 26 SmartAXIS Touch User s Manual ...
Page 558: ...9 Calendar 9 142 SmartAXIS Touch User s Manual ...
Page 668: ...6 Timer 11 52 SmartAXIS Touch User s Manual ...
Page 754: ...4 Using Data and Detected Alarms 13 34 SmartAXIS Touch User s Manual ...
Page 792: ...4 Using the Data 14 38 SmartAXIS Touch User s Manual ...
Page 810: ...4 Using the Data 15 18 SmartAXIS Touch User s Manual ...
Page 870: ...3 Text Manager 19 16 SmartAXIS Touch User s Manual ...
Page 924: ...6 Important Notes 20 54 SmartAXIS Touch User s Manual ...
Page 1036: ...5 User Communication 22 74 SmartAXIS Touch User s Manual ...
Page 1092: ...2 Monitoring on the Touch 24 26 SmartAXIS Touch User s Manual ...
Page 1142: ...2 Word Devices 27 18 SmartAXIS Touch User s Manual ...
Page 1186: ...2 Analog Cartridge 29 34 SmartAXIS Touch User s Manual ...
Page 1194: ...3 Handling Problems 30 8 SmartAXIS Touch User s Manual ...


