


SmartAXIS Touch User’s Manual
8-21
2 Multi-State Lamps
8
Lamps
●
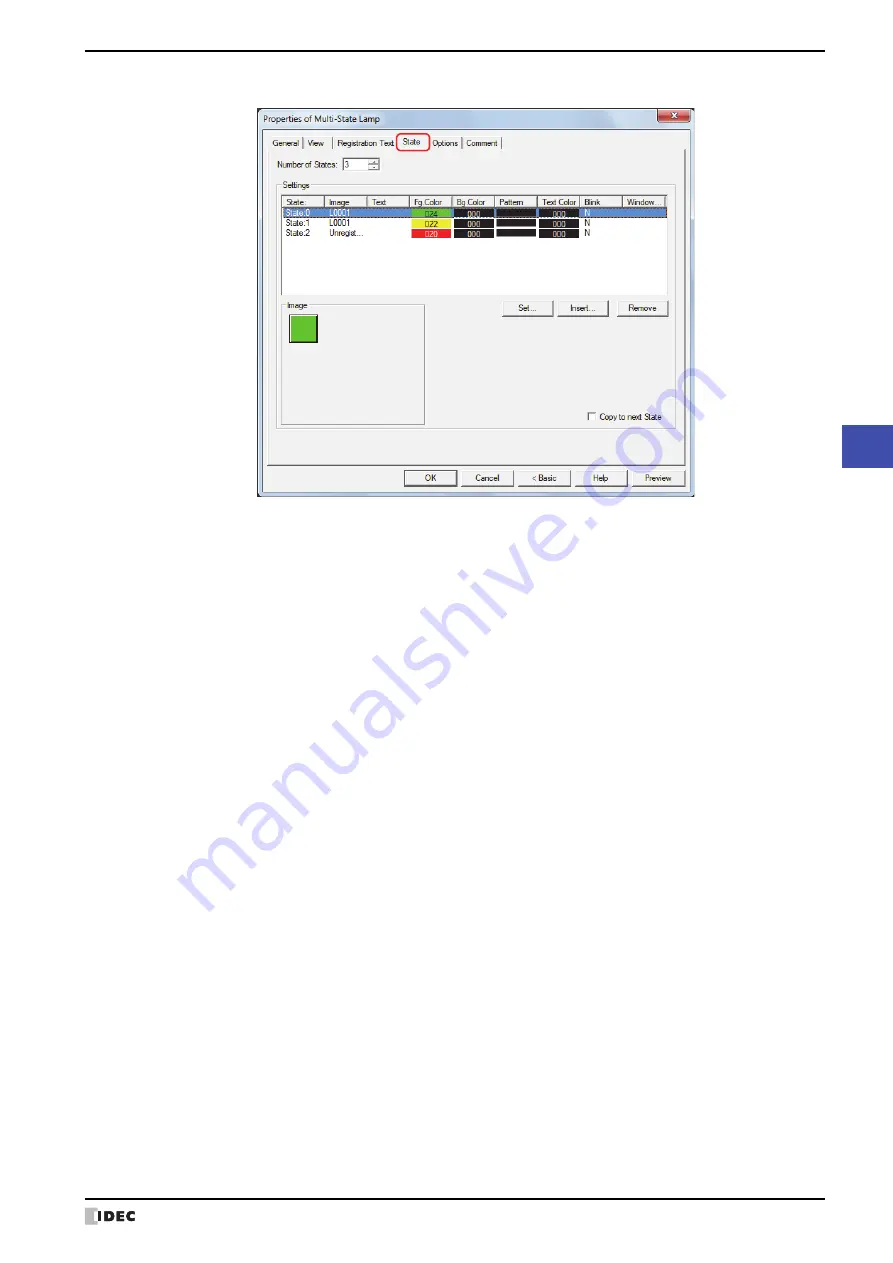
State
Tab
■
Number of States
Specify the number of drawing objects (1 to 16) to display by switching.
■
Settings
Lists the state settings. The list shows various settings such as the state number and file name for the drawing object.
State:
Shows the state number. Double clicking the cell displays the State Settings dialog box where
you can edit the state settings. For details, refer to “State Settings dialog box” on page 8-22.
Image:
Shows the name or a file name for a drawing object. Double clicking the cell opens the View
Browser if
Standard
is selected under Image Type on the
View
tab, or Picture Manager if
Picture
is selected. This allows you to change the drawing object to display.
Text:
Shows the registration text. Double clicking the cell displays the Unicode Input dialog box. If you
selected the
Use Text Manager
check box on the
Registration Text
tab, the Text Manager
dialog box will appear. This allows you to change the registration text.
Fg.Color, Bg.Color: Shows the foreground and background colors (color: 256 colors, monochrome: 8 shades) for
standard images. Double clicking the cell opens the Color Palette where you can change the
foreground and background colors. This setting can only be changed if Image Type is set to
Standard
on the
View
tab.
Pattern:
Shows the pattern for standard images. Double clicking the cell opens the Pattern Palette where
you can change the pattern of the image. This setting can only be changed if Image Type is set
to
Standard
on the
View
tab.
Text Color
Shows the color of the registration text. Double clicking the cell opens the Color Palette where
you can change the color of the text.
Blink:
Indicates whether to display the drawing object blinking or constantly lit. Double clicking the cell
toggles between
Y
for yes and
N
for no.
Windows Font:
Shows the currently set Windows Font. Double clicking the cell displays the Font Settings dialog
box where you can change the Windows Font. This setting can only be changed when
Windows
is selected for
Font
on the
Registration Text
tab.
Set:
Registers the state settings to the list. If you select a state number that is already registered,
that number is overwritten with the new settings.
Click this button to display the State Settings dialog box. For details, refer to “State Settings
dialog box” on page 8-22.
Insert:
Inserts the settings in the position selected on the list.
Select a state number in the list, and then click this button to display the State Settings dialog
box. The settings at the insertion point shift down one line. Settings cannot be inserted if all
state numbers are configured.
Remove:
Deletes the registered settings from the list.
Select a state number, and then click this button to delete the selected settings from the list.
Summary of Contents for SmartAXIS Touch FT1A Series
Page 1: ...FT1A Series FT9Y B1390 4 SmartAXIS Touch User s Manual ...
Page 22: ...Contents Preface 21 SmartAXIS Touch User s Manual ...
Page 240: ...6 Using Library Screens 4 36 SmartAXIS Touch User s Manual ...
Page 416: ...2 Multi State Lamps 8 26 SmartAXIS Touch User s Manual ...
Page 558: ...9 Calendar 9 142 SmartAXIS Touch User s Manual ...
Page 668: ...6 Timer 11 52 SmartAXIS Touch User s Manual ...
Page 754: ...4 Using Data and Detected Alarms 13 34 SmartAXIS Touch User s Manual ...
Page 792: ...4 Using the Data 14 38 SmartAXIS Touch User s Manual ...
Page 810: ...4 Using the Data 15 18 SmartAXIS Touch User s Manual ...
Page 870: ...3 Text Manager 19 16 SmartAXIS Touch User s Manual ...
Page 924: ...6 Important Notes 20 54 SmartAXIS Touch User s Manual ...
Page 1036: ...5 User Communication 22 74 SmartAXIS Touch User s Manual ...
Page 1092: ...2 Monitoring on the Touch 24 26 SmartAXIS Touch User s Manual ...
Page 1142: ...2 Word Devices 27 18 SmartAXIS Touch User s Manual ...
Page 1186: ...2 Analog Cartridge 29 34 SmartAXIS Touch User s Manual ...
Page 1194: ...3 Handling Problems 30 8 SmartAXIS Touch User s Manual ...


