


Operating Precautions
15
Connecting to the Analog Input Terminals
Connecting to the Terminals
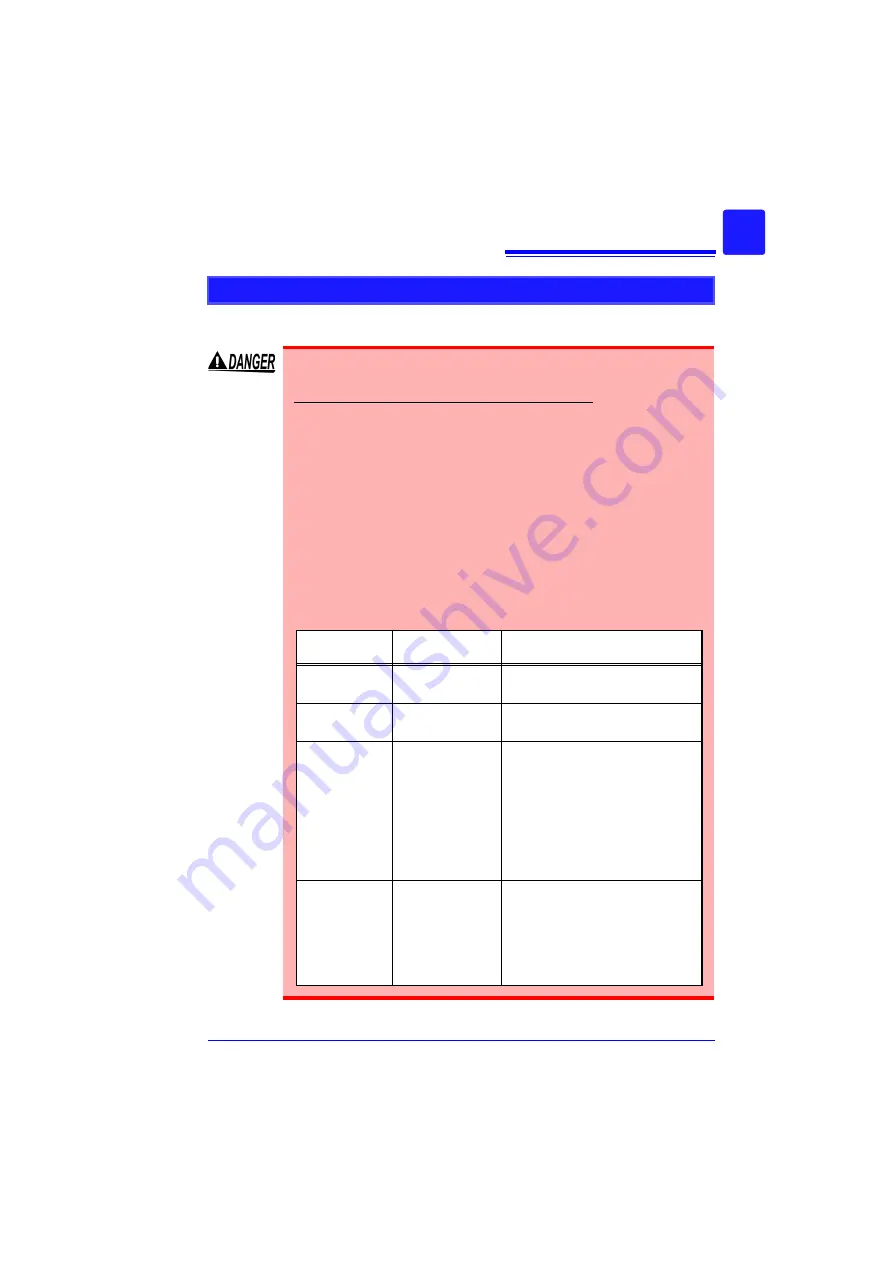
• Note the following maximum input voltage and maximum rated
voltage to earth.
600 V AC/DC (CAT III, II), 300 V AC/DC (CAT IV)
If their voltages are exceeded, this device will be damaged and
personal injury will result. Therefore, do not perform measure-
ment in this case.
The maximum allowable input voltage is the smaller of that of the
instrument or of the measurement cables.
• The relationship between the maximum allowable input voltage
and the maximum rated voltage to earth of the combined Mem-
ory HiCorder and measurement cables is as follows.
To avoid electric shock or damage to the instruments, do not
apply input voltage above the lowest maximum.
The maximum rated voltage to earth in the table applies when
measuring through input attenuators.
Measurement
cables
Maximum input
voltage
Maximum rated voltage to earth
Model 9197
Model L9197
600 V AC/DC
600 V AC/DC (CAT III, II)
300 V AC/DC (CAT IV)
Model L9198
Model L9217
300 V AC/DC
600 V AC/DC (CAT II)
Model L9790
600 V AC/DC
When using Model L9790-01 Alligator
clip and Model 9790-03 Contact Pin
600 V AC/DC (CAT II)
300 V AC/DC (CAT III)
When using Model 9790-02 Grabber
clip
300 V AC/DC (CAT II)
150 V AC/DC (CAT III)
Model 9322
2000 V DC,
1000 V AC
When using the Grabber clip
1500 V AC/DC (CAT II)
600 V AC/DC (CAT III)
When using the Alligator clip
1000 V AC/DC (CAT II)
600 V AC/DC (CAT III)
Summary of Contents for MR8880-20
Page 2: ......
Page 12: ...Procedure 2 ...
Page 40: ...1 3 Screen Configuration and Display 30 ...
Page 76: ...3 4 Measurement Using Setting Wizard PRESETS key 66 ...
Page 174: ...6 4 Data Management 164 ...
Page 186: ...7 7 Performing a Printer Check 176 ...
Page 196: ...8 4 Numerical Value Calculation Expressions 186 ...
Page 216: ...10 4 Making System Settings 206 ...
Page 222: ...11 3 Communication Using Commands 212 4Click Next to start install ing Installing Click ...
Page 226: ...11 3 Communication Using Commands 216 ...
Page 254: ...13 6 Setting Wizard Function PRESETS 244 ...
Page 292: ...Appendix 10 Installing Waveform Viewer A30 ...
Page 297: ......
Page 298: ......
Page 299: ......
Page 300: ......


