background image

Operating Precautions

5

Follow these precautions to ensure safe operation and to obtain the full benefits of the various functions.

Before using the instrument for the first time, verify that it operates normally to ensure the no damage
occurred during storage or shipping. If you find any damage, contact your authorized Hioki distributor or
reseller.

Operating temperature and humidity: 
0 to 40°C (32 to 104°F), 20 to 80% RH or less, Indoors (non-condensating)
Storing temperature and humidity:
-10 to 55°C (14 to 131°F) 20 to 80% RH or less, Indoors (non-condensating)
Temperature and humidity range for guaranteed accuracy, 23

±

5°C, RH or less

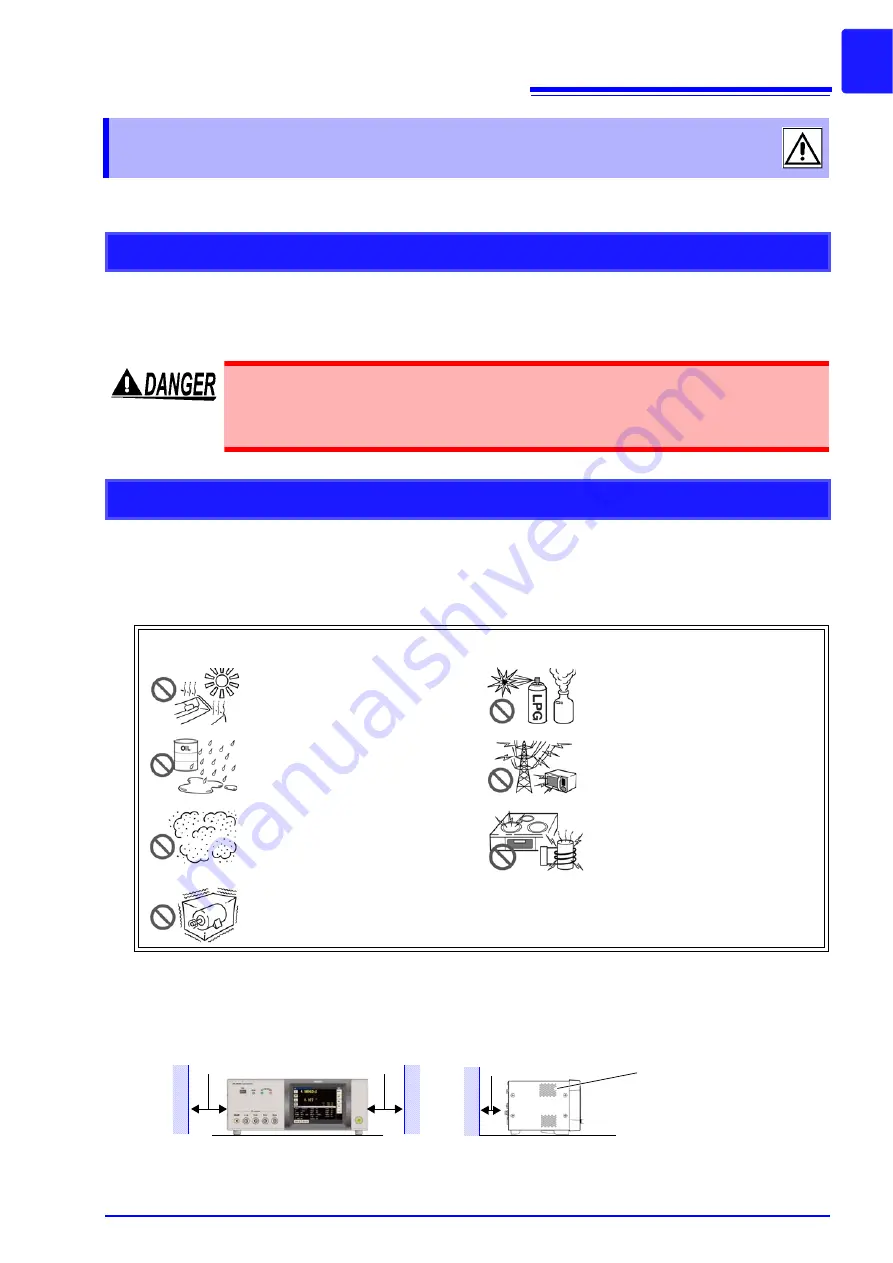
To prevent overheating, be sure to leave the specified clearances around the instrument.
• The instrument should be operated only with the bottom or rear side downwards.
• The instrument must not be placed on an unstable table or tilted surface.
• Vents must not be obstructed.

Operating Precautions

Preliminary Checks

Before using the instrument, make sure that the insulation on the voltage cords is
undamaged and that no bare conductors are improperly exposed. Using the instru-
ment in such conditions could cause an electric shock, so contact your dealer or
Hioki representative for replacements.

Instrument Installation

Avoid the following locations that could cause an accident or damage to the instrument.

Exposed to direct sunlight

Exposed to high temperature

In the presence of corrosive or explosive
gases

Exposed to water, oil, other chemi-
cals, or solvents
Exposed to high humidity or conden-
sation

Exposed to strong electromagnetic fields

Near electromagnetic radiators

Exposed to high levels of particulate
dust

Near induction heating systems 
(e.g., high-frequency induction heating
systems and IH cooking utensils)

Subject to vibration

The instrument can be used with the stand (p. 11). 
It can also be rack-mounted (p.A15)

50 mm or more

10 mm or more

Rear

50 mm or more

Vents

Summary of Contents for IM3533

Page 1: ...IM3533 IM3533 01 LCR METER Instruction Manual Instruction Manual IM3533 01 LCR METER IM3533 September 2012 Revised edition 1 IM3533A981 01 12 09H...

Page 2: ......

Page 3: ...Setting Basic Settings of Measurement Conditions 50 4 2 1 Setting the Measurement frequency 50 4 2 2 Setting the Measurement signal level 52 4 2 3 Limiting the Voltage and Current Applied to the Samp...

Page 4: ...g Measurement and Setting the Valid Edge of Trigger Input 136 4 5 7 Setting the EOM Output Method 137 4 5 8 Saving Measurement Results Memory function 138 4 5 9 Setting the Number of Display Digits 14...

Page 5: ...209 7 1 About CONTINUOUS Measurement Function 209 7 1 1 Measurement screen 209 7 2 Configuring CONTINUOUS Measurement Basic Settings 210 7 3 Performing CONTINUOUS Measurement 211 7 4 Checking CONTINUO...

Page 6: ...Mode 323 12 3 Internal Circuitry 325 Electrical Specifications 326 Connection Examples 327 12 4 External I O Settings 328 Setting Delay Time from Output of Compara tor and BIN Judgment Results until...

Page 7: ...dix6 The Residual Charge Protection Function A 10 Appendix7 Series Equivalent Circuit Mode and Parallel Equivalent Circuit Mode A 11 Appendix8 Open Circuit Compensation and Short Circuit Compensation...

Page 8: ...Contents vi...

Page 9: ...ment Use the original packing materials when transporting the instrument if possible See Transporting the instrument p 354 Introduction Verifying Package Contents Confirm that these contents are provi...

Page 10: ...ample dimensions Lead diameter of 0 3 mm to 2 mm Lead pitch of 5 mm or more This fixture is for measuring lead components less than 10 m residual resistance after zero adjustment 9262 Test Fixture eas...

Page 11: ...information that the user should read before using the instrument The symbol printed on the product indicates that the user should refer to a corresponding topic in the manual marked with the symbol b...

Page 12: ...s otherwise specified Windows represents Windows 95 98 Me Widows NT4 0 Windows 2000 Windows XP Windows Vista or Windows 7 Dialogue Dialogue box represents a Windows dialog box f s maximum display valu...

Page 13: ...or tilted surface Vents must not be obstructed Operating Precautions Preliminary Checks Before using the instrument make sure that the insulation on the voltage cords is undamaged and that no bare co...

Page 14: ...nt protect it from physical shock when transporting and handling Be especially careful to avoid physical shock from dropping Do not apply heavy downward pressure with the stand extended The stand coul...

Page 15: ...range The temperature probe has a protective nylon cap fitted on the end of the probes Remove the cap before using the probe Put the protective cap back on the connector when not in use If the protec...

Page 16: ...ints on the disc or scratch the printing Never touch the recorded side of the disc Do not place the disc directly on anything hard Do not wet the disc with volatile alcohol or water as there is a poss...

Page 17: ...conditions p 50 Capable of measurement under a wide range of mea surement conditions measurement frequencies from 1 mHz to 200 kHz and measurement signal levels from 5 mV to 5 V Capable of high speed...

Page 18: ...voltage high terminal LPOT jack Detected voltage low terminal LCUR jack Measurement current detected terminal GUARD jack Shield measurement ground terminal LCD Display This is a touch panel display Pr...

Page 19: ...d Enables the instrument to be tilted Left side Vents Keep clear of obstructions p 5 Power Switch Main power Turns the power on and off p 35 Manufacturer s Serial Number Shows the serial number Do not...

Page 20: ...1 3 Screen Configuration and Operation Do not use excessive force on the touch panel and do not use sharp objects that could damage the touch screen 1 3 1 Initial Screen Operation keys An operation k...

Page 21: ...1 Measurement Screen Mode Selection IM3533 Mode Selection IM3533 01 Press ANALYZER mode IM3533 01 only p 149 TRANSFORMER mode p 193 Select the measurement mode LCR mode p 45 CONTINUOUS measurement mod...

Page 22: ...R mode TRANSFORMER mode and CONTINUOUS measurement mode On the IM3533 01 you can also configure ANALYZER mode settings Procedure LCR Mode Basic setting Trigger synchronous output function setting p 77...

Page 23: ...p 88 DC resistance measurement setting Line frequency setting p 87 Average setting p 99 DC delay setting p 83 Temperature correction function setting p 81 Adjustment delay setting p 85 Measurement sp...

Page 24: ...49 System reset p 147 Waveform averaging function setting p 128 Range synchronization function setting p 120 I O output setting of judgment results p 134 I O trigger setting p 136 HIGH Z reject functi...

Page 25: ...ignal Displays information regarding the DC signal Displays information about comparator measurement judgment standards Displays information about BIN mea surement judgment standards When using compar...

Page 26: ...ement speed setting p 166 Average setting p 167 Point delay setting p 168 Basic setting DC bias setting p 169 Measurement parameter setting p 150 Trigger delay setting p 153 Sweep point setting p 155...

Page 27: ...m reset p 191 Application settings Contact check function setting p 177 IO trigger setting p 189 Waveform averaging function setting p 173 AUTO range limit function p 180 EOM output method setting p 1...

Page 28: ...output function p 77 Measurement frequency setting p 50 Measurement signal level setting p 52 Voltage and current limit settings p 56 Measurement range setting p 62 Measurement speed setting p 73 Aver...

Page 29: ...averaging function setting p 128 Range synchronization function setting p 120 I O output setting of judgment results p 134 I O trigger setting p 136 HIGH Z reject function setting p 130 Number of disp...

Page 30: ...s the transformer model Displays information regarding the AC signal You can check the settings on the measurement screen The key display will vary depending on what type of information is being displ...

Page 31: ...get for continuous measurement p 210 Removes all items from targets for continuous measurement p 210 Sets all items as targets for continuous measurement p 210 Displays panel information p 210 CONTINU...

Page 32: ...edure 1 Press 2 Measurement Screen Set the compensation condition Open circuit compensation setting p 215 Scaling setting p 246 Cable length compensation setting p 245 Short circuit compensation setti...

Page 33: ...is installed RS 232C Setting Ref to Communication Instruction Manual LCR Application Disk Setting only available when the Z3001 is installed GP IB Setting Ref to Communication Instruction Manual LCR A...

Page 34: ...ayed Checking the Display Screen Panel test p 265 ROM RAM test p 270 I O test p 271 Display test p 268 Panel calibration p 266 Measurement screen is displayed Setting the Date and Time p 272 Indicates...

Page 35: ...save destination and type Save the measurement condition Saves the setting conditions p 293 Selects a file p 275 Displays the screen immediately above p 275 Switches operation buttons p 275 Measureme...

Page 36: ...Resistance Effective resistance in series equivalent circuit mode ESR Effective resistance in parallel equivalent cir cuit mode Conductance S Impedance Admittance S Impedance phase angle Q factor The...

Page 37: ...when the Z3001 is connected p 331 Connect the external interface as needed 4 RS 232C cable only when the Z3001 is connected LAN cable only when the Z3002 is connected EXT I O p 309 Connecting the Powe...

Page 38: ...r is any metal exposed 1 No Metal Exposed Peripheral Device Inspection Is the insulation on a measurement cable torn or is any metal exposed Metal Exposed If there is any damage measured val ues may b...

Page 39: ...nnect the power cord to the power inlet on the instrument and plug it into an outlet 2 3 Connecting the Power Cord 1 Check that the instrument s power switch is turned off 2 Connect a power cord that...

Page 40: ...are disconnected a meaningless number may be displayed on the unit Connecting a measurement cable fixture Connect directly to the measurement jacks with the label side up and affix with the levers on...

Page 41: ...target object insert the metal sheath to a length of at least 40 mm in order to assure accurate measurement as illus trated below 1 Check that the instrument s power switch is turned off 2 Holding the...

Page 42: ...used 1 Unplug the instrument s power cord from the wall outlet Disconnect connection cords 2 Remove the blank panel 3 Paying attention to the orientation of the interface inset it firmly into place R...

Page 43: ...in the specifications allow at least 60 minutes warm up before executing zero adjust ment If the main power switch is tuned off while the instrument is in the standby state it will start up in the sta...

Page 44: ...is waiting for STANDBY key input to be detected To allow STANDBY key input to be detected some internal cir cuitry is operating with power consumption of approximately 4 W To cancel the standby The in...

Page 45: ...procedure refer to the instruction manual supplied with the fixture 2 Set the first parameter to Cs and the third parameter to D p 46 Trigger synchronous output function setting OFF p 77 3 Set the me...

Page 46: ...efer to the instruction manual supplied with the fixture 5 Check the measurement results When you want to judge the measurement results See 4 4 1 Judging with Upper and Lower Limit Values Comparator M...

Page 47: ...e connection procedure refer to the instruction manual supplied with the fixture Measurement signal mode Open voltage V mode p 158 Measurement signal level 1 000 V p 158 POINT DELAY 0 0000 s p 168 2 A...

Page 48: ...3 2 When ANALYZER Mode IM3533 01 only 40 4 Execute the sweep The sweep is repeated since TRIG is set to REPEAT When you want to check the measurement values See 5 1 1 Measurement screen p 149...

Page 49: ...ement parameter to Ls and the computation parameter to N p 196 p 197 Measurement frequency 1 0000 kHz p 50 Voltage and current limit OFF p 56 Trigger synchronous output function OFF p 77 Measurement r...

Page 50: ...de Primary side Secondary side 5 Execute the TRIG1 command Touch and measure the primary side of the transformer 6 Wire together the secondary side Primary side Secondary side Primary side Secondary s...

Page 51: ...heck the measurement results When you want to judge the measurement results See 6 3 Judging with Upper and Lower Limit Values Comparator Measurement Mode p 199 When you want to save the measurement re...

Page 52: ...3 3 When TRANSFORMER Mode 44...

Page 53: ...ayed depend ing on the situation Enlarges the screen p 49 Operation keys Displays the measurement conditions for DC measurement p 17 Saves the measurement data p 277 Prints the measurement data p 331...

Page 54: ...following Check the guaranteed accuracy range in 14 2 Measurement Range and Accu racy p 342 and change the measurement conditions or you should consider the mea sured values as values for reference P...

Page 55: ...h Impedance Components p A3 Appendix7 Series Equivalent Circuit Mode and Parallel Equivalent Circuit Mode p A11 4 1 2 Setting Display Parameters 1 Press the first parameter key LCR Measurement Screen...

Page 56: ...LCR function 48 If is selected in the parameter setting a measurement value is not displayed Press 4 Press to confirm the setting Parameter Setting 5 Cs and D are set as the parameters LCR Measuremen...

Page 57: ...power on 4 1 3 Enlarging Display of Measurement Values Procedure Press in the measurement screen to display the magnification display screen When you want to show normal display Press in the magnifica...

Page 58: ...s of Measurement Conditions 4 2 1 Setting the Measurement frequency 1 LCR Measurement Screen Example Measurement frequency 1 MHz LCR Basic Settings Procedure 3 Set each digit Set the frequency with th...

Page 59: ...a number is entered If you attempt to set a measurement frequency greater than 200 kHz it will automatically be reduced to 200 kHz If you attempt to set a measurement frequency lower than 1 mHz it wil...

Page 60: ...still connected to the measurement terminals because doing so may damage the test sample In constant voltage CV mode the generated voltage is controlled using software feed back so that the set consta...

Page 61: ...ent range during HOLD setting is not appropriate set again in the AUTO range or change the range by manual 3 To select the measurement signal mode Open circuit voltage V mode p 54 Constant voltage CV...

Page 62: ...h is applied across the terminals of the object which is being tested by itself if required you should either check the monitor voltage value or select constant voltage CV and set a voltage value acro...

Page 63: ...tant current accuracy 10 rdg 10 A 10 rdg 10 A Output impedance 100 10 25 5 Testing some types of sample is not possible using constant current In this case the following symbol appears on the display...

Page 64: ...Values When open circuit voltage V mode or constant voltage CV mode is set Set the current limit When constant current CC mode is set Set the voltage limit Procedure LCR Measurement Screen You can che...

Page 65: ...ay such as the following When a voltage or current in excess of the applica ble limit value is not applied to the sample so that the measurement signal level setting is not reached changes to the meas...

Page 66: ...tor measurement 4 2 4 Setting the DC bias Procedure LCR Measurement Screen LCR Basic Settings 1 Press 2 LCR Basic Settings 3 DC Bias Setting Select ON OFF for the DC bias Disables DC bias Enables DC b...

Page 67: ...bias function refer to Appendix5 1 How to Supply a DC Bias Voltage p A7 When superimposing a DC voltage on a coil or the like refer to Appendix5 2 How to Supply a DC Bias Current p A9 If the total va...

Page 68: ...ied or triggering occurs With this instrument you can select the following two types of trigger 4 2 5 Perform Measurements with User defined Timing Trigger Measurement Internal Trigger Trigger signals...

Page 69: ...Trigger When External Trigger Press on the screen to manually input a trigger Measurement is performed once Input via EXT I O Measurement is performed once each time a negative logic pulse signal is...

Page 70: ...nchronization setting is on the judgment synchronization setting is automatically turned off AUTO The most suitable test range is set automatically This allows the most suitable measurement range to b...

Page 71: ...ry with the fre quency p 67 When you want to control the AUTO ranging range See AUTO range limit function p 64 If the instrument is being used outside the limits of its specification the suitable rang...

Page 72: ...edure LCR Measurement Screen 1 LCR Basic Settings Press 2 LCR Basic Settings Press 3 If the instrument is being used outside the limits of its specification the suitable range may not be set in auto r...

Page 73: ...step 4 touch and select the AUTO range upper limit range 8 Press to close the setting screen When canceling the AUTO range limit function set the lower limit range to 100 m and the upper limit range...

Page 74: ...4 2 Setting Basic Settings of Measurement Conditions 66 Setting the Ranging to HOLD Procedure LCR Measurement Screen LCR Basic Settings 1 2 Press LCR Basic Settings 3 Range Setting Press...

Page 75: ...aranteed accuracy range varies depending on the measurement conditions See Check the accuracy assured ranges in 14 2 Measurement Range and Accuracy p 342 Changing the set range when auto ranging is en...

Page 76: ...sis of the impedance of the sam ple under test If this happens you should change the test range making reference to 8 1 Setting Open Circuit Compensation p 215 and 8 2 Short Circuit Compensation p 224...

Page 77: ...ency you can fix the measurement range to the optimal range relative to the judgment standards Judgment synchronization setting This setting is only available when the judgment standards have been set...

Page 78: ...asurement Parameters and Calculation Formula p A1 3 Range Setting Turn the judgment synchronization setting on or off Disables the judgment synchronization setting Enables the judgment synchronization...

Page 79: ...rent can flow to the measurement sample allowing highly accurate measurement 2 Low Z High Accuracy Mode Procedure 2 Press LCR Measurement Screen LCR Basic Settings LCR Basic Settings 1 3 Range Setting...

Page 80: ...h accuracy mode p 54 Changing the low Z high accuracy mode setting while open compensation short compen sation or load compensation is enabled causes the compensation values to be disabled No Measurem...

Page 81: ...Disable the waveform averaging function before setting the speed See 4 5 2 Setting the Detection Signal Waveform Averaging Count Waveform Averaging Function p 128 Procedure LCR Measurement Screen 1 LC...

Page 82: ...d values over the set number of times for averaging is always calculated backwards from the present When the sample to be tested is changed over it takes a little time for a certain stabili zation tim...

Page 83: ...Settings Press 2 LCR Basic Settings When you want to turn off the averaging function Press The number of averaging times is set to 001 and the averaging function is set to OFF 3 Number of Averaging T...

Page 84: ...t function p 79 4 2 9 Setting the Delay Time until Measurement Data is Captured Trigger Delay Procedure LCR Measurement Screen 1 LCR Basic Settings Press 2 LCR Basic Settings Use or to enter the delay...

Page 85: ...educing the generation of heat in the sample and decreasing electrode wear See Trigger delays and the trigger synchronous output function p 79 4 2 10 Applying the Signal to the Sample during Measureme...

Page 86: ...s after mea surement ends When the contact check timing is set to either or for the contact check function the trigger synchronous output function is automatically turned on Set the time to wait until...

Page 87: ...us output function Measurement Data acquisition Trigger Delay Measurement signal Trigger Signal Trigger Signal Measurement signal Trigger delay on trigger synchronous output on Trigger Delay Trigger s...

Page 88: ...to make measurements Failure to properly set the line frequency will prevent you from acquiring stable measurement values See 4 3 4 Setting the Line Frequency p 87 To measure DC resistance you need to...

Page 89: ...following when connecting the 9478 Sheath type temperature probe to the TC SENSOR terminal on the back of the instrument See 2 5 Connecting a Temperature Probe p 33 4 3 1 Configuring the Temperature C...

Page 90: ...Correction Function Setting 4 Reference Temperature Setting Press and use the numeric keypad to set the reference temperature Settable range 10 C to 99 9 C Press key to confirm the setting 5 Temperat...

Page 91: ...bi lizes When number of averaging times is 1 Setting changed Changed from AC measurement to DC measurement Range changed Measure DC resistance ADJ delay Initial value 0 0030 seconds DC delay Initial v...

Page 92: ...nt 84 Press 2 Rdc Basic Settings Use or to enter the delay time 3 Settable range 0 s to 9 9999 s Delay Time Setting When you want to cancel setting of the delay time Press The set time is set to 0 s 4...

Page 93: ...030 seconds When the number of averaging times is 2 or more The number of times is 2 in this example DC delay Initial value 0 seconds Measure DC resistance Measure offset Measure offset Obtain average...

Page 94: ...offset measurement time with and 3 Settable range 0 0030 s to 9 9999 s Adjustment Delay Setting When you want to revert the offset measure ment delay time to its default value Press The set time is se...

Page 95: ...instru ment can reject noise Set this parameter to the frequency of the commercial power supply being used before using the instrument to make measurements Failure to properly set the line frequency...

Page 96: ...e test range is set automatically This allows the most suitable measurement range to be set when for example measuring a test sample whose nature is unknown HOLD The measurement range is fixed The ran...

Page 97: ...e See AUTO range limit function p 90 If the instrument is being used outside the limits of its specification the suitable range may not be set in auto ranging function In this case check the accuracy...

Page 98: ...Measurement Screen 1 LCR Basic Settings Press 2 LCR Basic Settings Press 3 If the instrument is being used outside the limits of its specification the suitable range may not be set in auto ranging fu...

Page 99: ...touch and select the AUTO range upper limit range When canceling the AUTO range limit function set the lower limit range to 100 m and the upper limit range to 100 M 8 Press to close the setting scree...

Page 100: ...4 3 Setting DC Resistance Measurement 92 Setting the Ranging to HOLD Procedure LCR Measurement Screen Rdc Basic Settings 1 2 Press Rdc Basic Settings 3 Range Selection Press...

Page 101: ...reference to 8 1 Setting Open Circuit Compensation p 215 and 8 2 Short Circuit Compensation p 224 When the measurement value is outside the guaranteed accuracy range the following icon appears at the...

Page 102: ...nchronization setting This setting is only available when the judgment standards have been set for comparator and BIN measurement When judgment standards have been set for comparator and BIN measureme...

Page 103: ...or off Disables the judgment synchronization setting Enables the judgment synchronization set ting 4 Press to close the setting screen OFF Rdc OFF Rdc The third parameter The first parameter Invalid...

Page 104: ...25 to ensure adequate current flow to the measurement sample 2 Low Z High Accuracy Mode Procedure LCR Measurement Screen Rdc Basic Settings 1 2 Press Rdc Basic Settings 3 Range Setting Select ON OFF f...

Page 105: ...Changing the low Z high accuracy mode setting while open compensation short com pensation or load compensation is enabled causes the compensation values to be dis abled No Measurement range 1 100 M 2...

Page 106: ...with the measurement conditions See About Measurement Times and Measurement Speed p 350 Performs high speed measurement This is the normal measurement speed Measurement precision improves Measurement...

Page 107: ...d the measurement values are displayed 4 3 7 Displaying Average Values Average set The averaging process during DC resistance measurement performs arithmetic mean pro cessing regardless of the trigger...

Page 108: ...easurement values Use the following procedure to select and set one of the modes 4 4 Judging Measurement Results Setting the judgment mode Judgment by comparator measurement and BIN mea surement is pe...

Page 109: ...mparator and BIN measurement Enables comparator measurement p 102 Enables BIN measurement p 109 Judgment Mode Setting When comparator measurement and BIN measurement are performed only the first and t...

Page 110: ...enthecomparator measurement result is HI or LO When the comparator measurement result is IN Measured value is above upper limit Upper limit value calculated value lower limit value Measured value is b...

Page 111: ...no error message will be displayed if you set the upper limit value and lower limit value the wrong way around If the power is turned off while the comparator measurement screen is displayed the comp...

Page 112: ...et the upper limit value 3 Upper Limit Value Setting Settable range 9 99999 G to 9 99999 G When you do not want to set the upper and lower limit values Press Changing the unit a f p n m None k M G Ste...

Page 113: ...e Value Percentage Mode Procedure 1 Press LCR Measurement Screen Press 2 Comparator Condition Setting Press and use the numeric keypad to set the reference value 3 Reference Value Setting Settable ran...

Page 114: ...e a decision to be made Upper limit comparison value reference value reference value Upper Limit Value Setting When you do not want to set the upper limit Press 100 Percentage set value 6 Press to con...

Page 115: ...ode See Setting the Upper or Lower Limit Value as a Percentage Relative to a Reference Value Percentage Mode p 105 The settings of the reference value and the upper and lower limit values are common t...

Page 116: ...imit Value Setting 5 Press and use the numeric keypad to set the upper limit value Settable range 999 999 to 999 999 When you do not want to set the upper limit Press 6 Press to confirm the upper limi...

Page 117: ...the set judgment standard If none of the BIN judgments is determined to apply OUT OF BINS will be displayed 4 4 2 Classifying Measurement Results BIN Measurement About BIN function Select the judgment...

Page 118: ...ation about HI IN LO judgment procedures see Page 103 If the power is turned off in BIN measurement mode the mode will be BIN measurement mode when the instrument starts the next time you turn the pow...

Page 119: ...the Upper or Lower Limit Value as an Absolute Value ABS Absolute Value mode Procedure 1 Press LCR Measurement Screen 2 Press BIN Settings The button display differs depending on the measurement parame...

Page 120: ...the upper limit value of the first parameter 6 Settable range 9 99999G to 9 99999G Upper Limit Value Setting Press to confirm the upper limit value When you do not want to set the upper and lower limi...

Page 121: ...nt Results 113 4 Chapter 4 LCR Function 9 Return to step 4 and set the upper and lower limit values of the third parameter in the same way 10 Press to return to the BIN setting screen 11 Press to clos...

Page 122: ...Lower Limit Value as a Percentage Relative to a Reference Value Percentage mode Procedure 1 Press LCR Measurement Screen 2 Press BIN Settings The button display differs depending on the measurement pa...

Page 123: ...on Press Use the numeric keypad to enter the reference value and press Settable range 9 99999G to 9 99999G 4 Reference Value Setting Press to return to the BIN setting screen 5 BIN Mode Setting 6 Use...

Page 124: ...9 999 to 999 999 Upper Limit Value Setting Press to confirm the upper limit value When you do not want to set the upper and lower limit values Press 9 Return to step 7 press and use the numeric keypad...

Page 125: ...ower Limit Values as Values Relative to the Off set from the Reference Value Deviation Percentage Mode Procedure 1 Press LCR Measurement Screen 2 Press BIN Settings The button display differs dependin...

Page 126: ...the numeric keypad to enter the reference value and press Settable range 9 99999G to 9 99999G 4 Reference Value Setting Press to return to the BIN setting screen 5 BIN Mode Setting 6 Use or to select...

Page 127: ...able range 999 999 to 999 999 Upper Limit Value Setting Press to confirm the upper limit value When you do not want to set the upper and lower limit values Press 9 Return to step 7 press and use the n...

Page 128: ...t Ranges Range Synchronization Function Settings are the same as those described in 4 2 Setting Basic Settings of Measurement Conditions p 50 Rdc Measurement speed DC averaging settings DC BASIC Measu...

Page 129: ...Chapter 4 LCR Function 3 Range Synchronization Function Setting Turn the range synchronization function on or off Disables the range synchronization function Enables the range synchronization functio...

Page 130: ...wish to configure with and and configure the associated functions LCR Range Synchronization Function Settings Screen Basic 4 Press to close the setting screen Settings are the same as those described...

Page 131: ...nfigure function settings To apply settings to all ranges To configure settings for an individual measurement range disable LCR Range Synchronization Function Settings Screen Basic 1 Press 3 Press to...

Page 132: ...en Basic 1 Select the measurement range you wish to configure with and and touch Range Synchronization Function Edit Screen Basic 2 Configure the speed averaging trigger delay and trig ger synchronous...

Page 133: ...on Function 3 Select the measurement range you wish to configure with and and configure the associated functions LCR Range Synchronization Function Settings Screen Rdc Sets the measurement speed p 98...

Page 134: ...d functionality To apply settings to all ranges To apply settings to individual measurement ranges disable LCR Range Synchronization Function Settings Screen Rdc 1 Press 3 Press to close the setting s...

Page 135: ...scribed in 4 3 Setting DC Resistance Measurement p 80 LCR Range Synchronization Function Settings Screen Rdc 1 Select the measurement range you wish to configure with and and touch 3 Press to close th...

Page 136: ...increases the measurement speed 4 5 2 Setting the Detection Signal Waveform Averag ing Count Waveform Averaging Function When the waveform averaging function is set the measurement speed setting is un...

Page 137: ...Hz to 0 999 Hz 1 3 1 000 Hz to 10 000 Hz 1 to 4 4 10 001 Hz to 39 999 Hz 1 to 10 5 40 000 Hz to 99 999 Hz 1 to 40 6 100 00 Hz to 300 00 Hz 1 to 50 7 300 01 Hz to 500 00 Hz 1 to 200 8 500 01 Hz to 1 00...

Page 138: ...ee Chapter 12 External Control p 309 The judgment reference is calculated from the nominal value range name of the current measurement range and the judgment reference value as shown below Judgment re...

Page 139: ...ables the HIGH Z reject function Use or to set the judgment reference value 4 Settable range 0 to 30000 HIGH Z Setting A ratio is set using the range name as the refer ence value Example When the 1 k...

Page 140: ...act Defects and the Contact State Contact Check Function Procedure LCR Measurement Screen LCR Application Settings 1 Press 2 LCR Application Settings 3 Contact Check Settings Select the timing at whic...

Page 141: ...r occurs at the timing the temperature measurement will be shown as DISP OUT since the measurement will not have been performed at that point The allowable contact resistance value may vary depending...

Page 142: ...Chart p 318 4 5 5 Setting the Delay Time from the Output of Com parator and BIN Judgment Results until Output of EOM LOW and Resetting Judgment Results Procedure LCR Measurement Screen LCR Application...

Page 143: ...eset the comparator and BIN judgment results when the signal changes to EOM HIGH Stores the last judgment results until the next judgment results are output Resets the judgment results when the sig na...

Page 144: ...8 4 5 6 Enabling Trigger Input for during Measurement and Setting the Valid Edge of Trigger Input Procedure LCR Measurement Screen LCR Application Settings 1 Press 2 LCR Application Settings 3 I O Tri...

Page 145: ...output method can be changed in the same manner See Chapter 12 External Control p 309 4 5 7 Setting the EOM Output Method Procedure LCR Measurement Screen LCR Application Settings 1 Press 2 LCR Applic...

Page 146: ...h the MEASure VALid setting For details on how to acquire the saved measurement results or set MEASure VALid refer to LCR Application Disk Commu nication Commands 4 5 8 Saving Measurement Results Memo...

Page 147: ...d When the contact check timing is set to When a contact check error has been displayed see the error display p 360 5 Press to close the setting screen 4 Memory Function Setting Select ON IN OFF for t...

Page 148: ...gs 140 You can set the number of effective digits of the measurement value for each parameter 4 5 9 Setting the Number of Display Digits Procedure LCR Measurement Screen 1 LCR Application Settings Pre...

Page 149: ...to three decimal places Up to five decimal places Up to second decimal place Up to three decimal places Up to 6 digits 5 Up to second decimal places Up to four decimal places Up to one decimal place...

Page 150: ...2 LCR Application Settings When you want to turn the backlight on again If you touch the touch panel while the backlight is off the backlight will turn on again The backlight will turn off again if y...

Page 151: ...sound is emitted Beep tone settings You can select from four beep tones and When judgment performed with 1 comparator When the comparator result is IN a beep sound is emitted When the comparator resul...

Page 152: ...can also set a passcode security code 4 5 12 Disabling Key Operation Key lock Function Procedure LCR Measurement Screen LCR Application Settings 1 4 Press to close the setting screen 3 Press Press 2 L...

Page 153: ...passcode is set it needs to be entered to disable the key lock Take care not to forget the set passcode Press when the key lock is enabled Disable Key Lock Input Passcode When a passcode is set Enter...

Page 154: ...rror indication shown on the left appears check the following items Key Lock Disable Error Cause Remedy was pressed before you entered the passcode Press and enter the passcode The entered passcode is...

Page 155: ...Description of communications commands on the included LCR Application Disk RST PRESet 4 5 13 Initializing System Reset If the initialization screen cannot be displayed perform a full reset p 359 Perf...

Page 156: ...4 5 Setting Application Settings 148...

Page 157: ...5 1 1 Measurement screen The settings of differ depending on the measurement mode Menu keys Select the measurement mode p 13 Set the details p 150 Set the compensation p 215 Set the system p 263 Set t...

Page 158: ...easurement Screen ANALYZER Basic Settings 1 Press 2 ANALYZER Basic Settings 4 Press to close the setting screen 3 Measurement Parameter Setting LCR mode ANALYZER mode PARA1 PARA1 PARA2 Unused PARA3 PA...

Page 159: ...ence the trigger setting of LCR mode Procedure ANALYZER Measurement Screen ANALYZER Basic Settings 1 Press 2 ANALYZER Basic Settings 4 Press to close the setting screen 3 Trigger Setting Select the tr...

Page 160: ...measured If it is set to to give priority to the measurement time the screen update time becomes short 5 2 3 Setting the Display Timing Procedure ANALYZER Measurement Screen ANALYZER Basic Settings 1...

Page 161: ...ger End of measurement Endof measurement End of measurement End of measurement End of measurement Internal trigger Return to measurement of sweep point 1 External trigger External trigger External tri...

Page 162: ...n 4 Press to close the setting screen 3 Press 2 ANALYZER Basic Settings ANALYZER Basic Settings Trigger Delay Setting Use or to set the delay time 1 Settable range 0 s to 9 9999 s with resolution of 0...

Page 163: ...s the start value and end value of the sweep Each sweep point is automatically calculated from the number of sweep points 5 2 5 Setting Sweep Points Start value End value Number of sweep points Proced...

Page 164: ...ancel the input and start again When you want to cancel the setting Press Press or key to confirm the setting 4 Sweep Range Setting Press and use the numeric keypad to set the end value of the sweep S...

Page 165: ...o Check the Set Sweep Points 6 Sweep Range Setting Select the setting method for sweep points The sweep points are calculated linearly from the setting values of and The sweep points are calculated lo...

Page 166: ...se of software feedback control 5 2 6 Setting the Measurement Signal Level Do not switch between V CV and CC while the test sample is still connected to the measurement terminals because doing so may...

Page 167: ...e voltage or current value Measurement Signal Level Setting See For setting range and accuracy p 54 Normal measurement mode Measurement signal mode Settable range V CV 0 005 V to 5 000 V CC 0 01 mA to...

Page 168: ...easurement range 5 2 7 Setting the Measurement Range 1 Setting the method for determining the measurement range AUTO HOLD The ranges are all defined in terms of impedance Therefore for a parameter oth...

Page 169: ...ranges may not be available depending on the frequency range 10 M range Up to 100 00 kHz 100 M range Up to 10 000 kHz The AUTO ranging range can be limited See 5 3 6 AUTO Range Limit Function p 182 I...

Page 170: ...Setting Basic Settings of Measurement 162 Setting the Ranging to HOLD Procedure ANALYZER Measurement Screen ANALYZER Basic Settings 1 Press ANALYZER Basic Settings 2 3 Press Measurement Range Selecti...

Page 171: ...ance varies with frequency if the frequency is changed during measurement using HOLD measurement within the same range may not be possi ble When this happens change the measurement range The test rang...

Page 172: ...e measurement sample allowing highly accurate measurement 2 Low Z high accuracy mode Procedure ANALYZER Measurement Screen Analyzer Basic Settings 1 Press ANALYZER Basic Settings 2 Select ON OFF for t...

Page 173: ...3 01 Low Z high accuracy mode is only available for the 100 m and 1 ranges See the following table No Measurement range 1 100 M 2 10 M 3 1 M 4 100 k 5 10 k 6 1 k 7 100 8 10 9 1 10 100 m Normal mode on...

Page 174: ...ed See 5 3 2 Setting the Detection Signal Waveform Averaging Count Waveform Averaging Function p 173 Procedure ANALYZER Measurement Screen ANALYZER Basic Settings 1 Press ANALYZER Basic Settings 2 To...

Page 175: ...Average set The measurement values are averaged by arithmetic mean during ANALYZER measure ment regardless of the trigger setting p 74 Procedure ANALYZER Measurement Screen ANALYZER Basic Settings 1...

Page 176: ...ue to stabilize due to transient response In this case set a point delay time See 5 2 4 Setting the Trigger Delay p 153 Procedure ANALYZER Measurement Screen ANALYZER Basic Settings 1 Press ANALYZER B...

Page 177: ...rimposed on the measurement signal during capacitor measure ment 5 2 11 Setting the DC Bias Procedure Press ANALYZER Measurement Screen ANALYZER Basic Settings 1 ANALYZER Basic Settings 2 3 DC Bias Se...

Page 178: ...5 1 How to Supply a DC Bias Voltage p A7 When superimposing a DC current on a coil or the like refer to Appendix5 2 How to Sup ply a DC Bias Current p A9 If the total value for the measurement signal...

Page 179: ...the generation of heat in the sample and decreasing electrode wear 5 3 Application Settings 5 3 1 Applying the Signal to the Sample Only during Measurement Trigger Synchronous Output Function Procedur...

Page 180: ...hen the trigger signal is input and stops after mea surement ends Setting the contact check timing to either or for the contact check function will cause the trigger synchronous output functionality t...

Page 181: ...llows you to set the number of measurement waveforms for each frequency band as desired 5 3 2 Setting the Detection Signal Waveform Averag ing Count Waveform Averaging Function When the waveform avera...

Page 182: ...4 3 1 000 Hz to 10 000 Hz 1 to 4 4 10 001 Hz to 39 999 Hz 1 to 10 5 40 000 Hz to 99 999 Hz 1 to 40 6 100 00 Hz to 300 00 Hz 1 to 50 7 300 01 Hz to 500 00 Hz 1 to 200 8 500 01 Hz to 1 0000 kHz 1 to 300...

Page 183: ...utput as Hi Z See Chapter 12 External Control p 309 The judgment reference is calculated from the nominal value range name of the current measurement range and the judgment reference value as shown be...

Page 184: ...Z reject function 4 HIGH Z Setting Use or to set the judgment reference value Settable range 0 to 30000 A ratio is set using the range name as the reference value Example When using the 1 k range a ra...

Page 185: ...and the Contact State Contact Check Function ANALYZER Application Settings 1 ANALYZER Measurement Screen Procedure Press 2 ANALYZER Application Settings 3 Contact Check Settings Select the timing at...

Page 186: ...179 When the measurement mode is changed partway through a series of frequency points When the sample is a high capacitance capacitor the contact check function may not operate under some measurement...

Page 187: ...s apply to mode mode and mode When the memory function is set to IN in or mode it will be set to ON in mode The items saved to memory are in accordance with the MEASure VALid setting For details on ho...

Page 188: ...e memory function Saves all measurement values to memory Clears all of the saved measurement values from the instrument memory Saves the measurement values stored in the in strument memory to a USB fl...

Page 189: ...pears subsequent measurement results will not be saved To resume saving load or clear the measurement results from the instrument memory When using the contact check function setting measurement value...

Page 190: ...limit function allows you to limit the AUTO ranging range 5 3 6 AUTO Range Limit Function ANALYZER Application Settings 1 ANALYZER Measurement Screen Procedure Press 2 ANALYZER Application Settings Se...

Page 191: ...tings 5 Press to close the setting screen Operation is only enabled within the set AUTO ranging range Example When the upper limit range is set to 1 k and the lower limit range is set to 1 M Screen di...

Page 192: ...ettings 1 ANALYZER Measurement Screen Press 2 ANALYZER Application Settings When you want to turn the backlight on again If you touch the touch panel while the backlight is off the backlight will turn...

Page 193: ...error an error tone will sound regard less of whether the beep tone is turned on or off Procedure ANALYZER Application Settings 1 ANALYZER Measurement Screen 2 Press ANALYZER Application Settings Bee...

Page 194: ...n Key lock Function In the case of an external trigger the key lock is not enabled for The measurement value zoom display ZOOM can be accessed and measurement con dition switching can be performed Tur...

Page 195: ...1 to 4 digits Default passcode 3533 Passcode Setting When a passcode is set Enter the passcode and press The entered passcode is indicated as on the screen To cancel input Press When a passcode is no...

Page 196: ...indication shown on the left appears check the following items Key Lock Disable Error Cause Remedy was pressed before you entered the passcode Press and enter the passcode The entered passcode is inc...

Page 197: ...ing Chart p 318 5 3 10 Enabling Trigger Input for during Measurement and Setting the Valid Edge of Trigger Input Procedure ANALYZER Application Settings 1 ANALYZER Measurement Screen Press 2 ANALYZER...

Page 198: ...o high off after the completion of measurement The INDEX output method can be changed in the same manner See Chapter 12 External Control p 309 5 3 11 Setting the EOM Output Method Procedure ANALYZER A...

Page 199: ...ications commands on the included LCR Application Disk 5 3 12 Initializing System Reset If the initialization screen cannot be displayed perform a full reset p 359 Performing a system reset causes the...

Page 200: ...5 3 Application Settings 192...

Page 201: ...p 13 Set the details p 198 Set the compensation p 213 Set the system p 261 Set the save settings p 271 Measurement parameter key Set each parameter p 196 Displays the comparator measurement judgment r...

Page 202: ...g ratio and inductance difference 6 1 2 Measurement Methods Winding ratio and inductance difference Procedure 1 Measure the coil s primary side with TRANSFORMER Measurement Screen Primary side Seconda...

Page 203: ...Connect the two sides in phase and in series as shown below and measure with TRANSFORMER Measurement Screen Primary side Secondary side In phase in series connection In phase in series measurement va...

Page 204: ...ndix7 Series Equivalent Circuit Mode and Parallel Equivalent Circuit Mode p A11 6 1 3 Setting the measurement parameter Procedure Select a measurement parameter Parallel equivalent circuit mode induc...

Page 205: ...culation parameter See 6 1 2 Measurement Methods p 194 6 1 4 Setting Calculation Parameters 1 Touch the calculation parameter key on the measurement screen Procedure TRANSFORMER Measurement Screen Sel...

Page 206: ...RANSFORMER Basic Settings Sets the measurement frequency p 49 Sets the measurement signal level p 51 Sets the voltage and current limits p 55 Sets the measurement range p 61 Sets the measurement speed...

Page 207: ...igher than the upper limit value IN within the range set for the upper and lower limit values or LO lower than the lower limit value Output the judgment results to an external device via the EXT I O c...

Page 208: ...on upper limit value and comparison lower limit value In the case of the comparison lower limit value if a value that is lower than the reference value is set the minus sign is required for the percen...

Page 209: ...uring comparator measurement Procedure TRANSFORMER Measurement Screen 1 TRANSFORMER Application Settings Press 2 TRANSFORMER Application Settings 3 Turn comparator measurement on or off Disables compa...

Page 210: ...e the numeric keypad to set the upper limit value 3 Upper Limit Value Setting Settable range 9 99999 G to 9 99999 G When you do not want to set the upper and lower limit values Press Changing the unit...

Page 211: ...elative to a Reference Value Percentage Mode Procedure 1 Press TRANSFORMER Measurement Screen Press 2 Comparator Condition Setting Press and use the numeric keypad to set the reference value 3 Referen...

Page 212: ...lated value to enable a decision to be made Upper limit comparison value reference value reference value Upper Limit Value Setting When you do not want to set the upper limit Press 100 Percentage set...

Page 213: ...s in the percentage mode See Setting the Upper or Lower Limit Value as a Percentage Relative to a Reference Value Percentage Mode p 203 The settings of the reference value and the upper and lower limi...

Page 214: ...eviation mode Upper Limit Value Setting 5 Press and use the numeric keypad to set the upper limit value Settable range 999 999 to 999 999 When you do not want to set the upper limit Press 6 Press to c...

Page 215: ...m averaging function setting p 126 HIGH Z reject function setting p 128 Contact check function setting p 130 I O output setting of judgment results p 132 I O trigger setting p 134 EOM Output method se...

Page 216: ...6 4 Setting Application Settings 208...

Page 217: ...ave settings p 273 Scrolls the list Displays a list of panels for which continuous measurement is to be performed An operation key is displayed depending on the situation Operation keys Saves the meas...

Page 218: ...Settings 1 2 CONTINUOUS Measurement Basic Setting A list of the measurement conditions saved with LCR mode and ANALYZER mode appears Removes the selected panel from the tar gets for continuous measur...

Page 219: ...NTINUOUS Measurement Function 7 3 Performing CONTINUOUS Measurement Execute CONTINUOUS Measurement Press Panels that were set to in the setting screen are displayed in the list Stop CONTINUOUS Measure...

Page 220: ...e first and third parameters only Indicates the panel number Displays the judgment result LCR mode The first parameter The third parameter Displays the mea surement value Select the ANALYZER mode pane...

Page 221: ...t is set to to give priority to the measurement time the screen update time becomes short 7 5 Configuring CONTINUOUS Measurement Application Settings 7 5 1 Setting the Display Timing Procedure CONTINU...

Page 222: ...ent Application Settings CONTINUOUS Measurement Screen 1 Press 2 CONTINUOUS Measurement Application Settings When you want to turn the backlight on again If you touch the touch panel while the backlig...

Page 223: ...ng cable You will be unable to obtain correct values if measurement is performed in the compensa tion state prior to replacement For SPOT compensation the open circuit compensation will be valid only...

Page 224: ...alues for all measurement frequencies See To limit the compensation frequency range for all compensation p 218 8 1 1 All Compensation Procedure Compensation Screen 1 LCR Measurement Screen 2 Press Ope...

Page 225: ...isition time Approximately 45 seconds When you want to cancel compensation Press Compensation is cancelled and the compensation screen is redisplayed The open circuit compensation value state from las...

Page 226: ...mpensation Compensation range limitation function Procedure 1 Open Compensation All Compensation Press 2 Compensation Range Limitation Setting Turn DC open compensation on or off Disables DC open comp...

Page 227: ...ettable range 20 000 Hz to 200 kHz If you make a mistake during input press to cancel the input and start again 5 Minimum Compensation Frequency Setting Press a instrument key to confirm the setting T...

Page 228: ...d and the compensa tion screen is redisplayed 3 Spot Compensation Value Setting Until one of these keys is pressed for input of a numer ical value the previous frequency for which SPOT compensation wa...

Page 229: ...points Performing Open Compensation Spot Compensation When you want to cancel compensation Press Compensation is cancelled and the compensation screen is redisplayed The open circuit compensation val...

Page 230: ...ollowing points before starting the compensation process again Check that the test cables are properly connected Check that nothing is connected to the test cables Open circuit compensation cannot be...

Page 231: ...test cables Open circuit compensation cannot be performed while any test sample is connected to the test cables Check that the test leads are arranged as closely as possible to their configuration in...

Page 232: ...n short circuit compensation will be valid only when the measure ment frequency and spot compensation frequency match When performing compensation make sure that there is no noise source nearby Noise...

Page 233: ...t it is as thick and short as possible Usage example Arrange the test leads as closely as possible to their configuration in which measurement will be performed and short circuit together the HIGH and...

Page 234: ...s for all measurement frequencies See To limit the compensation frequency range for all compensation p 218 8 2 1 All Compensation Procedure Compensation Screen 1 LCR Measurement Screen 2 Press Short C...

Page 235: ...nsation starts Compensation value acquisition time Approximately 45 seconds When you want to cancel compensation Press Compensation is cancelled and the compensation screen is redisplayed The short ci...

Page 236: ...d and the compensa tion screen is redisplayed 3 Spot Compensation Value Setting Until one of these keys is pressed for input of a nu merical value the previous frequency for which SPOT compensation wa...

Page 237: ...d The short circuit compensation values from last time remain When you do not want to acquire the compen sation values Press The compensation screen is redisplayed and the com pensation values from la...

Page 238: ...ure not to disturb the test cables or to move your hand near them A window such as the following will be displayed if the compensation process fails If an error message is displayed and compensation c...

Page 239: ...26 and touch to disable the acquired compensation data When You Want to Make Short Circuit Compensation Data Invalid The compensation values that are stored internally are not cleared by the operation...

Page 240: ...Actual data of The measured values of Z and are first compensated using the following equations and then individual parameters from the compensated Z and values are employed Z Z before compensation C...

Page 241: ...g will be displayed on the Measurement screen and compensa tion will be canceled If a condition other than the compensation frequency does not match compensation is performed but an error like the fol...

Page 242: ...ating Values to Match Reference Values Load Compensation 234 Procedure Compensation Screen 1 LCR Measurement Screen 2 Load Compensation Press 3 Select and press to confirm the selection Load Compensat...

Page 243: ...ter to use for reference value p 241 Reference value p 242 Compensation cannot be performed if all settings have not been configured When you want to use the current measurement conditions as the load...

Page 244: ...s is changed following data acquisition the acquired compensation data is invalidated When you want to cancel compensation data acquisition Press When compensation failed p 244 7 Load Compensation Per...

Page 245: ...ent frequency does not agree with the load compensation frequency the load compensation will be invalid and ON will not appear LCR Measurement Screen 2 Use the numeric keypad to enter the compensation...

Page 246: ...ange for compensation The range that can be set varies depending on the com pensation frequency Compensation Range Setting To enable LOW Z Press of LOW Z Load Compensation Setting 1 Press 3 Press to c...

Page 247: ...asurement signal mode for the compensa tion signal level Open circuit voltage V mode p 54 Constant voltage CV mode p 54 Constant current CC mode p 55 Level Setting 3 Use or to enter the voltage or cur...

Page 248: ...for the compensation frequency setting the DC bias setting cannot be set If you make a mistake during input press to cancel the input and start again DC Bias Setting 2 Select ON OFF for the DC bias Se...

Page 249: ...et When DC is selected for the compensation frequency setting DC resistance measure ment Rdc is selected automatically and the parameter to use for the reference value setting cannot be set If you cha...

Page 250: ...lue Reference Value Setting Load Compensation Setting 1 Press reference value1 3 Press a instrument key to confirm the setting 4 Press to confirm the setting 5 Also set reference value2 in the same wa...

Page 251: ...tions frequency range measurement signal mode and value for the measurement signal level and DC bias setting as the load compensation conditions by touching When You Want to Reset All Settings When Yo...

Page 252: ...lowing appears An error message is displayed and if compen sation is cancelled with load compensation is turned OFF Press in the Load Compensation Setting to disable load compensation When Load Compen...

Page 253: ...gth matches the length set with the instrument IM3533 1 m IM3533 01 1 m 2 m 4 m See Points to pay attention to when making your own probe p 32 When using the L2000 set cable length compensation to 1 m...

Page 254: ...on See Appendix1 Measurement Parameters and Calculation Formula p A1 However if the parameter corresponding to X is either D or Q scaling is applied to as shown in the following expression and then D...

Page 255: ...en you want to revert the settings to their default values Press When you want to cancel the setting Press Use the numeric keypad to set compensation coefficient A Settable range 999 999 to 999 999 To...

Page 256: ...eters 2 and 4 are invalid 6 Touch and use the numeric keypad to set compensation coefficient B in the same way as for A Then touch to accept com pensation coefficient B Settable range 9 99999G to 9 99...

Page 257: ...ion Chapter 9 Saving Data Measurement conditions and compensation values p 251 Loading Data Measurement conditions and compensation values p 256 Change panel name p 258 Delete panel p 260 Editing Save...

Page 258: ...p 260 Panels for both LCR and TRANSFORMER measurement modes are included under LCR Because this manual uses screenshots from the IM3533 in this description ANALYZER is not shown Loads the save conditi...

Page 259: ...a counts as one measurement condition and one compensation value Example When saving is performed with in mode LCR is counted as one item and the compensation value as one item 9 1 Saving Measurement...

Page 260: ...e measurement condition Saves only each of the setting values and com pensation values of open compensation short compensation load compensation cable length compensation and scaling compensation 4 Sa...

Page 261: ...asurement conditions Procedure 1 LCR measurement Screen LCR Application Settings Press 2 LCR Application Settings Use or to select the number of the panel to save 3 When you want to cancel saving Pres...

Page 262: ...e Setting Panel Name Setting 4 5 Enter the save name Up to 10 characters Changes the save name See step 5 Returns to the previous screen Returns to the Panel Main screen Saves the measurement conditio...

Page 263: ...e name press to return to step 4 and press to confirm saving 6 When saving to a panel that has already been saved a window confirming that you wish to overwrite the existing data will be displayed To...

Page 264: ...ent Conditions Panel Load Function Procedure LCR measurement Screen LCR Application Settings 1 Press 2 LCR Application Settings 3 Panel Main Screen Use or to select the number of the panel to load Whe...

Page 265: ...switch to the information of the previous or next panel 4 Returns to the Panel Main screen Reads the measurement conditions of the selected panel number The Measurement Screen is redisplayed automatic...

Page 266: ...the instrument 9 3 Changing a Panel Name Procedure 1 LCR Measurement Screen LCR Application Settings Press 2 LCR Application Settings Use or to select the number of the panel to rename 3 Press Panel M...

Page 267: ...nel Main Screen Change Panel Name Change Panel Name 5 Enter the save name Up to 10 characters Deletes all input characters Deletes the last character Changes the keyboard type 6 After you enter the ne...

Page 268: ...n delete a panel saved to the instrument 9 4 Deleting a Panel Procedure LCR Measurement Screen LCR Application Settings 1 Press 2 LCR Application Settings Use or to select the number of the panel to d...

Page 269: ...Press Some of the information saved to the panel is displayed Panel Main Screen 5 Check the information saved to the panel Panel Delete Confirmation Press A panel cannot be restored once it is delete...

Page 270: ...9 4 Deleting a Panel 262...

Page 271: ...d 1 LCR Measurement Screen Interface Settings Procedure This operation is possible in any of the mode mode and mode Normally only USB set tings are available Ref to Communication Instruction Manual LC...

Page 272: ...ent 264 10 2 Checking the Version of the Instrument You can check the version in mode mode or mode LCR Measurement Screen 1 Instrument Info Procedure 2 Instrument Info Check the version of the instrum...

Page 273: ...u can check the touch panel in mode mode or mode Press 2 Self Checks 3 Panel Test Press the keys displayed on the screen If the pressed keys are highlighted and the green appears the touch panel is wo...

Page 274: ...mpensation of the touch panel Panel Compensation LCR Measurement Screen 1 Self Checks Procedure You can perform this compensation procedure in mode mode or mode Press 2 Self Checks 3 Panel Compensatio...

Page 275: ...ng the SYSTEM 4 Panel Compensation Complete Press to close the setting screen If the indication does not appear the instru ment needs to be repaired Contact your authorized Hioki distributor or resell...

Page 276: ...268 Check the display state of the screen and lighting state of the LEDs Screen Display Test LCR Measurement Screen 1 Self Checks Procedure You can check the display state and lighting state in mode m...

Page 277: ...t the instrument needs to be repaired Contact your authorized Hioki distributor or re seller Screen Color Front Panel LEDs Red All LEDs turn on Green All LEDs turn off Blue The OUT LED turns on Black...

Page 278: ...e test automatically Approx 40 seconds No operation is possible during the ROM RAM test Never turn off the power during a test 3 ROM RAM Test When IM3533 If the overall judgment result indication is P...

Page 279: ...I O test in mode mode or mode LCR Measurement Screen 1 Self Checks Procedure Press 2 Self Checks 3 I O Test To perform an input signal test The signal line name of the input signal being input LOW is...

Page 280: ...etting the Date and Time You can set the date and time in mode mode or mode LCR Measurement Screen 1 Date Time Settings Procedure Settable range 00 00 00 January 1 2000 to 23 59 59 December 31 2099 2...

Page 281: ...as a computer Avoid forcing insertion of storage media backwards or in the wrong orientation as this could damage the media or instrument When a USB flash drive is accessed the color of the USB icon c...

Page 282: ...not insert a USB flash drive that is not Mass Storage Class compatible Not all commercially available USB flash drives are compatible If a USB flash drive is not recognized try using another USB flash...

Page 283: ...Press the information indication portion to confirm de tails p 307 Moves to the level immediately above The indicated key varies depending on the type of the selected file FDR p 297 p 290 TXT CSV BMP...

Page 284: ...e save function 11 3 About the File Save Setting Screen Insert the USB flash drive into the USB port front panel 1 Procedure 2 LCR Measurement Screen File Save Setting Screen 3 File Save Setting Scree...

Page 285: ...DATE 11 11 30 TIME 10 10 06 FREQ 1 0000E 03 Hz V 1 000 V LIMIT OFF RANGE AUTO 10k ohm LOW Z OFF JUDGE SYNC OFF JUDGE OFF SPEED MED TRIG INT AVG OFF DELAY 0 0000 s TRIG SYNC OFF DCBIAS OFF OPEN OFF SHO...

Page 286: ...Screen Disables the text file type Saves measurement values as text data 4 File Type Setting Press Enable the text file type 5 Turns the save date and time ON OFF Turns the measurement condition ON O...

Page 287: ...record the save date and time Records the save date and time 2 Press to close the setting screen HIOKI E E CORPORATION IM3533 Ver 1 00 Serial No 123456789 FREQ 1 0000E 03 Hz V 1 000 V LIMIT OFF RANGE...

Page 288: ...RPORATION IM3533 Ver 1 00 Serial No 123456789 DATE 11 11 30 TIME 10 10 06 FREQ 1 0000E 03 Hz V 1 000 V LIMIT OFF RANGE AUTO 10k ohm LOW Z OFF JUDGE SYNC OFF JUDGE OFF SPEED MED TRIG INT AVG OFF DELAY...

Page 289: ...FREQ 1 0000E 03 Hz V 1 000 V LIMIT OFF RANGE AUTO 10k ohm LOW Z OFF JUDGE SYNC OFF JUDGE OFF SPEED MED TRIG INT AVG OFF DELAY 0 0000 s TRIG SYNC OFF DCBIAS OFF OPEN OFF SHORT OFF LOAD OFF CABLE 0 m SC...

Page 290: ...HIOKI E E CORPORATION IM3533 Ver 1 00 Serial No 123456789 DATE 11 11 30 TIME 10 10 06 FREQ 1 0000E 03 Hz V 1 000 V LIMIT OFF RANGE AUTO 10k ohm LOW Z OFF JUDGE SYNC OFF JUDGE OFF SPEED MED TRIG INT AV...

Page 291: ...12 05 FREQ 1 0000E 03 Hz V 1 000 V LIMIT OFF RANGE AUTO 10k ohm LOW Z OFF JUDGE SYNC OFF JUDGE OFF SPEED MED TRIG INT AVG OFF When OFF HIOKI E E CORPORATION IM3533 Ver 1 00 Serial No 123456789 DATE 11...

Page 292: ...is automatically created in the USB flash drive and the file is saved The date is used for the name of the folder cre ated when you press The date and time are automatically assigned to the file name...

Page 293: ...0 1 1 2 1 9999999999E 28 Overflow 7 999999E 28 0 1 1 3 1 9999999999E 28 Outside of HIGH Z reject limit range 5 Normal Measurement Values Normal judgment Normal judgment Normal judgment Normal Measurem...

Page 294: ...utside of guaran teed accuracy range 2 Normal Measurement Values Normal judgment Normal Measurement Values Normal Measurement Values 0 Normal Measurement Values Normal judgment Normal Measurement Valu...

Page 295: ...bmp 2 Saving a Copy of the Screen Procedure 2 LCR Measurement Screen File Save Setting Screen Insert the USB flash drive into the USB port front panel 1 Press 3 File Save Setting Screen Select the BM...

Page 296: ...aved USB Flash Drive Recognition When is pressed a folder is automatically created in the USB flash drive and the file is saved The date is used for the name of the folder cre ated when you press The...

Page 297: ...11 4 Saving Measurement Data 289 8 11 Chapter 11 Using USB Flash Drive When LCR mode Example of screen copy When ANALYZER mode IM3533 01 only When TRANSFORMER mode...

Page 298: ...Files Procedure Insert the USB flash drive into the USB port front panel LCR Measurement Screen File List Screen 2 1 Use or to select the file to check 3 Press to check the file File Selection CSV Fil...

Page 299: ...Screen File Save Setting Screen 2 Insert the USB flash drive into the USB port front panel 1 3 File Save Setting Screen Press Press to confirm the setting Automatically creates a folder for today s d...

Page 300: ...be specified The folder name must be no more than 12 characters 5 Press to close the setting screen Only folders in the root directory of the USB flash drive can be selected with If the folder specifi...

Page 301: ...tting file is SET This function is convenient for when you want to back up the setting state of the instrument For the settings that are saved refer to Appendix12 Initial Settings Table p A18 11 5 Sav...

Page 302: ...save confirmation screen The measurement data is saved Save Instrument Settings When you want to cancel saving Press The setting file is saved to the SETTING folder in the USB flash drive The date an...

Page 303: ...le to the USB flash drive The extension of the setting file is SET The extension of the panel save is PNL For the settings that are saved refer to Appendix12 Initial Settings Table p A18 2 Saving All...

Page 304: ...le and panel save data are saved to a folder of the save date and time that is created automatically in the SETTING folder The date and time are automatically assigned to the folder name and file name...

Page 305: ...ave file that is saved to the USB flash drive and restore the settings 11 6 Loading Instrument Settings 1 Loading instrument settings Procedure 2 LCR Measurement Screen File List Screen Insert the USB...

Page 306: ...ile s contents Press You can check the contents of the file selected in Step 4 Instrument Settings Confirmation screen When is selected When you want to return to the Setting File Selection screen Pre...

Page 307: ...hen the Read Confirmation Screen Appears If an error appears when is pressed one of the following are likely to be cause The setting file is damaged The file is not a setting file that can be read by...

Page 308: ...all save function See Saving All Settings of Instrument ALL SAVE Function p 295 2 Loading all settings saved on a USB flash drive ALL LOAD Function 2 LCR Measurement Screen File List Screen Insert th...

Page 309: ...the and buttons set TYPE to ALL files Setting File Selection Press Selecting LOAD will cause the instrument s current settings to be deleted If the instrument is unable to load the settings file a be...

Page 310: ...initialized Insert the USB flash drive to be formatted into the USB port on the front panel p 274 and start the format The instrument formats drives in the FAT32 format 11 7 File and Folder Operation...

Page 311: ...When you perform a format all of the data saved to the USB flash drive is deleted and cannot be restored Carefully check the contents before you perform a format We recommend making a backup of any i...

Page 312: ...he folder 2 Deleting Files and Folders Procedure 2 Select the file or folder you wish to delete with and and touch 3 Press 4 A deleted file or folder cannot be restored once it is deleted Confirm the...

Page 313: ...ions 305 8 11 Chapter 11 Using USB Flash Drive 3 Creating Folders Procedure 2 Insert the USB flash drive into the USB port front panel 1 LCR Measurement Screen File List Screen 3 Press File List Scree...

Page 314: ...Input Folder Name Input Folder Name Enter the save name Up to 12 characters Deletes all input characters Deletes the last character Changes the keyboard type 6 Press to create a folder Input Folder Na...

Page 315: ...g the USB Flash Drive Information Procedure Insert the USB flash drive into the USB port front panel LCR Measurement Screen File List Screen 2 1 Press the part indicating the disc information 3 File L...

Page 316: ...11 7 File and Folder Operations 308...

Page 317: ...External Input Output Connector and Signals To avoid electric shock or damage to the equipment always observe the following precautions when connecting to the EXT I O terminals Always turn off the po...

Page 318: ...3 14 15 16 17 18 19 20 21 22 23 24 25 26 27 28 29 30 31 32 33 34 35 36 37 TRIG Unused Unused LD1 LD3 Unused ISO_5V ISO_COM Unused Unused LD5 ERR Unused Unused Unused Unused Unused Unused Unused Unused...

Page 319: ...sults obtained by applying an AND operation to the judgment results for measurement results for two parameters When both judgment results are IN or one of the No 1 or No 3 parameters has not been judg...

Page 320: ...p 316 Neg Level 7 Unused 8 ISO_5V Isolated 5 V power output 9 ISO_COM Isolated common signal ground 10 OUT ERR Outputs when a sampling error overcurrent error contact error HIGH Z reject error or cons...

Page 321: ...umber p 316 Neg Level 7 Unused 8 ISO_5V Isolated 5 V power output 9 ISO_COM Isolated common signal ground 10 OUT ERR Outputs when a sampling error contact error HIGH Z reject er ror constant voltage c...

Page 322: ...ERR Outputs when a sampling error overcurrent error contact error HIGH Z reject error temperature sensor error constant voltage constant current error or voltage current limit value exceeded error occ...

Page 323: ...ay be changed Neg Edge 30 OUT No 1_PARA1 IN Outputs IN comparator judgment results for the first No 1 pa rameter Neg Level 31 OUT No 1_PARA3 HI Outputs HI comparator judgment results for the first No...

Page 324: ...surement during output of the EOM signal HI See Enabling Trigger Input for during Measurement and Setting the Valid Edge of Trig ger Input p 136 LD0 to LD6 Selects the number of the panel to load If a...

Page 325: ...fore measurement LOW HI LCR 11 31 1 HI LOW L side contact error before measurement LOW HI LCR 11 31 1 HI LOW H side contact error before measurement LOW HI LCR 11 31 1 HI LOW Underflow HI HI LCR 12 32...

Page 326: ...id edge of the TRIG signal is set to falling ON 12 2 Timing Chart 12 2 1 LCR Mode Start of measurement signal Analog end of measurement signal End of measurement signal 1 Comparator result output Judg...

Page 327: ...the comparator BIN judgment result differs depending on the configuration of the circuit connected to the EXT I O there is the likeli hood of an incorrect judgment if the level of the comparator BIN j...

Page 328: ...re high off When the high off time is too short due to characteristics of the input circuit the instru ment can be configured to maintain the low on state for a preset time once EOM changes to low on...

Page 329: ...alog end of measurement signal End of measurement signal Judgment result Error output Last judgment result Signal line Description INDEX The transition to HIGH is performed when measurement of the fir...

Page 330: ...G1 and TRIG2 measurement are performed with the comparator set When a panel is loaded 12 2 3 TRANSFORMER Mode 1 HI IN LO AND 2 Reset when signal changes to EOM HIGH HIGH Do not reset when signal chang...

Page 331: ...measurement Screen Example Continuous measurement using panel numbers 1 2 and 4 1 No x_PARAy HI No x_PARAy IN No x_PARAy LO AND 2 Reset when signal changes to EOM HIGH HIGH Do not reset when signal c...

Page 332: ...judgment results are reset when the signal changes to EOM HIGH or updated when measurement completes can be selected on the instrument or using a communica tion command See 4 5 5 Setting the Delay Ti...

Page 333: ...Internal Circuitry Input Circuit Output Circuit Internally Isolated 5 V PLC etc Output Common Internally Isolated Common Signal Ground Do not apply external power Internally Isolated 5 V PLC etc Inpu...

Page 334: ...serted OFF voltage Open or 5 to 30 V Input asserted ON current 3 mA ch Maximum applied voltage 30 V Output Signals Output type Optocoupler isolated npn open collector outputs current sink active low M...

Page 335: ...Switch Connections Relay Connections PLC Output Source Output Connections PLC Output Sink Output Connections Output Common Common Output Output Output Output Output Output Output Output Input Input C...

Page 336: ...rator and BIN Judgment Results until Output of EOM LOW and Resetting Judgment Results p 134 LCR Application Disk Communication Commands IO RESult RESet Whether to enable or disable trigger input from...

Page 337: ...horts Are the comparator decision signals HI IN LO retained during measure ment or can they be off They are initially set to be confirmed at the end of measurement and turned OFF when measurement star...

Page 338: ...12 6 Measurement Using a Computer 330...

Page 339: ...urement values and comparator decisions Statistical calculation results Connecting the printer to the instrument Make instrument settings p 333 Make printer settings 13 1 Connecting the Printer Becaus...

Page 340: ...nsmit Data 3 RxD Receive Data 7 GND Signal or Common Ground 4 RTS Request to Send 5 CTS Clear to Send Function Signal Name Pin Receive Data RxD 2 Transmit Data TxD 3 Signal or Common Ground GND 5 Requ...

Page 341: ...nishes Prints the measurement results as text Prints the screen BAUD RATE Communication speed with the printer HANDSHAKE Configuring flow control 3 Select and check each of the settings and press to c...

Page 342: ...printed automatically it is recommended to print using an external trigger When set to use an external trigger pressing causes the measurement data to be printed Prints the state when is pressed in th...

Page 343: ...gs p 333 In ANALYZER mode the TYPE setting can only be set to a copy of the screen Example Printouts When LCR Mode When the display is enlarged the print type is text even when TYPE is set to When ANA...

Page 344: ...The printer cannot be configured in CONTINUOUS measurement mode To change the printer settings place the instrument in LCR mode ANALYZER mode IM3533 01 only or TRANSFORMER mode When the TYPE setting i...

Page 345: ...ivalent parallel resistance X Reactance G Conductance B Susceptance Ls Equivalent series inductance Lp Equivalent parallel inductance Cs Equivalent series capacitance Cp Equivalent parallel capacitanc...

Page 346: ...guaranteed accuracy is displayed when out of the ranging range OVERFLOW or UNDERFLOW is displayed when out of the A D input range Low Z High Accuracy Mode Improves measurement accuracy in the 100 m an...

Page 347: ...AC signal voltage setting V DC resistance measurement Settable when setting the Rdc measurement item The measurement condition when DC resistance measurement is settable to other than AC measurement M...

Page 348: ...d function LCR mode TRANSFORMER mode A total of 60 measurement conditions can be saved ANALYZER mode Two measurement conditions can be saved Compensation value only 128 different measurement condition...

Page 349: ...2000 m 6562 ft Rated supply voltage AC100 V to 240 V Rated supply frequency 50 60 Hz Maximum rated power consumption 50 VA Dimensions Approx 330 W 119 H 168 D mm 12 99 W 4 69 H 6 61 D excluding protr...

Page 350: ...oefficient F and temperature coeffi cient G by the basic accuracy The basic accuracy is calculated by determining coefficient A and B from the basic accuracy coefficient table in accordance with the m...

Page 351: ...15 B 0 02 A 0 25 B 0 04 A 0 4 B 0 3 A 0 3 B 0 02 A 0 1 B 0 02 A 0 1 B 0 015 A 0 4 B 0 02 A 1 2 B 0 3 10 k A 0 1 B 0 01 A 0 3 B 0 025 A 0 2 B 0 025 A 0 05 B 0 02 A 0 2 B 0 025 A 0 3 B 0 03 A 0 3 B 0 0...

Page 352: ...guaranteed accuracy Measurement speed coefficient 8 4 2 1 2 0 001 Hz to 0 999 Hz 1 1 3 1 000 Hz to 10 000 Hz 1 to 4 1 2 3 4 4 10 001 Hz to 39 999 Hz 1 to 10 1 2 to 4 5 to 9 10 5 40 000 Hz to 99 999 Hz...

Page 353: ...cy G Temperature coefficient The coefficient corresponding to the operating temperature is obtained from the operating temperature coeffi cient table and then added to the basic accuracy 0 m 1 m 2 m 4...

Page 354: ...o 5 V 100 k 100 k to 1 M 0 05 V to 5 V 0 101 V to 5 V 10 k 10 k to 100 k 0 05 V to 5 V 0 101 V to 5 V 1 k 1 k to 10 k 0 005 V to 5V The above voltages are the voltage settings equivalent to when V mod...

Page 355: ...the 100 measurement range will be used 2 Obtain the Z coefficients A and B from the accuracy table p 343 and then calculate the basic accuracy of Z In the 10 kHz 100 range the accuracy table p 343 yi...

Page 356: ...ccuracy formula p 342 for 1 k or more ranges Z 4 Similarly calculate the basic accuracy of The accuracy table p 343 yields the values A 0 03 and B 0 002 Using the basic accuracy formula p 342 for 1 k...

Page 357: ...midity 23 5 C 80 rh or less Accuracy Conversion table from C and L to Z Frequency Hz Temperature measurement Guaranteed accuracy range 10 0 C to 99 9 C Accuracy 0 5 rdg 1 C 1 Sampling time Approx 640...

Page 358: ...60 Hz 37 ms 103 ms 203 ms 803 ms 0 001 Hz to 0 999 Hz Tf s 3 ms Tf s 3 ms Tf s 3 ms Tf s 3 ms 1 000 Hz to 10 000 Hz Tf s 3 ms 2 Tf s 3 ms 3 Tf s 3 ms 4 Tf s 3 ms 10 001 Hz to 39 999 Hz Tf s 3 ms 2 Tf...

Page 359: ...ion C Measurement mode E Saving to memory F Contact check function Measurement times EOM FAST MED SLOW SLOW2 All frequencies 1 0 ms Tolerance 10 0 1 ms OPEN SHORT LOAD compensation No 0 0 ms Yes MAX 0...

Page 360: ...changed the wait time is 1 ms When switching ranges When the range is changed the wait time is 1 ms Also when low Z impedance high accuracy mode is turned ON OFF the wait time is 1 ms When DC bias Whe...

Page 361: ...or Hioki representative However in the following cases immediately stop using the instrument unplug the power cord and contact your authorized Hioki distributor or reseller When the nature of the dam...

Page 362: ...ting the instrument if possible Transporting the instrument Cleaning To clean the instrument wipe it gently with a soft cloth moistened with water or mild deter gent Never use solvents such as benzene...

Page 363: ...ork You don t know how to use the instru ment Did you check the Instruction Manual Check the appropriate section of the Instruc tion Manual Are you using the instrument as part of an auto mated system...

Page 364: ...erter electromagnetic switch power line equipment generating sparks etc or perform the measurement in a sepa rate room Plug the instrument into a grounded outlet Use a separate power supply from the d...

Page 365: ...voltage you may dam age the instrument Avoid measuring the sample Are you measuring an element on a printed circuit board You can measure an element on a printed circuit board if the target element i...

Page 366: ...automatic output function enabled When the measurement value automatic out put function is enabled a send error occurs on the measuring instrument side if the receive operation is not performed on th...

Page 367: ...you have forgotten the passcode for the key lock When no apparent cause can be established Full Reset Procedure 1 Turn ON the switch on the back panel 2 While the opening screen is displayed press the...

Page 368: ...hange the measurement signal level so that the limit value is not exceeded p 56 This is displayed when load compensa tion is enabled and a load compensation condition other than the frequency does not...

Page 369: ...When LCR mode TRANSFORMER mode CONTINUOUS measure ment mode This is displayed when the HPOT HCUR LPOT or LCUR terminal is not connected after measurement for example due to a break in wiring Check th...

Page 370: ...either remove it from service or mark it clearly so that others do not use it inadvertently Lithium Battery Removal Take care not to short the and Doing so may cause sparks CALIFORNIA USA ONLY This p...

Page 371: ...lane Furthermore admittance Y that is the reciprocal of impedance Z can also be used depending on the characteristics of circuit components As in the case of impedance Z the following values can also...

Page 372: ...phase angle of admittance Y Ls Rs Cs The measured values of L C and R in series equivalent circuit mode Lp Rp Cp The measured values of L C and R in parallel equivalent circuit mode The phase angle i...

Page 373: ...formed by the use of guarding that is connecting a metallic plate to the GUARD terminal and carrying out the measurement on the metallic plate When measuring components on a metal plate use for exampl...

Page 374: ...owing through the resistors R3 not flowing through R4 is absorbed by this guard terminal so that the resistance value for the resistor R2 is accurately measured Appendix3 Measurement of In circuit Com...

Page 375: ...nd wire of the power cable can be used as protective grounding for the unit Protective grounding plays an important role in not only the prevention of electrical accidents but also the use of an inter...

Page 376: ...cores and ferrite beads are commercially available from various specialist manufacturers If interference is producing noise in the measurement cables its influence can be moderated by the following co...

Page 377: ...ough impedance to the RHP Be careful about the polarity when connecting together the probes the sample to be tested and the DC voltage source It takes a little time for the DC voltage which is being s...

Page 378: ...bias voltage still being supplied then the test sample is left charged which is very dangerous In order to avoid electric shock Do not short circuit between the clips of the test probes with the DC b...

Page 379: ...and the DC cur rent source Be careful not to magnetically saturate the choke coil CH with the DC bias current It takes a little time for the DC current which is being supplied to the sample under test...

Page 380: ...ed by this func tion is for reference purposes only and is not a guaranteed value There may be danger of damage to the instrument depending upon the operational circumstances and upon how often such c...

Page 381: ...equivalent circuit mode and parallel equivalent circuit mode Generally for measurement of a low impedance device approx less than 100 like a large capacitance capacitor or a low inductance a serieseq...

Page 382: ...then be performed by substituting them into the above equation Deviations in the measured values can become comparatively large in the following cases If only short circuit compensation has been perf...

Page 383: ...coefficient of 3930 ppm measures 100 at 30 C its resistance at 20 C is calculated as follows For more information about how to configure the temperature correction function see below See 4 3 1 Configu...

Page 384: ...Annealed copper wire Cu 99 9 8 89 1 00 to 1 02 3810 to 3970 Hard drawn copper wire Cu 99 9 8 89 0 96 to 0 98 3770 to 3850 Cadmium copper wire Cd 0 7 to 1 2 8 94 0 85 to 0 88 3340 to 3460 Silver coppe...

Page 385: ...tru ment damage and electric shock accidents When installing the Rack Mounting Plate the screws must not intrude more than 6 mm into either side of the instrument When removing the Rack Mounting Plate...

Page 386: ...the instrument s legs When installing into the rack reinforce the installation with a commercially available support stand M4 x 6 mm Spacers Rack Mounting Plate EIA Rack Mounting Plate JIS Spacers M4...

Page 387: ...Appendix Appendix11 Dimensional Diagram A17 Appendix11 Dimensional Diagram Unit mm 330 1 119 1 168 114 33 25 35 48 33 14 330 1...

Page 388: ...No Yes Yes Yes Yes Current limit value 100 00 mA No Yes Yes Yes Yes Voltage limit value 5 00 V No Yes Yes Yes Yes DC bias TRANSFORMER mode None ON OFF OFF No Yes Yes No Yes Bias value 0 00 V No Yes Y...

Page 389: ...orm averages No Yes Yes Yes Yes Judgment result Delay between judg ment results and EOM 0 0000 s No No No No Yes Reset ON No No No No Yes IO trigger ENABLE ON No No No No Yes Edge DOWN No No No No Yes...

Page 390: ...No Yes Yes Lower limit value OFF No No No Yes Yes Percent mode Deviation percent age mode Reference value 10 0000 No No No Yes Yes Upper limit value OFF No No No Yes Yes Lower limit value OFF No No N...

Page 391: ...ensation DC bias ON OFF OFF No Change No Yes ADJ Yes ADJ Yes ADJ Yes Bias value 0 00 V No Change No Yes ADJ Yes ADJ Yes ADJ Yes Compensation value Impedance coefficient OFF No Change No Yes ADJ Yes AD...

Page 392: ...e MANUAL No Change No Change No No No No Yes Type TEXT No Change No Change No No No No Yes Header OFF No Change Yes No No No No Status Byte register 0 No Change No Change No Change Yes No No No Yes Ev...

Page 393: ...minator are all reinitialized 5 List of message exchange options Input buffer capacity and operation See The included LCR Application Disk Queries to which multiple response message instruments are re...

Page 394: ...limitations for block data Block data is not used 8 Summary of program data elements used in expressions and deepest nesting level allow able in sub expressions including syntax restrictions imposed b...

Page 395: ...returns the instrument to its initial state See Description of communications commands on the included LCR Application Disk RST 20 Scope of the self testing executed as a result of the TST query See...

Page 396: ...Appendix 13 Device Compliance Statement A26...

Page 397: ...260 Deviation Percentage 117 Deviation Percentage Mode 107 205 dgt 4 Dimensional Diagram 17 Discarding 362 Display Timing 152 213 E EMI Suppression 6 Enlarging Display 49 Error display 360 EXT I O Con...

Page 398: ...nting 334 Probe 32 R Rack Mounting 15 Range 62 88 160 Range Synchronization Function 120 rdg 4 Replaceable Parts 353 Residual Charge Protection A10 ROM RAM Test 270 S Saving Measurement Results 138 17...

Page 399: ......

Page 400: ......

Reviews: