Initial Setup and Configuration
Set the Handle Position
2
2-5
Set the Handle Position
The handle is used to easily transport the Product but can also be used as a stand.
Figure 2-3 shows the various handle positions and also shows how to remove and install
the handle and the protective rubber boots.
Carrying Position
Viewing Position
Alternate Viewing Position
Removal Position (to Remove,
Pull Ends Out)
To Remove, Pull End From Unit
4
5
Boot Removal
6
2
1
3
Hcn003.eps
Figure 2-3. Handle Positions and Boot Removal
Summary of Contents for 1586A
Page 6: ...1586A Users Manual iv Error Messages 7 3 Troubleshooting 7 20...
Page 8: ...1586A Users Manual vi...
Page 10: ...1586A Users Manual viii...
Page 34: ...1586A Users Manual 2 2...
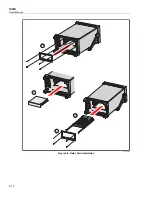
Page 42: ...1586A Users Manual 2 10 2 3 4 1 hcn018 eps Figure 2 6 Relay Card Installation...
Page 44: ...1586A Users Manual 2 12 hcn032 eps Figure 2 7 DAQ STAQ Multiplexer Installation...
Page 46: ...1586A Users Manual 2 14...
Page 48: ...1586A Users Manual 3 2...
Page 82: ...1586A Users Manual 3 36...
Page 84: ...1586A Users Manual 4 2...
Page 108: ...1586A Users Manual 5 2...
Page 114: ...1586A Users Manual 6 2...
Page 118: ...1586A Users Manual 6 6...
Page 120: ...1586A Users Manual 7 2...


