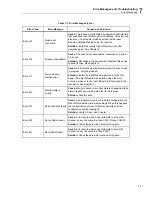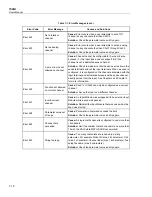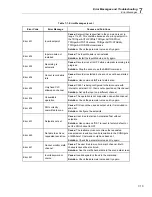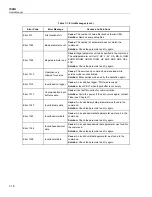
1586A
Users Manual
7-20
Troubleshooting
In the event that the Product functions abnormally, Table 7-2 can help find and solve the
problem. Several possible problem conditions are described with likely causes and
solutions. If a problem occurs, please read this section carefully and attempt to
understand and solve the problem. If the Product seems faulty or the problem cannot
otherwise be solved, contact an Authorized Service Center for assistance, see Chapter 1.
Be sure to have the instrument model number, serial number, and regional voltage
available to tell the Service Technician.
Table 7-2. Troubleshooting Chart
Problem
Causes and Solutions
The Product does not
power on.
Cause 1:
Fuses.
Solution 1:
If a fuse blows, it could be because of a power surge or a
component failure. Replace the fuse once. DO NOT replace the fuse with one
of a higher current rating. Always replace the fuse with one of the same rating,
voltage, and type. If the fuse blows a second time, it is likely caused by failure
of a component part.
Cause 1:
Power Cord.
Solution 1:
Check that the power cord is plugged in and connected to the
Product.
Cause 2:
AC mains power.
Solution 2:
Make sure the circuit that supplies power to the Product is on.
Cause 3:
Power entry is not properly set.
Solution 3:
Make sure the power entry setting is matching with the AC mains
power supply rate.
LED lights are
illuminated but the
display is blank.
Cause 1:
The unit is standby mode (the power LED should be amber).
Solution 1:
Press the Standby key on the front panel to exit the standby
mode.
Cause 2:
Screen saver activated.
Solution 2:
Press any front panel key to exit the screen saver.
Cause 3:
Screen or unit is malfunctioning.
Solution 3:
Contact Fluke. See Chapter 1.
Input Module is not
recognized.
Cause 1:
Input Module not fully seated.
Solution 1:
Reinstall the Input Module and make sure it is fully seated in the
slot.
Cause 2:
Relay card not installed.
Solution 2:
Make sure the relay card is installed.
Cause 3:
Input Module has failed.
Solution 3:
Contact an Authorized Customer Service Center.
Summary of Contents for 1586A
Page 6: ...1586A Users Manual iv Error Messages 7 3 Troubleshooting 7 20...
Page 8: ...1586A Users Manual vi...
Page 10: ...1586A Users Manual viii...
Page 34: ...1586A Users Manual 2 2...
Page 42: ...1586A Users Manual 2 10 2 3 4 1 hcn018 eps Figure 2 6 Relay Card Installation...
Page 44: ...1586A Users Manual 2 12 hcn032 eps Figure 2 7 DAQ STAQ Multiplexer Installation...
Page 46: ...1586A Users Manual 2 14...
Page 48: ...1586A Users Manual 3 2...
Page 82: ...1586A Users Manual 3 36...
Page 84: ...1586A Users Manual 4 2...
Page 108: ...1586A Users Manual 5 2...
Page 114: ...1586A Users Manual 6 2...
Page 118: ...1586A Users Manual 6 6...
Page 120: ...1586A Users Manual 7 2...


