Input and Channel Configuration
Channel Configuration
3
3-19
4.
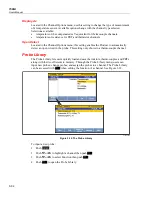
After the channel is configured, verify that the channel is configured properly and
reading the input. For instructions, see “Verify a Channel” on page 3-14.
Current and Voltage Channels
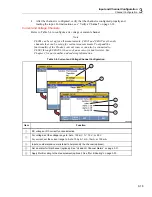
Refer to Table 3-4 to configure a dc voltage or current channel.
Note
Ch001 can be set up for all measurements. ChX21 and ChX22 are the only
channels that can be set up for current measurements. To expand the
functionality of the Product, current sources can also be connected to
ChX01 through ChX20 by the use of an accessory shunt resistor. See
Chapter 2 for part number and ordering information.
Table 3-4. Current and Voltage Channel Configuration
1
2
3
4
5
hcn050.eps
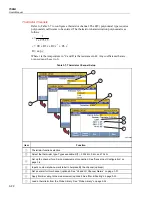
Item Function
DC voltage or DC current function selection.
For voltage, set the voltage range to: Auto, 100 mV, 1 V, 10 V, or 50 V.
For current, set the current range to: Auto, 100
μ
A, 1 mA, 10mA, or 100 mA.
Input a custom alpha-numeric label to help identify the channel (optional).
Set an alarm for this channel (optional). See “HI and LO Channel Alarms” on page 3-31.
Apply Mx+B scaling to the measurement (optional). See “Mx+B Scaling” on page 3-30.
Summary of Contents for 1586A
Page 6: ...1586A Users Manual iv Error Messages 7 3 Troubleshooting 7 20...
Page 8: ...1586A Users Manual vi...
Page 10: ...1586A Users Manual viii...
Page 34: ...1586A Users Manual 2 2...
Page 42: ...1586A Users Manual 2 10 2 3 4 1 hcn018 eps Figure 2 6 Relay Card Installation...
Page 44: ...1586A Users Manual 2 12 hcn032 eps Figure 2 7 DAQ STAQ Multiplexer Installation...
Page 46: ...1586A Users Manual 2 14...
Page 48: ...1586A Users Manual 3 2...
Page 82: ...1586A Users Manual 3 36...
Page 84: ...1586A Users Manual 4 2...
Page 108: ...1586A Users Manual 5 2...
Page 114: ...1586A Users Manual 6 2...
Page 118: ...1586A Users Manual 6 6...
Page 120: ...1586A Users Manual 7 2...


