


Pro Tools Reference Guide
272
Creating a Click Track
Pro Tools lets you create a Click track using the
DigiRack Click plug-in. You can also create a
click track using MIDI.
To create a click track using the DigiRack Click
plug-in:
■
Choose Track > Create Click Track.
Pro Tools creates a new Auxiliary Input track
named “Click” with the Click plug-in already
inserted. In the Edit window, the click track’s
Track Height is set to Mini. You can create more
than one click track and each subsequent click
track is named in sequence. For example, Click
1, Click 2, and Click 3.
To hear the click during playback and recording,
configure the Click Options (see “Click Op-
tions” on page 272) and ensure that Click is en-
abled (see “Enabling Click” on page 273).
To create a click track using MIDI:
1
Create a new (mono) Auxiliary Input or In-
strument track.
2
Do one of the following:
• From the track’s Input selector, select the
path to which the MIDI device is con-
nected.
– or –
• Insert an instrument plug-in on the track
(such as Digidesign’s Xpand!).
3
Configure the Click/Countoff options, and be
sure to select the port for the MIDI device or in-
strument plug-in from the Output pop-up menu
(see “Click Options” on page 272).
4
Enable Click (see “Enabling Click” on
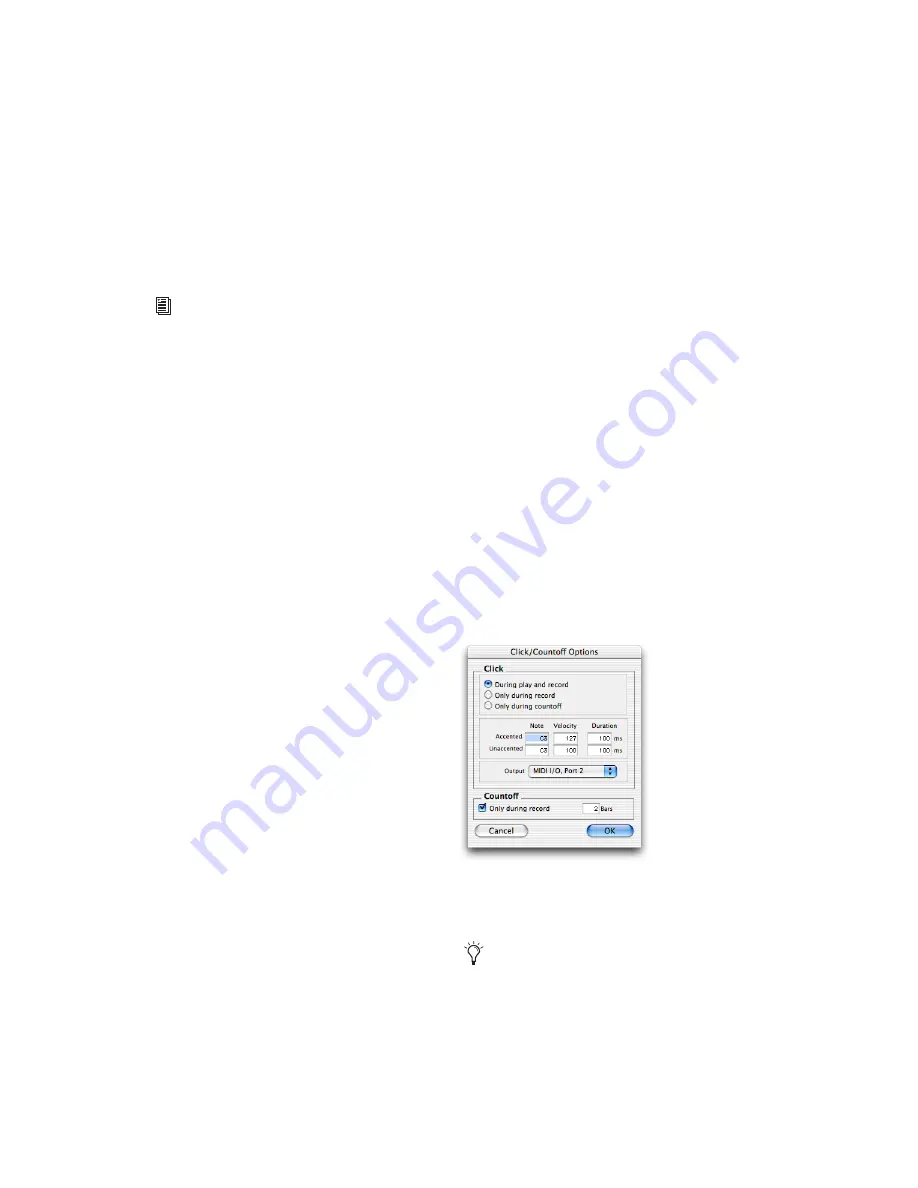
Click Options
Pro Tools provides options and controls for
driving a click. The following steps are for con-
figuring and enabling a click using the DigiRack
Click plug-in or MIDI.
To configure click options:
1
Open the Click/Countoff Options dialog by
doing one of the following:
• Choose Setup > Click.
– or –
• Double-click the Metronome Click or
Countoff button in the Transport window.
2
In the Click/Countoff Options dialog, do one
of the following:
• If using the DigiRack Click plug-in, select
None in the Output pop-up menu.
– or –
• If playing a click using MIDI, select the port
number (device) and channel for the click
from the Output pop-up menu.
3
Specify the note, velocity, and duration for
the accented and unaccented notes.
For more information on the Click plug-in,
see the DigiRack Plug-ins Guide.
Click/Countoff Options dialog
If one is connected, you can also play new
note values on a MIDI controller keyboard.
Summary of Contents for Pro Tools
Page 1: ...Pro Tools Reference Guide Version 7 3 ...
Page 15: ...1 Part I Introduction ...
Page 16: ...2 ...
Page 33: ...19 Part II System Configuration ...
Page 34: ...20 ...
Page 44: ...Pro Tools Reference Guide 30 ...
Page 94: ...Pro Tools Reference Guide 80 ...
Page 95: ...81 Part III Sessions Tracks ...
Page 96: ...82 ...
Page 108: ...Pro Tools Reference Guide 94 ...
Page 130: ...Pro Tools Reference Guide 116 ...
Page 269: ...255 Part IV Recording ...
Page 270: ...256 ...
Page 310: ...Pro Tools Reference Guide 296 ...
Page 345: ...331 Part V Editing ...
Page 346: ...332 ...
Page 402: ...Pro Tools Reference Guide 388 ...
Page 496: ...Pro Tools Reference Guide 482 ...
Page 548: ...Pro Tools Reference Guide 534 ...
Page 571: ...557 Part VI MIDI Editing ...
Page 572: ...558 ...
Page 596: ...Pro Tools Reference Guide 582 ...
Page 637: ...623 Part VII Mixing ...
Page 638: ...624 ...
Page 702: ...Pro Tools Reference Guide 688 ...
Page 771: ...757 Part VIII Video Sync Surround ...
Page 772: ...758 ...
Page 792: ...Pro Tools Reference Guide 778 ...
Page 806: ...Pro Tools Reference Guide 792 ...
Page 856: ...Pro Tools Reference Guide 842 ...