EDITING PATTERNS
244
b
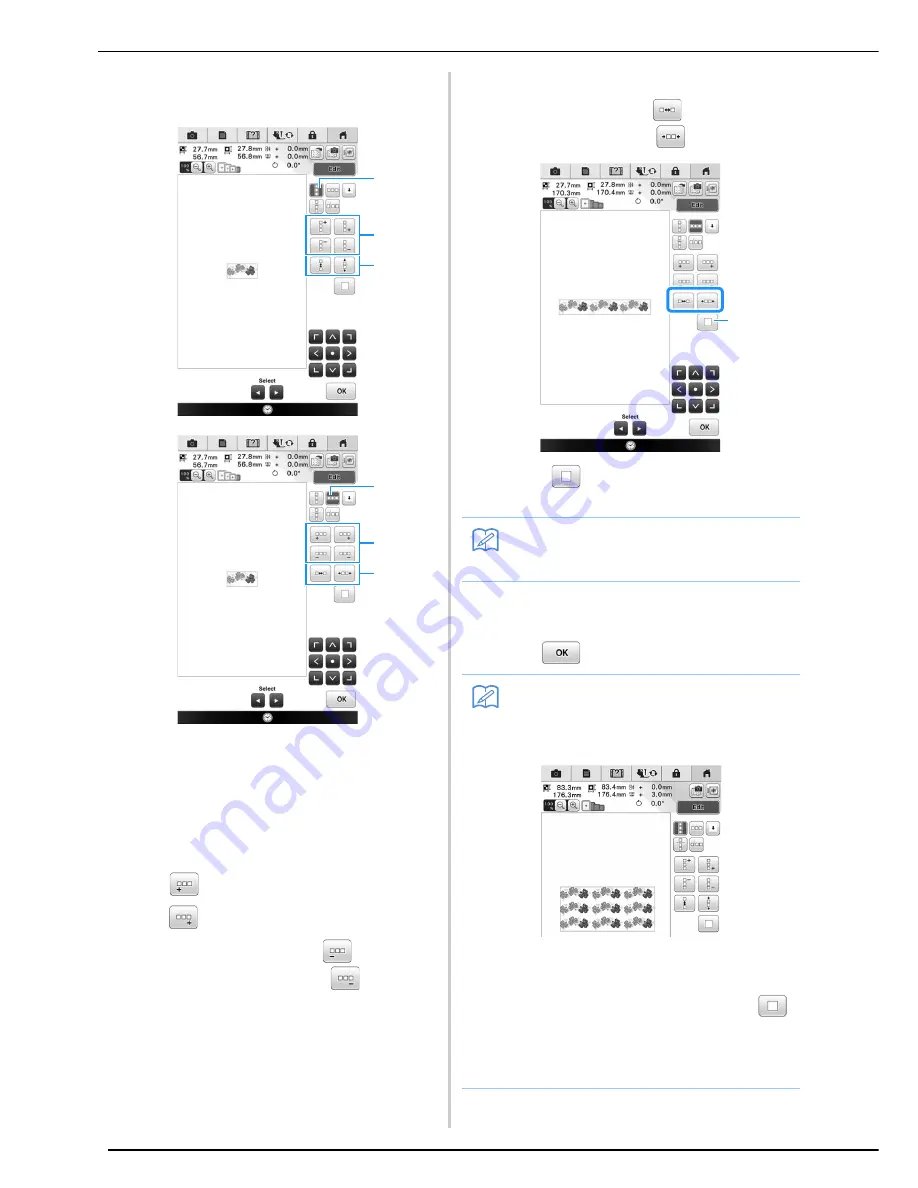
Select the direction in which the pattern
will be repeated.
a
Vertical direction
b
Horizontal direction
c
Repeating and deleting vertical keys
d
Repeating and deleting horizontal keys
e
Spacing keys
→
The pattern direction indicator will change
depending on the direction selected.
c
Use
to repeat the pattern on the left
and
to repeat the pattern on the right.
*
To delete the left pattern, press
.
*
To delete the right pattern, press
.
d
Adjust the spacing of the repeated pattern.
*
To widen spacing, press
.
*
To tighten spacing, press
.
a
Press
to change a repeated pattern back to
one single pattern.
e
Complete repeated patterns by repeating
steps
b
through
d
.
f
Press .
e
a
c
e
b
d
Memo
• You can only adjust the spacing of patterns
included in the red frame.
Memo
• When there are two or more patterns, all
patterns will be grouped together as one
pattern in the red frame.
• When changing the direction in which the
pattern will be repeated, all of the patterns
in the red frame will automatically be
grouped as one repeating unit. Press
to change a repeated pattern back to one
single pattern. See the following section on
how to repeat one element of a repeated
pattern.
a
Summary of Contents for 82-W20
Page 2: ......
Page 30: ...NAMES OF MACHINE PARTS AND THEIR FUNCTIONS 28 ...
Page 82: ...NEEDLE CALIBRATION USING THE BUILT IN CAMERA 80 ...
Page 170: ...SEWING THE STITCHES 168 ...
Page 190: ...COMBINING STITCH PATTERNS 188 Press Press ...
Page 198: ...USING THE MEMORY FUNCTION 196 ...
Page 210: ...USING STORED CUSTOM STITCHES 208 ...
Page 264: ...ATTACHING THE EMBROIDERY FRAME 262 b Pull the embroidery frame toward you ...
Page 286: ...ADJUSTMENTS DURING THE EMBROIDERY PROCESS 284 ...
Page 338: ...RESUME FEATURE 336 ...
Page 362: ...ILLUSTRATION SCAN 360 ...
Page 418: ......
Page 419: ......


