


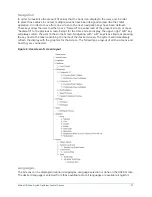


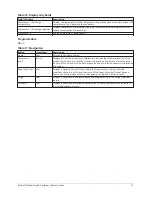


Table 3: Programmable
Button
Access level
Description
Login
View
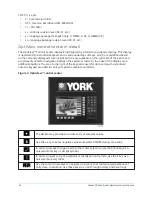
The OptiView™ Panel restricts certain operations based on password entry by the
operator. Three different access levels are provided as follows:
•
VIEW:
The panel defaults to the lowest access level which is termed VIEW. In
this mode, the chiller operating values and setpoints can be observed, but no
changes can be made.
•
OPERATOR:
The second access level is termed OPERATOR and will allow the
customer to change all of the setpoints required to operate the chiller system.
The OPERATOR access level reverts to the VIEW level after 10 continuous
minutes without a keypress.
•
SERVICE:
In the event that advanced diagnostics are necessary, a SERVICE
access level has been provided. Only qualified service personnel utilize this
access level. This level provides advanced control over many of the chiller
functions and allows calibration of many of the chiller controls.
The access levels are listed above in hierarchical order beginning with the lowest level
and proceeding to the highest level. Users logged in under higher access levels may
perform any actions permitted by lower access levels.
The
OPERATOR
access level is accompanied by a 10-minute timeout. After ten
successive minutes without a keypress, the panel will revert to the VIEW access
level. This prevents unauthorized changes to the chiller if a user was logged in at a
higher access level and failed to logout. Proper procedure requires that after making
necessary setpoint adjustments the user return to the Home Screen and logout.
Logout
Operator
This key is displayed when a user is logged in at any level other than
VIEW
. Pressing it
will return the access level to
VIEW
.
View
Use this key to generate a hard-copy report of the present system status. This provides
a snapshot of the primary operating conditions at the time the key is pressed. The
History page provides enhanced reporting capability. See
details.
Message Clear
Service
When certain safety or cycling conditions have been detected and the chiller has been
shutdown, the main status display of the chiller will continue to display a message
indicating the cause of the shutdown. Using this key, the message can be cleared once
the condition has been removed.
Warning reset
Operator
Use this key to acknowledge a warning condition and reset the message display
associated with it.
Soft shutdown
Operator
This key, displays as
Start
when the chiller is shut down. It changes to
Soft Shutdown
when the chiller is running. If both compressors are running, the soft shutdown
is performed on both compressors simultaneously. Otherwise it is performed on
whichever compressor is running. A Soft Shutdown fully closes the pre-rotation vanes
prior to shutting down the compressor. This reduces bearing wear by eliminating
compressor backspin at shutdown. Pressing this key causes the vanes to be driven to
the fully closed position. While the vanes are closing,
System Unloading Before
Shutdown
is displayed on the System Status line. When the vane motor switch (VMS)
closes, indicating the vanes have fully closed (or 3.5 minutes have elapsed, whichever
occurs first), the Run signal is removed from the compressor motor starter and
a “System Coastdown” is performed. While the vanes are closing, if a Local Stop
is initiated with the Compressor Switch or any fault other than “Leaving Chilled
Liquid Temp – Low Temperature”, “Remote Stop”, “Multi-Unit Cycling – Contacts
Open”, “System Cycling #X-Contacts Open” or “Control Panel – Schedule” occur, it
will immediately enter “System Coastdown”. To restart the chiller after an operator
initiated Soft shutdown, the Start button on the Home screen must be pressed if
in local or, if in remote, the BAS must command a restart after the Start button is
pressed.
Model YD Mod D with OptiView Control Center
30
Содержание YD Mod D
Страница 2: ...2 Model YD Mod D with OptiView Control Center...
Страница 8: ...Nomenclature Model YD Mod D with OptiView Control Center 8...
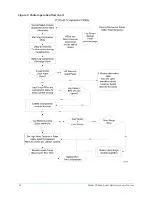
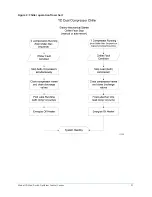
Страница 17: ...Figure 2 Chiller operation flow chart 17 Model YD Mod D with OptiView Control Center...
Страница 18: ...Figure 2 Chiller operation flow chart Model YD Mod D with OptiView Control Center 18...
Страница 19: ...Figure 2 Chiller operation flow chart 19 Model YD Mod D with OptiView Control Center...
Страница 20: ...Figure 2 Chiller operation flow chart Model YD Mod D with OptiView Control Center 20...
Страница 21: ...Figure 2 Chiller operation flow chart 21 Model YD Mod D with OptiView Control Center...
Страница 22: ...Figure 2 Chiller operation flow chart Model YD Mod D with OptiView Control Center 22...
Страница 150: ...Figure 57 Sample printout status Model YD Mod D with OptiView Control Center 150...
Страница 151: ...Figure 57 Sample printout status 151 Model YD Mod D with OptiView Control Center...
Страница 152: ...Figure 58 Sample printout setpoints Model YD Mod D with OptiView Control Center 152...
Страница 153: ...Figure 58 Sample printout setpoints 153 Model YD Mod D with OptiView Control Center...
Страница 154: ...Figure 59 Sample printout schedule Model YD Mod D with OptiView Control Center 154...
Страница 155: ...Figure 60 Sample printout sales order 155 Model YD Mod D with OptiView Control Center...
Страница 156: ...Figure 61 Sample printout history Model YD Mod D with OptiView Control Center 156...
Страница 157: ...Figure 61 Sample printout history 157 Model YD Mod D with OptiView Control Center...
Страница 159: ...Figure 64 Sample printout custom screen report 159 Model YD Mod D with OptiView Control Center...