41
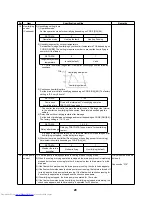
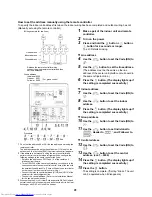
How to set the address manually using the remote controller
To specify the indoor unit address first when the indoor wiring has been completed and outdoor wiring has not
(Manually set using the remote controller)
*1 Do not set the address 29 or 30 if the line address is set using the
remote controller.
The address cannot be set on the outdoor unit. If it is set on the
outdoor unit, the test code [E04] (Communication error) appears.
*2 If the address is set manually using the remote controller and
perform central control between refrigerant lines, configure the
following settings to the center units for the lines:
• Set each line address on SW13 and 14 of the center unit
interface circuit board.
• Turn off SW30-2 of the center unit interface circuit board in the
lines connected to the same central control, except the line with
the smallest line address No. (There will be only one terminator
on the indoor / outdoor central control wiring.)
• Connect the relay connector between [U1U2] and [U3U4] of the
center unit for each refrigerant line.
• Then set the central address. (Refer to the Installation Manual
for the central control device.)
*3 When setting the Air to Air Heat Exchanger with DX Coil Unit and
normal indoor unit in the same group, do not set the Air to Air Heat
Exchanger with DX Coil Unit as the header.
1
Make a pair of the indoor unit and remote
controller.
2
Turn on the power.
3
Press and hold the
button for 4 seconds or longer.
The LCD starts blinking.
▼
Line address
4
Use the
button to set the Code (DN) to
.
5
Use the
button to set the line address.
(The address must be the same as the line
address of the center unit interface circuit board in
the same refrigerant line.)
6
Press the
button. (The display lights up if
the setting is completed successfully.)
▼
Indoor address
7
Use the
button to set the Code (DN) to
.
8
Use the
button to set the indoor
address.
9
Press the
button. (The display lights up if
the setting is completed successfully.)
▼
Group address
10
Use the
button to set the Code (DN) to
.
11
Use the
button to set Individual to
, Header to
, and Follower to
.
▼
Central address
12
Use the
button to set the Code (DN) to
.
13
Use the
button to set the central
address. (0001 – 0064)
14
Press the
button. (The display lights up if
the setting is completed successfully.)
15
Press the
button.
The setting is complete. ("Setting" blinks. The unit
can be operated when it disappears.)
(Wiring example for two lines)
Line address
ĺ
1
Indoor address
ĺ
1
Group address
ĺ
1
Out
Out
In
In
In
In
In
Header
Follower
Group address
Individual :0000
Header
:0001
Follower :0002
Release the remote controller wiring,
connect the wired remote controller and then
set the addresses.
For group control
Procedure
End
Содержание MD-VNK802HEXE
Страница 120: ...118 11Owner s Manual Excerpt ...
Страница 137: ...135 12Installation Manual Excerpt ...


