background image

Registering Applications

Direct Input 182

Registering Applications

An application must be registered before it can be used to access Direct 
Input mode. A variety of applications are compatible with Direct Input.

Registering an Application

1

Launch OmniPage if it is not already open.

2

Choose 

Register Applications...

 in the Settings menu.

This command is enabled only when 

Enable Direct Input 

is selected in 

the Direct Input settings panel.

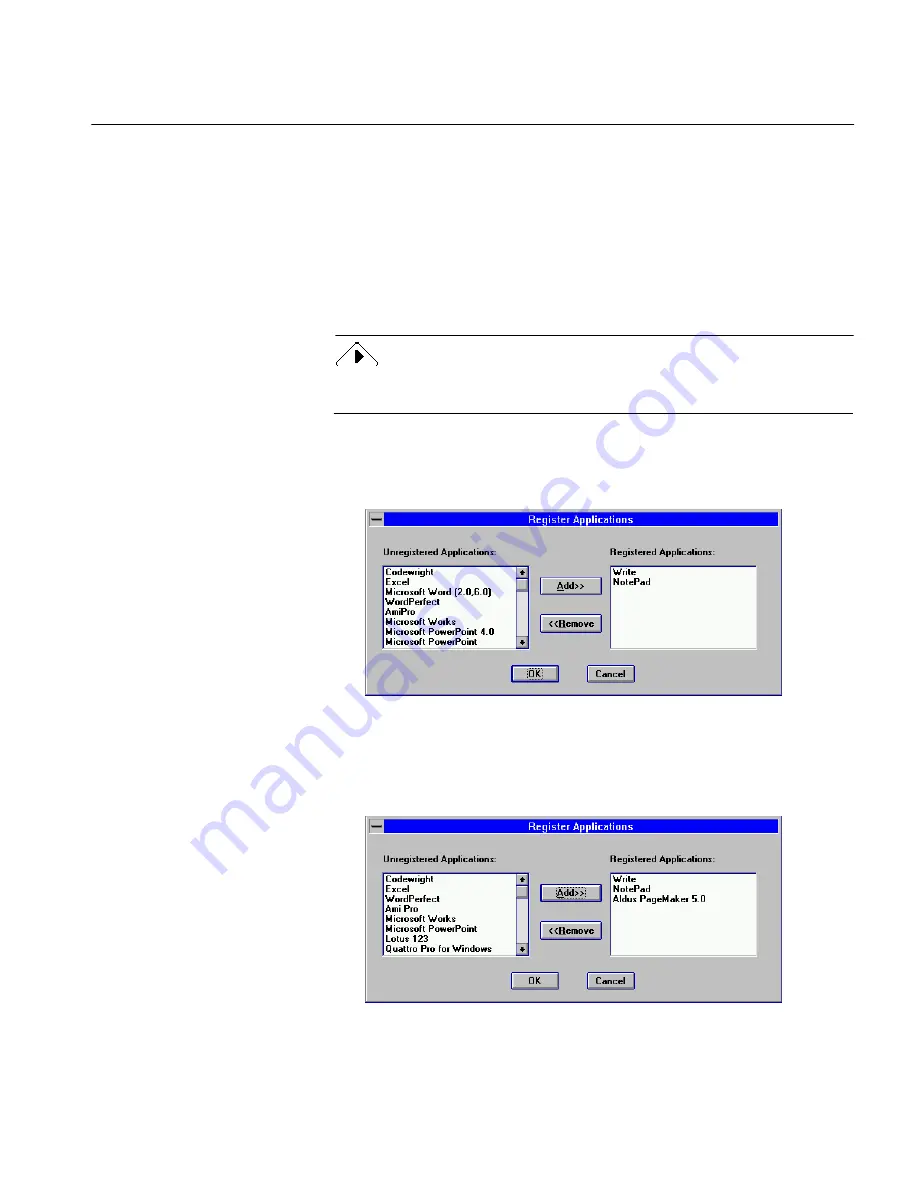
The Register Applications dialog box appears. It displays a list of 
all applications that are compatible with Direct Input. The 

Windows programs Write and NotePad are pre-registered.

3

Select an application to register in the 

Unregistered Applications 

list 

box.

4

Click 

Add>>.

The application moves into the 

Registered Applications

 list box.

Содержание OMNIPAGE PRO 6 - REFERENCE FOR WINDOWS

Страница 1: ...1 OmniPage Pro Version 6 for Windows Reference Manual...

Страница 2: ...duce you to basic scanning and many features of OmniPage Use the toolbar buttons in Adobe Acrobat Reader to view the Bookmarks or Thumbnails Clicking on the Bookmarks or Thumbnails navigates to the pa...

Страница 3: ...ion Copyright 1995 1997 Caere Corporation All rights reserved CAERE OmniPage OmniPage Professional Image Assistant AnyPage AnyFax 3D OCR and True Page are trademarks of Caere Corporation Many of the d...

Страница 4: ...es Omnipage Pro program OmniPage Pro online manual which can be printed OmniPage Reference manual if separately requested System Requirements To install and run OmniPage you need the following setup C...

Страница 5: ...ore installation This preserves your entries Move the 5 x user dictionary back to the omnipro directory after installation to overwrite the newer user dictionary A user dictionary from OmniPage or Omn...

Страница 6: ...lone The disk space used for a swap file is different than the disk space needed for temporary storage while you are working on a file Be sure to allocate enough free disk space for both a swap file a...

Страница 7: ...isk compression method consult its documentation regarding swap files 7 Select Permanent in the Type list 8 Type 8192 or greater in the New Size edit box and select Use 32 Bit Disk Access if it is ava...

Страница 8: ...Direct Input feature until you restart Windows See Chapter 5 Direct Input for information Scan Manager Installation You must install the Scan Manager if you plan to use a scanner with OmniPage Be sure...

Страница 9: ...te and select your scanner in the List of Scanners list box 6 Click Install The scanner appears in the Installed Scanners list box 7 Click Set As Default Scanner The scanner appears in the Default Sca...

Страница 10: ...the Caere Applications program group The Scanner Setup dialog box appears 3 Click Add 4 Insert the Scan Manager disk when prompted The dialog box expands to show a list of available scanner drivers 5...

Страница 11: ...9 Click Set As Default Scanner The scanner appears in the Default Scanner list box 10 Click Close Make sure the scanner you selected is already attached to your computer turned on and working when yo...

Страница 12: ...age 151 for information After 25 sessions the Registration dialog appears when you launch OmniPage but the program exits if you click Cancel Registering your copy of OmniPage entitles you to technical...

Страница 13: ...e Registration dialog box closes Refer to Chapter 2 Tutorials for an overview of OmniPage tools and recognition techniques The tutorials begin with basic scanning and an overview of the OmniPage windo...

Страница 14: ...rials are in this chapter Tutorial 1 Introduction to OmniPage Tutorial 2 Basic Text Recognition Tutorial 3 Working With Graphics Tutorial 4 Evaluating a Page Tutorial 5 Scanning a Single Column or Tab...

Страница 15: ...Quick Scan Page sample in this tutorial Launch OmniPage Double click the OmniPage icon in the Caere Applications program group to launch OmniPage The OmniPage window opens The toolbar contains an AUT...

Страница 16: ...for and defines characters on the image to produce editable text You can export the recognized text from OmniPage to a variety of word processing page layout and spreadsheet programs OCR is also refe...

Страница 17: ...utton to activate the buttons automatically depending on what is selected in the drop down lists In the following tutorial exercises you will select a processing option for each stage of OCR before yo...

Страница 18: ...text window 3 Choose Tile Vertical in the Windows menu so that you can see both the zone and text windows The zone window shows the scanned image of the page Note that although you can see the text yo...

Страница 19: ...he page you just scanned had a simple page layout with crisp black text on a clean white background Most settings work well with this type of page You will customize the Settings Panel options in late...

Страница 20: ...tions may look different than those pictured above depending on your scanner 6 Click Help The online Help program opens to Scanner Options This section of the Help program gives information on all the...

Страница 21: ...orials Save the files as directed during the exercises so you can use them in later exercises Scanning With the Default Settings You will select the default settings in this exercise observe the OCR p...

Страница 22: ...lick the OCR icon Retain Font and Paragraph Formatting is the default setting under the section Output Formatting Options This setting preserves paragraph order and formatting centered or left aligned...

Страница 23: ...Click the Zone button OmniPage determines column flow and automatically draws zones This shows how text and graphics will be ordered during OCR Your zones may be different depending on whether you are...

Страница 24: ...rs as OCR takes place The recognized document opens in a new maximized text window See the next section for an overview of the text window and its editing tools The Text Window The document s font and...

Страница 25: ...rification window opens You can still edit the word if this window is open Click anywhere outside the Verification window to close it 4 Click the Bold button in the text window The text becomes bold 5...

Страница 26: ...replace the word in the text Alternatively type the proper word in the Change To edit box If the word is correct Click Add to add the word to the User Dictionary The word will still be flagged if it i...

Страница 27: ...cessing file Save as a Caere Document 1 Click the Save As button or choose Save As in the File menu The Save As dialog box opens 2 Select Caere MET in the Save File as Type drop down list The data dir...

Страница 28: ...and image files A Caere Document can contain both text and zone window information from a recognized document An image file contains only an image You can save a Caere Document to multiple file format...

Страница 29: ...gs 1 Choose Open in the File menu to locate and open the multi met file if you did not leave it open after the previous exercise See Reopen the Document on page 28 for information 2 Click the Settings...

Страница 30: ...Arial and so would not change during OCR There are no monospaced fonts in the True Page sample so ignore these settings for now You can change the selection in any of the drop down lists and the font...

Страница 31: ...in the body of the text 4 Choose Font in the Format menu The Font dialog box appears 5 Verify that the font display matches the font you selected in the Serif Proportional drop down list in the Fonts...

Страница 32: ...r the previous exercise See Reopen the Document on page 28 for information 2 Click with your right mouse button on the OCR button to open the Settings Panel to the OCR settings 3 Select Ignore All For...

Страница 33: ...rcise True Page Recognition You may want to scan a document and retain not only font and paragraph formatting but also as much page layout as possible You can retain page layout by using the True Page...

Страница 34: ...Page Formatting Use this option when you want to duplicate page layout as closely as possible 4 Click Close 5 Click the OCR button 6 Click Yes in the dialog box that asks if you want to replace the c...

Страница 35: ...you save your document in an appropriate file format You will work with True Page frames in this exercise 1 Click the text window to make it active if it is not already 2 Choose Select Recognized Zon...

Страница 36: ...y and click the right mouse button This selects an individual frame 10 Repeat the Alt right mouse button click to deselect the frame 11 Leave the document open for the next exercise Deselect Retain Gr...

Страница 37: ...xt OmniPage re recognizes the page The text appears in the same format as before but has an empty space where the graphic was originally 8 Choose Close Document in the File menu 9 Click No in the dial...

Страница 38: ...setting 3 Leave the Settings Panel open 4 Choose Save Settings in the File menu The Save Settings dialog box appears Caere Settings files SET is the only selection in the Save Files of Type list box T...

Страница 39: ...ent in the File menu 8 Click No in the dialog box that asks if you want to save changes Load an Image File OmniPage can load zone and recognize TIFF and PCX files in the same way it does scanned docum...

Страница 40: ...tion 5 Click OK OmniPage loads the image file creates automatic zones on it performs OCR and then displays the recognized text in the text window Load Multiple Image Files You can load your own image...

Страница 41: ...order selected The new document starts at page two if you left the document from the previous exercise open Each subsequent document becomes a new page in the final recognized document Three one page...

Страница 42: ...ic You will use the True Page Sample in this tutorial Export a Graphic You will export the graphic on the True Page sample as an individual graphic file in this exercise Select Settings 1 Click the dr...

Страница 43: ...he page being viewed 3 Select Save Each Graphic Zone to a File under Image Options There is one graphic zone on this page the image of the woman OmniPage will export just this image and none of the te...

Страница 44: ...page or any kind of page can present and how to correct those problems It also gives a basic introduction to manual zoning at the same time It contains the following exercises Overcoming Recognition...

Страница 45: ...Multiple Columns The page has multiple columns so this setting is appropriate OCR Retain Graphics You will retain the Caere logo in this exercise OCR True Page Retain All Page Formatting This setting...

Страница 46: ...r example The Problems to be Solved You may find some or all of the following recognition difficulties 1 Note that the Caere logo was not reproduced OmniPage tried to recognize it as text This is beca...

Страница 47: ...to recognize the tiny squares at the bottom of the page because they are easily confused with text You might see tildes or other characters here You will not always need all the information on a page...

Страница 48: ...standardized pages The next exercises cover the first three circumstances Creating a zone template is covered in the next tutorial Manual Zones Recognize Portions of a Page You can recognize portions...

Страница 49: ...on to zoom out of the image 7 Click the Draw Zones tool 8 Place the cursor by the Caere logo hold down the mouse button and drag the cursor to draw a rectangular zone around the title Leave out the vo...

Страница 50: ...ill zone this separately in another exercise You should now have five zones as pictured below Manual Zones Specify Zone Contents 1 Click in the zone around the Caere logo to make it active Handles app...

Страница 51: ...ognize just the columns in a different order Reorder the Zones 1 Click the Erase Zones tool 2 Click the first two zones to erase them OmniPage will recognize just the three columns 3 Click the Order Z...

Страница 52: ...2 Select Retain Font and Paragraph Formatting This setting allows you to see the reordered text in the text window Text would still be reordered with the True Page setting but you would have to export...

Страница 53: ...ed area in this case is too dark for the auto brightness settings to help much You may find adjusting brightness manually works better You will re recognize just the A Little Background article to imp...

Страница 54: ...at kind of scanner you have 5 Drag the slider box to the left on the slider toward Lighten You may have to experiment to find the optimum scanning brightness For now try to position the slider box app...

Страница 55: ...e and rescan The right image above has the right brightness setting The text outside the A Little Background article is lighter than the text inside the article you can use the Zoom tool to enlarge th...

Страница 56: ...n the left above still shows some of the shaded background Set the brightness to a lighter setting and rescan after OCR The Character window in the middle above shows thin broken characters Set the br...

Страница 57: ...ow have two pages with portions of recognized text on each You can cut and paste the text in the A Little Background Article into the text from the rest of the newsletter 1 Select the text in the A Li...

Страница 58: ...d in this tutorial You will also learn how to speed processing and increase recognition accuracy by creating a zone contents file and a zone template There are three exercises Recognize a Memo With a...

Страница 59: ...ont and Paragraph Formatting This option preserves the formatting of the page but not its layout as True Page would On the sample page for example True Page would interpret the wide spacing between se...

Страница 60: ...open for the next exercise Create a Zone Contents File You can speed OCR and minimize potential recognition errors by creating your own zone contents file Depending on the font and image quality Omni...

Страница 61: ...make sure your letters are uppercase as in the example The highlighted characters are replaced with the ones you enter 4 Click Save The Save dialog box opens 5 Type finance in the File Name text box 6...

Страница 62: ...wn list 8 Click the OCR button 9 Click Yes in the dialog box that asks if you want to replace the current text OmniPage recognizes each of the zones according to the zone contents you specified Becaus...

Страница 63: ...rform the previous exercise Draw and Specify Zones if you did not leave the document open 2 Choose Save Zone Template in the File menu The Save Zone Template File dialog box appears 3 Caere Zone zon i...

Страница 64: ...observe the setting in the Zone Contents drop down list to verify that your zone template is correct You could use this template on any similar documents You can create zone templates for any page th...

Страница 65: ...ngle Column or Table Page sample in this exercise Scan a Document With Special Characters 1 Place the Single Column or Table Page sample in your scanner making sure it is aligned correctly 2 Click the...

Страница 66: ...unrecognizable characters with red tildes 2 Double click a red tilde if you have any such as the one after the word LUMINA in the example above The Verification window opens to show the original scan...

Страница 67: ...ialog box The Train Characters Dialog Box Characters OmniPage had trouble identifying are displayed at the top of the dialog box Beneath each image in smaller type is OmniPage s attempted identificati...

Страница 68: ...lick the symbol It appears in the Character edit box If a symbol or character does not appear in the list you can type it in the Character edit box cut and paste it from another source or use an Alt n...

Страница 69: ...in the dictionary Save the File and Recognize the Document 1 Click the Save button The Save dialog box appears 2 Type a file name in the File Name edit box 3 Click OK A dialog box asks if you want to...

Страница 70: ...ent and on a saved document Use the Quick Scan Page sample and the True Page sample in this tutorial This tutorial contains the following exercise Scan Multiple Pages and Defer OCR Finish Current Docu...

Страница 71: ...n later You will finish the current open document in the next exercise Finish Current Document In the normal course of a day you may decide to leave scanned or loaded documents open in OmniPage and fi...

Страница 72: ...his save option 8 Click OK to return to the Finish Current Document dialog box 9 Click OK to begin OCR OmniPage recognizes each page and saves it as specified The Caere Document remains open in OmniPa...

Страница 73: ...urn to this section OmniPage scans and zones the pages You now have a two page document open in the zone window 2 Choose Save As in the File menu The Save As dialog box appears 3 Locate the omnipro in...

Страница 74: ...box This is where OmniPage looks by default for deferred files OmniPage assigns a a file format to your file based on the last selected file format In the previous example Word for Windows was the se...

Страница 75: ...R 3 Click OK OmniPage opens and recognizes the new met file and then saves it as specified You now have three more new files in the output directory The Quick Scan sample is named new001 The True Page...

Страница 76: ...rom your application A variety of applications are compatible with Direct Input You will register a compatible application in this exercise if you have one 1 Launch OmniPage if it is not already open...

Страница 77: ...of the registered application s 7 Choose Exit in the File menu Launch Direct Input 1 Place the Quick Scan Page sample in your scanner making sure it is aligned properly 2 Open or switch to any regist...

Страница 78: ...e Direct Input window appears Direct Input Mode Always select the appropriate settings before you begin the OCR process 1 Click the drop down list under each process button and select these options Sc...

Страница 79: ...P at any time to cancel processing but remain in Direct Input mode OmniPage scans zones and recognizes the document in the Direct Input window Then the program exits your initiating application appear...

Страница 80: ...Direct Input Mode Tutorials 80...

Страница 81: ...u The menu command information is listed in the same order in this chapter that the commands appear in the menu See Chapter 5 Direct Input for an explanation of the different toolbar options and menu...

Страница 82: ...looks for and defines characters on the image to produce editable text You can export the recognized text from OmniPage for use in a wide variety of applications The toolbar s process buttons perform...

Страница 83: ...ly You can also click AUTO to finish processing the current page of an open document The resulting operation depends on the state of the page and the selected Image Zone and OCR commands If the page i...

Страница 84: ...CX When you load an image file in OmniPage it appears in the zone window See Supported Input File Formats on page 239 for a list of files OmniPage can load Click the STOP button in the toolbar to canc...

Страница 85: ...out each of these options see Zones Options on page 163 If the current page already has zones when you select this command you are prompted to delete the current zones Click Yes to have OmniPage delet...

Страница 86: ...rming OCR make sure the appropriate OCR options are selected in the Settings Panel If there are no zones on the page when you select Perform OCR and click the OCR button OmniPage automatically creates...

Страница 87: ...hortcut command buttons perform the same functions as the commands of the same name in the File Edit Settings and Help menus For example you can click the Settings Panel button in the toolbar to open...

Страница 88: ...ent to open a Caere Document met or an image file A Caere Document is created the first time you scan a page or load an image file This is a proprietary OmniPage file format See Caere Document met on...

Страница 89: ...d its original image in the zone window In either case the first page of your file is displayed Click Cancel to exit without opening a file An image file becomes a Caere Document once it is opened wit...

Страница 90: ...of recognized text from your currently open document This command only appears if you have a MAPI compliant mail system such as Microsoft Mail Save Choose Save to write the contents of your current w...

Страница 91: ...ell You must perform OCR on any document before you can save it to a text format 3 Type a name for your file in the File Name text box See the next section for information on how the save option you c...

Страница 92: ...images as a Caere Document however requires more room on the hard drive The amount depends on the size of the image s Save Options When you save your document to a file format other than a Caere Docum...

Страница 93: ...n graphics Graphics are only displayed in applications that support graphics Normal differences in typeface sizes between applications can result in differences in the page formatting and display of t...

Страница 94: ...ile formats 3 Type a name for your file in the File Name text box See Graphic File Name on page 96 for information on how the options you choose affect the length of the file name 4 Select a location...

Страница 95: ...n a page to an image file Image Options You can select one of two Image Options Select Save Each Graphic Zone to a File if you want OmniPage to save only the graphics within your page image You must c...

Страница 96: ...s a letter to indicate the order of the graphic on the page A PCX file with multiple graphic zones named form would be saved as forma pcx formb pcx and so forth This creates one file for each graphic...

Страница 97: ...a better copy of the page or to enter the text manually The Get Accuracy Info dialog box provides a statistical report for the most recently recognized page Number of Characters This is the number of...

Страница 98: ...er second cps The formula is total number of characters recognition time cps Accuracy Rate This is the character recognition accuracy given as a percentage The formula for Accuracy Rate is number of c...

Страница 99: ...location is omnipro data 7 Click OK Choose Load Settings in the File menu to load the file See the next section Load Settings Choose Load Settings to load a previously saved settings file set A loade...

Страница 100: ...various zone attributes such as position order and zone contents If you frequently process documents with layouts and content that require the same type of zoning you can create and save a zone templ...

Страница 101: ...to start the print job Click Cancel to exit without printing or saving the selected print options Publish to Envoy Choose Publish to Envoy to save recognized text and any retained graphics as a Novell...

Страница 102: ...selected automatically 2 Click OK The Save Envoy Runtime As dialog box appears Envoy Runtime Files exe is the selection in the Save Files as Type drop down list 3 Type a name for your file in the Fil...

Страница 103: ...n the regular Envoy viewer if you have the complete version of Envoy installed You can print annotate and share this file on any the system Descriptions appear on the Envoy title bar at the top of the...

Страница 104: ...oard This command is also available as a button in the toolbar 1 Select the text you want to cut 2 Choose Cut or click the Cut button The selected text disappears and is copied to the Clipboard Text s...

Страница 105: ...permanently 1 Select the text you want to clear 2 Choose Clear Cleared text is not copied to the Clipboard Clear All Zones Choose Clear All Zones to delete all zones on a page image in the zone window...

Страница 106: ...er is the default Words not found in the main or user dictionary When OmniPage finds a suspect word the Check Recognition dialog box shows the original image of the word as it appeared in the original...

Страница 107: ...pears as the first word in the list box in case you want to change it back Done Click this to exit the Check Recognition operation Any changes made up to this point will be retained Choose Save in the...

Страница 108: ...rification window to close it The Verification window may not show an accurate image for text that is cut and pasted from one page to another Find Replace Choose Find Replace to find a word or set of...

Страница 109: ...t you want to replace in the Find What edit box 2 Type the desired replacement word in the Replace With edit box 3 Select specific search options if desired Select Match Whole Word Only to find only t...

Страница 110: ...e handles on the frames 2 Click in the graphic zone to delete The zone you clicked in is deleted but other zones are not You can also delete a text zone this way See the next section for more informat...

Страница 111: ...hoose Delete Current Page to delete the page being viewed You may want to delete a page in your document that was poorly scanned or recognized A dialog box prompts you to confirm the selection if Prom...

Страница 112: ...edit box Click OK to go to the selected page Click Cancel to exit and return to the current page OmniPage opens the last page if you type a number greater than the actual number of pages If you accide...

Страница 113: ...r section of text in a recognized document Fonts options are also available as buttons in the toolbar as described later in this section Applying Character Formatting 1 Select the text you want to for...

Страница 114: ...box Effects Select Underline to change selected characters to an underlined format Font Style Buttons You can also use the Bold Italics and Underline buttons in the text window to format selected tex...

Страница 115: ...ter for center aligned text Select Right for right aligned text Select Justify for justified text 5 Click OK to format the selected paragraph s You can also use the buttons in the text window to forma...

Страница 116: ...agraphs You can place your cursor in a paragraph if you want to format just one 2 Click the appropriate Line spacing button Alignment Buttons You can use the Alignment buttons in the text window to al...

Страница 117: ...Process menu commands that appear only in Direct Input mode Auto Choose Auto to automatically start and finish processing each page of a new document or finish processing the current page of an open d...

Страница 118: ...may want to stop scanning your page if you realize that the page is misaligned or that the wrong zoning method was set Scan Image Choose Scan Image to scan a page in your scanner This command performs...

Страница 119: ...rking document Adding a Page to a Scanned Image A scanned image becomes your working document If a document is already open when you begin to scan the newly scanned image can be added to it The newly...

Страница 120: ...ll to add all files in the selected directory Select a file and click Remove to remove it from the Selected Files list box Click Remove All to remove all files from the Selected Files list box Click C...

Страница 121: ...u have selected all the files to load OmniPage loads zones and recognizes each file in the order it was selected If you had selected a non automatic processing option such as Manual Zones you would dr...

Страница 122: ...ones on a scanned or loaded page image in the zone window Each zone has a number indicating its recognition order This command performs the same function as the Zone button when Auto Zones is selected...

Страница 123: ...one numbers disappear 2 Click in a zone The number 1 appears in the zone It will be recognized first 3 Click in another zone The number 2 appears in the zone It will be recognized second 4 Continue un...

Страница 124: ...options see Zones Options on page 163 You are prompted to delete the current zones before zoning if a page already has zones Click Yes to proceed Use the manual zone tools to draw reorder resize move...

Страница 125: ...Resizing Zones 1 Click the Draw Zones tool 2 Click a zone to select it Handles appear on the zone border 3 Hold your cursor over a handle so that it turns into a two way arrow 4 Hold the mouse button...

Страница 126: ...nts files to manually drawn zones for better recognition accuracy For example if your image has a text paragraph followed by a table or numbers you can draw separate zones around each and assign an al...

Страница 127: ...all zone template files in the omnipro data directory the default location for these files 2 Select the zone template to use for the current page image 3 Click OK OmniPage draws zones on the page imag...

Страница 128: ...n Defer OCR is selected in the drop down list OCR can be a time and memory intensive process so you may want it to take place while you are away from your computer For example you can load or scan mul...

Страница 129: ...r Training File 1 Open an image file or scan an image that includes the characters you want to train 2 Create manual or automatic zones on the document 3 Choose Train OCR in the Process Settings casca...

Страница 130: ...cause identification problems common errors such as a 5 being recognized as an S characters in a specialized font such as Zapf Chancery The next section explains how to identify or specify characters...

Страница 131: ...cters as necessary You can select a specified character and click Delete to remove it from the Train Characters dialog box 5 Click either Append or Save when you are done See the following sections fo...

Страница 132: ...directory This is the only place OmniPage looks for the files A dialog box asks if you want to make this the current training file and recognize your document Click Yes to recognize your page image an...

Страница 133: ...is section starting on page 117 Finish Current Document Choose Finish Current Document to finish recognition of an open document OmniPage uses the currently selected Settings Panel options to finish p...

Страница 134: ...ave As The Save As dialog box appears 3 Select a file type for your saved file in the Save Files as Type drop down list 4 Type a name for your file in the File Name text box 5 Select a location for yo...

Страница 135: ...recognition during automatic processing See Defer OCR on page 128 for more information Deferred documents must be saved as Caere Documents or as image files in order to reopen and process them You mu...

Страница 136: ...directory appear in the Files to Finish list box See Supported Input File Formats on page 239 for a list of supported file formats OmniPage assigns each file a format based on the last selected forma...

Страница 137: ...Set a time using the up down arrows 6 Click OK Click Cancel if you want to exit the dialog box without saving any changes and without performing OCR OmniPage opens and recognizes all documents listed...

Страница 138: ...all files in a selected directory to the Selected Files list box Select a file in the Selected Files list box and click Remove to remove it from the list Click Remove All to remove all files from the...

Страница 139: ...tory where OmniPage will look for your deferred documents You can click Set Output Directory to choose a directory to which the deferred documents will be saved after OCR Both these buttons are descri...

Страница 140: ...affect the length of the file name you can assign Set Input Directory Click Set Input Directory to set a default directory for your deferred files This opens the Select Input Directory dialog box It o...

Страница 141: ...all the files in the Files To Finish list box You can select a file and click Save As to change the file type or location to which the file will be saved after recognition as described previously in t...

Страница 142: ...so available as a button in the toolbar The Settings Panel is the central location for document processing settings There are seven panels in the Settings Panel dialog box Scanner Zones OCR Fonts Spel...

Страница 143: ...y Select only one language if you use the Language Analyst or 3D OCR Selecting a Language 1 Click once on a language to select it 2 Select as many languages as you need Selected languages are highligh...

Страница 144: ...r system An application must be installed however to use it to initiate Direct Input 2 Click any application on the left to select it 3 Click Add The application moves into the Registered Applications...

Страница 145: ...ist OmniPage during text recognition and allow better recognition accuracy of special characters See Train OCR on page 129 for detailed information on how to create a training file See Deleting set tr...

Страница 146: ...page 131 for detailed information Click Cancel to exit without saving the edits to the training file Edit Zone Contents File Choose Edit Zone Contents File to create a new zone contents file or edit...

Страница 147: ...haracter set More characters are in the Extended ANSI list box to the right Click in the Zone Contents edit box and delete or add characters as needed If you do not click first to deselect the edit bo...

Страница 148: ...edit box contains characters you specified previously More characters are in the Extended ANSI list box to the right Click in the Zone Contents edit box and delete or add characters as needed If you d...

Страница 149: ...existing dictionary select a file and click OK To create a new dictionary click New Enter a name in the dialog box that appears and click OK Whether you are creating a new dictionary or editing an ex...

Страница 150: ...tion OmniPage will go through the selected text file discard words already in the main or other user dictionaries and add the remaining words to your current user dictionary Click Export to save your...

Страница 151: ...dialog box appears on launch but if you click Cancel the program exits Registering your copy of OmniPage entitles you to technical support notification of special offers and upgrades and the lowest pr...

Страница 152: ...t to activate Tile Vertical Choose Tile Vertical to resize the open zone and text windows so they fit in the window area vertically To switch windows click the window that you want to activate Cascade...

Страница 153: ...nto view Text Window Choose Text Window to bring the text window into view Zoom In Choose Zoom In to enlarge an area of an image in the zone window for a close up view You can also click the Zoom tool...

Страница 154: ...ts for a list of the topics available in the OmniPage Help program The Help program conforms to the Windows Help standard Procedures Choose Procedures for a Help listing of procedures for different Om...

Страница 155: ...llowing topics are included Settings Panel Overview Scanner Options Zones Options OCR Options Fonts Options Spelling Options Direct Input Options Preferences Options The options in each settings panel...

Страница 156: ...lect the zoning option that determines how text is organized during recognition Click the OCR icon to select input options that assist OmniPage during recognition and output options to set formatting...

Страница 157: ...Columns is selected when you open the Settings Panel You open the Settings Panel select One Zone and exit OmniPage without closing the Settings Panel The next time you launch OmniPage Multiple Column...

Страница 158: ...be the page size and orientation of the document you want to recognize Size The Size drop down list box lets you select the dimensions of the pages you are scanning Select Letter for 8 5 by 11 size pa...

Страница 159: ...ADF and click the AUTO button the first page is scanned and processed and then the next page This process continues until the ADF is empty OmniPage uses the same settings and processing commands for e...

Страница 160: ...paper and print quality in much the same way you would adjust brightness on a copier Depending on the quality of your page the option you choose can greatly affect recognition accuracy You can select...

Страница 161: ...high recognition accuracy This option is only available with supported grayscale scanners When to Use AnyPage HP AccuPage 2 technology automatically adjusts images to get the optimum brightness level...

Страница 162: ...nning and the Brightness Setting on page 53 for examples When to Use Another Setting Recognition accuracy is highest using AnyPage HP AccuPage 2 and 3D OCR technologies These two options are only avai...

Страница 163: ...thin each zone OmniPage also uses the selected zoning method to draw and order zones on the page image when you choose the Auto Zones processing command Multiple Columns Select Multiple Columns if you...

Страница 164: ...want recognized text displayed in one column with any retained graphics at the end OmniPage ignores font and paragraph formatting and does not attempt to reproduce page layout Single Column or Table...

Страница 165: ...One Zone Select One Zone if you want OmniPage to recognize the entire page area as a single text zone This option does not retain graphics even if they are defined How it Works OmniPage does not repr...

Страница 166: ...t of the recognized document Use your right mouse button to click the OCR button in the toolbar when it is active and automatically open the Settings Panel to OCR options Input Options Input options d...

Страница 167: ...ning files that you create appear in this list A character training file is a set of pre recognized text characters that OmniPage compares with the characters in the page image during recognition For...

Страница 168: ...you may want to deselect the Language Analyst to increase recognition speed Inappropriate Word Replacement If any words in your document such as company specific terms are replaced inappropriately dur...

Страница 169: ...so OmniPage automatically distinguishes graphics from text If you select Single Column or Table or One Zone in the Zones settings panel you must create zones manually and identify graphics with the G...

Страница 170: ...t True Page Retain All Page Formatting as the OCR output option if you want the recognized document to match the original page layout as closely as possible Select True Page formatting only if you wan...

Страница 171: ...e Columns is selected in the Zones settings panel The frames are exported intact when you save a document in an appropriate file format and open it in an application that supports frame based layouts...

Страница 172: ...tead as a page with side by side columns If you also selected Retain Graphics any graphics in your document would appear at the bottom of the page You must also select Multiple Columns as the zoning m...

Страница 173: ...ttings panel This option does not retain the original page layout If you selected Retain Graphics any graphics in your document would appear at the bottom of the page This option is useful if you need...

Страница 174: ...Character spacing varies depending on each character short lines finish off the letter strokes The body text in this manual is Palatino a serif proportional font Sans Serif Proportional Character spac...

Страница 175: ...universal font and font size for recognized text in your document if you chose Ignore All Formatting in the OCR settings panel Select a font in the Font drop down list box and a font size in the Font...

Страница 176: ...list box User dictionaries have the file extension ud Your default user dictionary is user ud To create a new user dictionary or edit an existing user dictionary choose Edit User Dictionary in the Set...

Страница 177: ...ognition on a page or they will not take effect during the check recognition process This is because OmniPage compiles its list of suspect word during OCR from the page being recognized Direct Input O...

Страница 178: ...d the choices in the process button drop down lists are set correctly before you begin automatic processing Direct Output Options You can select the following options under Direct Output Formatting Op...

Страница 179: ...ch Tab with a Space OmniPage replaces areas between text of approximately five or more spaces with a tab during recognition Select this option to replace these areas with one space instead of a tab Do...

Страница 180: ...you want OmniPage to prompt you before carrying out the Delete Page command This gives you the option of canceling the operation before deleting a page Save Settings on Quit Select this if you want to...

Страница 181: ...atible application Most commands and settings in Direct Input mode are the same as those found in the regular OmniPage mode This chapter describes the differences Refer to Chapter 3 Commands and Setti...

Страница 182: ...hoose Register Applications in the Settings menu This command is enabled only when Enable Direct Input is selected in the Direct Input settings panel The Register Applications dialog box appears It di...

Страница 183: ...ry 1 Choose Register Applications in the Settings menu to open the Register Applications dialog box 2 Select an application in the Registered Applications list box 3 Click Remove The application name...

Страница 184: ...closed OmniPage switches to Direct Input mode if it was already open or was running as a desktop icon If a document is open in OmniPage at the time a dialog box prompts you to close and save the Omni...

Страница 185: ...detailed information on how your settings affect OCR output Acquiring an Image When no Image is Open Automatic processing begins immediately if you selected Click the AUTO button on launch in the Dire...

Страница 186: ...to Zones or a zone template but did not click AUTO You can draw zones manually after an image is loaded or scanned if Manual Zones is selected under the Zone button Remember that Direct Input does not...

Страница 187: ...ings for Direct Input It is always important to select the right settings before processing Use the Settings Panel the toolbar and the menu items to set your processing options before scanning a page...

Страница 188: ...Empty Select Scan Multiple in the Image button drop down list in Direct Input mode instead if you want to scan multiple pages Double sided pages Direct Input mode does not support recognition of doubl...

Страница 189: ...same function as it does in the OmniPage mode It initiates automatic processing when clicked It uses the selected options in each process button to process a document Image Button Select Scan Multiple...

Страница 190: ...o your open registered application after OCR Select Copy to Clipboard to copy recognized text to the Clipboard after OCR OmniPage does this automatically if you close a registered application or if th...

Страница 191: ...to Clipboard Choose Copy to Clipboard to copy recognized text to the Clipboard after OCR OmniPage does this automatically if you close a registered application or if there is no document open in the...

Страница 192: ...ocuments differently depending on the type of page you process and the Settings Panel options you select To get the most benefit out of True Page learn how to identify your page type and select the ap...

Страница 193: ...around to modify your document s page layout Single Column or Table or One Zone If you select one of these as your zoning method True Page does not use frames to preserve the positioning of text and g...

Страница 194: ...if you wanted to incorporate a newspaper article into your own newsletter you would perform OCR on the text and graphic elements of the article and then put this information into your own page layout...

Страница 195: ...s paragraphs and graphics Glance quickly at your page if separate areas are not immediately obvious then you probably should draw zones manually to distinguish these separate areas True Page is effect...

Страница 196: ...h Formatting and Ignore All Formatting options However if your OCR goal is to get editable text and then extensively format your document s format and layout in another application select the Ignore A...

Страница 197: ...s may vary True Page results may vary for different page types Experiment with various settings to get the best results for your particular page The next sections describe different types of pages and...

Страница 198: ...structure and text and graphic positioning of the original page Although the document is formatted in frames in the OmniPage text window these frames are not retained when you save the document to ano...

Страница 199: ...ext and graphic positioning of the original page Tabs are used to preserve side by side formatting in tables spaces are used if OmniPage detects less than five spaces between columns Although the docu...

Страница 200: ...of one column and multiple column layouts If you use True Page for combination documents select the Multiple Columns zoning method for best results True Page tries to replicate the font attributes par...

Страница 201: ...or example try drawing zones manually if auto zoning does not work well to retain all elements on a page Example Combination Page One column format Two column format select Multiple Columns in the Zon...

Страница 202: ...ttings Panel options that are particularly important to True Page output include OCR Options Zones Options Fonts Options OCR Options Select True Page Retain All Page Formatting in the OCR settings pan...

Страница 203: ...thod you select in the Zones settings panel regardless of whether you draw zones manually or OmniPage creates zones automatically For True Page output select either Multiple Columns or Single Column o...

Страница 204: ...hort lines finish off the letter strokes character spacing varies depending on each character For example Times New Roman Sans Serif Proportional letter strokes do not have finishing lines character s...

Страница 205: ...t in another file format depends on the target application You will find recommended True Page applications in the Save Files as Type drop down list when you save your recognized document These file f...

Страница 206: ...Refers to Frames Editing Frames Getting Started Microsoft Word for Windows 6 x Choose Page Layout in the View menu Frame Click an area of text to display its frame border Click the border handles appe...

Страница 207: ...actual look of it In Normal view it appears in a one column layout Frames are normally invisible Click a frame to see its border To see all frame borders choose Options in the Tools menu and select t...

Страница 208: ...and general advice on how to speed up recognition make recognition more accurate and streamline your OCR workflow The following topics are included Improving Speed Improving Accuracy Legal Documents S...

Страница 209: ...Power This affects speed the most A Pentium computer is faster than a 486 which is faster than a 386 and so on You should have a minimum of 8MB RAM but as with most CPU intensive programs more memory...

Страница 210: ...printed on white paper recognition is faster with the Language Analyst turned off This is because the Language Analyst requires time to evaluate words compute likely errors and determine replacement w...

Страница 211: ...se Settings Panel in the Settings menu to open the Settings Panel Scanner Settings and Accuracy 3D OCR with AnyPage HP AccuPage 2 Select this setting to scan poor quality pages pages with very small t...

Страница 212: ...recognition See the next section The Character Window The Character Window Sometimes a small manual adjustment to brightness can make a big difference in recognition accuracy for users who have black...

Страница 213: ...hten and rescan The Language Analyst and Accuracy Select Use Language Analyst in the OCR Settings Panel for improved accuracy on most documents The Language Analyst uses information about language con...

Страница 214: ...age in the scanner correctly it is still possible for the page to be turned slightly so that text will be difficult to recognize The final document may have missing characters split lines of text or w...

Страница 215: ...or reformatting You may want to draw manual zones in some circumstances If numbers on pleading papers are printed less than five spaces from the text OmniPage will consider the numbers to be part of...

Страница 216: ...ou can create new zone contents files for special characters that your spreadsheet may contain See Save Zone Template on page 100 Foreign Language and Multilingual Documents For the best possible reco...

Страница 217: ...can order a dictionary for that language from your Caere distributor or by calling Caere in the United States at 800 535 SCAN Multilingual Documents You may want to recognize a document written in mor...

Страница 218: ...ot selected 5 Scan or load your document 6 Draw zones around just the French portions of the text when OmniPage opens the zone window 7 Click the OCR button when you are done zoning OmniPage recognize...

Страница 219: ...example OmniPage will process all documents according to your settings You can then save the documents as a single file or as several smaller files You must select either Auto Zones or a zone templat...

Страница 220: ...page file Create one file per page The pages would be saved as 25 one page files Create new file at each blank page Insert blank pages as separators into a stack of one sided documents All pages follo...

Страница 221: ...nter a name with up to five characters OmniPage adds three numbers to each file name to make it unique For example if you typed file in the File Name box the first batch is saved as file001 the second...

Страница 222: ...ormats Error Messages Caere Product Support Many error messages in OmniPage are self explanatory and offer a solution Some are explained in more detail in this chapter these are listed alphabetically...

Страница 223: ...installation problems as well as information on how to optimize the installation process Installing OmniPage with the Norton Desktop Speeding Up Installation Conflicts with Disk Caching Programs Usin...

Страница 224: ...talling successfully If you are using a disk cache program other than Windows SMARTDrive temporarily disable it and try to install OmniPage again Then enable the cache program and verify that it works...

Страница 225: ...ner Driver Name and Version System Crash During Scan Scanner Hardware Compatibility Microtek Scanners TWAIN Scanners Deinstalling the Scan Manager No Scan Image Command No Scan Image command appears i...

Страница 226: ...location is c 2 Locate a line similar to one of the following device c dos emm386 sys or device c qemm qemm386 sys 3 Type rem followed by a space in front of this line This prevents the expanded memor...

Страница 227: ...your scanner supports and click OK If you receive a message that says something similar to Cannot find AccuPage dll or Can t find scanner see the message that begins Problem with scanner on page 245...

Страница 228: ...ce drivers for the same scanner may cause problems Extended Memory Manager If you use an extended memory manager avoid loading your scanner driver high in memory Consult your memory manager documentat...

Страница 229: ...8 Click Close Do not run other TWAIN compliant applications while using or installing a TWAIN scanner with OmniPage Use Relisys and Umax Scanners with TWAIN Only OmniPage supports Relisys scanners an...

Страница 230: ...e the following files in your windows system directory pizperm dll pixdflt dll pixpnr dll Select the Scan Manager icon in the Caere Applications program group and press the Delete key on your keyboard...

Страница 231: ...ed on thermal paper are more difficult to scan than a document on regular white paper Try this to improve fax recognition accuracy Have senders select Fine or Best Mode when they send you a fax This s...

Страница 232: ...one wider than 7 5 inches recognize it as a single zone Adjust the right margin in your target application as necessary Spreadsheet Applications Spreadsheet type documents may require a special OCR pr...

Страница 233: ...size is correct Retaining Graphics With AUTO and HP AccuPage 2 If you use an HP Scanner that supports HP AccuPage technology select 3D OCR with HP AccuPage 2 or Auto Brightness with HP AccuPage 2 in...

Страница 234: ...the typical recognition time for a good quality document and image on your system Successfully completing the test procedure does the following Provides a benchmark for recognition time on your syste...

Страница 235: ...of memory Type defrag at the DOS prompt or check your DOS or Windows documentation Error Messages or Slow Operation You may receive out of memory error messages or find that OmniPage works slowly and...

Страница 236: ...page 238 for a list of output file formats and the conversion filter file associated with each one The default location of the conversion filter files is c omnipro Slow Operation OCR can be a very tim...

Страница 237: ...s OmniPage your scanner your hard drive or your monitor Restart your computer See your DOS documentation for instructions on how to edit your autoexec bat and config sys files Be sure to back up any s...

Страница 238: ...se III III W4W770T DLL DisplayWrite DCA RFT W4W15T DLL EBCDIC W4W02T DLL Excel 3 0 4 0 5 03 W4W21T DLL Excel Text W4W21T DLL Lotus WK1 W4W20T DLL Microsoft RTF W4W19T DLL Microsoft Word 3 0 3 1 W4W05T...

Страница 239: ...at inserts hard returns to preserve the original line and paragraph breaks use this format for data destined for a system that only recognizes the standard ASCII or ANSI format Stripped ASCII or ANSI...

Страница 240: ...t To increase the amount of virtual memory available 1 Choose Memory in the Setup menu 2 In the Temporary file section locate the Maximum text box 3 Delete the number in the box and type in a number t...

Страница 241: ...ere is at least 1MB of free disk space in your temp directory The default location of the temp file is c temp Error creating the zone window Try closing open windows and applications to free up memory...

Страница 242: ...s and your scanner to defragment memory and reset the scanner to its default state Error initializing OCR Try closing open windows and applications to free up memory See Low Memory on page 235 Error l...

Страница 243: ...there it is probably corrupt Delete it OmniPage will recreate the file the next time you relaunch it Reenter deferred files in the Files to Finish list box if necessary Error opening removing word fro...

Страница 244: ...or various save options Insufficient disk space on destination drive Please free up some disk space and try again You have run out of free disk space on your hard disk Delete any unnecessary files to...

Страница 245: ...alf of the page Cut and paste the recognized text either in your target application or in OmniPage The word already exists in the dictionary The text you are trying to enter into the dictionary is alr...

Страница 246: ...k No to remove the file from the Files to Finish list box but not delete it This message appears if you select a file that has the words Job Failed under File Format in the Finish Deferred Document di...

Страница 247: ...pound symbol but OmniPage removes the symbol before loading the word into the dictionary The word five for example would be added to the user dictionary simply as five You can only select Caere Docum...

Страница 248: ...OmniPage on page 12 Information We Need From You For the most efficient response please have the following information on hand and be near your computer when you call OmniPage serial number and versio...

Страница 249: ...copy machine simply transferring an image into your computer A scanner translates a page into data by dividing the scanned image into millions of dots or bits usually from 40 000 to 90 000 per square...

Страница 250: ...page Isolate each character in the text in order to correctly identify it Interpret the recognition results and resolve any ambiguities in order to reproduce the words accurately on the page Format th...

Страница 251: ...stem responsible for the identification of a single character This is in marked contrast to other OCR technologies which are based upon a probability analysis of dots within a matrix field By the prob...

Страница 252: ...computer intensive and therefore somewhat slow One of the patents pending for Caere has to do with an accelerating self learning routine which allows each unique character to only have to be recognize...

Страница 253: ...hat other OCR packages literally can t even see Black print on gray stationary sidebars in the Wall Street Journal and stained yellowed and faded documents All these can now be seen cleaned up and rec...

Страница 254: ...guage Analyst uses information about language context and usage rules to evaluate characters and words during the recognition process In addition to the character analysis techniques that OmniPage use...

Страница 255: ...on might appear very lightly inked 3D OCR evaluates the grayscale information of that lightly inked area and correctly recognizes the character as an n Or imagine applying too much ink to a rubber sta...

Отзывы: