The Process Menu
Commands and Settings 136
Finishing Deferred Documents
1
Choose
Finish Deferred Documents...
in the Process menu.
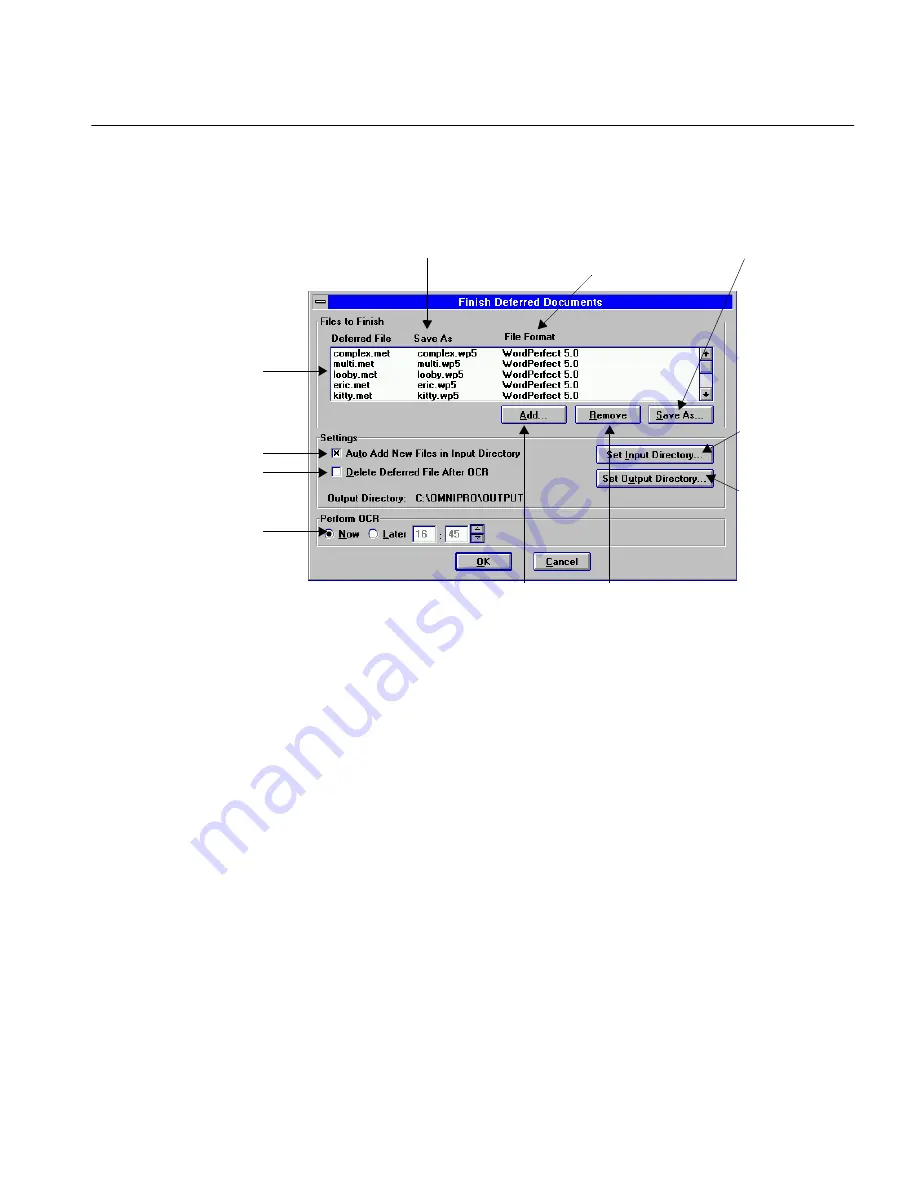
The Finish Deferred Documents dialog box appears.
You can now select one or more deferred files to recognize and
set a variety of options to take place after recognition.
2
Click
Set Input Directory...
.
The Set Input Directory dialog box appears. It opens to the
omnipro\input
directory by default. This is the default
directory in which OmniPage looks for your deferred files. You
can select another location if you wish. The input directory
cannot contain more than 100 documents for deferred processing.
3
Click
OK
to return to the Finish Deferred Documents dialog box
.
All supported files in the input directory appear in the
Files to
Finish
list box. See “Supported Input File Formats” on page 239
for a list of supported file formats. OmniPage assigns each file a
format (based on the last-selected format to which you saved). It
assigns each file a file name based on that format.
4
Click
Set Output Directory...
.
The Set Output Directory dialog box appears. It opens to the
omnipro\output
directory by default. This is the directory to
The deferred file is saved
with this name after OCR.
The deferred file is
saved in this file
format after OCR.
Deferred files selected for
OCR appear in the
Files
to Finish list box.
Delete the original
deferred file after OCR.
Update the
Files To Finish
list box automatically.
Choose to perform
OCR now or at a set time.
Set the default
location for
deferred files.
Set the default
location for
documents after
OCR.
Add file(s)
to the list.
Remove a
selected file.
Change save options
for a selected file.
Содержание OMNIPAGE PRO 6 - REFERENCE FOR WINDOWS
Страница 1: ...1 OmniPage Pro Version 6 for Windows Reference Manual...
Страница 80: ...Direct Input Mode Tutorials 80...


