M160 Internet Router Hardware Guide
Installing a Routing Engine
NOTE:
If two Routing Engines are installed, they must both be the same version.
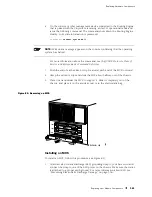
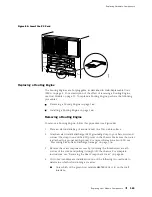
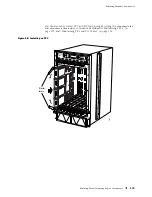
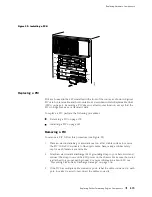
To install a Routing Engine, follow this procedure (see Figure 86):
1.
Attach an electrostatic discharge (ESD) grounding strap to your bare wrist and
connect the strap to one of the ESD points on the chassis. Make sure the router
is attached to a proper earth ground. For more information about ESD, see
“Preventing Electrostatic Discharge Damage” on page 226.
2.
Verify that the extractor clip at each end of the Routing Engine is flipped
toward the outer edge of the unit. If necessary, use your thumbs to push and
hold the red tab on each extractor clip toward the outer edge, then push the
ends of the extractor clips outward.
3.
Place one hand under the Routing Engine to support it and grasp one of the
extractor clips on the faceplate with the other hand.
4.
Align the rear of the Routing Engine with the guide rails inside the chassis
and slide it in completely.
CAUTION:
Align the Routing Engine carefully with the guide rails and push it in
evenly. Damage can result if it gets lodged in the rails because of uneven movement.
5.
Press the extractor clip at each end of the Routing Engine inward to seat the
unit firmly in the chassis.
6.
Check the host module LEDs on the craft interface to verify that the green
LED labeled
ONLINE
is lit for the host module to which the Routing Engine
belongs (Figure 11 shows the LEDs).
You can also verify correct Routing Engine functioning by issuing the
show chassis routing-engine
command described in Maintaining Host Module
Components on page 131.
7.
Reinstall the rear component cover and tighten the thumbscrew at each corner
to secure it to the chassis. For complete instructions, see “Reinstalling the Rear
Component Cover” on page 109.
CAUTION:
To maintain proper airflow and provide electromagnetic shielding, do
not operate the router without the rear component cover in place.
168
Replacing Host Module Components
Содержание Internet Router M160
Страница 12: ...M160 Internet Router Hardware Guide xii Table of Contents ...
Страница 16: ...M160 Internet Router Hardware Guide xvi List of Figures ...
Страница 18: ...M160 Internet Router Hardware Guide xviii List of Tables ...
Страница 24: ...M160 Internet Router Hardware Guide xxiv Requesting Support ...
Страница 26: ...2 Product Overview ...
Страница 30: ...M160 Internet Router Hardware Guide 6 Safety Requirements Warnings and Guidelines ...
Страница 66: ...M160 Internet Router Hardware Guide 42 Cable Management System ...
Страница 80: ...M160 Internet Router Hardware Guide 56 Routing Engine Architecture ...
Страница 82: ...58 Initial Installation ...
Страница 104: ...M160 Internet Router Hardware Guide 80 Unpacking the Router ...
Страница 148: ...M160 Internet Router Hardware Guide 124 Configuring the JUNOS Internet Software ...
Страница 150: ...126 Hardware Maintenance Replacement and Troubleshooting Procedures ...
Страница 242: ...M160 Internet Router Hardware Guide 218 Troubleshooting the Power System ...
Страница 244: ...220 Appendixes ...
Страница 292: ...M160 Internet Router Hardware Guide 268 Packing Components for Shipment ...
Страница 301: ...Part 5 Index Index 277 ...
Страница 302: ...278 Index ...

