M160 Internet Router Hardware Guide
3.
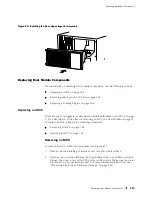
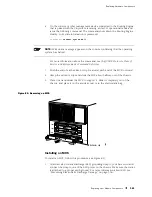
Remove the rear component cover by loosening the thumbscrew at each
corner of the cover and pulling it straight off the chassis. For complete
instructions, see “Removing the Rear Component Cover” on page 86.
4.
If two host modules are installed, use one of the following two methods to
determine which is functioning as master:
Note which of the green host module
MASTER
LEDs is lit on the craft
interface.
Issue the following CLI command. The master Routing Engine is
designated
Master
in the
Current state
field:
user@host> show chassis routing-engine
Routing Engine status:
Slot 0:
Current state
Master
...
5.
If the component you are removing belongs to the master host module and a
second host module is installed, issue the following CLI command to switch
mastership to the standby host module:
user@host> request chassis routing-engine master switch
If the Routing Engines are running JUNOS Release 6.0 or later and are
configured for graceful switchover, the standby Routing Engine immediately
assumes Routing Engine functions and there is no interruption to packet
forwarding. Otherwise, packet forwarding halts while the standby Routing
Engine becomes the master and the Packet Forwarding Engine components
reset and connect to the new master Routing Engine. For information about
configuring graceful switchover, see the section about Routing Engine
redundancy in the
JUNOS System Basics Configuration Guide
.
NOTE:
Router performance might change if the standby Routing Engine’s
configuration differs from the former master’s configuration. For the most
predictable performance, configure the two Routing Engines identically, except
for parameters unique to a Routing Engine, such as the hostname defined at the
[edit system]
hierarchy level and the management interface (
fxp0
or equivalent)
defined at the
[edit interfaces]
hierarchy level.
To configure Routing Engine-specific parameters and still use the same configuration
on both Routing Engines, include the appropriate configuration statements under
the
re0
and
re1
statements at the
[edit groups]
hierarchy level and use the
apply-groups
statement. For instructions, see the
JUNOS System Basics Configuration Guide
.
160
Replacing Host Module Components
Содержание Internet Router M160
Страница 12: ...M160 Internet Router Hardware Guide xii Table of Contents ...
Страница 16: ...M160 Internet Router Hardware Guide xvi List of Figures ...
Страница 18: ...M160 Internet Router Hardware Guide xviii List of Tables ...
Страница 24: ...M160 Internet Router Hardware Guide xxiv Requesting Support ...
Страница 26: ...2 Product Overview ...
Страница 30: ...M160 Internet Router Hardware Guide 6 Safety Requirements Warnings and Guidelines ...
Страница 66: ...M160 Internet Router Hardware Guide 42 Cable Management System ...
Страница 80: ...M160 Internet Router Hardware Guide 56 Routing Engine Architecture ...
Страница 82: ...58 Initial Installation ...
Страница 104: ...M160 Internet Router Hardware Guide 80 Unpacking the Router ...
Страница 148: ...M160 Internet Router Hardware Guide 124 Configuring the JUNOS Internet Software ...
Страница 150: ...126 Hardware Maintenance Replacement and Troubleshooting Procedures ...
Страница 242: ...M160 Internet Router Hardware Guide 218 Troubleshooting the Power System ...
Страница 244: ...220 Appendixes ...
Страница 292: ...M160 Internet Router Hardware Guide 268 Packing Components for Shipment ...
Страница 301: ...Part 5 Index Index 277 ...
Страница 302: ...278 Index ...

