Replacing Hardware Components
b.
Unscrew the screws that secure the cable connector to the port, using a
2.5-mm flat-blade screwdriver if necessary.
c.
Pull the cable connector straight out of the port.
d.
Disconnect the cable from the console or auxiliary device.
2.
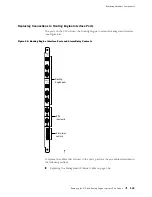
Plug the female end of the replacement serial cable into the appropriate
CONSOLE
or
AUXILIARY
port. Figure 66 shows the external device ports on the
CIP. The ports labeled
HOST 0
connect to the Routing Engine in the upper
Routing Engine slot (
RE 0
), and the ports labeled
HOST 1
connect to the Routing
Engine in the lower Routing Engine slot (
RE 1
).
3.
Tighten the screws on the connector, using a 2.5-mm flat-blade screwdriver if
necessary.
4.
Power on the auxiliary or console device.
Figure 68: Serial Port Connector
1027
Replace Alarm Relay Wires
To connect the router to external alarm-reporting devices, attach wires
to the
RED ALARM
and
YELLOW ALARM
relay contacts on the CIP. A system
condition that triggers the red or yellow alarm LED on the craft interface
also activates the corresponding alarm relay contact.
The terminal blocks that plug into the alarm relay contacts are supplied
with the router. They accept wire of any gauge between 24-AWG and
12-AWG (0.20 and 3.33 mm2), which is not provided. Use the gauge of wire
appropriate for the external device you are connecting.
To replace the wires connecting to an alarm-reporting device, follow
this procedure (see Figure 66:
1.
Disconnect the existing wire at the external device.
2.
Prepare the required length of replacement wire with gauge between 24-AWG
and 12-AWG (0.20 and 3.33 mm2).
3.
Using a 2.5 mm flat-blade screwdriver, loosen the small screws on the face of
the terminal block and remove the block from the relay contact.
4.
Using the 2.5 mm flat-blade screwdriver, loosen the small screws on the side of
the terminal block. Remove existing wires from the slots in the front of the
block and insert replacement wires. Tighten the screws to secure the wire.
Replacing the CIP and Routing Engine Interface Port Cables
147
Содержание Internet Router M160
Страница 12: ...M160 Internet Router Hardware Guide xii Table of Contents ...
Страница 16: ...M160 Internet Router Hardware Guide xvi List of Figures ...
Страница 18: ...M160 Internet Router Hardware Guide xviii List of Tables ...
Страница 24: ...M160 Internet Router Hardware Guide xxiv Requesting Support ...
Страница 26: ...2 Product Overview ...
Страница 30: ...M160 Internet Router Hardware Guide 6 Safety Requirements Warnings and Guidelines ...
Страница 66: ...M160 Internet Router Hardware Guide 42 Cable Management System ...
Страница 80: ...M160 Internet Router Hardware Guide 56 Routing Engine Architecture ...
Страница 82: ...58 Initial Installation ...
Страница 104: ...M160 Internet Router Hardware Guide 80 Unpacking the Router ...
Страница 148: ...M160 Internet Router Hardware Guide 124 Configuring the JUNOS Internet Software ...
Страница 150: ...126 Hardware Maintenance Replacement and Troubleshooting Procedures ...
Страница 242: ...M160 Internet Router Hardware Guide 218 Troubleshooting the Power System ...
Страница 244: ...220 Appendixes ...
Страница 292: ...M160 Internet Router Hardware Guide 268 Packing Components for Shipment ...
Страница 301: ...Part 5 Index Index 277 ...
Страница 302: ...278 Index ...

