background image

123

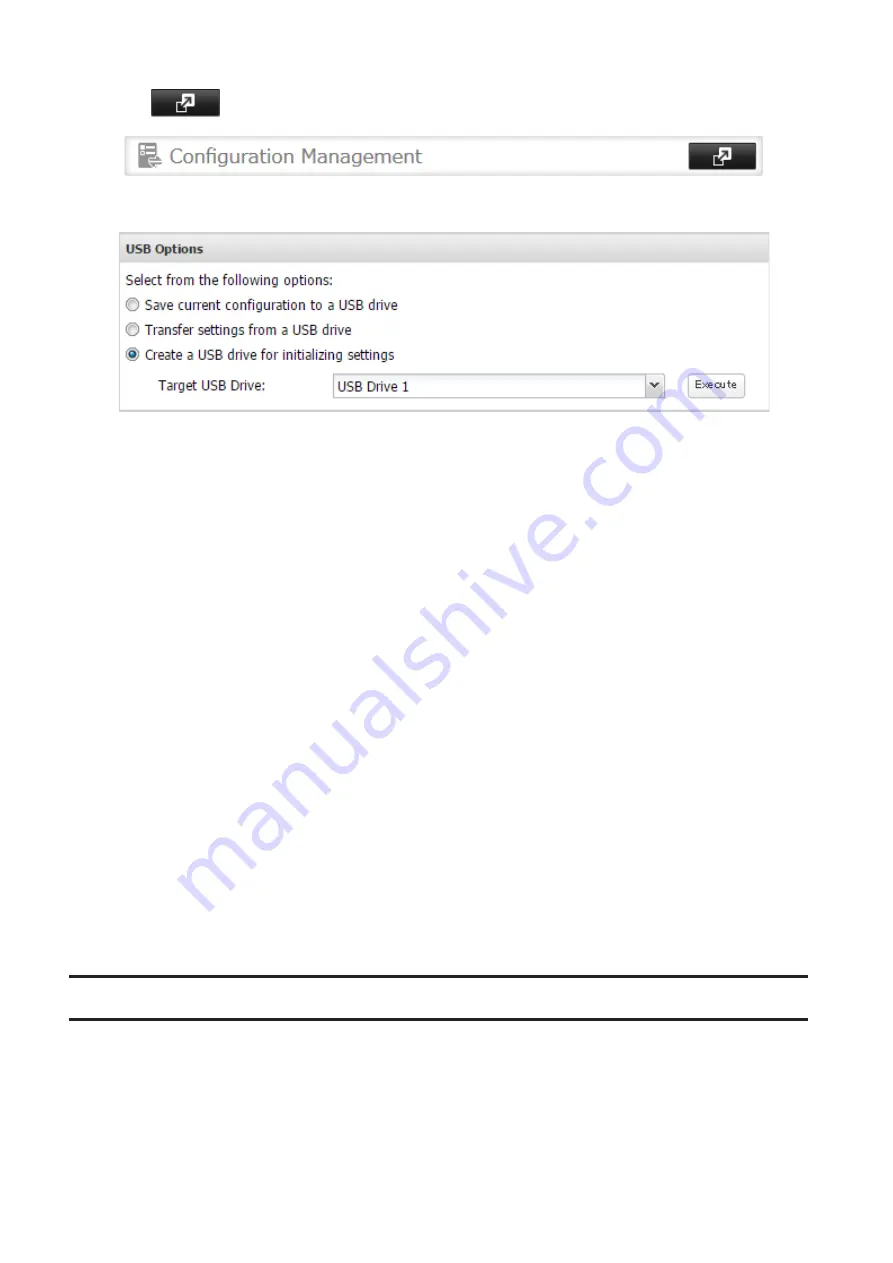
Click 

 to the right of "Configuration Management".

From "Target USB Drive", select the USB drive that is connected to the USB port on the TeraStation.

Select "Create a USB drive for initializing settings", then click 

Execute

.

The "Confirm Operation" screen will open. Enter the confirmation number, then click 

OK

. The TeraStation will 

create the initialization drive. This will take about a minute.

When the "finished" message is displayed, the USB initialization drive is ready to use. Click 

OK

.

Initializing with the USB Drive

To initialize the settings on your TeraStation with the USB drive as created above, follow the procedure below.

Note: 

If using the initialization drive to initialize, the unit's current firmware version will be changed to the 

version used to create the initialization drive.

Turn off the TeraStation by pressing and holding the power button for 3 seconds.

Insert the USB drive into a USB port on the TeraStation. Make sure that no other USB drives are currently 
connected to the TeraStation.

Power on the TeraStation while holding down the function button.

When the I41 message appears on the LCD panel, press the function button.

It will take several minutes for initializing the settings. The TeraStation will restart when it's finished.

Dismount the USB drive before unplugging it. See the "Dismounting Drives" section in chapter 4 for the procedure 
on dismounting drives.

Resetting the Administrator Password

If you forget the admin username or password and cannot log in to Settings, or wrong network settings are 
configured and Settings is inaccessible, initialize these settings by holding down the init button (refer to the 
TeraStation diagram in chapter 1) on the front panel for three seconds. Normally this will reset the admin username 
and password, network configuration, SSL, and security port settings to their factory default values.
This button can be disabled in Settings; to do so, navigate to 

Management

 - 

Restore/Erase

 - 

Edit

 under "Init Button 

Settings", then select "Keep current admin username and password" and click 

OK

.

Содержание TeraStation 5010

Страница 1: ...ow the procedure If you have any inquiries about the product contact the number on the warranty statement or the packing box Do not discard this manual the warranty statement or the packing box Americas www buffaloamericas com Europe www buffalo technology com Asia Pacific www buffalo asia com 35021131 05 2016 11 ...

Страница 2: ...itial Setup Wizard 15 Opening Advanced Settings 19 Opening Easy Admin 20 Chapter 3 Sharing Files 23 Configuring Shared Folders 23 Adding a Shared Folder 23 Recycle Bin 25 Read Only Shares 26 Hidden Shares 26 Configuring Users 26 Adding a User 26 Importing User Information 27 Adding a Group 28 Configuring Access Restrictions 30 Local Users and Groups 30 Active Directory 31 ...

Страница 3: ...lity 43 Dismounting Drives 44 Dismounting with the Function Button 44 Dismounting from Settings 44 Checking Drives 45 S M A R T 46 Formatting Drives 47 Encrypting Drives 49 Erasing Data on the TeraStation Completely 49 Drive Quotas 50 Quotas for Users 50 Quotas for Groups 50 Size Limits 51 Using the TeraStation as an iSCSI Device 54 Introduction 54 Creating an iSCSI Volume 54 Connecting or Disconn...

Страница 4: ...nfiguring a Replication Task 73 Synchronizing Between Source and Destination Units Periodically 76 Failover 77 Usage Restrictions 78 Configuring Failover 79 Switching to the Backup Unit Manually 82 Synchronizing Between Main and Backup Units Periodically 82 Backing Up Your Mac with Time Machine 83 Chapter 6 Remote Access 89 WebAccess 89 FTP 91 Cloud Storage 93 Configuring Cloud Storage 93 Uploadin...

Страница 5: ...2 Encrypting Data Transmission 115 Encrypting Settings Data 115 Encrypting FTP Transfer Data 116 SSL Keys 116 SNMP 116 Saving and Applying Settings 117 Saving Settings 118 Applying Settings 119 Transferring Another TeraStation s Settings 120 Creating a Config File nas_config 120 Transferring Settings 121 Restoring Factory Defaults 122 Initializing from Settings 122 Initializing with the USB Initia...

Страница 6: ...r 134 Jumbo Frames 135 Changing the IP Address 138 Boot Authentication 140 Note Before Use 140 Important Notice 140 Setting Up the Authentication Server on a Windows PC 141 Configuring Boot Authentication on the TeraStation 141 If the TeraStation Cannot Be Accessed 143 Chapter 8 Replacing Drives 146 LEDs 146 Drive Replacement Procedure 147 Using JBOD or a Redundant RAID Mode Other Than RAID 0 and ...

Страница 7: ...k Drive 160 Changing the IP Address 161 NovaBACKUP 162 Chapter 10 Appendix 163 TeraStation Does Not Boot Properly 163 Booting the TeraStation in Emergency Mode 163 Power LED Keeps Blinking 163 Cleaning the Dustproof Filter 164 LCD Panel 166 Modes 166 Errors 167 Status 168 Default Settings 170 Specifications 170 Chapter 11 Regulatory Compliance Information 172 For Customers in the United States 172...

Страница 8: ...7 For Customers in Taiwan 175 ...

Страница 9: ...grams Depending on the number or type of drives in the unit the model name will be different Check the sticker on the packing box for your unit s model name TS5410DN 1 3 4 5 6 10 9 8 11 2 7 13 12 19 20 14 15 16 17 18 23 26 24 25 8 ...

Страница 10: ... TS5210DN 1 3 4 5 6 19 20 13 18 16 15 14 12 10 9 11 2 7 8 17 23 26 24 25 1 Power Button To power on connect the power cable and wait for 10 seconds then press the power button To power off press and hold the power button for 3 seconds 2 Power LED When the TeraStation is on the LED glows green ...

Страница 11: ...ing a USB drive 11Drive Lock Open the front panel with the key to replace drives or access the init button 12Init Button Hold down this button with something pointed to initialize the TeraStation s admin username and password IP settings SSL and service port restriction settings to their factory default values The effects of this button can be modified in Settings 13Status LEDs Normally these LEDs...

Страница 12: ... amber when the unit is connected to a network at 100 Mbps 251000 Mbps Link LED Glows green when the unit is connected to a network at 1000 Mbps 2610 Gbps Link LED Glows blue when the unit is connected to a network at 10 Gbps Turning the TeraStation On and Off Note Do not disconnect or reconnect the internal drives while turning on or off the TeraStation Press the power button on the TeraStation t...

Страница 13: ...n s icon and select Settings For macOS select the TeraStation s icon while holding down the control key then select Settings 3 Enter the username and password then click OK Note The default username and password are admin and password ...

Страница 14: ...hen click OK When all the LEDs on the front of the TeraStation turn off the shutdown process is complete Creating an Initialization Drive We recommend creating an initialization drive as soon as possible This USB drive can be used to initialize the TeraStation s settings to its factory default values or recover the system if your TeraStation encounters an error that ...

Страница 15: ...14 prevents the unit from booting For detailed procedure refer to the Creating an Initialization Drive subsection in chapter 7 ...

Страница 16: ...et Explorer set security to Local intranet On Windows Server operating systems higher level security is configured by default Set the security to a lower level temporarily On a Mac you can also use Bonjour to log in to Settings Navigate to Bookmarks Bonjour TeraStation name from the menu bar of Safari If you don t see Bonjour in the Bookmarks menu click Safari Preferences and select Include Bonjou...

Страница 17: ...rd and click Next If you click Skip the administrator password will not change from the default value password 4 The time zone settings page will be displayed If you need to change the time zone from that which is currently displayed on the page select it from the drop down list and click Next ...

Страница 18: ...r proxy settings Click Next 6 The RAID settings page will be displayed To change the RAID mode from the default mode select the desired RAID mode and click Next then click Start in the next page The Confirm Operation screen will open so enter the confirmation number and click OK Changing the RAID mode will begin ...

Страница 19: ...ID settings page will not be displayed if using TS5210DN series 7 The usage feedback settings page will be displayed If you allow Buffalo to collect your usage and environment information select the Send usage feedback box If you don t permit information collection leave the box blank and click Next ...

Страница 20: ... on your TeraStation s icon in NAS Navigator2 and select Settings For macOS click your TeraStation s icon while holding down the control key then select Settings 3 Enter the username and password and click OK Notes If the time out period is set to 10 minutes you will be logged out of Settings after 10 minutes of inactivity Click Secure Connection to log in with an encrypted connection ...

Страница 21: ... is assigned as an administrator all settings are available If assigned under another group only system information read only is available Click to open Easy Admin Click to play a tone from the TeraStation for easy location Opening Easy Admin The Easy Admin page makes it easy to change common settings Follow the procedure below to open Easy Admin 1 Double click the icon to start NAS Navigator2 ...

Страница 22: ...21 2 Right click on your TeraStation s icon and choose Settings For macOS click the TeraStation icon while holding down the control key then select Settings 3 Click Easy Admin ...

Страница 23: ...22 4 The Easy Admin screen will open Note If you click any buttons you will need to enter a username and password ...

Страница 24: ...Chapter 3 Sharing Files Configuring Shared Folders Adding a Shared Folder 1 In Settings click File Sharing 2 Click to the right of Folder Setup 3 Click Create Folder 23 ...

Страница 25: ... 75 alphanumeric characters hyphens underscores _ and spaces Do not use a symbol or space as the first character You may create up to 400 shared folders If the names of shared folders accessed via AFP and FTP connections contain multibyte characters configure the client language in Management Name Time Language to match the characters If the setting does not match the shared folder name will not b...

Страница 26: ...ac The TeraStation belongs to the default zone in AppleShare the zone cannot be specified When files are copied to the TeraStation or to a USB drive connected to the TeraStation file information such as date created date modified and other date information may be updated or changed During a file transfer if settings are changed the file transfer operation may be aborted File copying to the TeraSta...

Страница 27: ...d folder or a USB drive to configure hidden shares 2 Select the Hidden share SMB only checkbox and click OK Notes If protocols other than SMB or Backup under LAN Protocol Support are enabled the hidden shares option will be grayed out and cannot be selected Configure hidden share attribute in Settings Configuring them from within Windows is not supported and may cause unexpected behavior To access...

Страница 28: ...ters and the following characters _ Do not use a symbol other than an underscore _ as the first character Use the same username and password for both Windows and the TeraStation or you may not be able to access shared folders Do not use any of the following words for a username as these words are reserved for internal use by the TeraStation _lldpd admin apache avahi avahi autoipd backup bin daemon...

Страница 29: ...as If you don t want user descriptions use a comma after password at the end If a line has an incorrect format the user on that line will not be registered If a username already exists the new user information will overwrite the old information Do not use commas in the username password or user description Note Imported users are added to the hdusers group automatically Adding a Group 1 In Setting...

Страница 30: ...e duplicate group IDs You may register up to 300 groups with the TeraStation If you are logged in as a member of the general users group you can only change your own password If you re logged in as an administrator you can change any settings including other users passwords If you are logged in as a member of the power users group you can create and edit shared folders users and groups Do not use ...

Страница 31: ... behavior You can also configure users groups and shared folders from Easy Admin by clicking Access Restrictions Shared folders with limited access can still be used as backup destinations If you change access restrictions for a user or group while they are accessing files unexpected behavior may result Local Users and Groups 1 In Settings click File Sharing 2 Click to the right of Folder Setup 3 ...

Страница 32: ...n users and groups Active Directory If there is an Active Directory environment the TeraStation will use account information from the Active Directory domain controller to set access restrictions for TeraStation s shared folders There is no need to perform individual account management for the TeraStation If multiple TeraStations are installed on the network the account information is centrally ma...

Страница 33: ...32 4 Select Active Directory then click Next 5 Click Yes 6 Enter the desired settings then click OK 7 Click to the right of Folder Setup ...

Страница 34: ...t restrictive access setting will apply If there is a difference of more than 5 minutes between the TeraStation s clock and the domain controller s clock joining the domain or authenticating domain users and groups may fail For best results use an NTP server to set the time for all network devices To use the TeraStation as a member server in an Active Directory domain the TeraStation should be log...

Страница 35: ...d folder if you change the access restrictions of all users and groups from read and write or read only to access prohibited from the user or group list page in Settings that shared folder can only be accessed by admin users and groups ...

Страница 36: ...mbines 4 or more drives into a single array The usable space is equal to the sum of the capacity of all drives minus the capacity of two drives For example if 4 drives are combined into a RAID 6 array the usable space is the sum of the capacity of 2 drives If 2 drives in the array are damaged you can recover data by replacing them If 3 or more drives are damaged your data is lost RAID 5 RAID 5 arr...

Страница 37: ...de offers faster performance than RAID modes that include parity If a single drive in the array fails then all data in the array is lost JBOD This mode uses the drives inside the TeraStation as individual drives The drive space you can use is the total capacity of all drives in the TeraStation If any drive is damaged then the data on that drive is lost Working with RAID Arrays To change RAID setti...

Страница 38: ...JBOD is configured create shared folders on each drive to use them Changing RAID Mode To change the RAID mode first put the drives in JBOD 1 In Settings click Storage 2 Click to the right of RAID 3 Click the array to delete 4 Click Delete RAID Array 5 The Confirm Operation screen will open Enter the confirmation number then click OK 6 Click OK ...

Страница 39: ...ick OK 10Click OK when finished Notes You can also configure RAID settings from Easy Admin After changing the RAID mode create a shared folder Configuring a Hot Spare If you have a hot spare configured and an array fails the TeraStation immediately switches over to the hot spare To use a hot spare you need an extra drive that s not part of any array and a RAID 1 or RAID 5 array ...

Страница 40: ... spare and again when it changes from a spare to a drive in the array A hot spare cannot be configured for TeraStation models with only two drives Use RAID 1 instead 1 In Settings click Storage 2 Click to the right of RAID 3 Choose a RAID array 4 Click Set as a hot spare 5 Click Yes ...

Страница 41: ...l drive choose Set as a normal drive RMM RAID Mode Manager With RMM you can create or expand a RAID array without erasing the data on the drives Changing from JBOD to RAID 1 You must have at least two drives available in JBOD not in a RAID array to build the RAID 1 array with RMM 1 In Settings click Storage 2 Click to the right of RAID 3 Choose a RAID array ...

Страница 42: ...RAID Array 9 The Confirm Operation screen will open Enter the confirmation number then click OK 10Click OK when finished Adding a Drive to an Existing RAID Array You can add a drive to a RAID 1 or RAID 5 array Drives in JBOD can be added to the RAID array Note RMM can be used to expand an array by one drive per operation To expand by two or more drives RMM must be performed multiple times 1 In Set...

Страница 43: ...OK when finished Changing the RAID Mode While Adding a Drive Select the drive you want to add to the RAID array and choose the mode for the array Enter the Confirm Operation number and click OK RAID Scanning A RAID scan checks you RAID array for bad sectors and if it finds any it automatically repairs them Arrays other than RAID 0 are supported For best results run a RAID scan regularly ...

Страница 44: ...your model and you can connect external drives to these ports Once connected they appear as shared folders on the TeraStation Formatted drives are detected automatically Unformatted drives should be formatted in Settings After a USB drive is recognized Windows adds usbdisk x under the TeraStation in Network where x is the USB port where the drive is connected Compatibility The following USB device...

Страница 45: ... and external before unplugging them You may dismount external drives with the function button or any drive from Settings If the TeraStation is off then all drives are already dismounted and may be unplugged safely Note Do not dismount internal drives while a RAID array is rebuilding or RMM is being configured If you do data on the drives may be lost Dismounting with the Function Button When you p...

Страница 46: ...on a drive in the TeraStation or one that is connected via USB for integrity Errors are fixed automatically With large drives a drive check may run for many hours Shared folders cannot be accessed during a drive check Do not turn off the TeraStation until the drive check is finished Use the procedure below to run a drive check 1 In Settings click Storage 2 Select Drives to check an internal drive ...

Страница 47: ...s internal drives to detect and report various indicators of reliability in the hope of anticipating failures When a failure is anticipated by S M A R T the user may choose to replace the drive to avoid outages and data loss Follow the procedure below to check S M A R T information for the TeraStation s internal drives Note S M A R T information is only available for internal drives 1 In Settings ...

Страница 48: ...ld value may be significant If an attribute reports a failure or has had one in the past it will be displayed in the status column Formatting Drives Notes Under some circumstances data deleted when a drive is formatted can be recovered To ensure that data is gone forever a format might not be sufficient See the Erasing Data on the TeraStation Completely section below After a drive is formatted the...

Страница 49: ...ill open Enter the confirmation number then click OK 6 Depending on the size and the formatted file system of your drive the format may take several minutes or several hours to complete Formatting will be displayed on the LCD panel until the format is complete Click OK when finished Notes Do not turn off or disconnect power to the TeraStation while formatting a drive For drives of 2 2 TB or larger...

Страница 50: ...a from a drive in a way that makes it nearly impossible to recover with current tools The TeraStation will then be in the following state All drives in JBOD An empty shared folder on each drive All settings returned to their default values All logs deleted If you remove a drive and then erase all data on the TeraStation the LCD panel will show the E22 error message and the number of the removed dr...

Страница 51: ... is set to 1 GB each array or drive can use a maximum of 1 GB Quotas cannot be set for external drives connected to the TeraStation If both user and group quotas are configured for a user the most restrictive quota will always apply Quotas for Users Follow this procedure to limit the shared folder drive space available for a user 1 In Settings click File Sharing 2 Click to the right of Users 3 Sel...

Страница 52: ...lect the user who will inherit the group quota settings 8 Change the user s primary group to the group with the quota then click OK 9 Click OK Size Limits If LVM is enabled volumes can be created with maximum size limits Note When creating a LVM volume all data in the area where you specified for the LVM volume will be erased Before changing any settings back up any important data 1 In Settings cl...

Страница 53: ... Select the drive or array where the volume will be located and click Enable LVM 4 The Confirm Operation screen will open Enter the confirmation number then click OK 5 Click OK 6 Click Edit under NAS Volume ...

Страница 54: ...e 8 Configure the desired settings then click OK 9 Click OK 10Click Close 11Click Close 12Navigate to File Sharing Folder Setup 13Click Create Folder 14Configure the settings 15Select the volume that you created and click OK ...

Страница 55: ...rectory can be used normally As a NAS the TeraStation is a server and computers including other servers on the network can access shared folders on it directly A separate server is not required and features such as backup are built in Network Configuration Use gigabit or faster network equipment with iSCSI For best results a dedicated network for iSCSI is recommended separate from the regular netw...

Страница 56: ...witch to the position to enable iSCSI 3 Click to the right of iSCSI 4 Click Create Volume 5 Enter a volume name volume description drive or array where a volume will be created and enter a volume size Click OK when finished ...

Страница 57: ...ssible from the iSCSI initiator software Connecting or Disconnecting Volumes Note By default the IP address of the TeraStation is automatically assigned from a DHCP server However in this case if you turn off and restart the TeraStation the IP address may be changed and the volumes on the TeraStation may not be accessible To avoid changing the IP address unexpectedly using a fixed IP address for t...

Страница 58: ... changing any settings 3 Right click the drive volume that shows the status Unallocated and click New Simple Volume from the displayed menu Follow the screen to finish formatting Formatting a volume is finished When the formatting process is completed the drive will be visible as an icon in Computer or My Computer and can be used as a normal drive on the computer Disconnecting a Volume 1 In Window...

Страница 59: ...connected from the client Configuring Access Restrictions A CHAP name and secret can be configured for the entire iSCSI volume or each existing volume Access restrictions can be configured so that entering a target CHAP name and secret is required for each connection The TeraStation can perform mutual authentication two way authentication Dual passwords ensure that only authorized client computers...

Страница 60: ...ret To search or connect the volume which has mutual authentication enabled from Microsoft iSCSI Initiator initiator CHAP secret settings should be configured 6 Click Close Configuring access restrictions for the entire TeraStation is finished Connecting Volumes on the Access Restricted TeraStation If access restrictions are configured for the entire iSCSI volume that volume will not be detected b...

Страница 61: ...HAP secret into the Target secret box If mutual authentication is enabled select the Perform mutual authentication checkbox 7 Click OK twice 8 In the Targets tab select the volume from Discovered targets and click Connect OK 9 If the status of the selected volume is displayed as Connected under Discovered targets the connection is established properly Accessing the volume on the access restricted ...

Страница 62: ...n the Microsoft iSCSI Initiator 2 Register the initiator CHAP secret to your computer first If you didn t enable mutual authentication skip this step Click CHAP in the Configuration tab In the Initiator CHAP secret box enter the configured initiator CHAP secret and click OK 3 In the Discovery tab click Discover Portal 4 Enter the TeraStation s IP address in the IP address or DNS name box 5 Click A...

Страница 63: ...under Discovered targets the connection is established properly Accessing the access restricted volume is finished Expanding Volume Sizes The volume size of the existing volumes can be expanded after they are created Notes Expanding the volume size may erase all data in the volume depending on the formatting type Back up the data before expanding the volume size is recommended To expand the volume...

Страница 64: ...ion number then click OK 6 Click OK then Close Expanding the volume size is finished Deleting Volumes To delete an existing volume follow the procedure below Note Deleting a volume will erase all data on the volume Back up the data before deleting the volume 1 In Settings click Storage 2 Click to the right of iSCSI ...

Страница 65: ... click Delete Volume 4 Confirm that the volume is correctly selected on the screen and click OK 5 The Confirm Operation screen will open Enter the confirmation number then click OK 6 Click OK 7 Click Close Deleting the volume is finished ...

Страница 66: ... folder will not show up as a target for the backup source or destination when configuring a backup job on another LinkStation or TeraStation To configure a backup access password enter it into the Backup Access Password box Leave this box blank if you don t want a backup access password Backing Up to a LinkStation or TeraStation on Another Network When Connected via VPN You can back up to a LinkS...

Страница 67: ...66 1 In Settings click Backup 2 Click to the right of Backup 3 Click List of LinkStations and TeraStations ...

Страница 68: ...et frame sizes If Ethernet frame sizes are significantly different the backup job may not be properly performed In such a case select the default frame size 1500 bytes You can also specify hostname by a fully qualified domain name FQDN Windows based TeraStations with multibyte characters in the hostname may not be detected as a backup destination and folders in these devices cannot be used as back...

Страница 69: ...68 3 Click Create New Job Note Up to 8 backup jobs can be configured 4 Select backup settings such as date and time to run The following types of backup jobs may be selected ...

Страница 70: ...ce folder Management backup Each time a backup is executed management information is stored and only files that have changed are copied or deleted Data is retrieved from the previous backup file for files that were not changed This is useful for making backups with limited space or for referencing status at a particular point in time for use for data snapshot applications The destination folder fo...

Страница 71: ...ain c 634 Receiver 3 1 0 Can t write to backup destination target disk is broken Code 5 The backup destination shared folder could not be found Verify that the Ethernet cable is surely connected and that the hub or other devices on the network are turned on rsync error error starting client server protocol code 5 at main c 1504 Code 10 The Ethernet cable was disconnected from the backup source Ter...

Страница 72: ...42 Code 23 Invalid characters were used in the filename or folder name of the backup destinations Change the filename or folder name using compatible characters Available characters are described in the Adding a Shared Folder section in chapter 3 rsync error some files could not be transferred code 23 at main c 702 The backup destination files were updated while the backup job was running Do not o...

Страница 73: ... backup from Settings B103 The backup source folders on the backup source TeraStation do not exist Verify that the backup source folders on the backup source TeraStation exist in the shared folder list B104 The backup destination folders on the backup destination TeraStation do not exist Verify that the backup destination folders on the backup destination TeraStation exist in the shared folder lis...

Страница 74: ... Destination First configure a folder as a replication destination 1 In Settings click File Sharing 2 Click to the right of Folder Setup 3 Choose the folder to set as a replication destination 4 Click Edit 5 Under LAN Protocol Support select the Backup checkbox and click OK Note Do not configure a backup access password for the shared folders Folders with a backup access password set cannot be sel...

Страница 75: ...74 3 Click Edit 4 Click Add 5 Click Browse under Replication Source ...

Страница 76: ... Target 8 Select the shared folder that will be the replication destination then click OK 9 Click OK 10Click Yes Notes During setup you may choose to encrypt and or compress replication data Encrypted data will be transferred securely on the network Compressed data will ease network loading and is recommended for ...

Страница 77: ...rs or cannot be selected As the replication destination you can select the first level of shared folders USB drives and on off subnet NASs shared folders Don t use the same TeraStation for both failover and replication or replication and Time Machine Don t configure replication from one source folder to multiple destination folders If a network problem causes a replication error unsynced data may ...

Страница 78: ...OK Failover With failover two TeraStations are connected to the network for redundancy If an issue renders the main TeraStation inaccessible operation automatically switches to the backup TeraStation Switches automatically if failure occurs Data on both TeraStations stays up to date Backup Main Failover will activate during any of the following situations The backup TeraStation cannot detect the m...

Страница 79: ...update operations can be made available by temporarily changing the TeraStation to maintenance mode Maintenance mode can be enabled or disabled at Backup Failover in the main TeraStation s Settings Click Maintenance mode to enable maintenance mode or click Cancel maintenance mode to disable maintenance mode To update the firmware while in maintenance mode the main TeraStation can be updated from S...

Страница 80: ...TeraStation will replace it completely The backup TeraStation will be updated over normal network traffic Main Backup Network LAN port 3 Static IP LAN port 3 Static IP Using Different LAN Ports for Connecting to the Network and Failover With this setup the backup TeraStation and main TeraStation are connected by a second Ethernet cable connecting their LAN 3 ports Updating is done over this dedica...

Страница 81: ...80 Configuration 1 In Settings for the main TeraStation click Backup 2 Click to the right of Failover 3 Click Configure Failover ...

Страница 82: ...tation will beep Press and hold the function button to accept the settings from the main TeraStation When you press the function button the backup TeraStation will stop beeping Hold it down until the backup TeraStation beeps again 8 The I51 message will display on the LCD panel and NAS Navigator2 for both TeraStations Wait until initialization finishes Failover is configured after it finishes and ...

Страница 83: ...dvanced Settings tab on Settings the backup TeraStation will not replace the main TeraStation if the main TeraStation fails To have the backup TeraStation replace the main TeraStation you can either Log in to Settings for the backup TeraStation and click Set as Main Unit Or press and hold down the function button on the backup TeraStation Synchronizing Between Main and Backup Units Periodically To...

Страница 84: ... the sync period If Weekly is selected specify the week days and the sync period 6 When the configuration is finished click OK Backing Up Your Mac with Time Machine Time Machine is a backup program included with macOS Configure your TeraStation as shown to use Time Machine 1 In Settings click File Sharing ...

Страница 85: ...ht of Folder Setup 4 Choose a shared folder as your backup destination for Time Machine 5 Click Edit 6 Under LAN Protocol Support select the AFP Mac checkbox and click OK 7 Click OK 8 Click Close 9 Click Backup 10Click to the right of Time Machine 11Click Edit 12Click Browse ...

Страница 86: ... 13Select the shared folder that you set in the previous step then click OK 14Click OK 15Click OK 16Move the Time Machine switch to the position to enable Time Machine 17On the Mac open System Preferences ...

Страница 87: ...86 18Click Time Machine ...

Страница 88: ...87 19Click Select Backup Disk 20Select the TeraStation then click Use Disk ...

Страница 89: ...strictions are not configured on the destination share log in with the administrator account The default username and password for the administrator account are admin and password If access restrictions are configured log in with an account with write privileges 22Time Machine will count down from 120 seconds and the backup will begin ...

Страница 90: ...WebAccess Certain settings can make the files in the shared folder available to anyone on the Internet without any access restrictions Notes You can also configure WebAccess from Easy Admin WebAccess supports downloading up to 60 000 files at a time Attempting to download up to 60 000 files at a time may result in unexpected behavior 1 In Settings click File Sharing 2 Click to the right of WebAcce...

Страница 91: ...ited before inactive users are logged out of WebAccess 5 Click OK 6 Move the WebAccess switch to the position to enable WebAccess 7 Click to the right of Folder Setup 8 Select a shared folder to publish Notes For best results create a new dedicated share for WebAccess When accessing shared folders through WebAccess from a remote location a username and password may be required for certain operatio...

Страница 92: ...only R W Read and write No access There are many ways to access WebAccess folders depending on your device From a computer supported browsers include Microsoft Edge Firefox Google Chrome Internet Explorer 9 or later Safari 9 or later Instructions http buffalonas com manual en To access from an iOS device install the WebAccess i application from the App Store Instructions http buffalonas com manual...

Страница 93: ...t usbdisk1 mnt usbdisk2 mnt usbdisk3 if your TeraStation has 3 USB ports For JBOD mnt disk1 share mnt disk2 share2 mnt disk3 share3 mnt disk4 share4 mnt usbdisk1 mnt usbdisk2 mnt usbdisk3 if your TeraStation has 3 USB ports Accessing the TeraStation with an Anonymous User To allow anonymous access to your FTP share disable access restrictions To access the TeraStation via anonymous FTP configure y...

Страница 94: ...cedure below to configure your TeraStation to use with your cloud storage service Note Set the TeraStation s time settings to the correct time Using NTP is recommended To configure NTP settings on the TeraStation refer to the Name Date Time and Language section in chapter 7 Configuring Cloud Storage 1 In Settings click Web Services 2 Click to the right of Cloud Storage 3 Click Add ...

Страница 95: ... from the drop down list Enter the bucket name access key ID and secret access key select the storage class and the connection protocol then click OK 5 Enter a shared folder name to use with the cloud storage service and click OK ...

Страница 96: ...ngs Click OK 7 Click OK 8 Click Close Note Do not configure a folder that is created through the procedure above as replication destination folder Uploading Files to Cloud Storage To upload files to cloud storage using backup job is recommended 1 In Settings click Backup 2 Click to the right of Backup ...

Страница 97: ...96 3 Click Create New Job 4 Select backup settings such as date and time to run 5 Click Add ...

Страница 98: ...older that uploaded files will be saved to then click OK 8 Click Browse under Backup Destination Folder Name 9 Select the shared folder created from the Configuring Cloud Storage section above then click OK 10Click OK Tasks added to Backup List are displayed 11Click Close ...

Страница 99: ...Explorer or a backup process the file will also be uploaded sequentially to the cloud storage bucket This second uploading process will start in the background during the first copying process and will not be visible If you shut down or restart the TeraStation immediately after copying a file to the remote folder the file may not be uploaded to the bucket Try copying the file again if this occurs ...

Страница 100: ... the right of Dropbox Sync 4 Click Add 5 Click View Dropbox Authentication Page 6 The authentication site that is offered by Dropbox will be displayed Log in to the website with your Dropbox account then click Allow ...

Страница 101: ...d Dropbox folders and configure encryption Click OK If you enable encryption you will need to set an encryption password The password cannot be changed once you configure it Please take note of the password and keep it secure If you forget the password create a new task using the same Dropbox account The old task can then be deleted 10Click OK 11Click Close Changing Dropbox Task Settings Follow th...

Страница 102: ...101 1 In Settings click Web Services 2 Click to the right of Dropbox Sync 3 From the task list click the task whose settings you want to change ...

Страница 103: ...102 4 Click the Options tab 5 Click Edit ...

Страница 104: ...opbox again or delete the task and recreate it again The following are the specific circumstances when files may not be synced When uploading or downloading fails When file extensions are removed from filtering When the sync direction is changed If using Dropbox through a proxy server click Proxy Settings In the displayed page you can select if using the configured settings or setting identical pr...

Страница 105: ...tem alert Refer to the contextual help in Settings for more detailed information such as when the notification email will be sent or the differences between the notification categories 1 In Settings click Management 2 Move the email notification switch to the position to enable email notification 3 Click to the right of Email Notification 4 Click Edit 5 Enter your email server settings notificatio...

Страница 106: ...vanced Report Settings On the displayed screen select or clear the category s checkboxes The notification emails will be categorized into the following importance levels Levels Details Daily Report Describes the status of the TeraStation in a daily report email Info Sends a notification email if an event occurs Info reports will contain just information such as capacity information job starts fini...

Страница 107: ...cation email if an error occurs Error reports will describe critical failure which prevents a function or unit from operating It is recommended to do the corrective action to for the error immediately Sleep Mode To save energy you can specify times to put the TeraStation into sleep standby mode during which the drive and LEDs are turned off 1 In Settings click Management 2 Click to the right of Sl...

Страница 108: ... time of 10 00 a m Wednesday Timer 1 Daily 9 00 18 00 Timer 2 Wednesday 10 00 20 00 Timer 3 Not used On days other than Wednesday normal operation begins at 9 00 a m and the unit goes into sleep mode at 6 00 p m On Wednesday the unit goes into sleep mode at 8 00 p m Example 3 If running at the current time of 10 00 a m Wednesday Timer 1 Daily 9 00 18 00 Timer 2 Wednesday 10 00 1 00 a m of the next...

Страница 109: ...t include Wake on LAN software The TeraStation does not support using Wake on LAN and port trunking at the same time You may use either feature but not both at the same time If the TeraStation is connected to a Buffalo wireless router configured for remote access then it may be turned on from outside the local network from the WAN side To use this feature connect the router to LAN port 1 or 2 on t...

Страница 110: ...ate at AC Power Recovery is selected the TeraStation will revert to the state before the power supply failure occurs If Stay off is selected the TeraStation will keep off even after the TeraStation shuts down due to the power supply failure When the TeraStation is restarted after an automatic shutdown such as from a power outage or power supply problem verify that the power supply has been restore...

Страница 111: ...to the 802 3ad specification TLB The outgoing network packet traffic is distributed according to the current load relative to the speed on each network interface slave A separate intelligent switch that supports IEEE 802 3ad is required Configure LACP in the switch first If the TeraStation is being used as an iSCSI drive disable iSCSI before changing network settings such as port trunking Navigate...

Страница 112: ...your PC is disconnected from the network When you next connect to the network the updated files are written and synchronized Follow the procedure below to configure offline files 1 In Settings click File Sharing 2 Click to the right of Folder Setup 3 Click the shared folder for offline files 4 Click Edit 5 Choose Manual caching of documents Automatic caching of documents or Automatic caching of pr...

Страница 113: ...files try the following procedure 1 Reconnect the computer to the network 2 In Control Panel change the view to the icon view and click Sync Center Click Sync All to synchronize all offline files 3 Disconnect the computer from the network and verify that you can access offline files Accessing from an NFS Client Note US customers only Buffalo s customer support will help configure the NFS settings ...

Страница 114: ...113 7 Move the NFS switch to the position to enable NFS 8 Click to the right of NFS 9 Click the Client Settings tab ...

Страница 115: ...ame of the NFS client then click OK You should add all NFS clients to access the shared folder 12Click the NFS Rules tab 13Click Add Rule 14Choose the folder to restrict access to and enter the clients that will have restricted access into the Hosts field Clients may be entered by hostname IP address or IP address range Wildcards are supported Separate ...

Страница 116: ...ss of the network For example if your local network subnet has a router at 192 168 1 1 and clients with IP addresses in the range from 192 168 1 2 through 192 168 1 48 with subnet mask 255 255 255 0 then the Public Network Address would be 192 168 1 0 and the Public Subnet Mask would be 255 255 255 0 This would mean that only clients on this local network would be able to access the NFS share If t...

Страница 117: ...ings was created by Buffalo and in some cases the message There is a problem with this website s security certificate may be displayed in your browser or other software Disregard this message and continue server key SSL Private Key This file is used as a pair with server crt server certificate This is required for decrypting the data that was encrypted by the server certificate and this is normall...

Страница 118: ...ing the Buffalo specific MIB management information base file The MIB file is available from the Buffalo website Depending on which SNMP client software you use the procedure for configuring the software will differ For more detailed information on configuring the client software refer to its help or included manual Saving and Applying Settings The TeraStation s settings can be saved to a USB driv...

Страница 119: ...Sharing Shared folder information of the USB drive Storage All settings in Drives All settings in LVM All settings in iSCSI USB drive information Web Services Task settings of Dropbox Sync Network All settings except for service port restrictions Wake on LAN and MTU size settings in IP Address All settings in Port Trunking Backup All settings in Failover Management The TeraStation s hostname All s...

Страница 120: ...as a capacity of 1 GB or larger The USB drive is not write protected Applying Settings The saved settings can be applied to a different TeraStation of the same series If applying settings to another TeraStation the unit s current firmware version will be changed to the version used to save the settings Note Since firmware version 2 10 saved settings cannot be applied from a USB drive which contain...

Страница 121: ...ps Note This feature currently supports the following series of TeraStations as of August 2016 The latest compatibility information will be on the Buffalo website TS X series firmware version 1 58 or later TS3000 series TS4000 series TS5000 series TS3010 series TS5010 series Creating a Config File nas_config Procedure for TS X Series To transfer settings from TS X series TeraStations it will use t...

Страница 122: ...ectory domain users skip to the next step 2 In Settings click Management 3 Click to the right of Configuration Management 4 Click Browse and select the config file nas_config that was created with another TeraStation If the config file was created with a password enter it into the Password box 5 Click Import 6 The Confirm Operation screen will open Enter the confirmation number then click OK 7 Whe...

Страница 123: ...on to their factory defaults You can initialize them without logging in to Settings Follow the procedure below to create an initialization drive Notes Initializing settings with the USB drive is available for the same TeraStation unit that created the initialization drive Normally making and using the initialization drive will not affect data on the TeraStation However always back up your data reg...

Страница 124: ...TeraStation Make sure that no other USB drives are currently connected to the TeraStation 3 Power on the TeraStation while holding down the function button 4 When the I41 message appears on the LCD panel press the function button 5 It will take several minutes for initializing the settings The TeraStation will restart when it s finished Dismount the USB drive before unplugging it See the Dismounti...

Страница 125: ...lect a log to view The file operation log stores file operations performed on the internal drives File operations on USB drives are not logged Note All logs are encoded in UTF 8 format To show them correctly change the software encoding to UTF 8 Transferring Logs to the Syslog Server 1 In Settings click Management 2 Click to the right of Logs 3 Click Edit ...

Страница 126: ... syslog server where you want to transfer the logs to 6 Select the type of log that you want to transfer from Logs to Transfer 7 Click OK Creating a Link to the Logs in the Shared Folder 1 In Settings click Management 2 Click to the right of Logs 3 Click Edit ...

Страница 127: ...oots You can update the firmware either manually or automatically Notes If all drives and RAID arrays on the TeraStation have LVM enabled but no LVM volumes have been created you will not able to update the firmware from Settings Settings is not available while the firmware is updating Don t try to access Settings from another computer until the update is complete Updating Manually 1 In Settings c...

Страница 128: ...127 Updating Automatically 1 In Settings click Management 2 Click to the right of Update 3 Click Edit ...

Страница 129: ...u to send your usage and environment information such as number of shared folders and client computers and or S M A R T information The collected information will only be used for improving future firmware stability and product development and no other purpose If you don t want to send this information to us follow the procedure below to disable the usage feedback delivery 1 In Settings click Mana...

Страница 130: ...nguage Configure the TeraStation s hostname date time and language as shown below Note If the TeraStation is being used as an iSCSI drive to change the settings navigate to Storage iSCSI in Settings and move the iSCSI switch to the off position temporarily before changing settings ...

Страница 131: ...agement 2 Click to the right of Name Time Language 3 Click Edit 4 Click the Name tab then configure the TeraStation s name and description 5 Click the Time tab Enable the NTP server and select the Use Default NTP Server checkbox ...

Страница 132: ...er a new NTP IP address Click OK If an NTP server is specified by name instead of IP address make sure that a DNS server is configured for the TeraStation Note The internal clocks of the TeraStation and other devices on your network may run at slightly different speeds Over a long period of time your network devices may show somewhat different times which can cause network problems If clocks on yo...

Страница 133: ...r functions To change the language displayed in Settings go to Advanced Settings or Easy Admin and click Language from the menu bar Choose your desired language from the drop down list Beep Alerts You can set the TeraStation to beep if certain errors occur 1 In Settings click Management 2 Click to the right of Notifications 3 Click Edit 4 Click the Alert Sound tab ...

Страница 134: ... to make the alert beep then click OK LCD and LEDs You may configure the LEDs and LCD on the front of the TeraStation 1 In Settings click Management 2 Click to the right of Notifications 3 Click Edit 4 Click the Front Panel tab ...

Страница 135: ...etwork that passes through a proxy server configuring the proxy server settings is recommended Unless you configure the proxy settings firmware updates from Settings will not work To configure the settings follow the procedure below 1 In Settings click Network 2 Click to the right of Proxy Server ...

Страница 136: ...roxy server settings you may use the settings for other web services such as could storage or Dropbox Sync by selecting the Configured settings option on each settings page Jumbo Frames If your other network devices support jumbo frames you may be able to increase network performance 1 In Settings click Network 2 Click to the right of IP Address ...

Страница 137: ...136 3 Click Edit ...

Страница 138: ...137 4 Select or enter the desired MTU size and click OK ...

Страница 139: ...he hub or router s Larger MTU sizes may not transfer the data to the TeraStation correctly Changing the IP Address Normally the TeraStation s IP address is set automatically from a DHCP server on your network If you prefer you can set it manually An easy way to do this is to change it from NAS Navigator2 running on a computer connected to the same router subnet as the TeraStation The procedure to ...

Страница 140: ...139 3 Click Edit 4 Clear the DHCP checkbox and enter the desired IP address and its subnet mask ...

Страница 141: ...on the drives will be erased Back up any important data to another device Even though the data is deleted the RAID array will be kept as is Assigning the TeraStation a fixed IP address is recommended for boot authentication When boot authentication settings finish export the configuration file for backup Refer to the Exporting Managed TeraStations to a File section in the Boot Authentication Tool ...

Страница 142: ...Boot Authentication Tool from the Buffalo website and install it onto the Windows PC 2 Register the specific port number that is used on the application as a firewall exception rule Navigate to Control Panel System and Security Windows Firewall on the authentication server 3 Click Advanced settings 4 Right click Inbound Rules and click New Rule 5 Select Port and click Next 6 Select TCP enter the p...

Страница 143: ...thentication server s IP address or hostname and port number specify the security level and communication time settings then click Activate 5 The drive formatting process will start Click Yes 6 The Confirm Operation screen will open Enter the confirmation number then click OK ...

Страница 144: ...he TeraStation Cannot Be Accessed If the TeraStation cannot communicate with the authentication server or vice versa such as in a case of network failure the TeraStation will not be accessible If the TeraStation is not accessible manually authenticate the TeraStation by following the procedure below Note The procedure defines an authentication server administrator as someone who manages the authen...

Страница 145: ...played Have the user forward the decryption key to the authentication server administrator 2 Open Boot Authentication Tool on the authentication server 3 From Boot Authentication Tool right click on the target TeraStation from the list and click Decrypt Passcode 4 Enter the decryption key received from the user and click Decrypt ...

Страница 146: ... will be displayed Send the passcode to the user 6 The user can then enter the 20 digit passcode into Settings and click OK If the passcode is authenticated the TeraStation will become available The user can click OK to log in to Settings ...

Страница 147: ...malfunction For the replacement drive use a Buffalo OP HDN series drive The new drive should be the same size or larger If a larger drive is used the extra space will not be usable in a RAID array To avoid damaging the TeraStation with static electricity ground yourself by touching something made of metal before handling any sensitive electronic parts After a drive is replaced it will take about 3...

Страница 148: ...sing JBOD or a Redundant RAID Mode Other Than RAID 0 and TeraStation Is On 1 Open the front cover with the included key 2 The failed drive s status LED will be glowing red Push its unlock button and swing the lock mechanism out 1 2 1 2 ...

Страница 149: ...red status LEDs lit are still on Do not unplug or remove them 3 Pull out the drive cartridge and remove it from the TeraStation 4 Insert the new drive into the empty slot Slide the drive in with the locking mechanism open ...

Страница 150: ... front of the TeraStation The TeraStation will beep If replacing multiple malfunctioning drives at once select the replaced drives on Settings and click Recover RAID Array 9 For RAID 1 5 or 6 The TeraStation will start rebuilding the RAID array automatically After a few minutes the I18 message will be displayed until the array is rebuilt For JBOD The drive will be formatted as an individual drive ...

Страница 151: ...not automatically turn off in the event of a malfunction Before replacing the failed drive shut down the TeraStation This section describes the process of replacing a drive with the TeraStation off Note If a drive malfunctions in RAID 0 all data on the RAID array will be lost All of the settings for the shared folders such as access restrictions are erased after replacing a drive from a RAID 0 arr...

Страница 152: ... a normal drive rather than a hot spare navigate to Storage RAID and click the RAID array select the new drive and click Set as a normal drive Note If a drive fails in the RAID array before it is rebooted the hot spare will not automatically replace the failed drive In this case follow the procedure below to repair the array 1 In Settings navigate to Storage Drives 2 Click the drive that was confi...

Страница 153: ... TeraStation until you format the new drive Operating in a Redundant RAID Mode Other Than RAID 0 If you are using a redundant RAID mode such as RAID 1 5 or 6 the RAID array will be in degraded mode after replacing the drive You will not be able to use the TeraStation until you rebuild the RAID array with the new drive ...

Страница 154: ...s IP address or check its drive To install NAS Navigator2 download the installer from http d buffalo jp TS5010 Double click the icon to start NAS Navigator2 Click your TeraStation s icon to open a share on the TeraStation and display Total capacity Capacity in use IP address Workgroup Subnet mask Default gateway MAC address Firmware version 153 ...

Страница 155: ...tations on the network you may choose to display them in order of hostname product name workgroup IP address subnet mask or default gateway Browse Opens the selected LinkStation s or TeraStation s shared folders Refresh Searches for NAS devices on the network again I m here Causes your LinkStation or TeraStation to beep Right click your device s icon to show these options Browse Shares Opens the s...

Страница 156: ...e Map Share Assigns the LinkStation s or TeraStation s shared folder as a network drive Disconnect Share Unmaps the network drive Create Shortcut Creates a desktop shortcut to the selected LinkStation s or TeraStation s shared folders I m here Causes your TeraStation to beep Refresh Refreshes list of NAS devices Browse Shares Displays NAS Navigator2 window Exit Exits NAS Navigator2 The following t...

Страница 157: ...ically If there is no DHCP server on the network you cannot use this function Select the Renew IP address checkbox to obtain an IP address from the DHCP server You can manually enter an IP address subnet mask and default gateway Mounting as a Network Drive You can easily map a shared folder as a network drive using NAS Navigator2 1 Double click the icon to start NAS Navigator2 ...

Страница 158: ...hare 3 An icon for the mapped share will appear in Computer You can use this network drive just like any other drive Changing the IP Address 1 Double click the icon to start NAS Navigator2 2 Right click on your TeraStation s icon and choose Properties IP Address ...

Страница 159: ...ing the init button on the TeraStation Local loopback address 127 0 0 1 255 255 255 0 Network address 0 0 0 0 255 255 255 0 Broadcast address 255 255 255 255 255 255 255 0 The IP address range from 224 0 0 0 to 255 255 255 255 NAS Navigator2 for Mac NAS Navigator2 is a utility program that makes it easy to display Settings change the TeraStation s IP address or check its drive To install NAS Navig...

Страница 160: ...sh Searches for NAS devices on the network again I m here Causes your LinkStation or TeraStation to beep Settings Opens Settings for the selected LinkStation or TeraStation Configure Opens a window that lets you configure NAS s IP address or open Settings Label Color Selects the color of the name displayed below the icon View Options Lets you choose icon size position and view mode Auto Power Mode...

Страница 161: ...icon The following tasks may be performed from the LinkStation s or TeraStation s properties page Name Description Configuration Click Settings to open the configuration interface IP Address Select the Use DHCP checkbox to assign an IP address from the DHCP server automatically If there is no DHCP server on the network you cannot use this function Select the Renew IP address checkbox to obtain an ...

Страница 162: ...and password with the rights to access the shared folder 3 Select the shared folder that you want to mount then click OK 4 The shared folder is now mounted as a network drive Changing the IP Address 1 Click the icon in the Dock to start NAS Navigator2 2 Click the TeraStation icon while holding down the control key then choose Configure IP Address ...

Страница 163: ...0 0 0 to 255 255 255 255 NovaBACKUP NovaBACKUP is a Windows utility that lets you back up the data on your computer The NovaBACKUP installer is available from http d buffalo jp TS5010 Select the region and model to go to your specific model s d buffalo website Download the NovaBACKUP installer and install it onto your computer To download the installer you will need the serial number of your TeraS...

Страница 164: ... the firmware updater from the Buffalo website 2 Extract the downloaded file by double clicking it and launch the updater 3 Update the firmware for the TeraStation unit that is currently in emergency mode When the i symbol and EM disappear from the icon and the hostname on NAS Navigator2 and the LCD panel returns to glowing blue the TeraStation is no longer in emergency mode Note If the TeraStatio...

Страница 165: ...te If you fail to update the firmware try the procedure of recovering from emergency mode from step 1 again Cleaning the Dustproof Filter If your TeraStation has a front cover and you are trying to clean the dustproof filter on the front cover follow the procedure below 1 Open the front cover with the included key 2 Remove the front cover while holding the hook downward ...

Страница 166: ...165 3 Remove the dustproof filter from the front cover and clear any dust such as by using a vacuum cleaner 4 When cleaning is finished return the filter and the front cover ...

Страница 167: ...nected at 10 Mbps half duplex LANx Full Duplex 10 Mbps Connected at 10 Mbps full duplex LANx Half Duplex 100 Mbps Connected at 100 Mbps half duplex LANx Full Duplex 100 Mbps Connected at 100 Mbps full duplex LANx 1000 Mbps Connected at 1000 Mbps LAN3 10 Gbps Connected at 10 Gbps LAN2 Port Trunking Displays if port trunking is configured Model Name Firmware Version TS5410D FW Version 1 00 Displays ...

Страница 168: ...he UPS connected to this TeraStation has been configured the UPS cable may be disconnected Verify that the UPS cable or LAN cable is connected properly If the setting to use the UPS connected to another TeraStation on the same network has been configured the LAN cable of this TeraStation may be disconnected E11 Fan Failure An error occurred in the fan speed Check that no foreign objects or dust ar...

Страница 169: ...he RAID array I14 Checking Array x Checking the RAID array I15 Scanning Array x Data Examining the error status of the RAID array Note Transfer speeds are slower during the examination process I16 Creating Array x Creating the RAID array I18 Rebuilding Array x Rebuilding the RAID array Note Transfer speeds are slower during the rebuilding process I19 Filling Array x with 0s Writing 0s to the RAID ...

Страница 170: ...s initiated but drive 1 was not detected Make sure that drive 1 is present and fully inserted in its slot I45 Recovery Failed Initialization failed I46 Migrating RAID Array x Data migration or conversion RAID migration is in progress Do not turn off the TeraStation s power I47 Don t Power Off System I48 Push Func to Start Failover This TeraStation is ready to become the failover backup for the mai...

Страница 171: ...annot edit or delete these default groups Microsoft Network Group Settings WORKGROUP MTU Size 1500 bytes SMB Enabled SMB Protocol Auto Recycle Bin Permissions All users Mac OS Temp Files Keep when original file is deleted AFP Enabled FTP Disabled SFTP Disabled WebAccess Disabled NFS Disabled RAID Scanning Disabled iSCSI Disabled Cloud Storage Disabled Dropbox Sync Disabled SNMP Disabled Time Machi...

Страница 172: ...the TeraStation malfunctions replace it with a Buffalo OP HDN series drive of the same capacity or larger The drives listed above are available from the Buffalo website Power Supply AC 100 240 V 50 60 Hz Dimensions D x W x H TS5410DN 230 x 170 x 215 mm 9 1 x 6 7 x 8 5 in TS5410RN 430 x 430 x 44 3 mm 16 9 x 16 9 x 1 7 in TS5210DN 230 x 170 x 170 mm 9 1 x 6 7 x 6 7 in Weight TS5410DN Approx 7 0 kg 1...

Страница 173: ... including interference that may cause undesired operation Only use the cables and accessories that are included in the package Don t use other accessories or cables unless specifically instructed to in the documentation UL and MET The socket outlet shall be installed near the equipment and shall be easily accessible Proposition 65 WARNING This product and its components contain chemicals known to...

Страница 174: ...to this TeraStation series Español Este es un producto de Clase A En una situación domestica este producto puede producir interferencias de radio en ese caso el usuario deberá tomar las medidas adecuadas Este producto puede causar interferencias al utilizarlo en áreas residenciales Debe evitarse utilizarlo así salvo si el usuario adopta medidas especiales para reducir las emisiones electromagnétic...

Страница 175: ...uk må unngås med mindre brukeren tar spesielle tiltak for å redusere elektromagnetisk stråling for å unngå interferens med mottak av radio og TV sendinger Bruk kun kabler og tilbehør som er inkludert i pakken Ikke bruk annet tilbehør eller kabler med mindre spesielt instruert til å gjøre det i dokumentasjonen Bruk ikke USB kabler på tre meter eller mer for å koble USB enheter til denne TeraStation...

Страница 176: ... paraziti önlemek üzere elektromanyetik salınımları azaltacak özel önlemler almadıkça bu şekilde kullanımdan kaçınılmalıdır Yalnızca pakette bulunan kablo ve aksesuarları kullanın Belgelerde özellikle belirtilmedikçe başka aksesuar ve kablolar kullanmayın USB aygıtları bu TeraStation serisine bağlamak için 3 metre ve daha uzun USB kabloları kullanmayın CB The socket outlet shall be installed near ...

Отзывы: