Chapter 4. Troubleshooting and Diagnostics
EK–MOL80–SV. B01
4–3
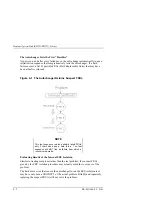
Figure 4–2 How Service Views the Suspect FRUs
If you consider the suspect FRU as a POINTER to the problem area rather than
the problem itself, an educated visual inspection, with perhaps some cable and
connector wiggling, should reveal the real problem.
A good visual inspection requires an understanding of how the autochanger acts
under normal operation. To understand what the autochanger does in normal
operation, run the various movements available from the control panel and watch
it closely. Reading the descriptions in the Micro-move table in this chapter will
also help you understand the composition of its movements.
Retrieving Performance Information
1.
With READY displayed, press NEXT until ADMIN* appears in the display
window.
NOTE
A three-part security code is required to access
options beneath ADMIN. This code may be 0-0-0
as set in the factory or another code chosen by
the customer after installation.
2.
Press ENTER.CODE1 and a flashing 0 displays. Press ENTER if no
security code has been set, otherwise press NEXT until the first number of
the security code displays, and then press ENTER. Repeat this step to enter
the next two parts of the security code.


