5-13
SCANNER/INTERNET FAX
Contents
CHANGING THE DISPLAY OF ONE-TOUCH KEYS IN
THE ADDRESS BOOK SCREEN
You can show destinations of only a specific transmission mode in the address book screen, or change the displayed
index tabs from the alphabetical tabs to the custom tabs. The procedure for selecting destinations does not change.
• Icons appear in the one-touch keys in the address book to indicate which mode is used for transmission.
☞
RETRIEVING A DESTINATION FROM THE ADDRESS BOOK
(page 5-18)
• For information on storing addresses in the address book, see "
STORING DESTINATION ADDRESSES FOR EACH
SCAN MODE IN THE ADDRESS BOOK
" (page 5-6).
• For information on storing destinations for Scan to Desktop, see "
STORING A DESTINATION FOR SCAN TO DESKTOP
"
(page 5-7).
•
System Settings:
Address Book
(page 7-16)
This is used to store Scan to E-mail and Internet fax addresses in one-touch keys.
•
System Settings (Administrator): The Number of Direct Address Keys Displayed Setting
This is used to change the default setting for the number of one-touch keys displayed in the address book screen.
•
System Settings (Administrator): Bcc Setting
This setting enables or disables Bcc delivery. When enabled, the [Bcc] key appears in the address book screen.
•
System Settings (Administrator): Default Display Settings
One of the following screens can be selected for the initial screen that appears when the [IMAGE SEND] key is touched.
- Base screen of each mode (scan, Internet fax, fax, or data entry mode)
- Address book screen
•
System Settings (Administrator): Address Book Default Selection
The following settings are available for the method of sorting the addresses that appear in the address book.
- Index type (alphabetical, custom)
- Address type (all, group, E-mail, FTP/Desktop, Network Folder, Internet fax, fax)
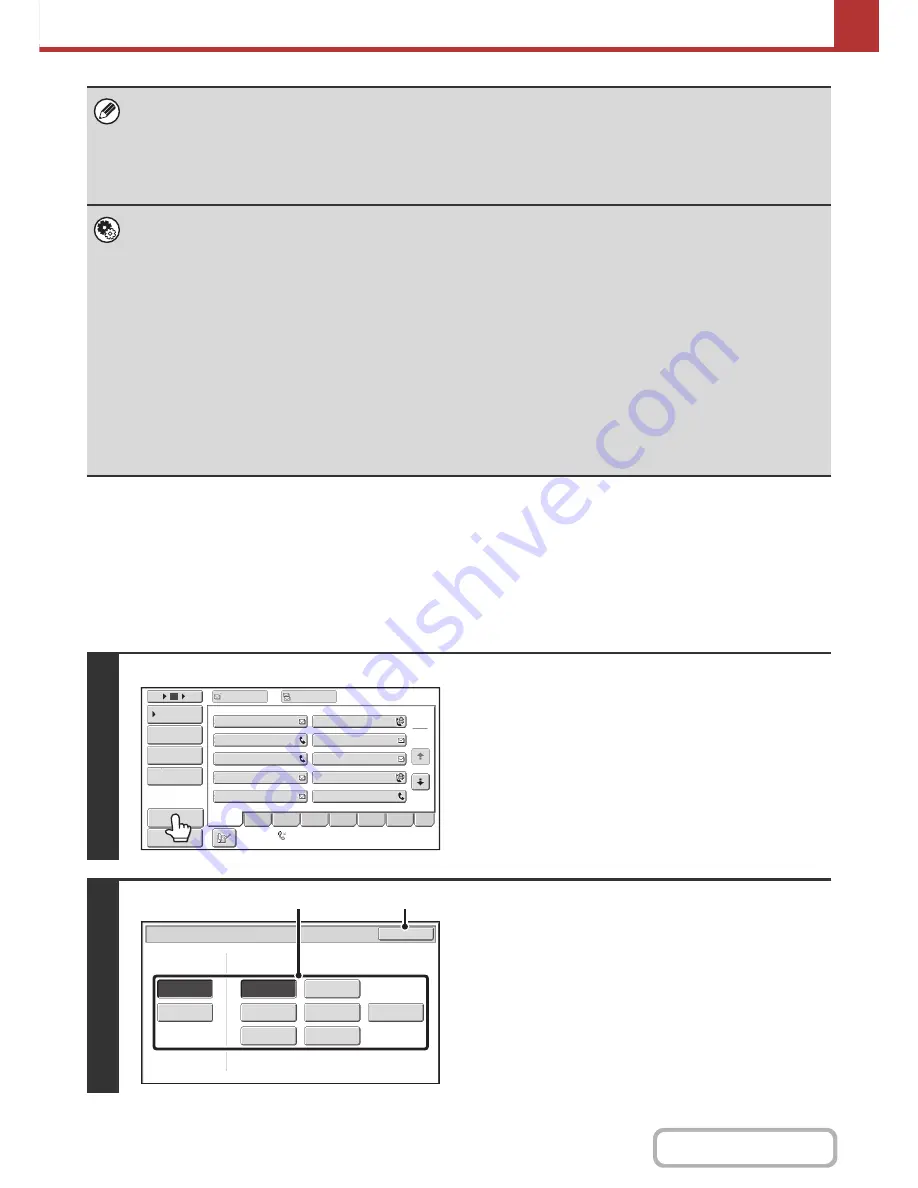
1
Touch the [Sort Address] key.
2
Change the display mode.
(1) Touch the key of the mode or tab that you
wish to display.
• To show only the one-touch keys of a particular send
mode, touch the desired mode key under "Address
Type".
• To change the index tabs to the custom indexes, touch
the [User] key under "Tab Switch".
(2) Touch the [OK] key.
Auto
Reception
Fax
Memory
:
100
%
III
III
GGG
GGG
EEE
EEE
CCC
CCC
AAA
AAA
JJJ
JJJ
HHH
HHH
FFF
FFF
DDD
DDD
BBB
BBB
1
2
5
15
10
Global
Address
Search
Address
Entry
Preview
Address
Review
Condition
Settings
To
Cc
ABCD
Fre
q
.
EFGH
IJKL
MNOP
QRSTU
VWXYZ
etc.
Sort
Address
Sort Address
OK
Group
FTP/Desktop
Network Folder
Fax
All
ABC
User
Address Type
Tab Switch
Internet Fax
(1)
(2)
Summary of Contents for MX-M282N
Page 11: ...Conserve Print on both sides of the paper Print multiple pages on one side of the paper ...
Page 35: ...Organize my files Delete a file Delete all files Periodically delete files Change the folder ...
Page 322: ...3 19 PRINTER Contents 4 Click the Print button Printing begins ...
Page 870: ...MXM502N GB Z1 Operation Guide MODEL MX M282N MX M362N MX M452N MX M502N ...


