2-84
COPIER
Contents
PRINTING THE DATE AND A STAMP ON
COPIES (Stamp)
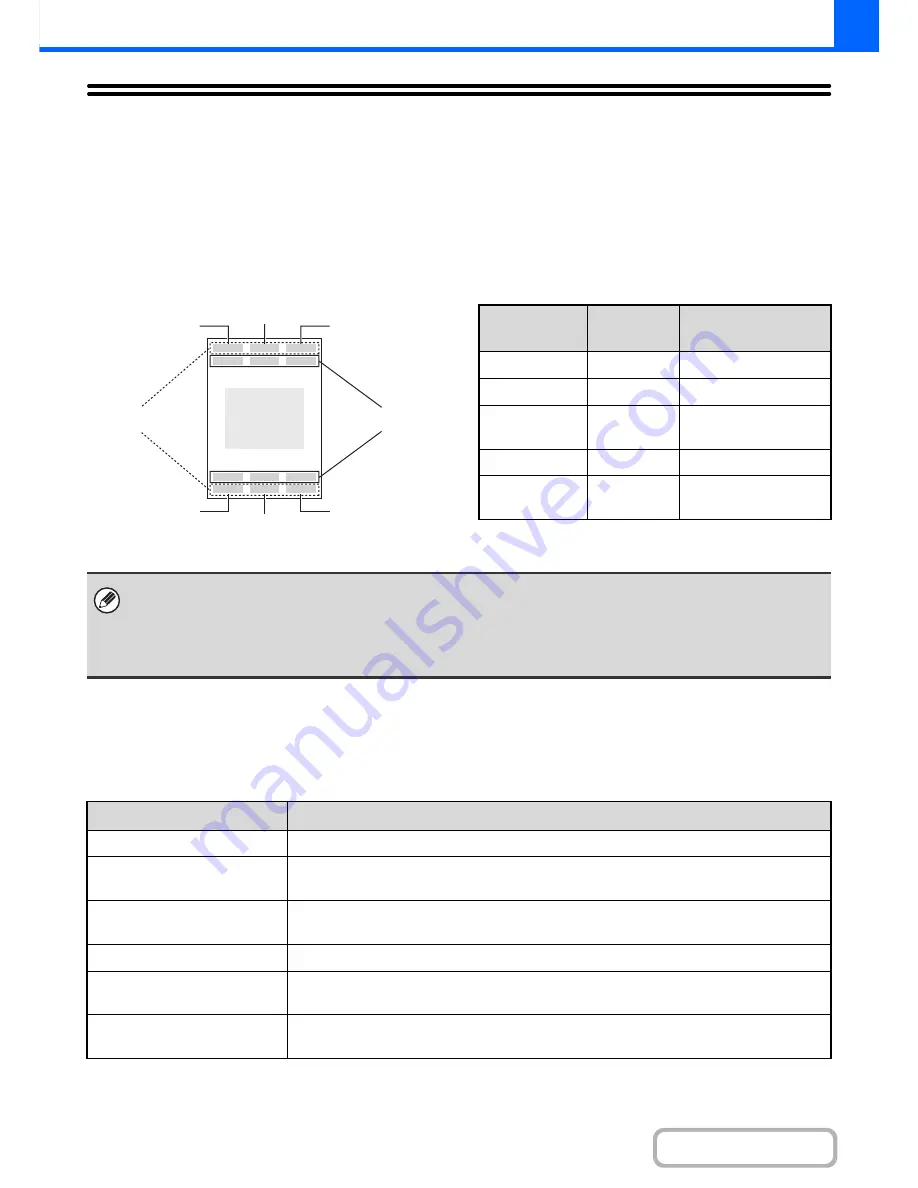
Use this function to print the date, a stamp, the page number, and text on copies. In addition, specific text can be added
to a copy as a watermark. (Watermark)
Six printing positions are available: top left, top centre, top right, bottom left, bottom centre, and bottom right.
The printing positions are separated into areas that are used for the date, page number and text (A below), and areas
that are used for a stamp (B below). The watermark is printed at the centre of the paper.
When used in combination with other special modes
When Stamp is used in combination with the following special modes, the special modes are reflected in the stamp
content.
B
A
Top centre
Top right
Top left
Bottom left
Bottom right
Bottom centre
Watermark
print position
Stamp
Print area
Maximum number
of positions
Date
A
1 position only
Stamp
B
6 positions
Page
Numbering
A
1 position only
Text
A
6 positions
Watermark
Centre of
paper
—
• If the selected stamp content of one position overlaps the stamp content of another position, priority will be given in the
following order: watermark, right side, left side, centre. Content that is hidden due to overlapping will not be printed.
• Text will be printed at the preset size regardless of the copy ratio or paper size setting.
• Text will be printed at the preset exposure regardless of the exposure setting.
• Depending on the size of the paper, some printed content may be cut off or shifted out of position.
Special Modes
Printing
Margin Shift
Together with the image, the stamp content is shifted the amount of the margin width.
Tab Copy
Centring
Unlike a copy image that moves, the image will be printed in the position set in the stamp.
Dual Page Copy
Card Shot
The stamp is printed on each copy sheet.
Multi Shot
The print content is printed on each original page.
Pamphlet Copy
Book Copy
The stamp is printed on each page of the resulting pamphlet or book.
Covers/Inserts
Use the stamp settings to select whether or not the item is printed on inserted covers and
inserts.
Summary of Contents for MX-M282N
Page 11: ...Conserve Print on both sides of the paper Print multiple pages on one side of the paper ...
Page 35: ...Organize my files Delete a file Delete all files Periodically delete files Change the folder ...
Page 322: ...3 19 PRINTER Contents 4 Click the Print button Printing begins ...
Page 870: ...MXM502N GB Z1 Operation Guide MODEL MX M282N MX M362N MX M452N MX M502N ...


