Date Code 20011205
Firmware Upgrade Instructions
B-3
SEL-311B Instruction Manual
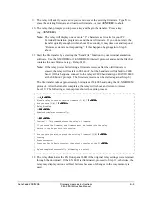
9. The relay will ask if you are sure you want to erase the existing firmware. Type
Y
to
erase the existing firmware and load new firmware, or just
<ENTER>
to abort.
10. The relay then prompts you to press a key and begin the transfer. Press a key
(e.g.,
<ENTER>
).
Note:
The relay will display one or more “C” characters as it waits for your PC
Terminal Emulation program to send the new firmware. If you do not start the
transfer quickly enough (within about 18 seconds), it may time out and respond
“Remote system is not responding.” If this happens, begin again in Step 8,
above.
11. Start the file transfer by selecting the “Send File” function in your terminal emulation
software. Use the XMODEM or 1k-XMODEM (fastest) protocol and send the file that
contains the new firmware (e.g., Relay.S19).
Note:
If the relay power fails during a firmware receive after the old firmware is
erased, the relay will restart in SEL
BOOT
, but the baud rate will default to 2400
baud. (If this happens, connect to the relay at 2400 baud and type BAUD 38400
at the SEL
BOOT
prompt. The firmware receive can be started again at Step 8.)
The file transfer takes approximately 6 minutes at 38,400 baud using the 1k-XMODEM
protocol. After the transfer completes, the relay will reboot and return to Access
Level 0. The following screen capture shows the entire process.
=>>L_D <ENTER>
L_D <ENTER>
L_D <ENTER>
L_D <ENTER>
Disable relay to send or receive firmware (Y/N) ? Y <ENTER>
Y <ENTER>
Y <ENTER>
Y <ENTER>
Are you sure (Y/N) ? Y <ENTER>
Y <ENTER>
Y <ENTER>
Y <ENTER>
Relay Disabled
!>SEN <ENTER>
SEN <ENTER>
SEN <ENTER>
SEN <ENTER>
Download completed successfully!
!>REC <ENTER>
REC <ENTER>
REC <ENTER>
REC <ENTER>
Caution! - This command erases the relay’s firmware.
If you erase the firmware, new firmware must be loaded into the relay
before it can be put back into service.
Are you sure you wish to erase the existing firmware? (Y/N) Y <ENTER>
Y <ENTER>
Y <ENTER>
Y <ENTER>
Erasing
Erase successful
Press any key to begin transfer, then start transfer at the PC <ENTER>
<ENTER>
<ENTER>
<ENTER>
Upload completed successfully. Attempting a restart
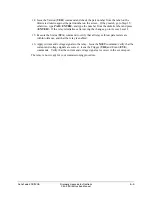
12. The relay illuminates the EN front-panel LED if the original relay settings were retained
through the download. If the EN LED is illuminated, proceed to Step 13; otherwise, the
relay may display various self-test failures because of changes in the way memory is
used.
Summary of Contents for SEL-311B
Page 6: ......
Page 8: ......
Page 10: ......
Page 24: ......
Page 26: ......
Page 122: ......
Page 124: ......
Page 138: ......
Page 168: ......
Page 172: ......
Page 254: ......
Page 282: ......
Page 306: ......
Page 348: ......
Page 364: ......
Page 366: ......
Page 448: ......
Page 460: ......
Page 466: ......
Page 476: ......
Page 482: ......
Page 494: ......
Page 500: ......
Page 522: ......
Page 526: ......
Page 528: ......
Page 534: ......
Page 536: ......
Page 550: ......
Page 570: ......
Page 586: ......
Page 600: ......

